Using Sampler’s synth features in Logic Pro X
More than a mere sample playback device, Logic Pro’s Sampler instrument features a range of powerful synthesis tools that can transform your samples beyond recognition.
Logic Pro X Sampler
In our Auto Sampler tutorial, we took a detailed look at the process of mapping samples using Logic Pro’s updated Sampler plug-in. The mapping of samples is undoubtedly the backbone of Sampler’s operation but for those more interested in the creative potential of sampling, the Synth pane is worth much closer investigation. As well as quick and easy modifications – such as adjusting volume envelopes and activating filters – the Synth pane significantly extends what you can achieve within Sampler, effectively turning it into a full-blown synthesizer that uses samples (rather than waveforms) as oscillators.
For the purposes of this workshop, we’re going to explore a number of classic synth sounds using Sampler. Rather than replacing Retro Synth, this workshop is designed to demonstrate the possible treatments from a range of sampled sources, ranging from acoustic string samples to the hardware synthesizers we sampled in our Auto Sampler tutorial. We’re also building on some concepts – notably Zones and Groups – that we covered in that tutorial, so it might be worth revisiting it if you’re unsure about this part of Sampler’s functionality.
Synth head
To understand the Synth pane, consider the hierarchy behind Sampler and how the mapping sections and synth parameters control and interact with one another. In simple terms, the mapping sits behind the synth section, concentrating purely on how the samples are mapped and assigned across the keyboard. The synth parameters sit on top of the mapping, with the entirety of the samples (well, almost the entirety) passing through the filter and amplifier sections of a typical synthesizer. Sampler sees these two sections as separate so that you can reset the synth parameters, for example, but keep the same mapping.
The synth parameters on Sampler are divided across three panes: Synth, Mod Matrix and Modulators. The Synth pane governs various global aspects of the instrument, including the two types of filter, the pitch and the overall volume and pan. Things get more exciting when you delve into the Mod Matrix, which lets you map various modulation sources, such as envelopes, LFOs and external MIDI inputs in the form of velocity or MIDI CC data to parameters within Sampler. Finally, the Modulators section provides access to four LFOs and five envelopes as part of the same patch.
Pushing the envelope
Basic use of the Sampler’s default synth parameters yields familiar results. Env 1, for example, is hard-wired to the amplifier so that you can quickly control the volume of the instrument over time. LFO 1 automatically manages the instrument’s pitch via the mod wheel so that you can quickly add vibrato. The two filters – which can switch between parallel and serial operation – are initially static but if you increase the amount parameter in the first Mod Matrix routing, Env 2 will modulate the filter cutoff over time.
Sampler’s synth parameters also feature new routing in the Mod Matrix. The Mod Matrix works like a modular synthesizer, connecting several modulation sources to target parameters, with the amount slider setting the relative depth of the modulation. The great thing about Sampler is the number of modulators you can apply in a single patch. You can, for example, set each of the two filters to be controlled by their own LFO and envelope generators. The LFOs can also be tempo-synced or run polyphonically so that each key triggers its own LFO waveform.
Filter fun
Having two filters can yield interesting results depending on whether you route them in series or parallel. Try using the parallel routing for Daft Punk-style synth sounds, mixing a 12dB gritty low-pass filter, for example, with a 6dB band-pass filter. Running the filters in series produces a cumulative effect. For example, the combination of low and high-pass filter effectively produces a band-pass filter (but with independent controls of the low and high frequencies).
Returning to the concept of the entirety of the sample mapping passing through the synth parameters, note that this is not the whole story. Using Groups as part of your mapping, you can set parameter offsets – both in respect to the envelopes and the filter – so that there’s some differentiation between the various layers of your mapping. For example, one group could have a darker filter setting, while the other has a brighter setting.
Shape of things
The following walkthrough uses traditional synth waveshapes so that the results sound familiar, but, in many ways, these techniques sound most exciting when applied to acoustic or electric sound sources. An acoustic piano, for example, can sound dark and ominous with some velocity-mapped 24dB filter settings, and a string sample can be turned into a synth pad using a variety of tempo-synced LFO settings.
Using Sampler’s synth features
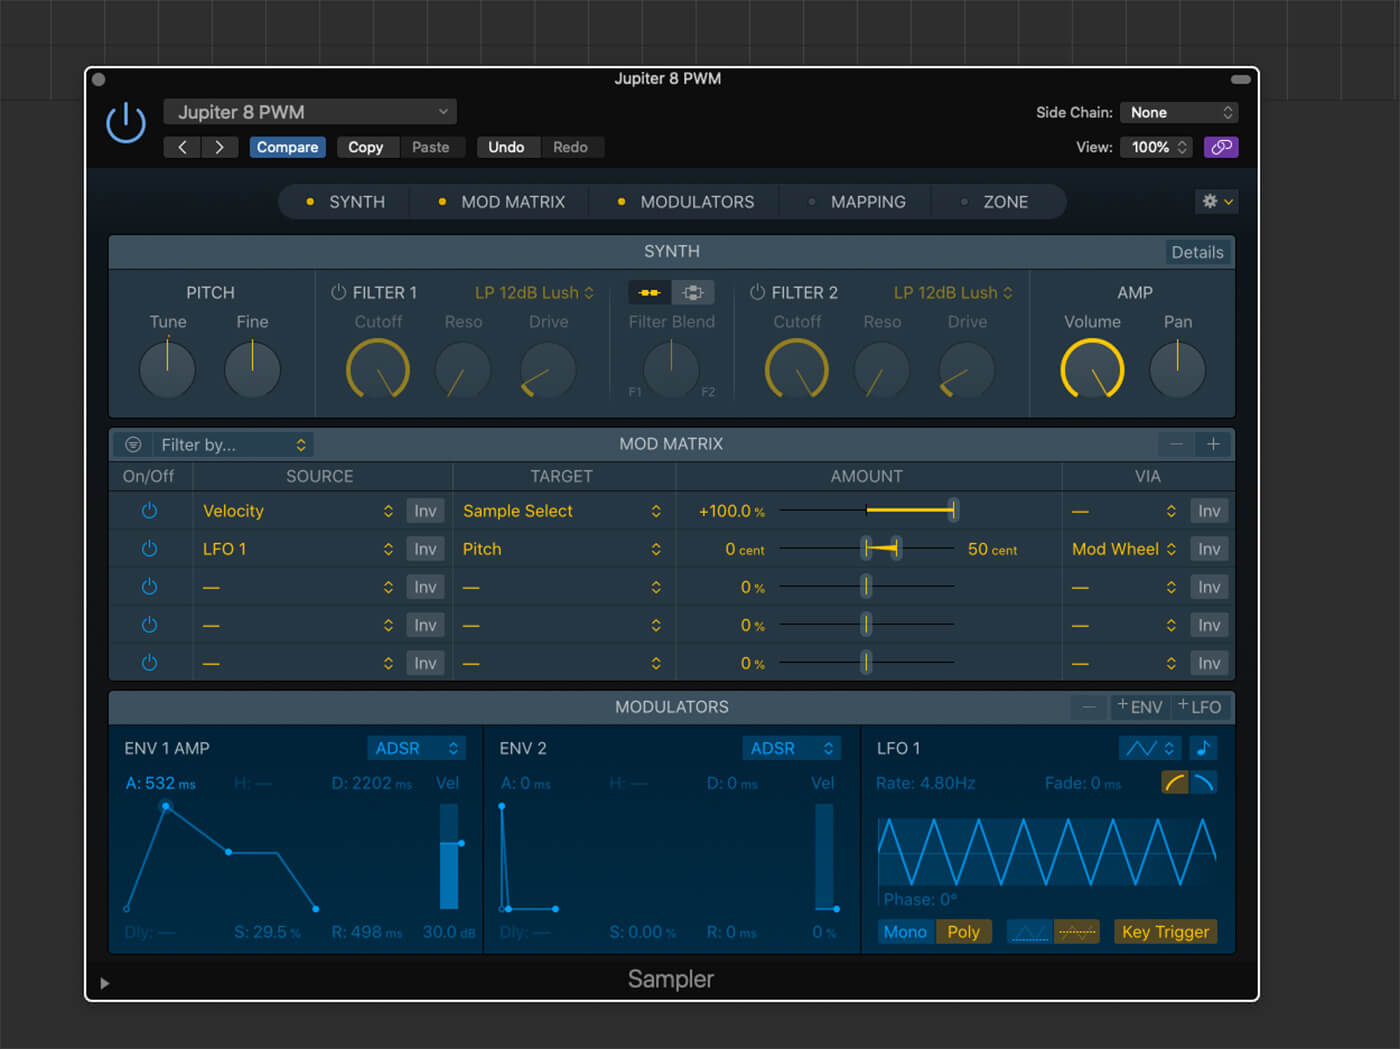
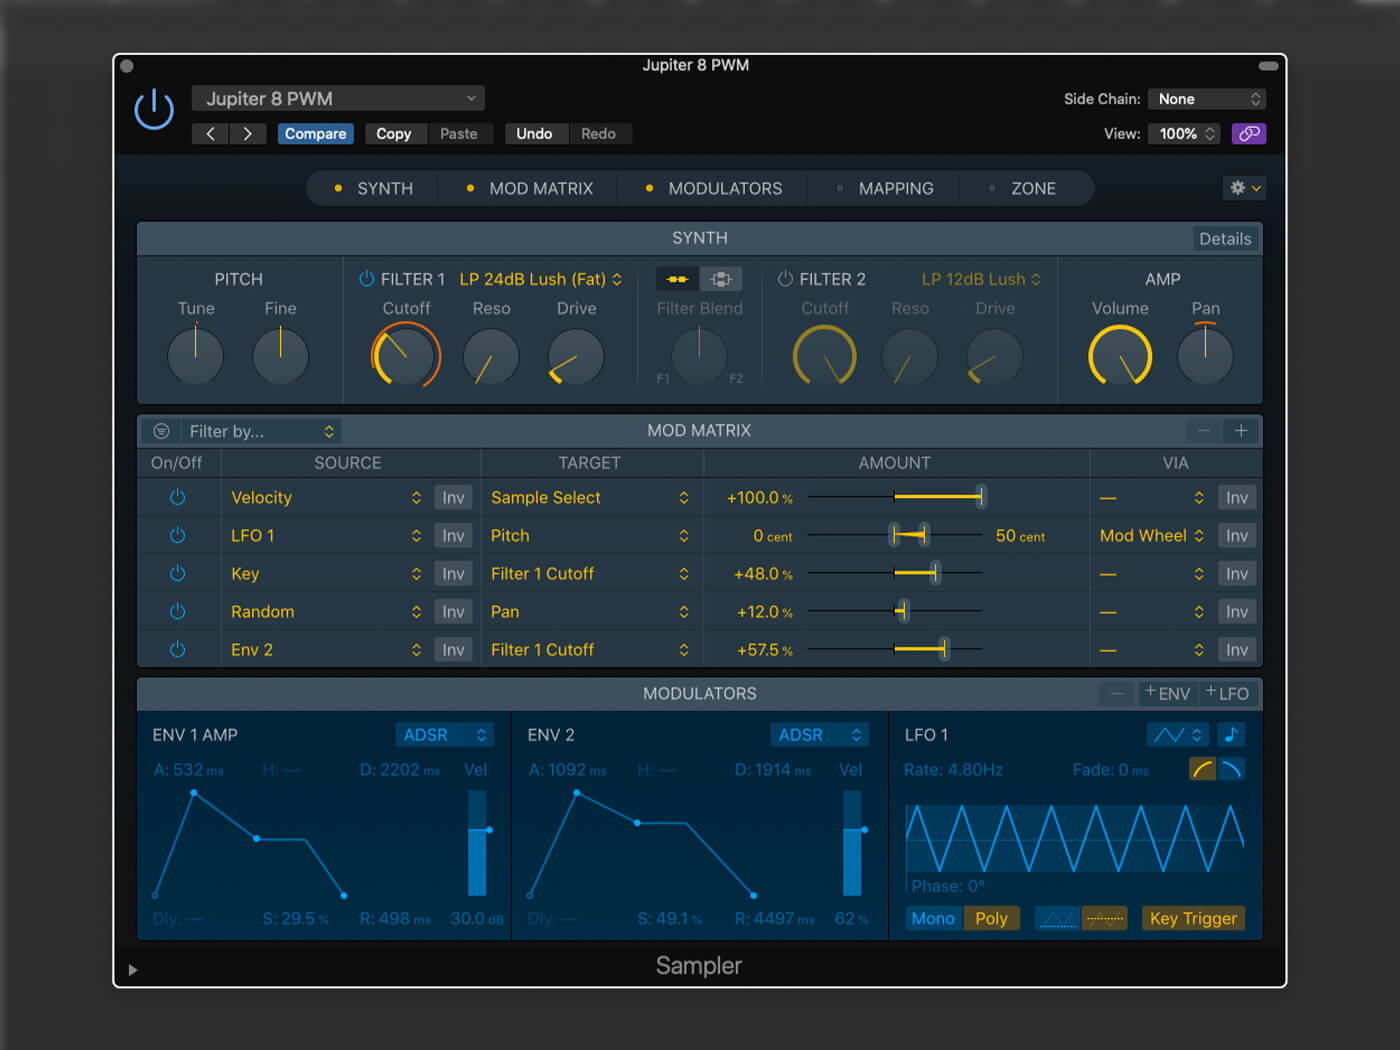
1. Open the Jupiter PWM instance of Sampler. At the moment, the sound is a raw sound wave. To make it more pad-like, soften Env 1 Amp, with a slower attack and decay, medium sustain and slow release.
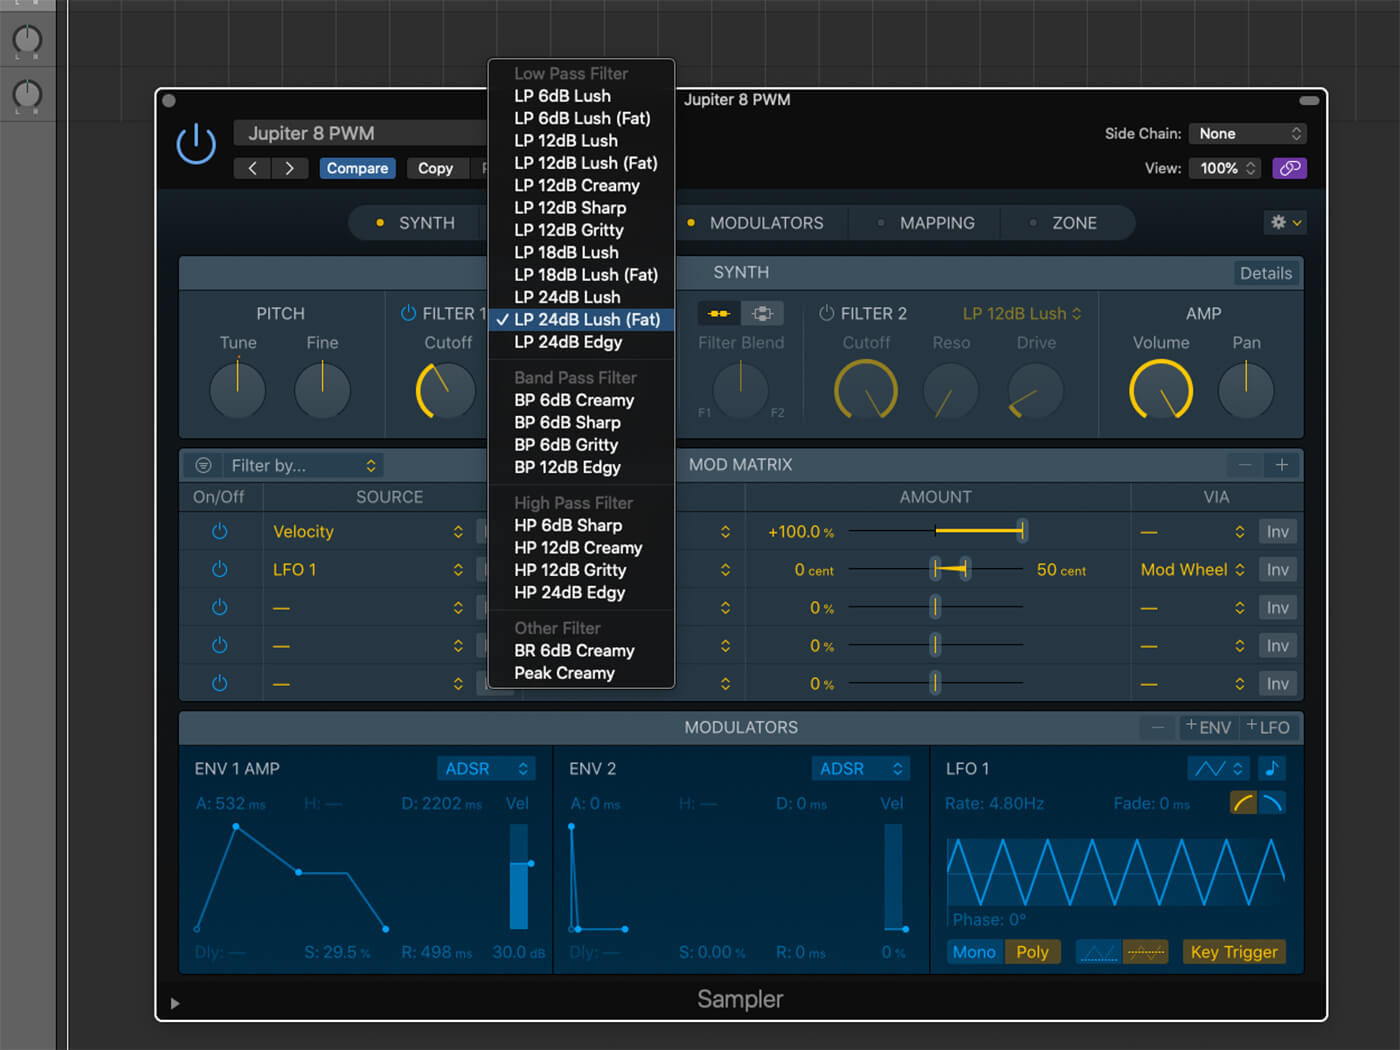
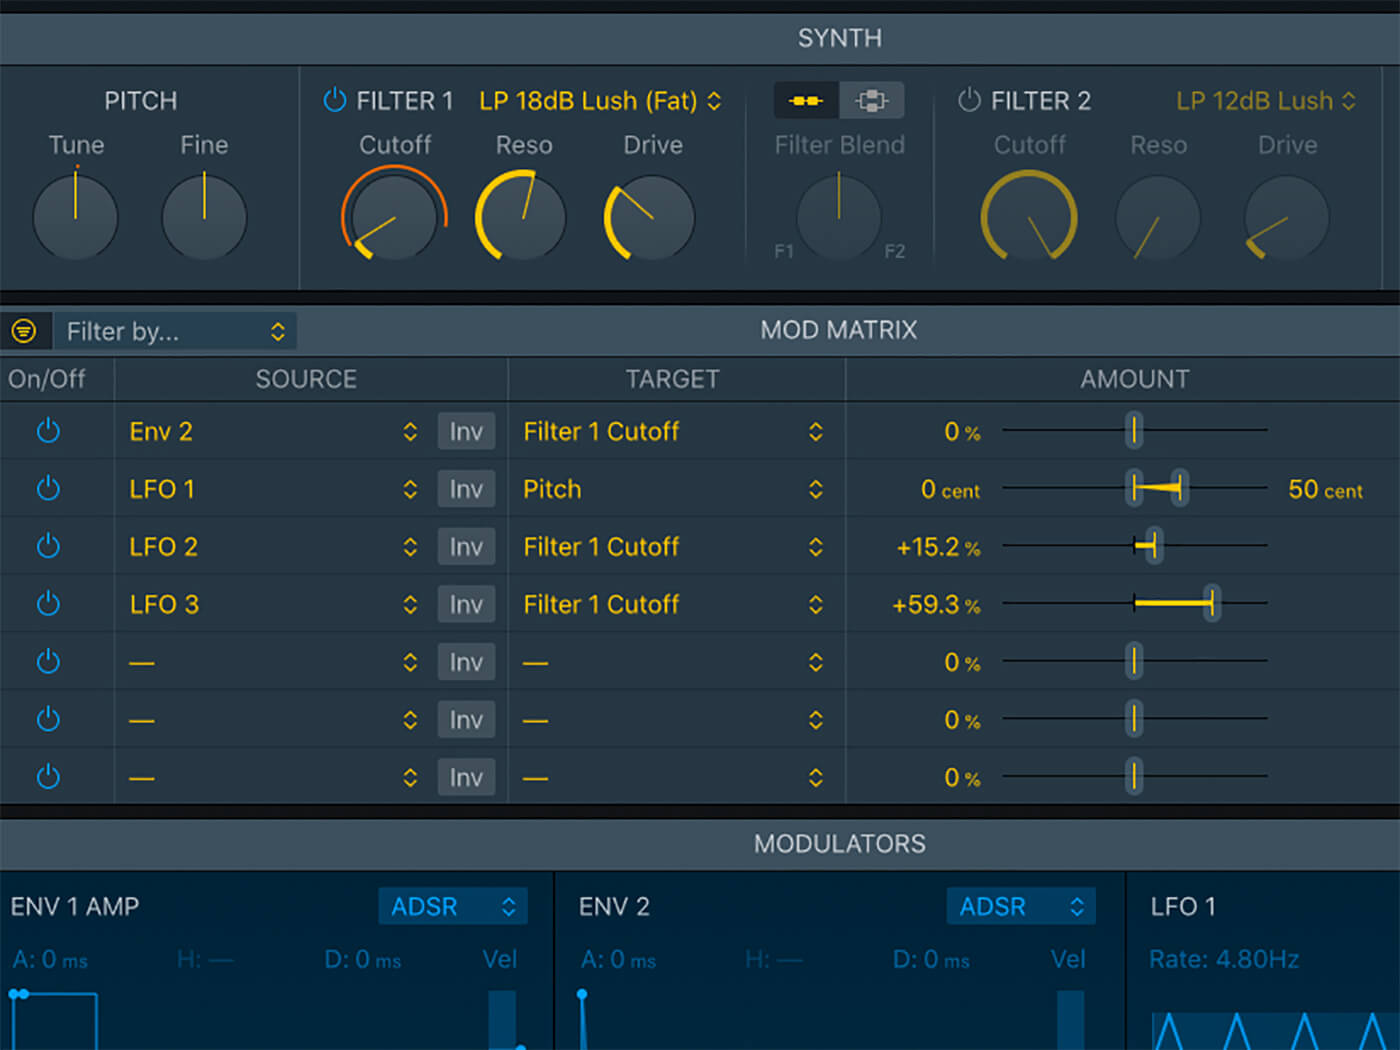
2. Activate Filter 1 and select the LP 24dB Lush (Fat) option from the drop-down filter menu. Reduce the cutoff to about 11 o’clock, and the pad will take on a darker tone.
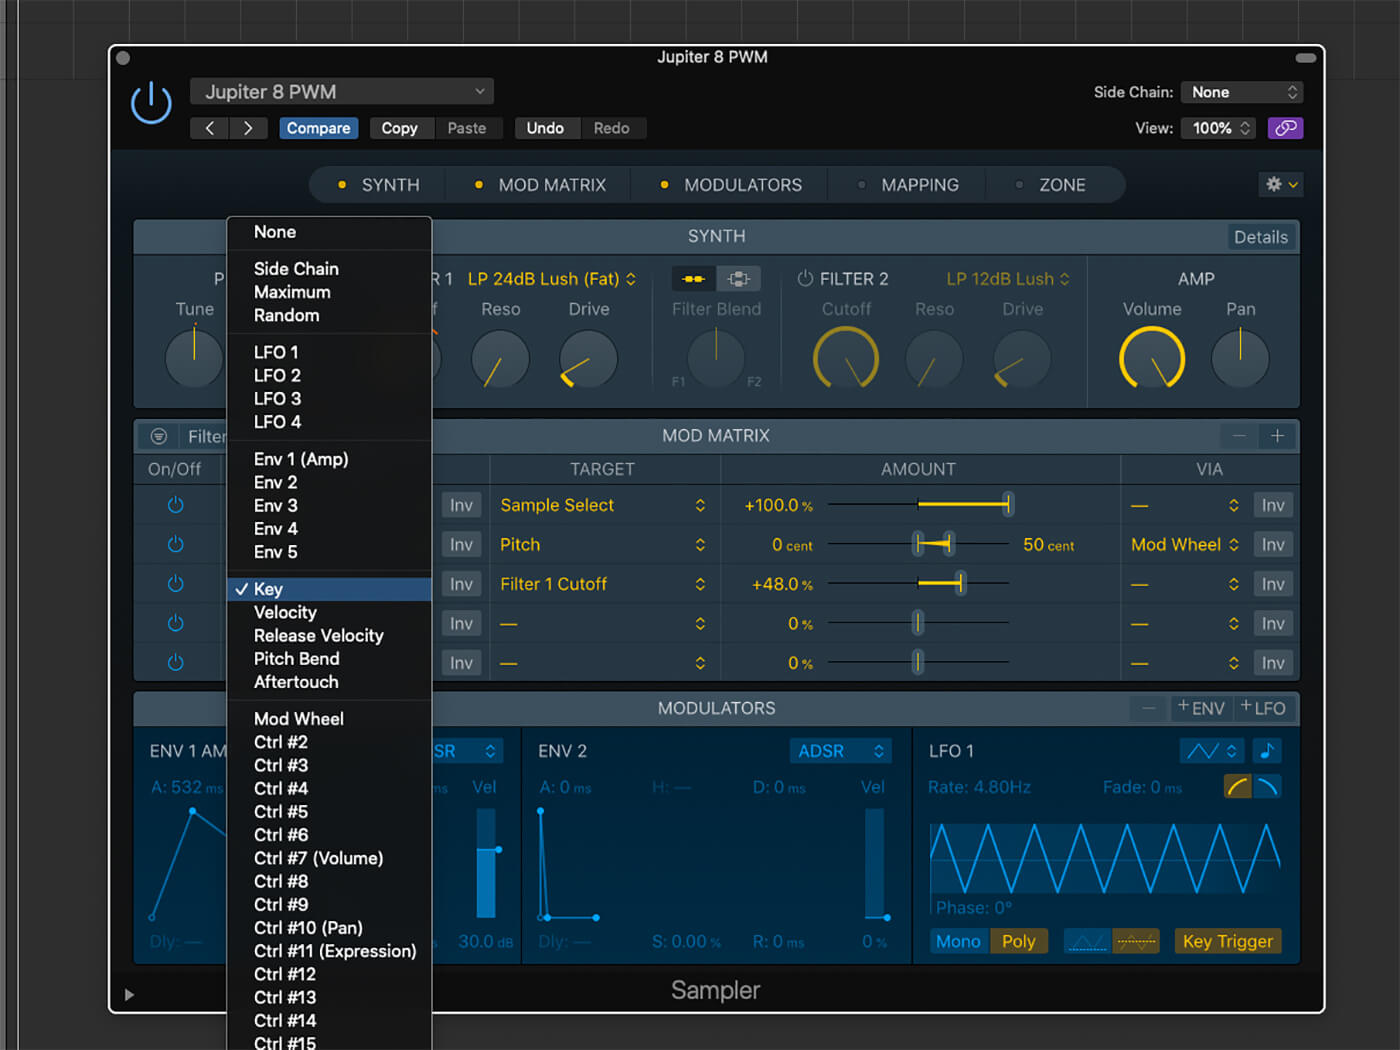
3. Letting the filter track the keyboard can make the sound feel more musical. In the Mod Matrix, select Key as the source and Filter 1 Cutoff as the destination, and set the amount to +48 per cent. Note the filter’s movements.
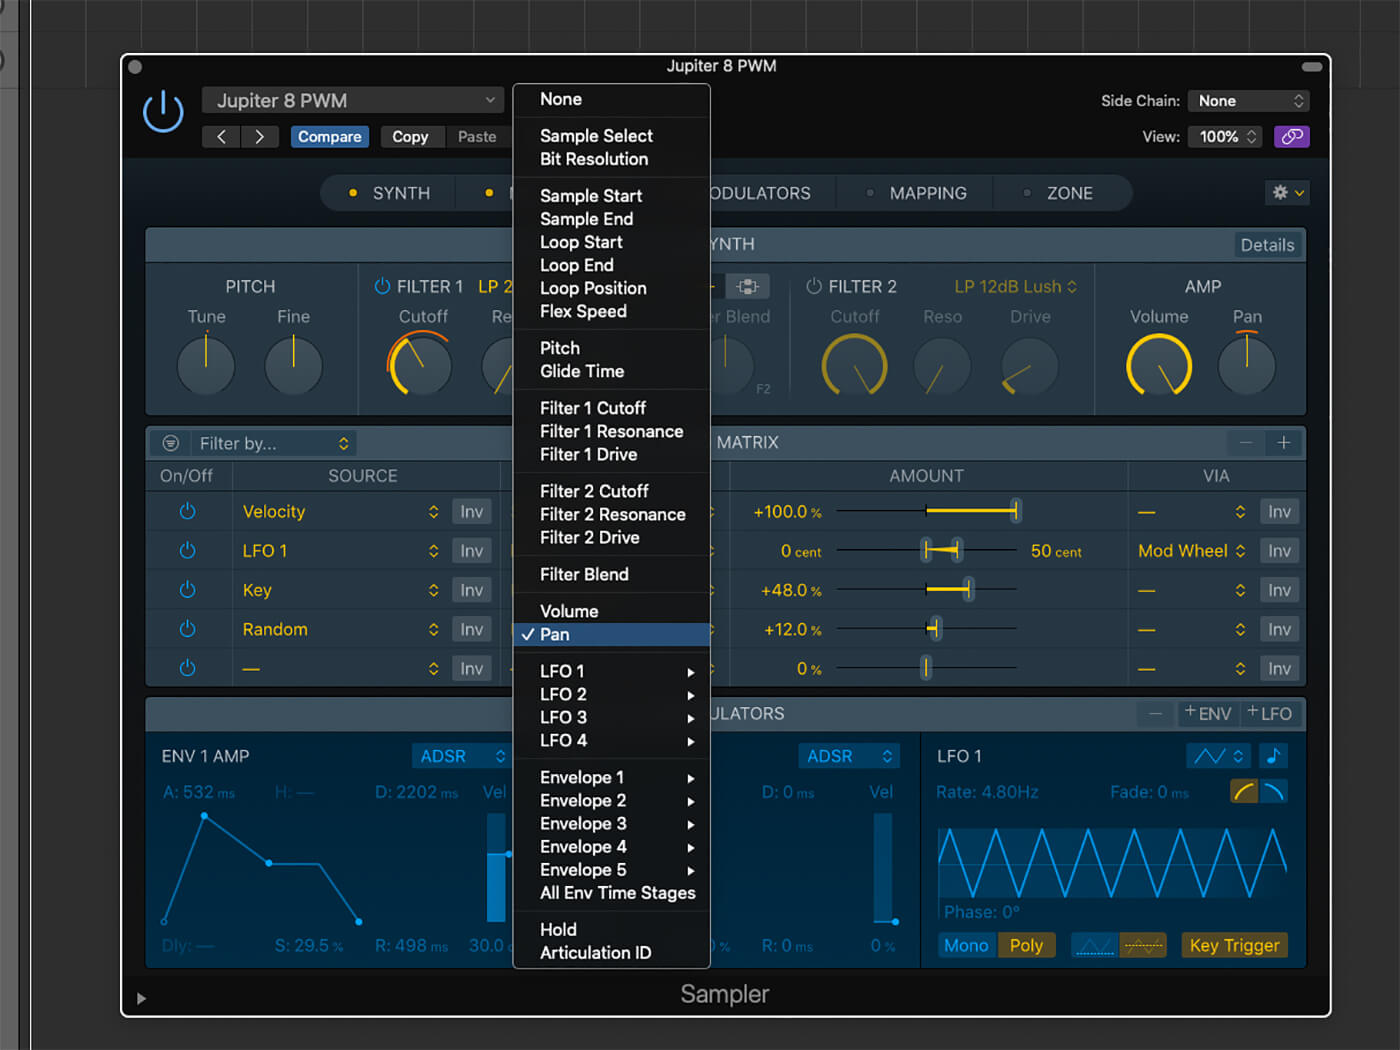
4. The Mod Matrix opens up the creative possibilities of Sampler. In this routing, we’re using the Random Source to modulate the pan level by 12 per cent, creating stereo interest by randomly positioning each voice.
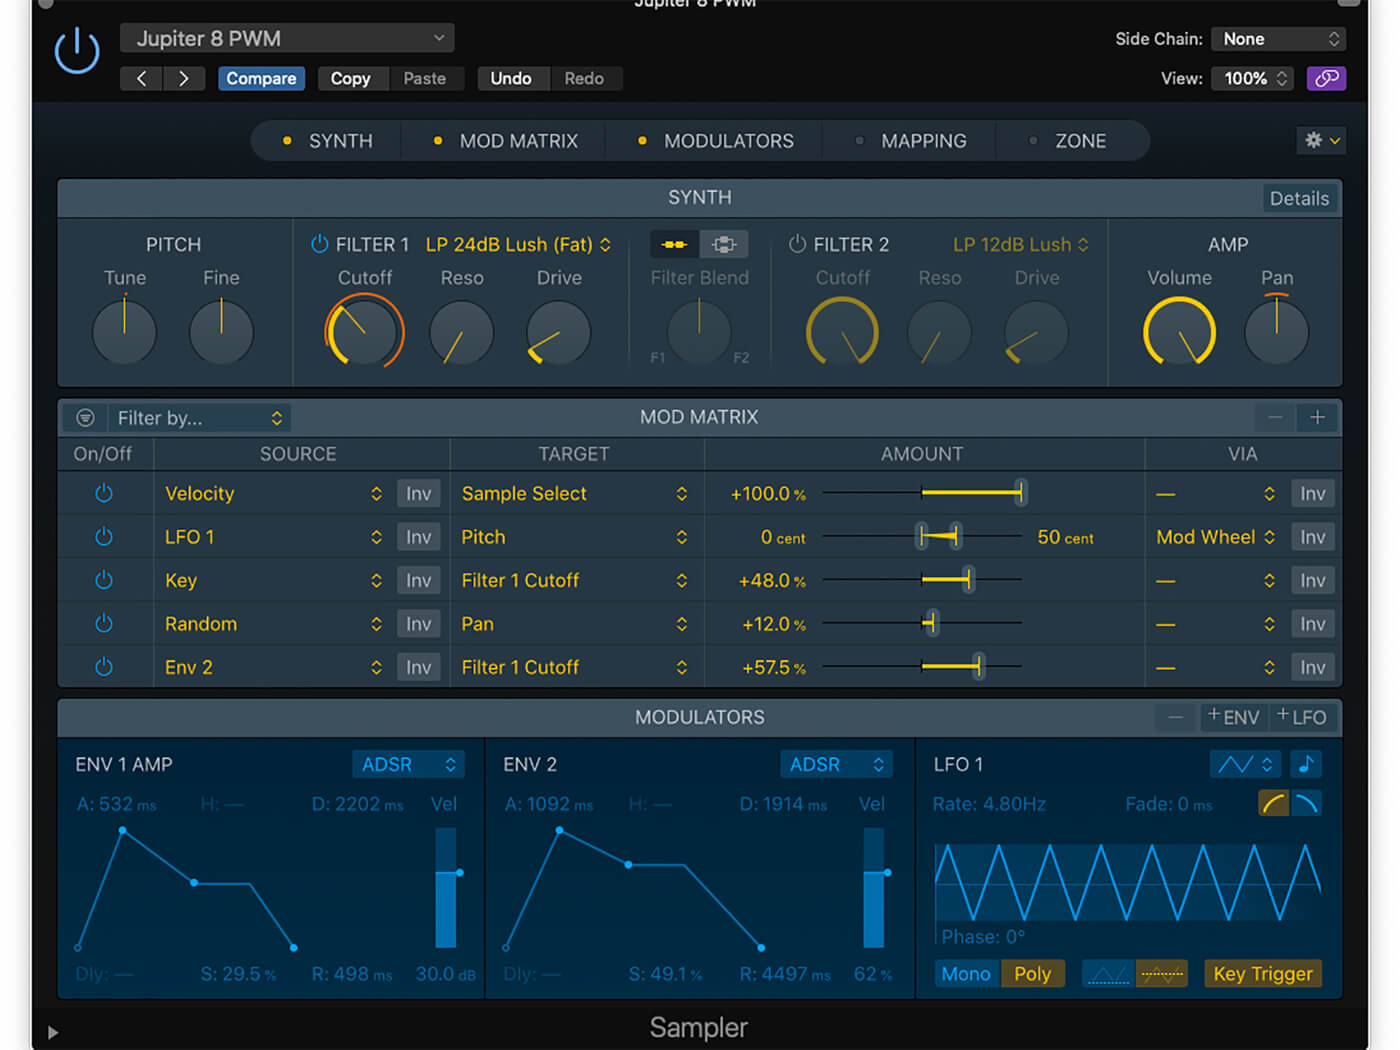
5. Env 2 must be routed to the filter (unlike Env 1). Set the amount to about 50 per cent and set the envelope up as a slightly slower version of Env 1, with slow attack, decay and release, and medium sustain.
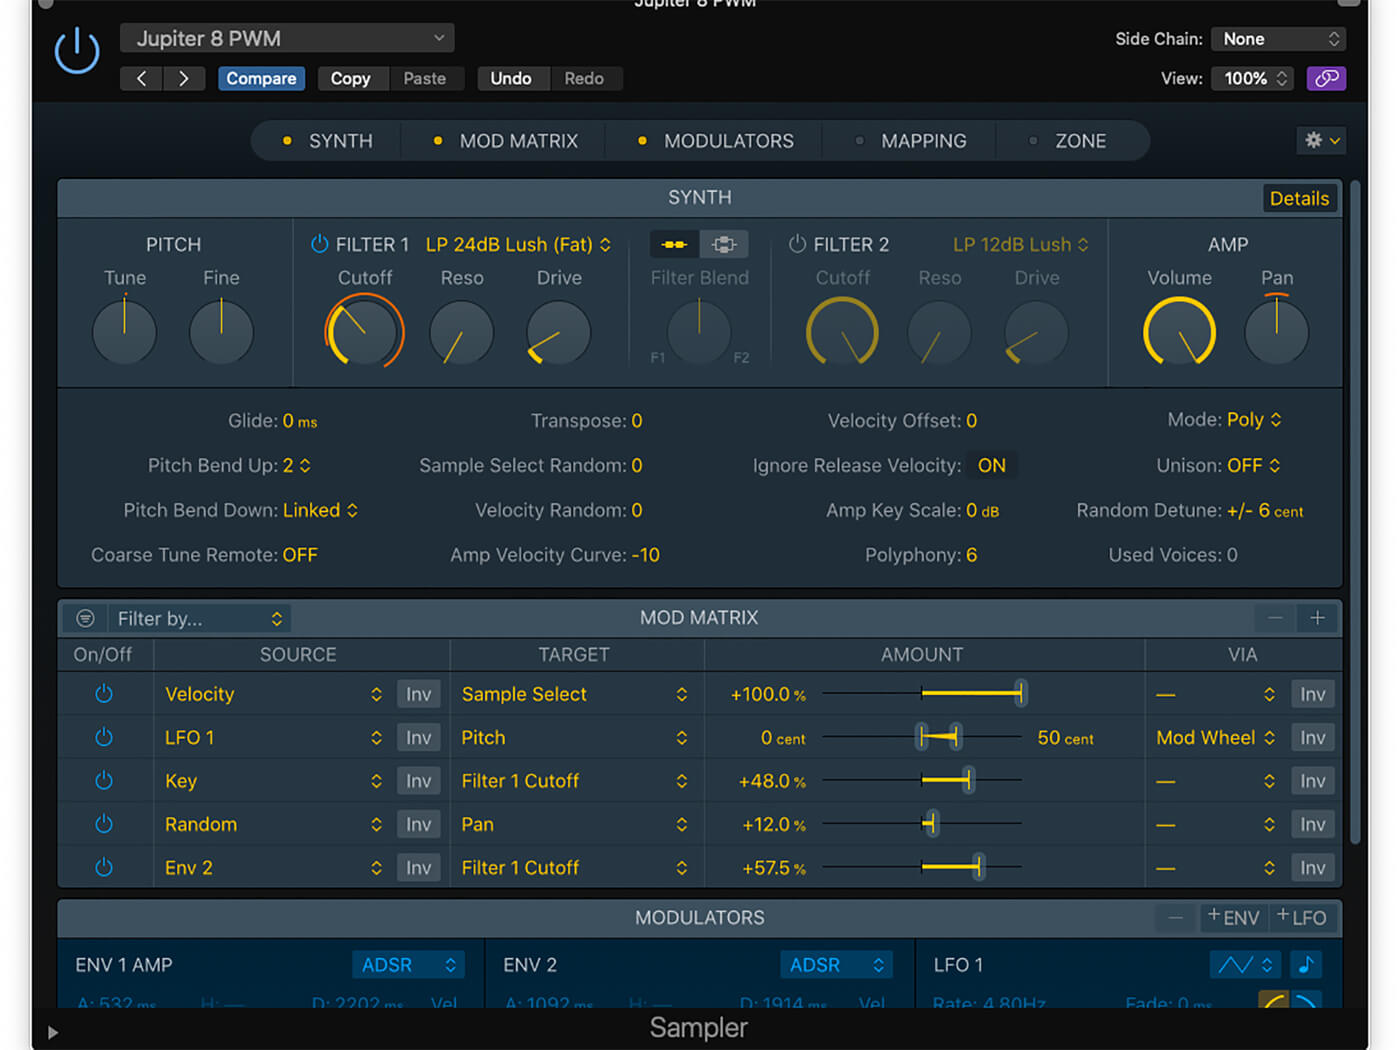
6. The Details section (as part of the Synth pane) contains some useful options. To make your pad sound more authentic, reduce the polyphony to six voices and set Random Detune to +/- 6 cents.
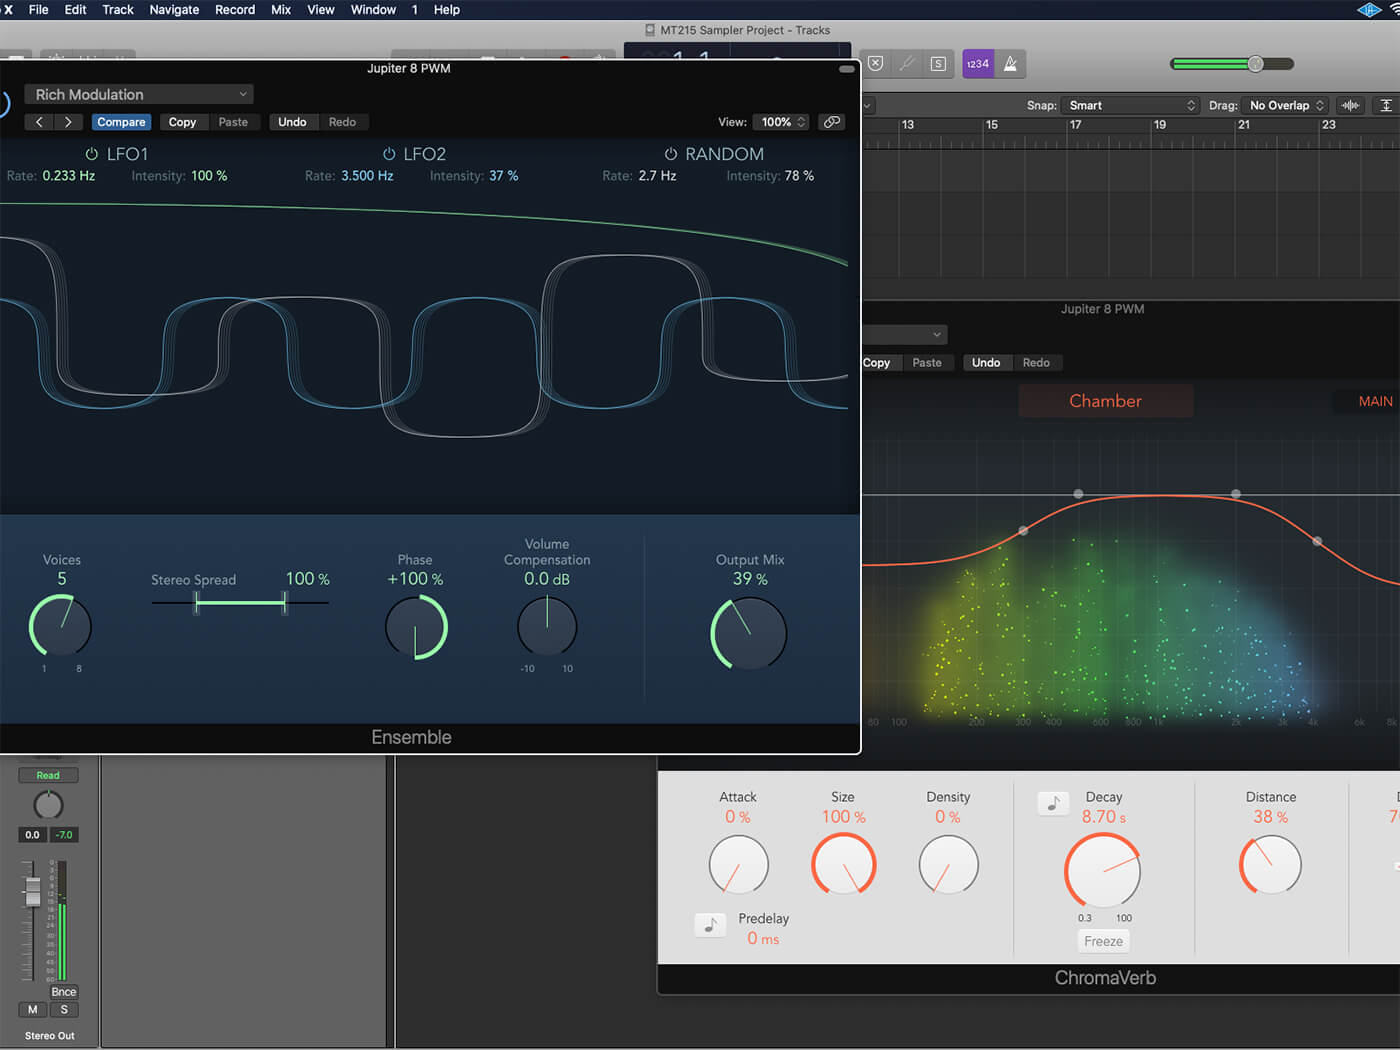
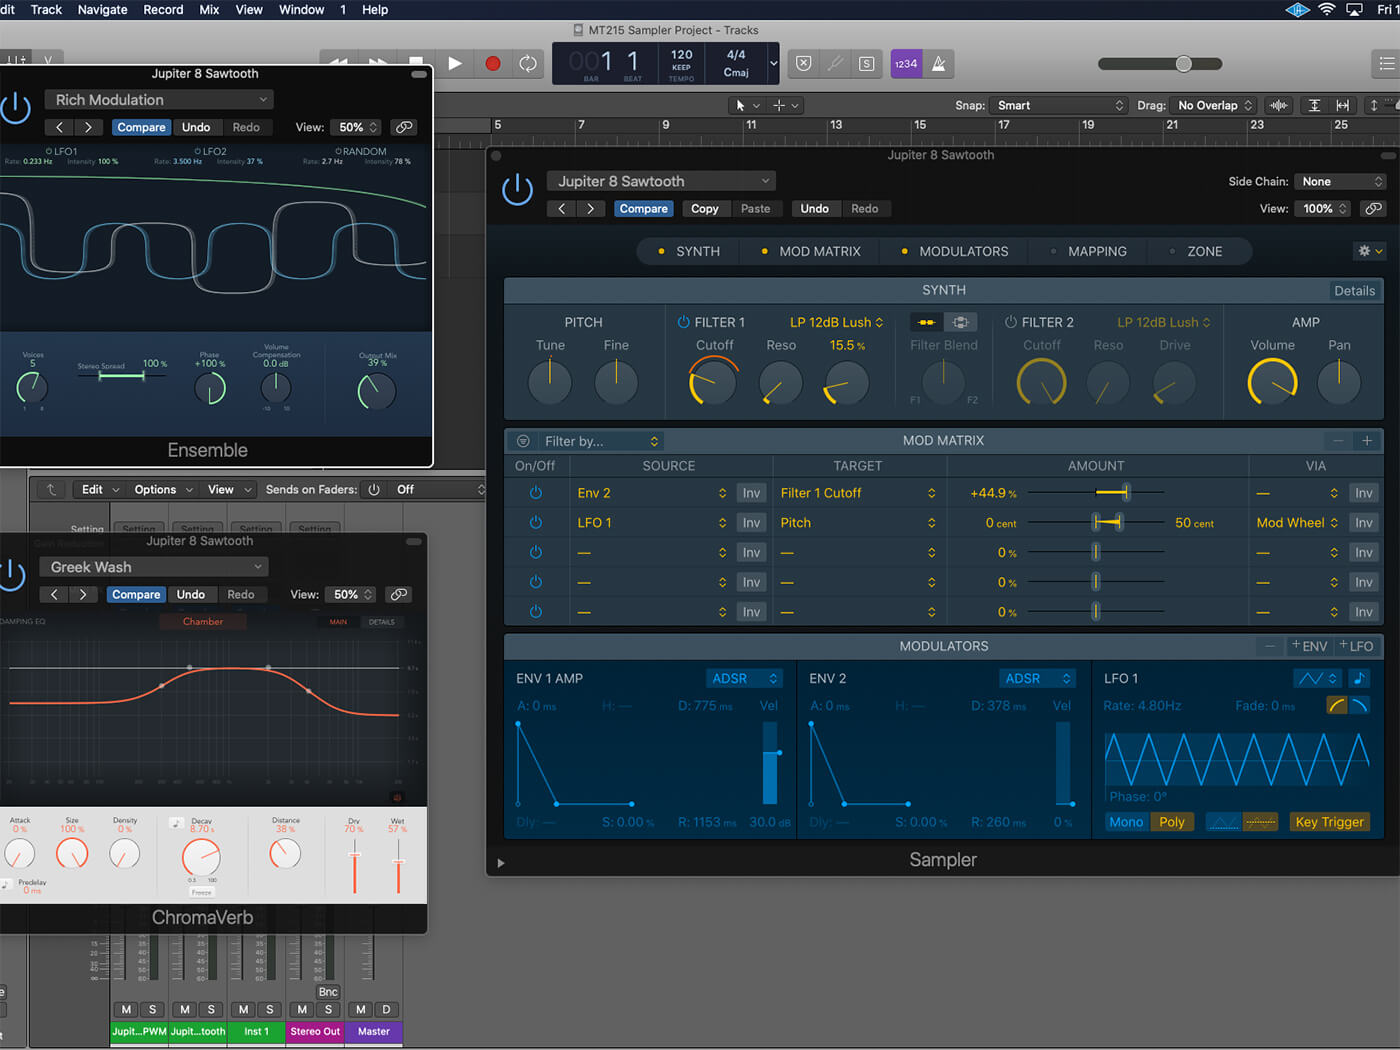
7. Add finishing touches to the sound with the addition of the Ensemble and ChromaVerb plug-ins. Set Ensemble to Rich Modulation and ChromaVerb to the Greek Wash setting in the Synth Reverbs folder.

8. Initialise the synth parameters using the cog in the top-right corner of Sampler and bypass the Ensemble and ChromaVerb plug-ins. You’ll be back at your starting point for now.

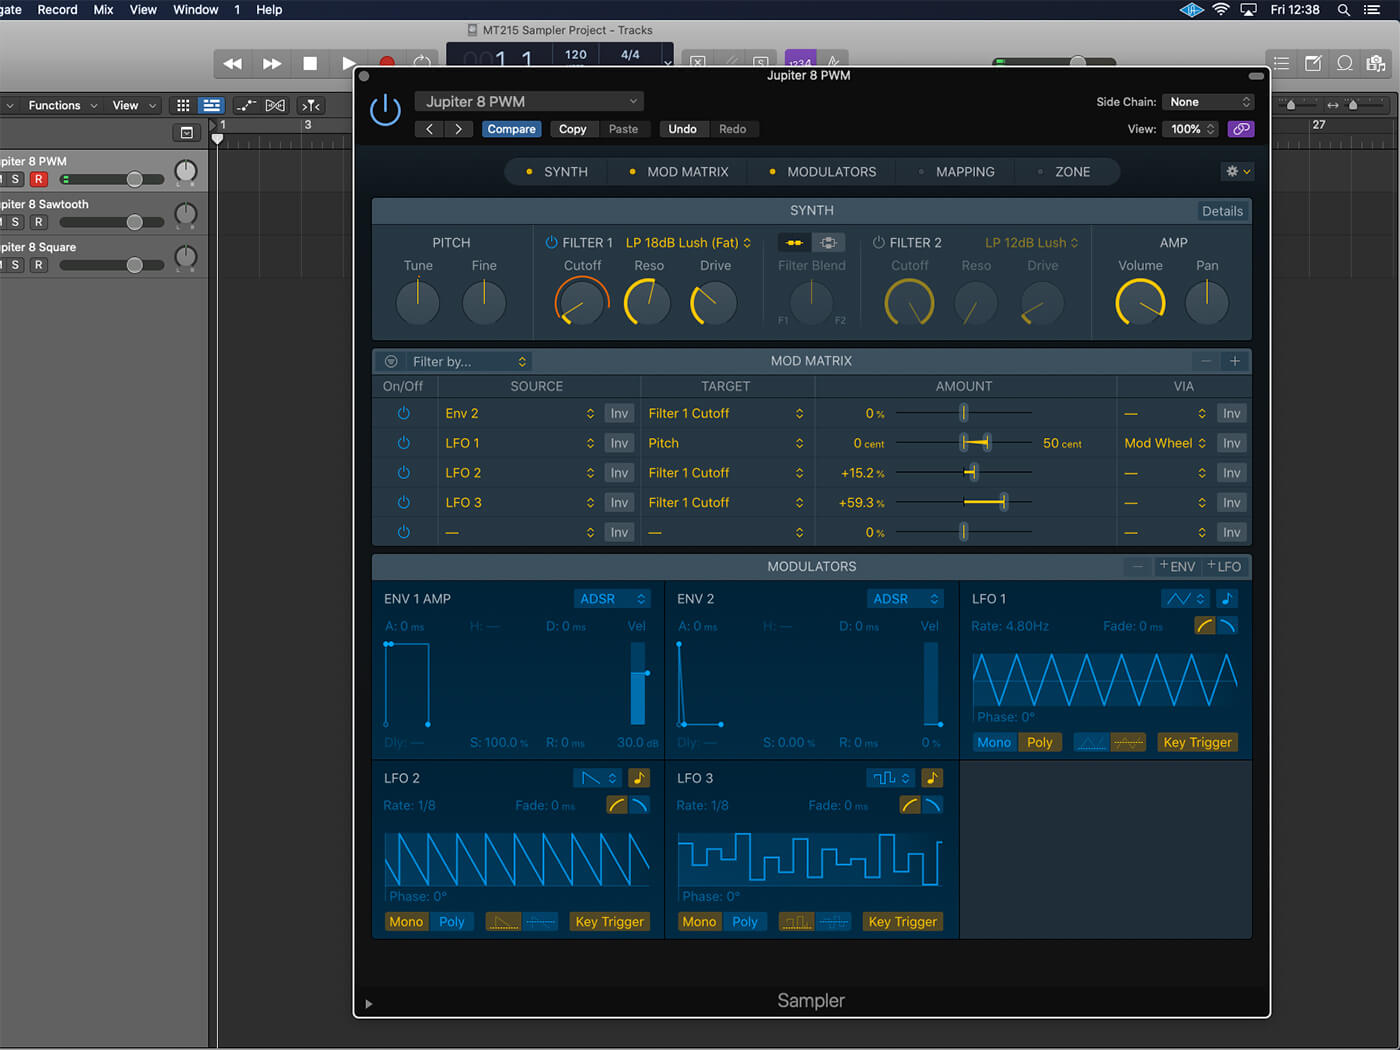
9. Look at the LFO modulators. Route LFO 2 to Filter 1 Cutoff (+14 per cent) using the Mod Matrix. This sound uses a weaker filter setting – LP 18dB Lush (Fat) – with added resonance and drive.
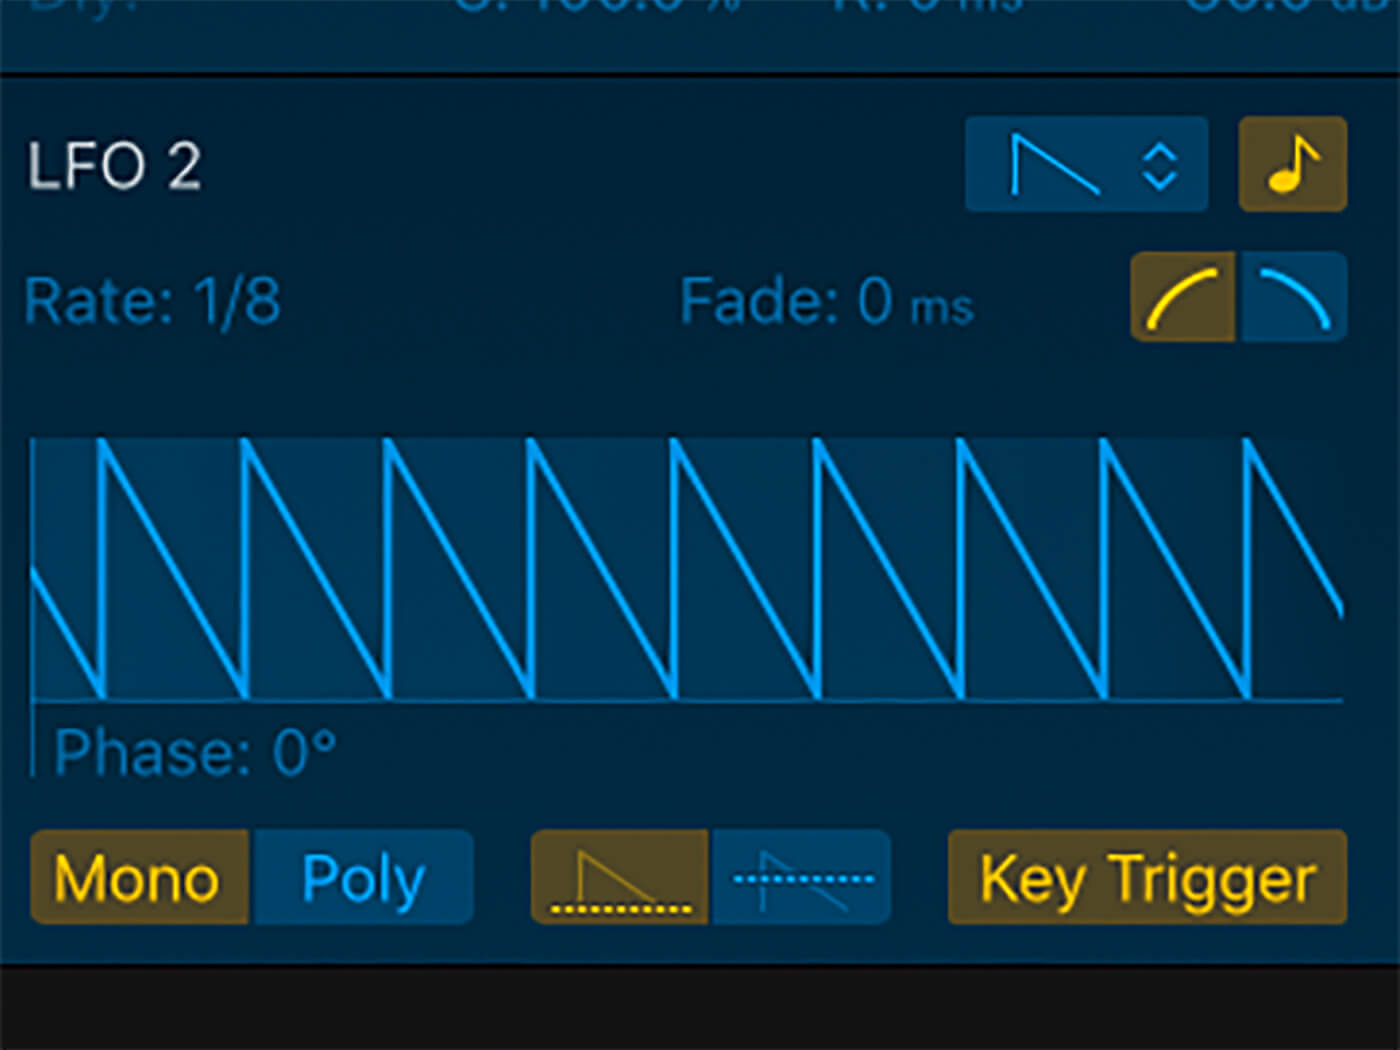
10. On LFO 2, click the small note icon to tempo-sync the LFO. Set it to Key Trigger mode and set the modulation mode to Unipolar (shown by the relative position of the waveform to a dotted line).
11. Add a third LFO, again using the Mod Matrix to have it modulate Filter Cutoff 1. Set the rate to 1/8th, the shape to S&H, tempo-synced to the project tempo, with Key Trigger active and Unipolar modulation set.
12. The finesse of the effect is in the relative position of the two Amount sliders in respect to the main cutoff control. Set the cutoff low and have LFO 3 (the S&H movement) modulate the filter more than LFO 2 (Saw).
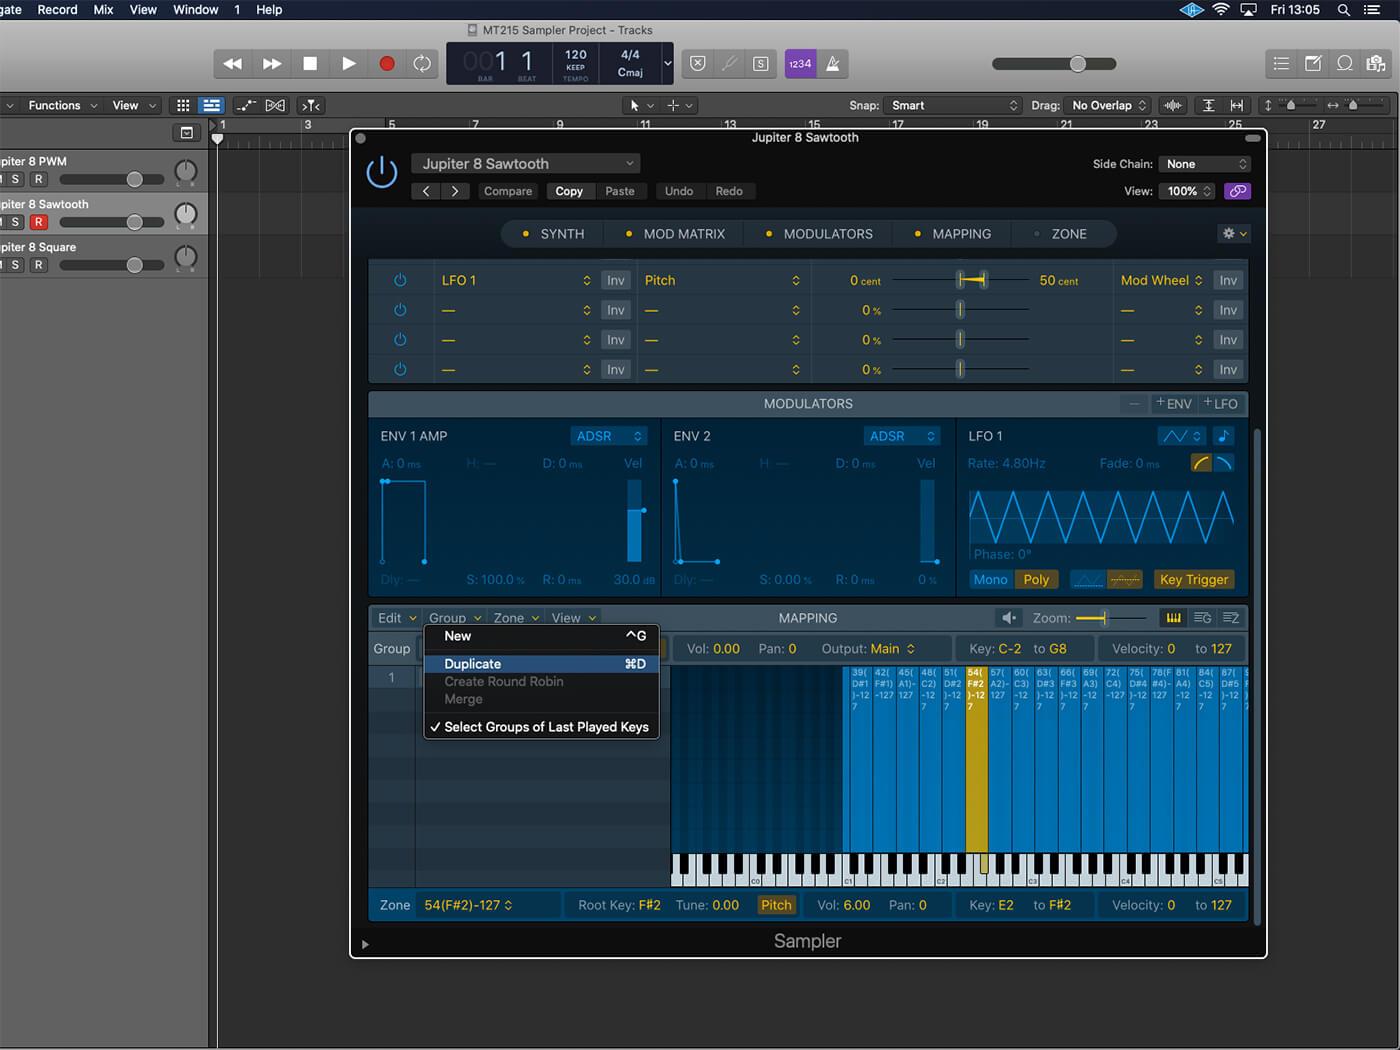
13. Move to the Jupiter 8 sawtooth patch so that you can see how Groups can work with the Synth controls. In the Mapping pane, use the Group menu to create a duplicate version of the initial mapping.
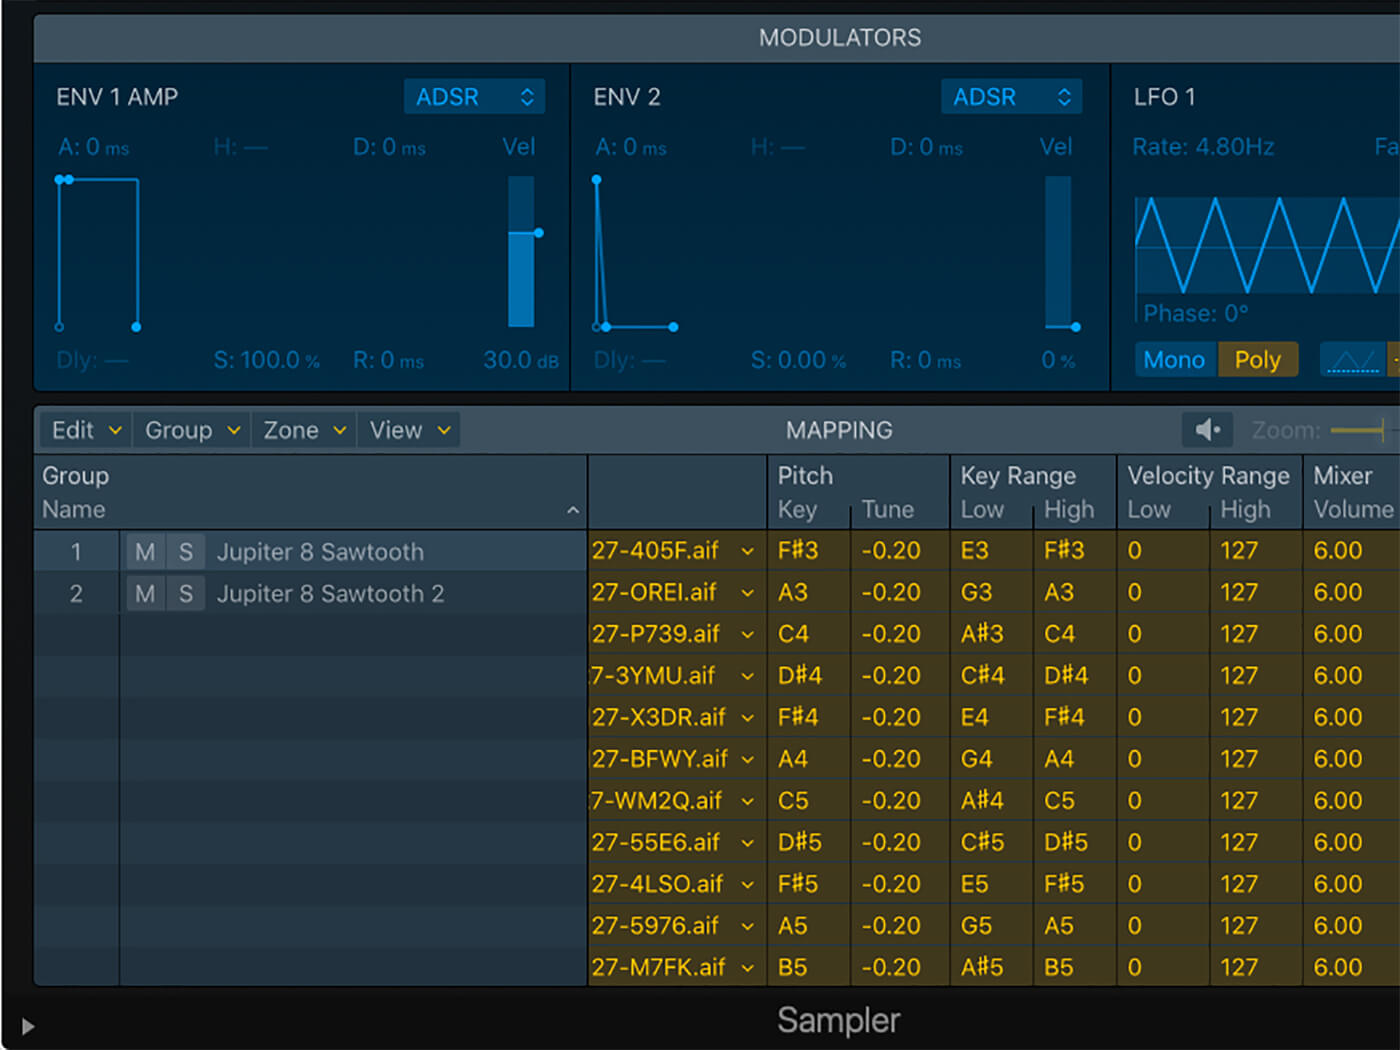
14. Use the Zone view to pan the respective groups hard-left and right, and shift the tuning to achieve a mild detune between the two voices. The results should have a pleasing stereo width to them.
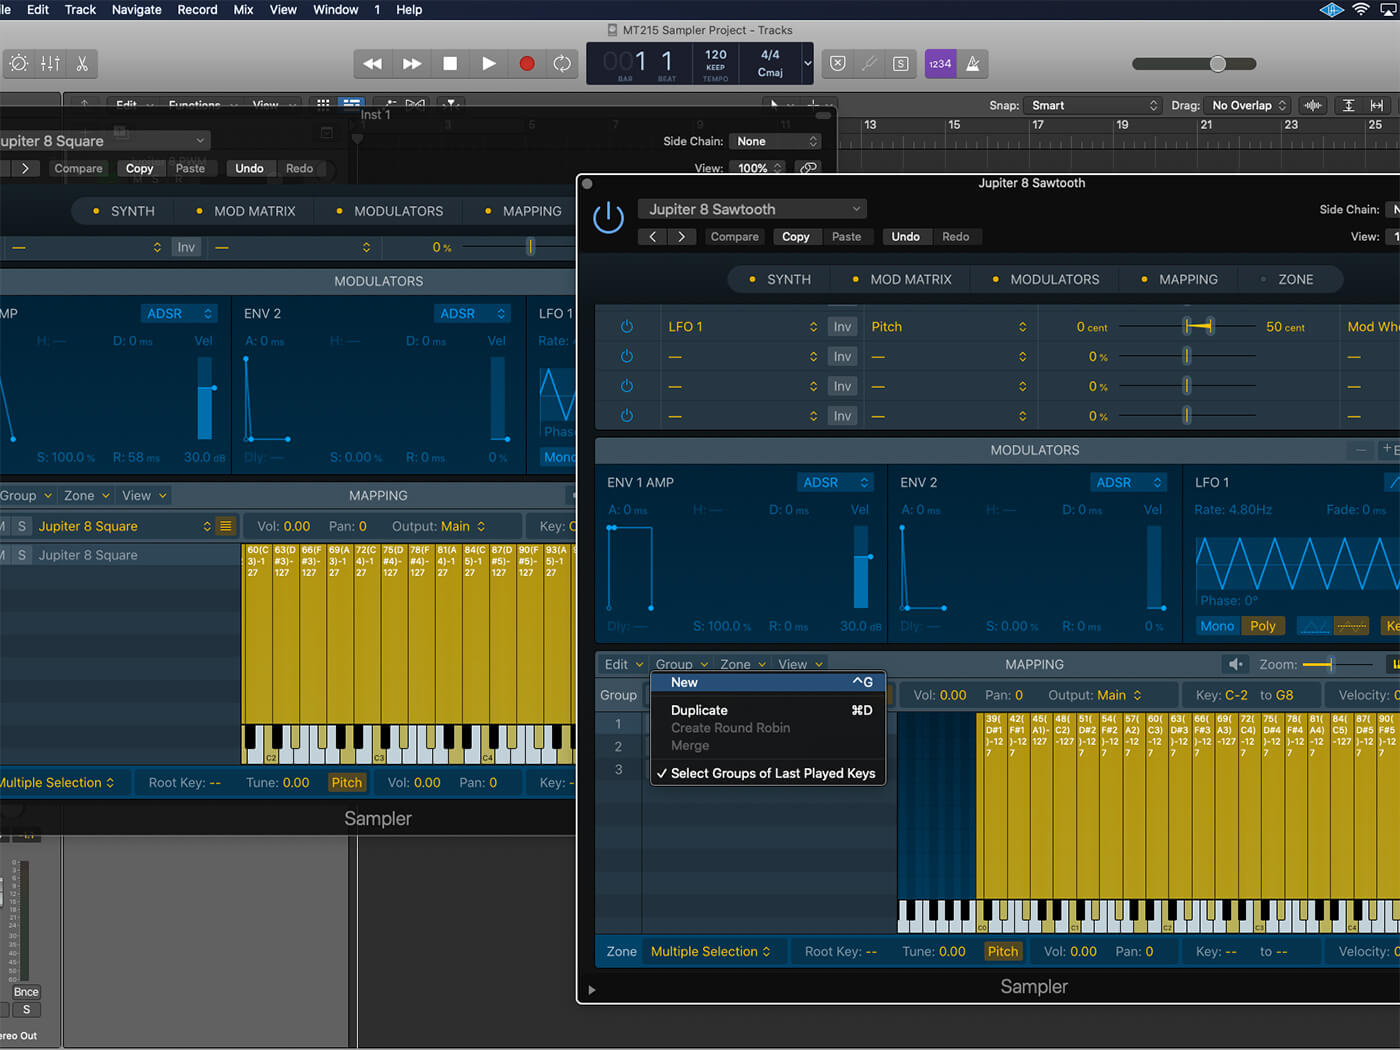
15. Create a new Group via the Group menu. Cut and paste the Mapping as part of the Jupiter 8 square patch. You’ll have a hybrid with three layers: two detuned sawtooth waves and a square wave up an octave.
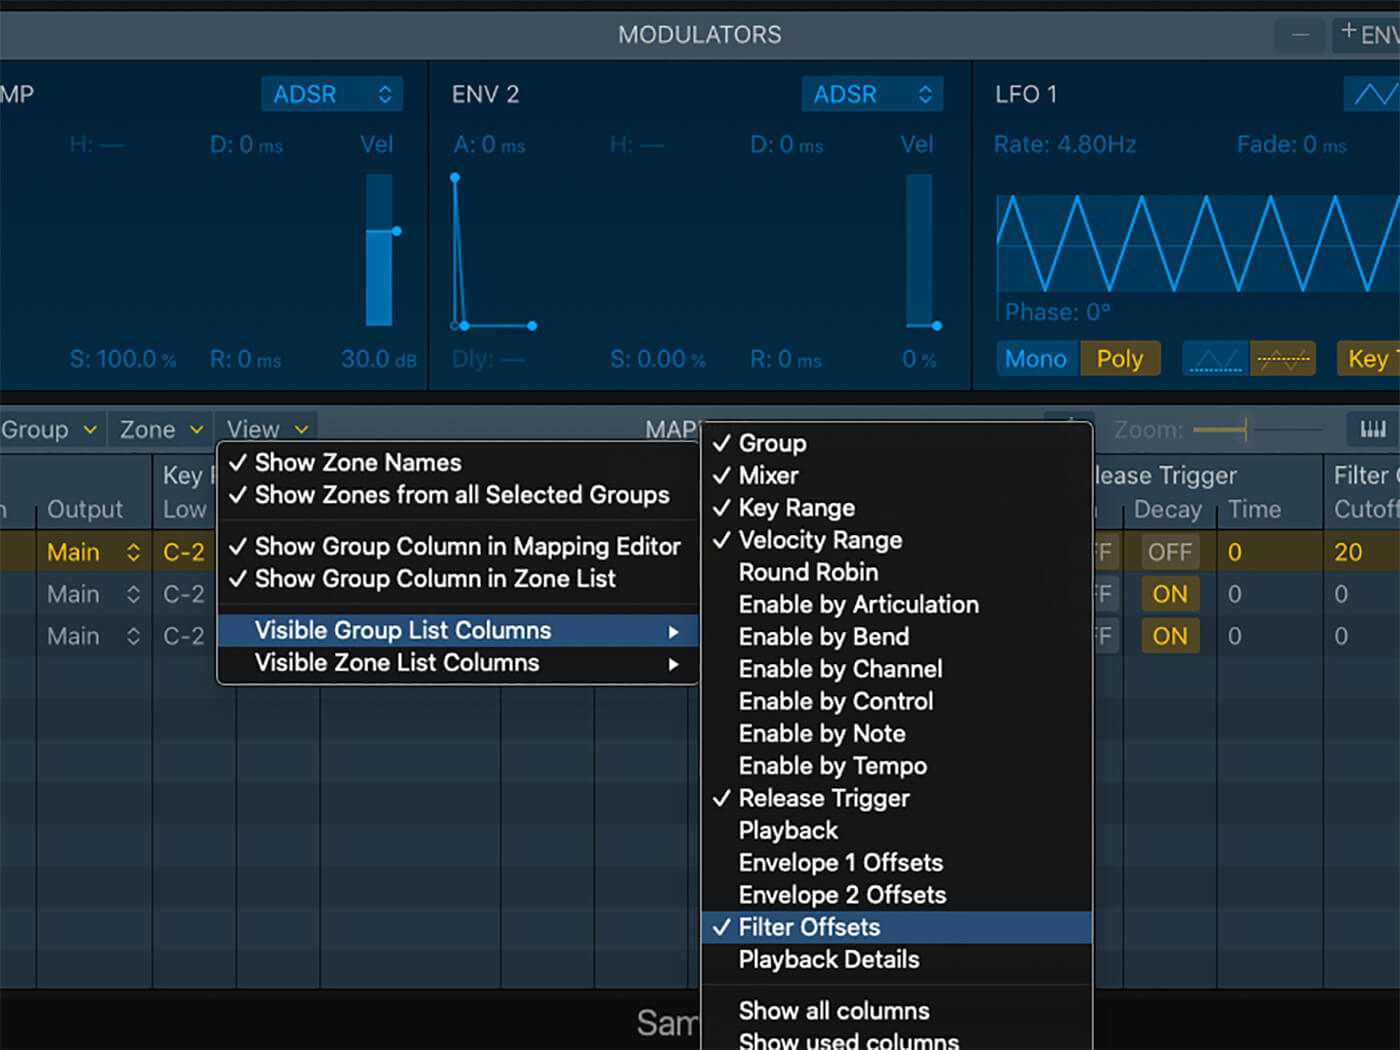
16. Move to the Group view and, from the View menu, under Visible Group List Columns, select the Filter Offsets option. Set the square wave group so that it has +20 offset on the Filter Cutoff.
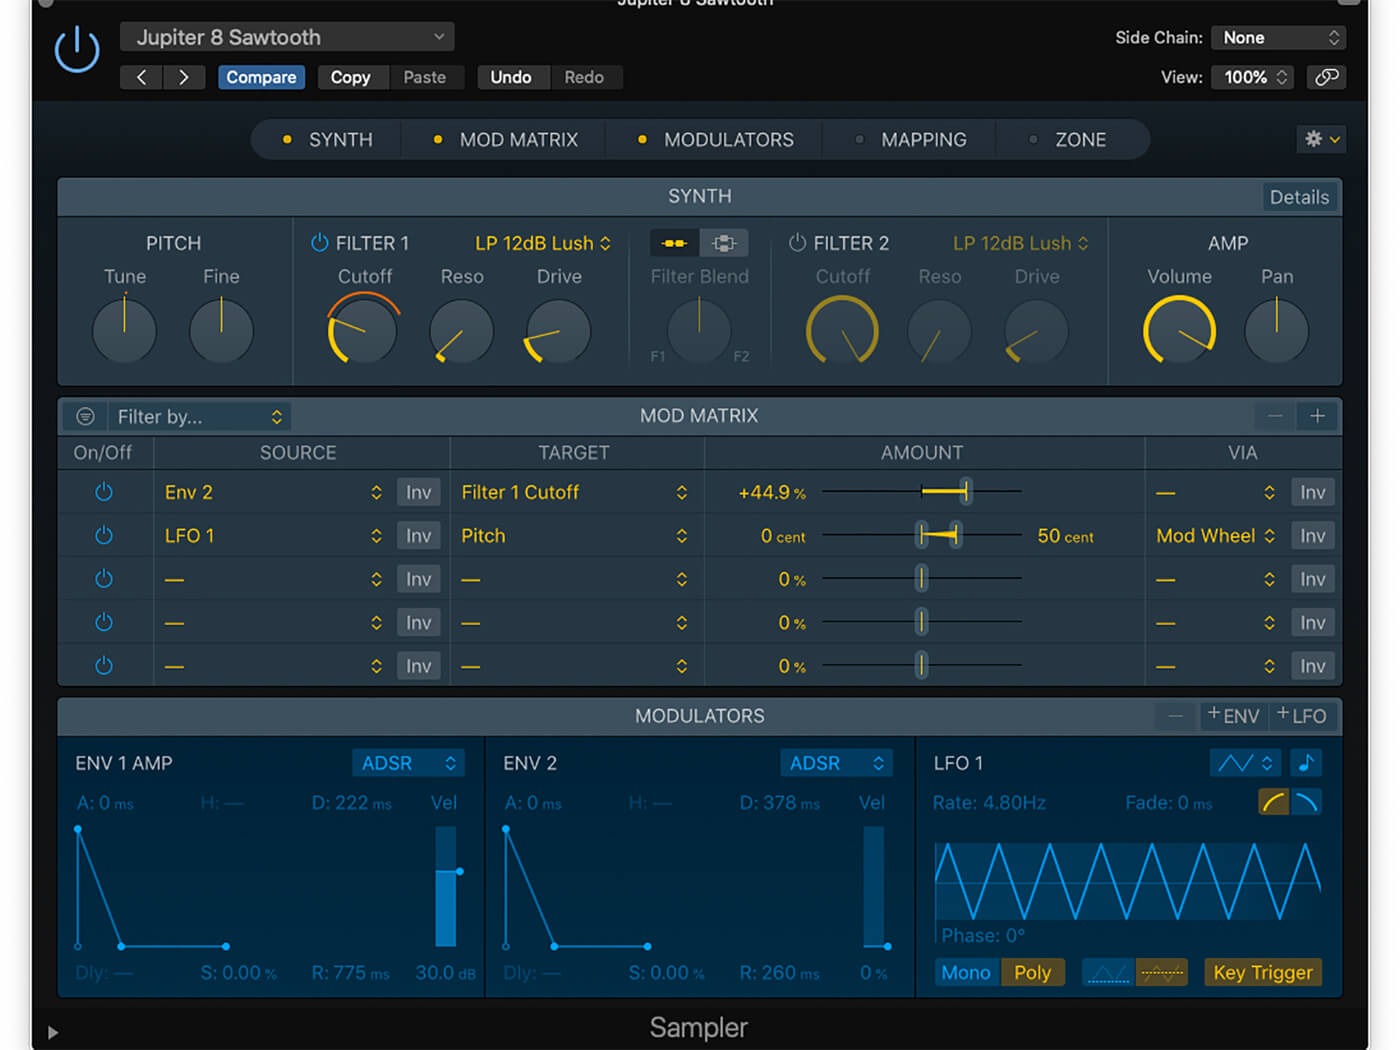
17. Here’s our finished pluck sound, using two short envelopes, with Env 2 modulating Filter 1 Cutoff. With the offset applied, the sawtooth groups will sound proportionately darker, while the square wave is brighter.
18. Apply the instances of Ensemble and ChromaVerb to finish the sound. Group-based offsets can also be applied to the two envelopes, letting you create distinction between the layers in respect to the amplitude.
For more tutorials, click here.