How to sample your hardware synths with Logic’s Auto Sampler
Sampling your synth collection can help bridge the gap between virtual and hardware synthesisers – and, thanks to Auto Sampler, it’s never been quicker or easier
The renaissance of hardware synths over the past decade has offered producers a welcome break from working entirely within the virtual realm, making sound design an activity you can enjoy without the need for a mouse and keyboard. Once you’ve created your sound on a hardware synth, though, there’s often little to do other than record the synth back into your DAW using a spare audio track – a process that tends to set that particular musical part in stone. But what if there was another way? An alternative option whereby you could create a multi-sampled version of your hardware synth patch, complete with looping, round-robins and velocity layers, all at the touch of a button?
Digital backup
Introduced in the recent Logic Pro X 10.5 update, Auto Sampler is an automated tool for the creation of complex multi-sampled EXS24 Instruments. Rather than simply recording patches as audio files, using Auto Sampler you can choose to sample the instruments, which in turn means your MIDI data can be reprogrammed at any point and your instrument can be used in different songs. Likewise, if you have a hardware synth that you’d like to use live but daren’t risk taking on the road, Auto Sampler could prove a solid solution by letting you turn your favourite patches into virtual facsimiles that can fit in your laptop bag.
Auto Sampler is designed to work as a plug-in, instantiated across either an External Instrument track for sampling hardware synthesisers or a Software Instrument track, should you wish to sample an instrument already in the virtual domain. Most of the time, Auto Sampler remains dormant, only leaping into action when you press the Sample button. Once sampling is initiated though, Auto Sampler transmits the appropriate MIDI note triggers, recording each note to separate audio. Once the sampling is finished, Auto Sampler then maps and saves the instrument in EXS24 format, which can be loaded into Sampler.
Fine detail
The joy of Auto Sampler is the fact that the sampling process is fully automated. Performed manually, even the most basic sampling task would take about 30 minutes to perform once you’ve factored in triggering and playing the instrument, editing the samples and mapping them correctly. Although complex sample sets that include round-robins and velocity layers might take a similar length of time, this a task you can easily set going during a tea break.
The principle trick to using Auto Sampler is deciding the level of detail you want to apply in sampling an instrument. Some sources, particularly vintage analogue synths that don’t respond to velocity, can be adequately sampled with just two or three notes per octave and a single velocity layer. If you want a detailed virtual version, however, you’ll need to increase the density of the note sampling and specify multiple velocity layers to mimic how the instrument responds to dynamics. The downside here, of course, is that the sampling takes longer to perform and has a proportionately bigger impact on drive and memory resources.
Reap what you sow
By default, both sample and instrument/mapping data is saved into an Auto Sampler folder as part of Logic’s instrument and plug-in settings – Audio Music Apps > Sampler Instruments > AutoSampled Instruments – which ensures you can open your newly created instrument in any Logic project. Despite Auto Sampler doing an impressive job of mapping the samples, you’ll often need to make tweaks in Sampler. For example, you might want to change the enveloping (changing the release phase for sounds that have a gradual release, for example) or how the instrument responds to velocity, especially if your source instrument isn’t velocity sensitive.
As well as being a smart way to capture existing instruments, there’s a lot of mileage in seeing the exercise of sampling as a creative endeavour in its own right. For example, you can create interesting results by manually changing parameters such as LFO speed, cutoff and oscillator detune on your hardware synths while Auto Sampler steps through its sampling process. The result will be a patch that subtly changes based on the keyboard position, which can be a thrilling way to liven up boring string pads. Likewise, you can use Auto Sampler in an insert slot after another effect, which will burn in the effect with the sample. Try this on an existing multi-sampled piano passed through a granulator plug-in such as Output’s Portal.
Auto Sampler is a great way of extending the musicality and usefulness of your synths, and offers possibilities that go beyond what hardware can deliver, particularly if it’s monophonic being made polyphonic. Most importantly though, it changes the interaction with sampling from a passive involvement – where you simply download and play pre-sampled content like a string library – to a process that sees you actively creating and sampling your own content. Put simply, Auto Sampler puts the creativity back into sampling, while removing all the hassle.
Sample hardware synths with Auto Sampler: step-by-step
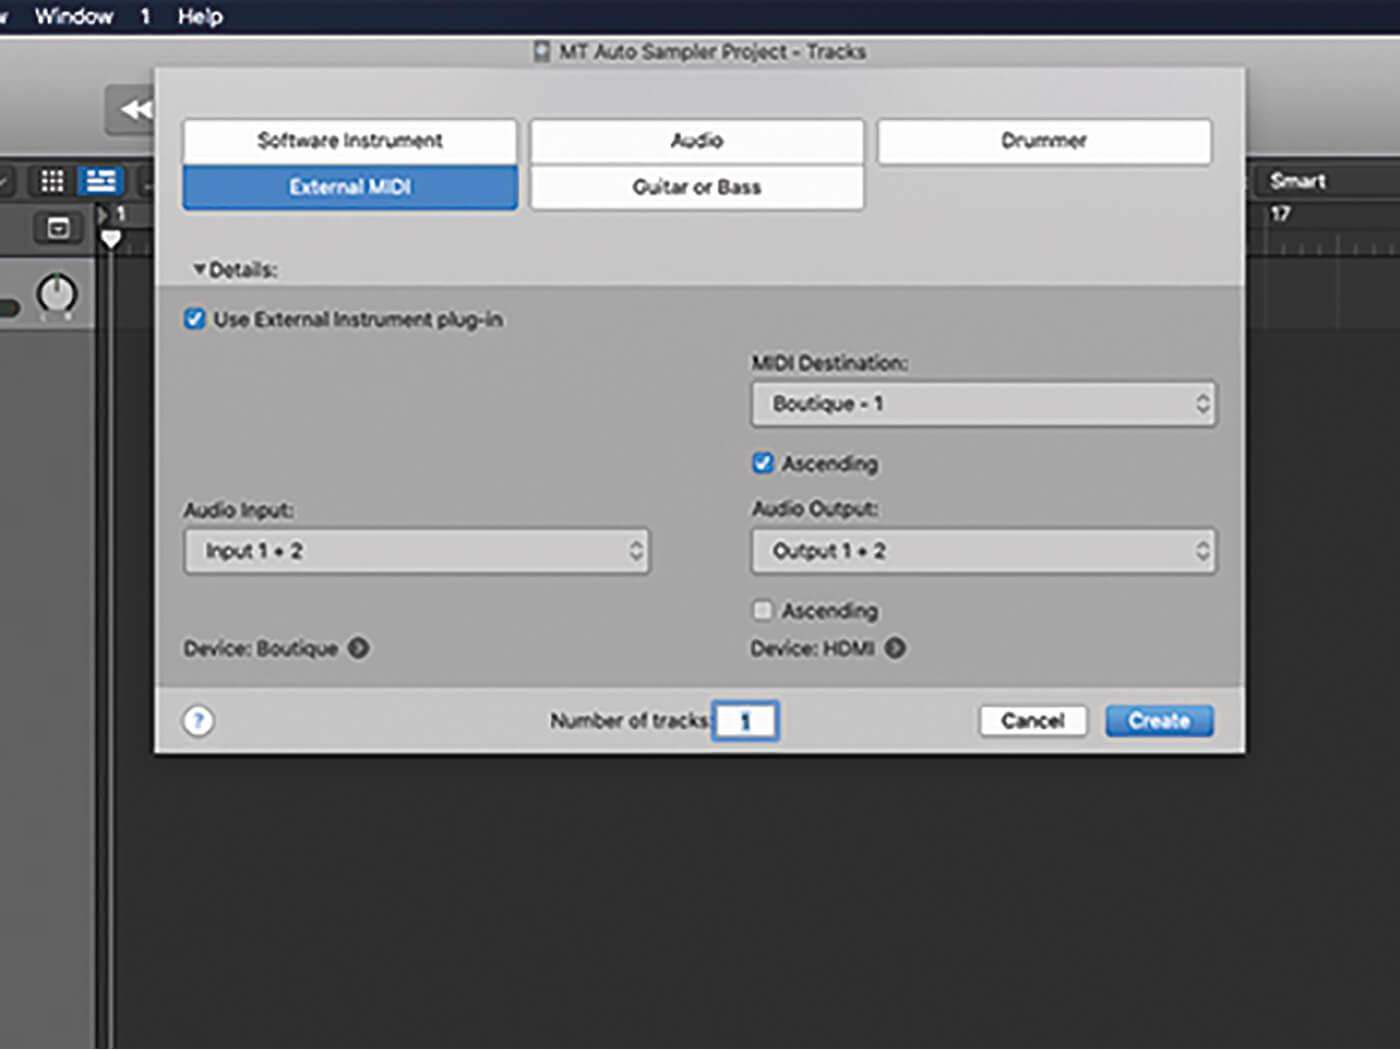
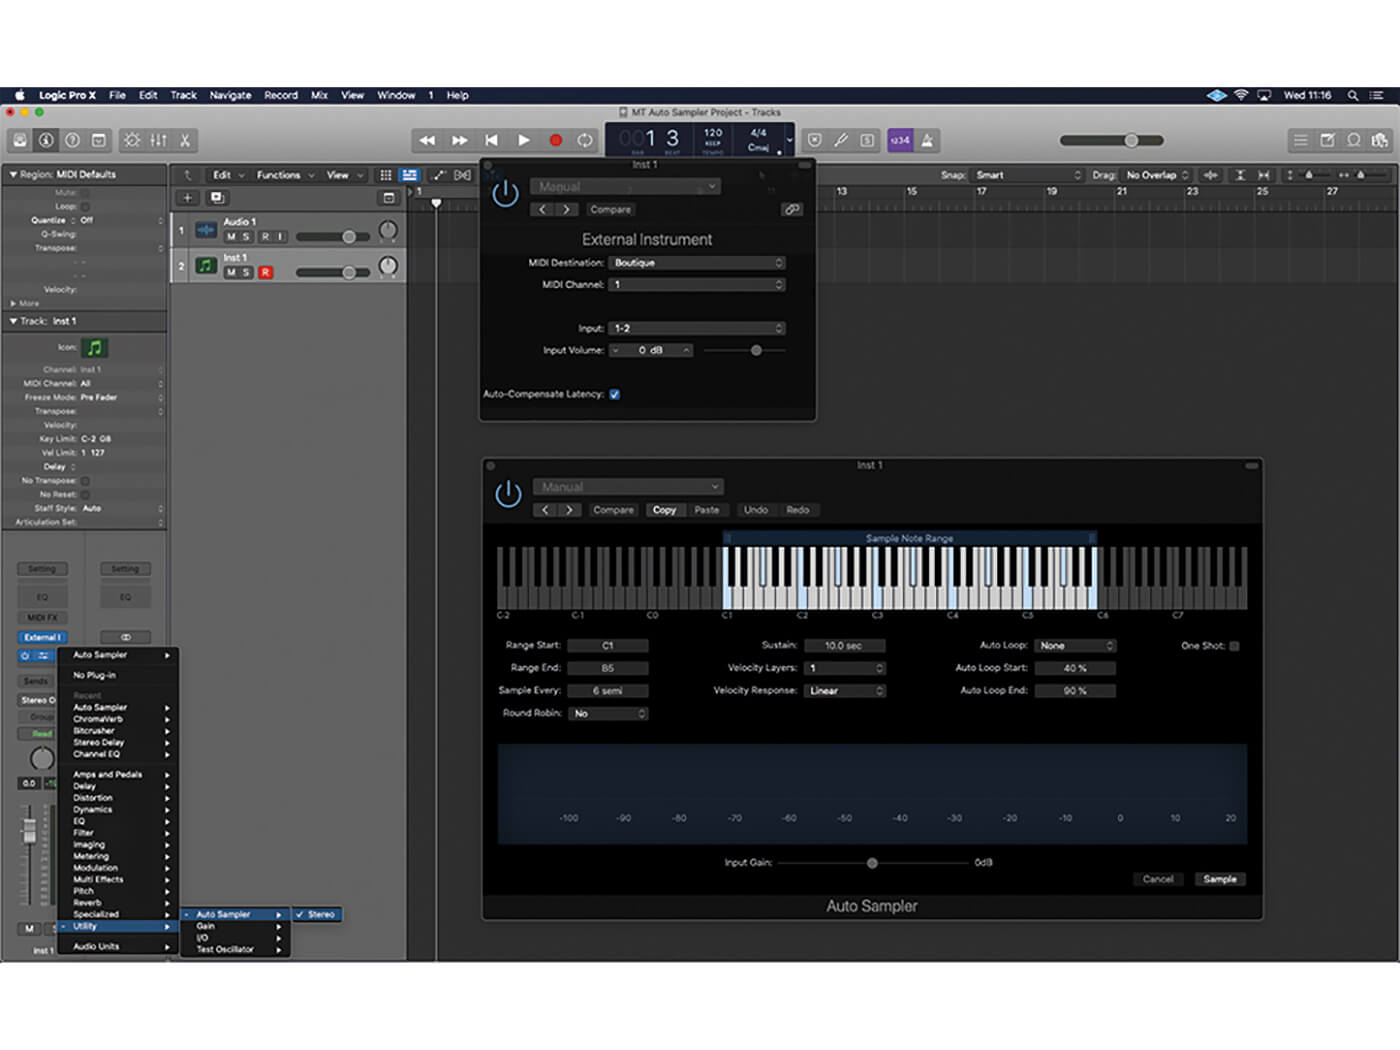
1. Create a new External MIDI track using the External Instrument plug-in. Set the MIDI destination to your chosen instrument and ensure the Audio Input matches the input where the synth is connected.
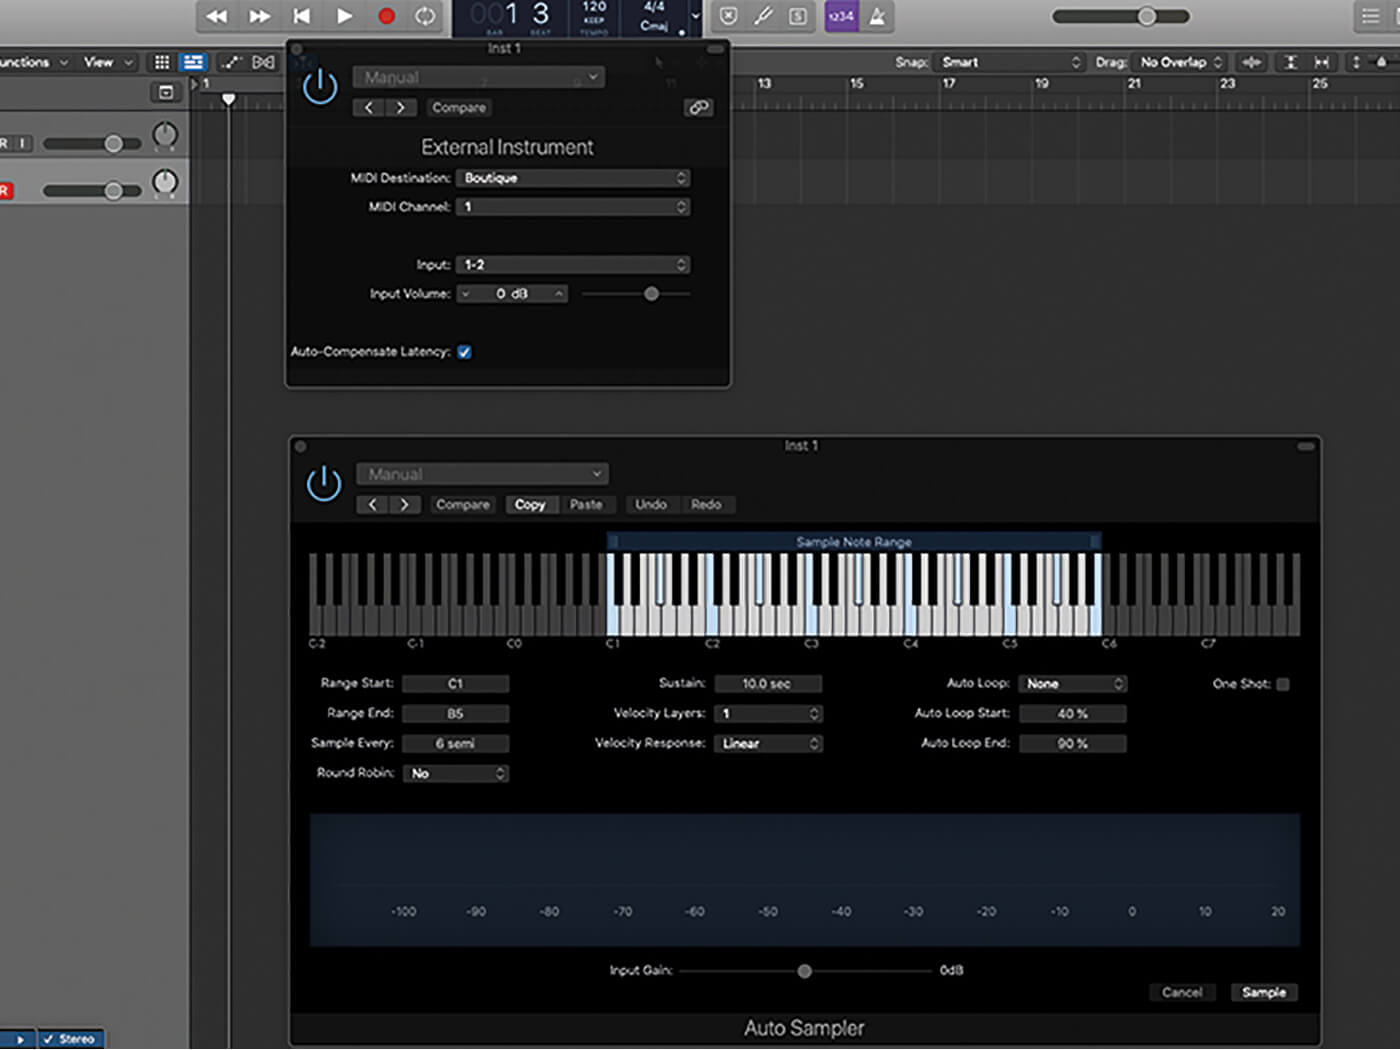
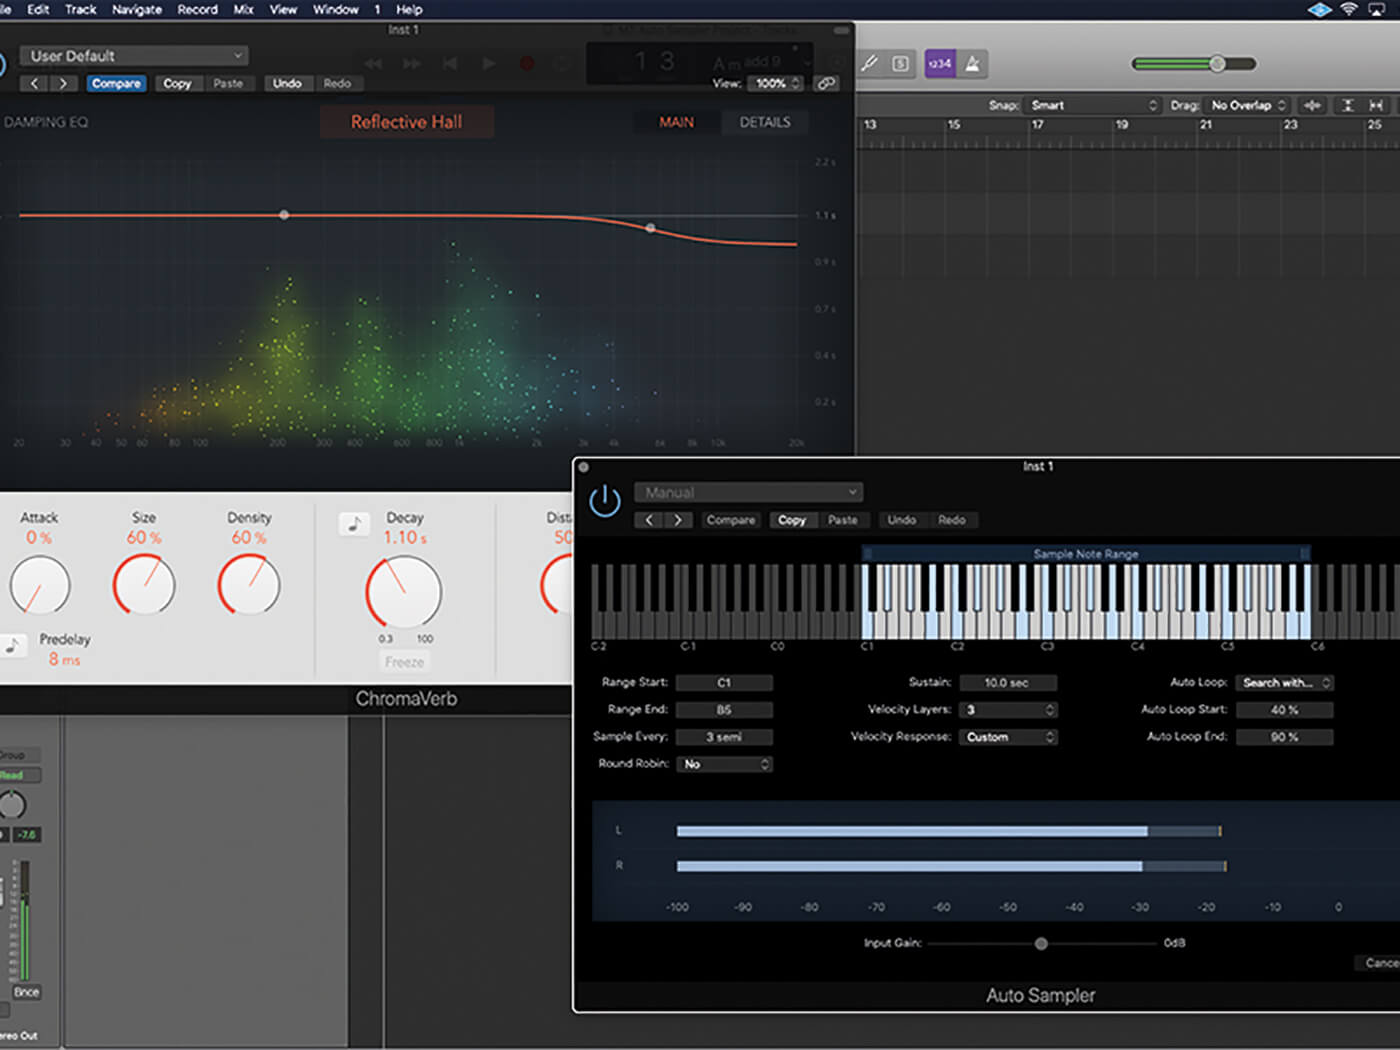
2. Place an instance of Auto Sampler on the new instrument track. The metering at the bottom of Auto Sampler’s interface shows the current signal levels, which can be adjusted using the input gain.
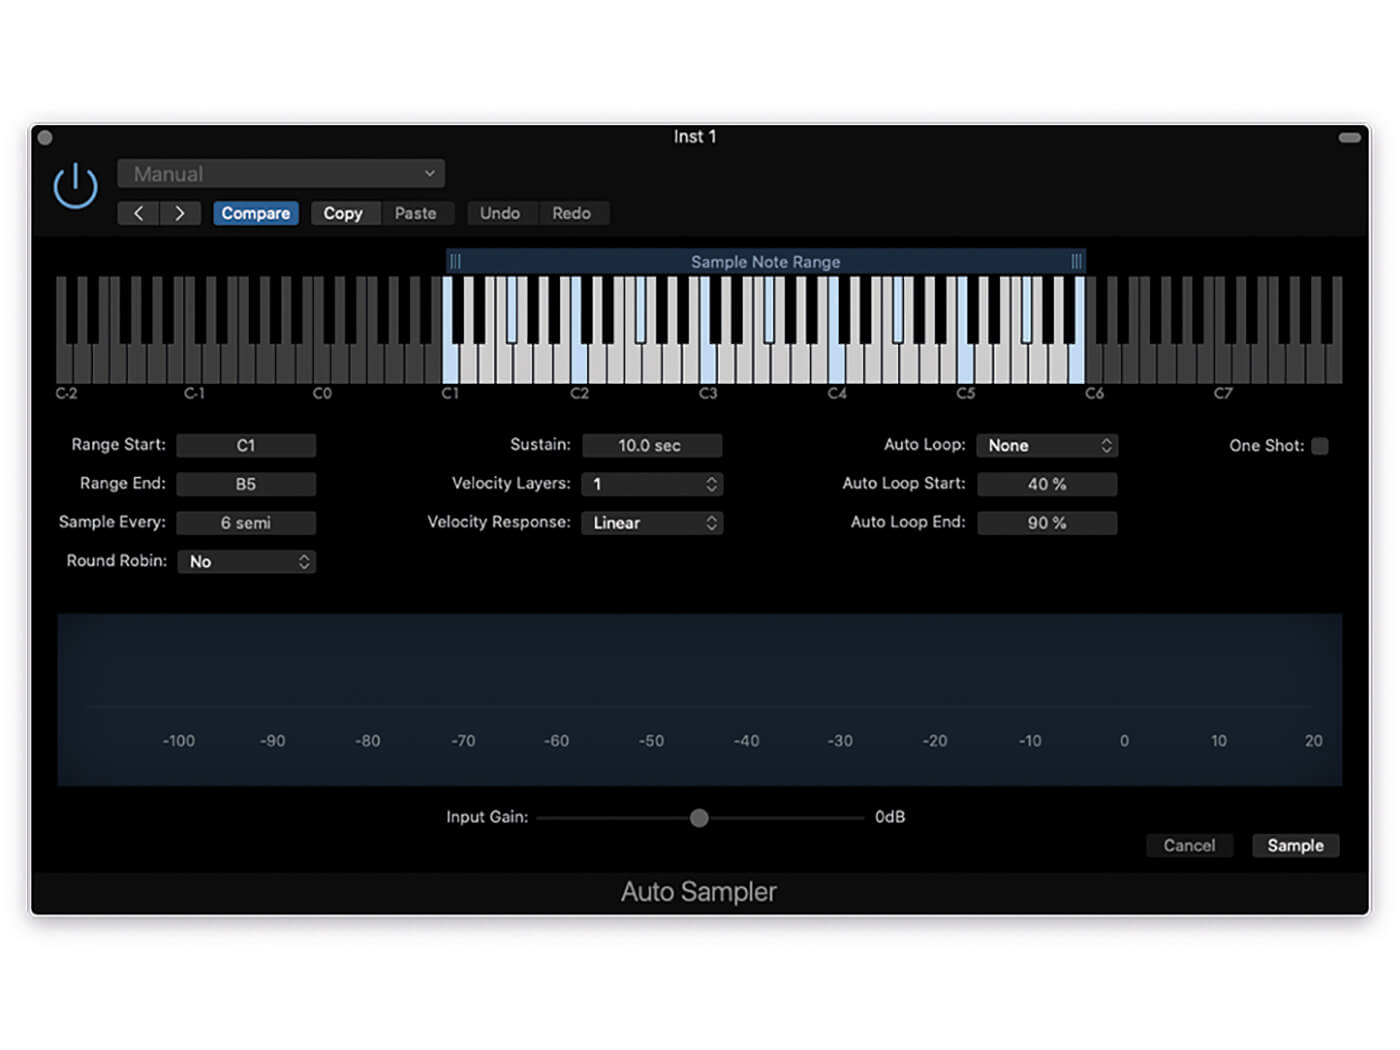
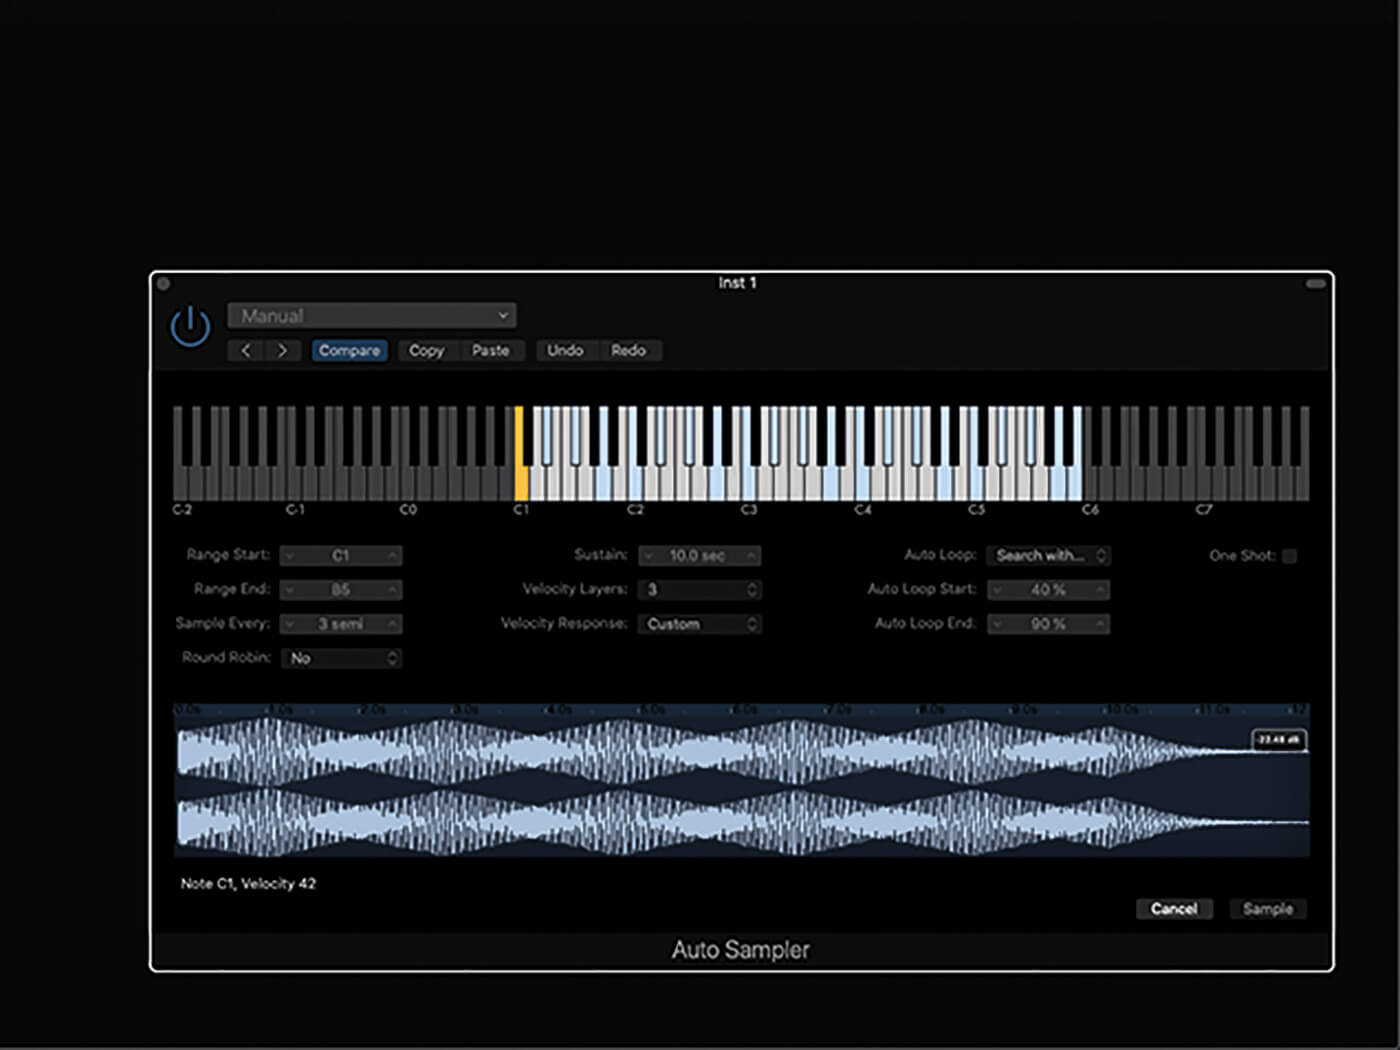
3. Start by setting the key range of your instrument, either graphically using the keyboard display or via the Range Start and End parameters. Pick a range that matches the musical use of the patch.
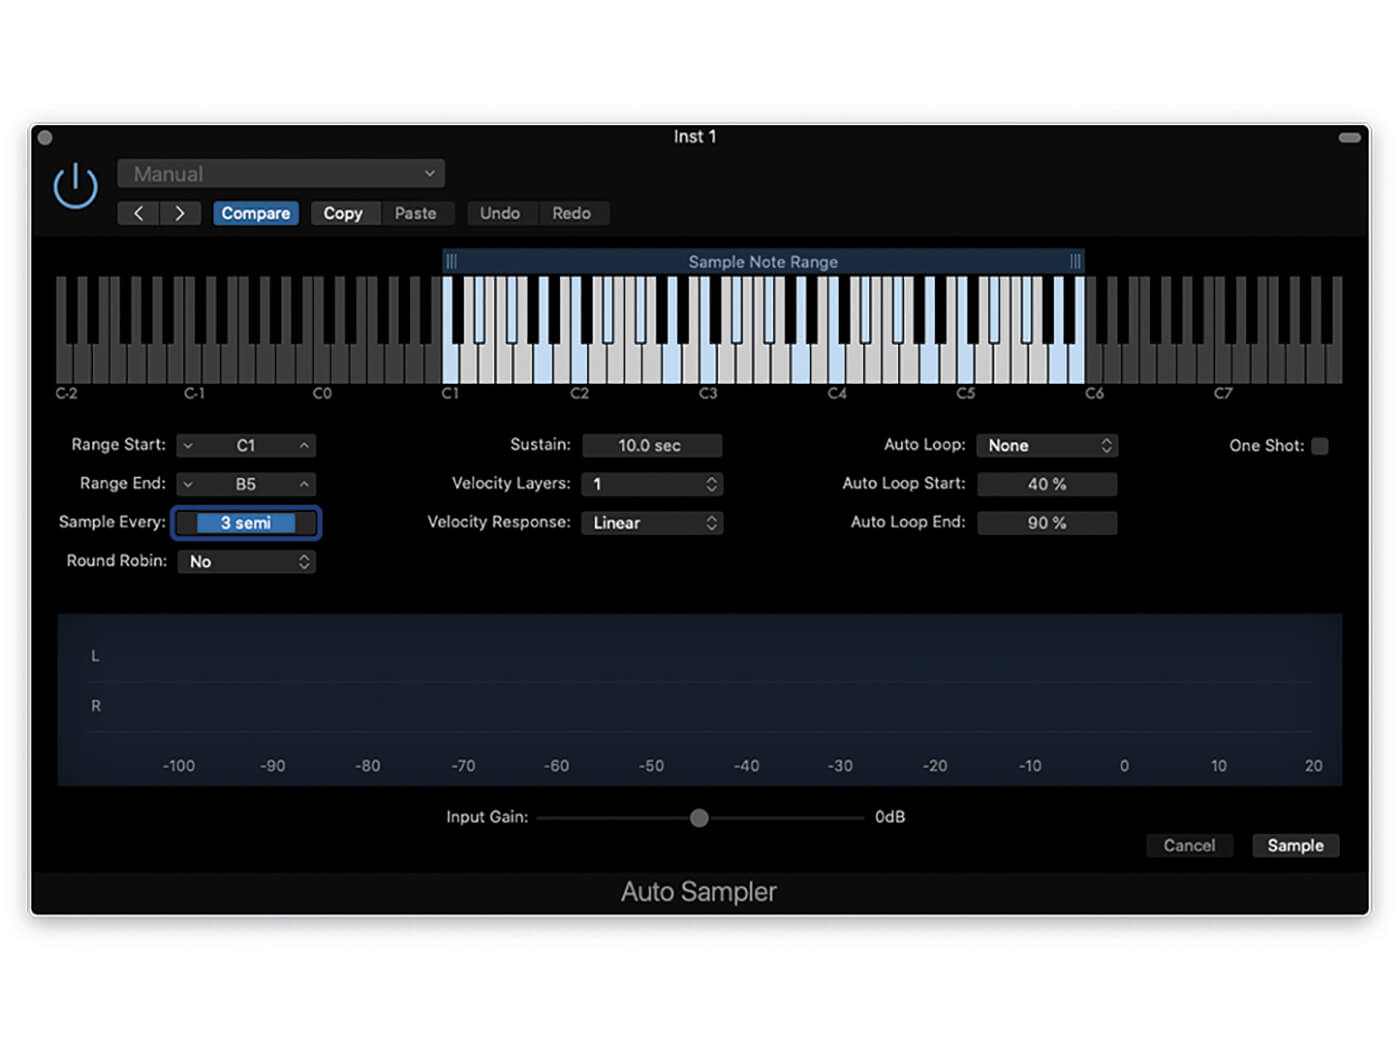
4. The Sample Every parameter defines the density of the sampling as you move up the keyboard. Three semitones tends to produce a good balance between detail and too many samples to record.
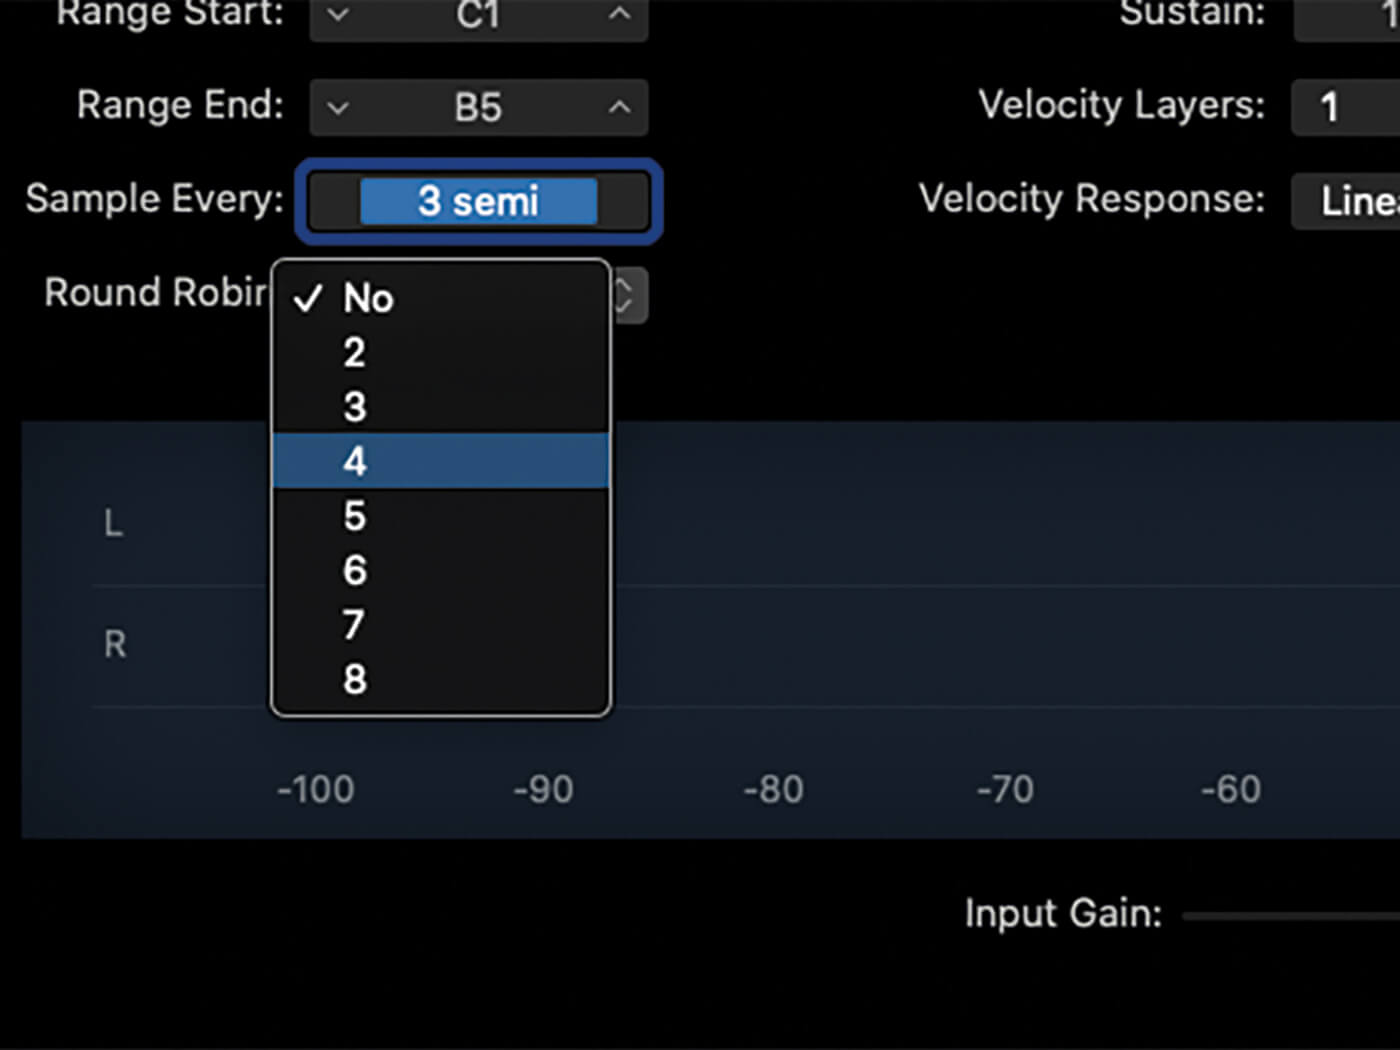
5. Round Robin provides alternative samples for successive note triggers. Round-robins are useful for percussive sounds, even those produced by analogue synths, but are less useful for conventional keyboard sounds.
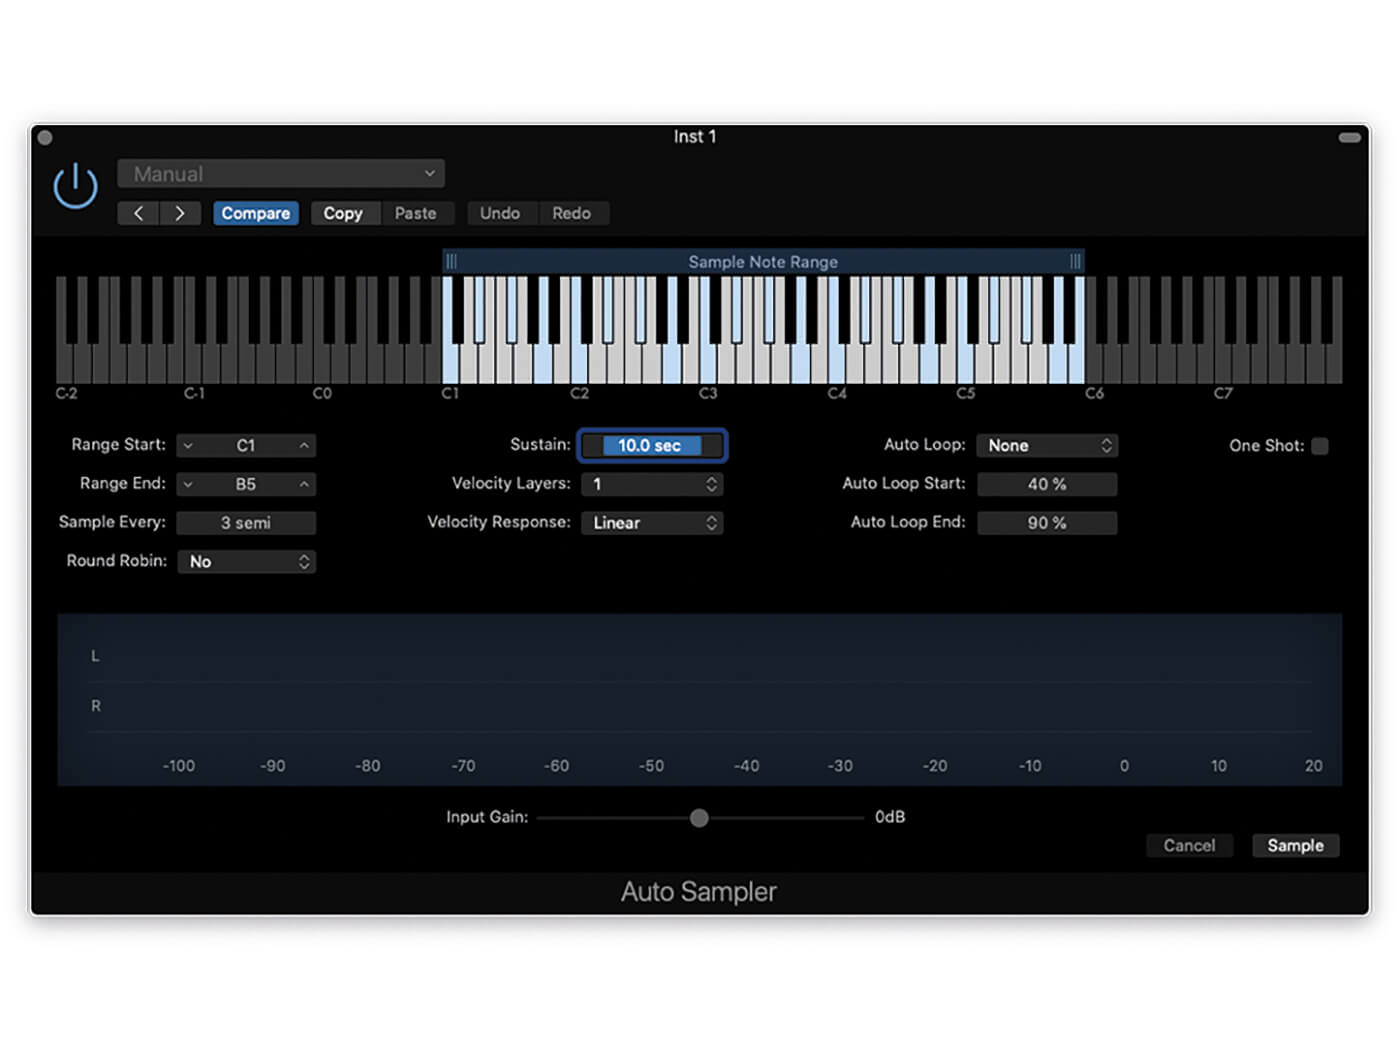
6. Sustain governs the length of the trigger note, which should correspond to the sound you want to capture. About 10 seconds is sensible for pads, whereas shorter sounds such as synth plucks can be just a few seconds long.
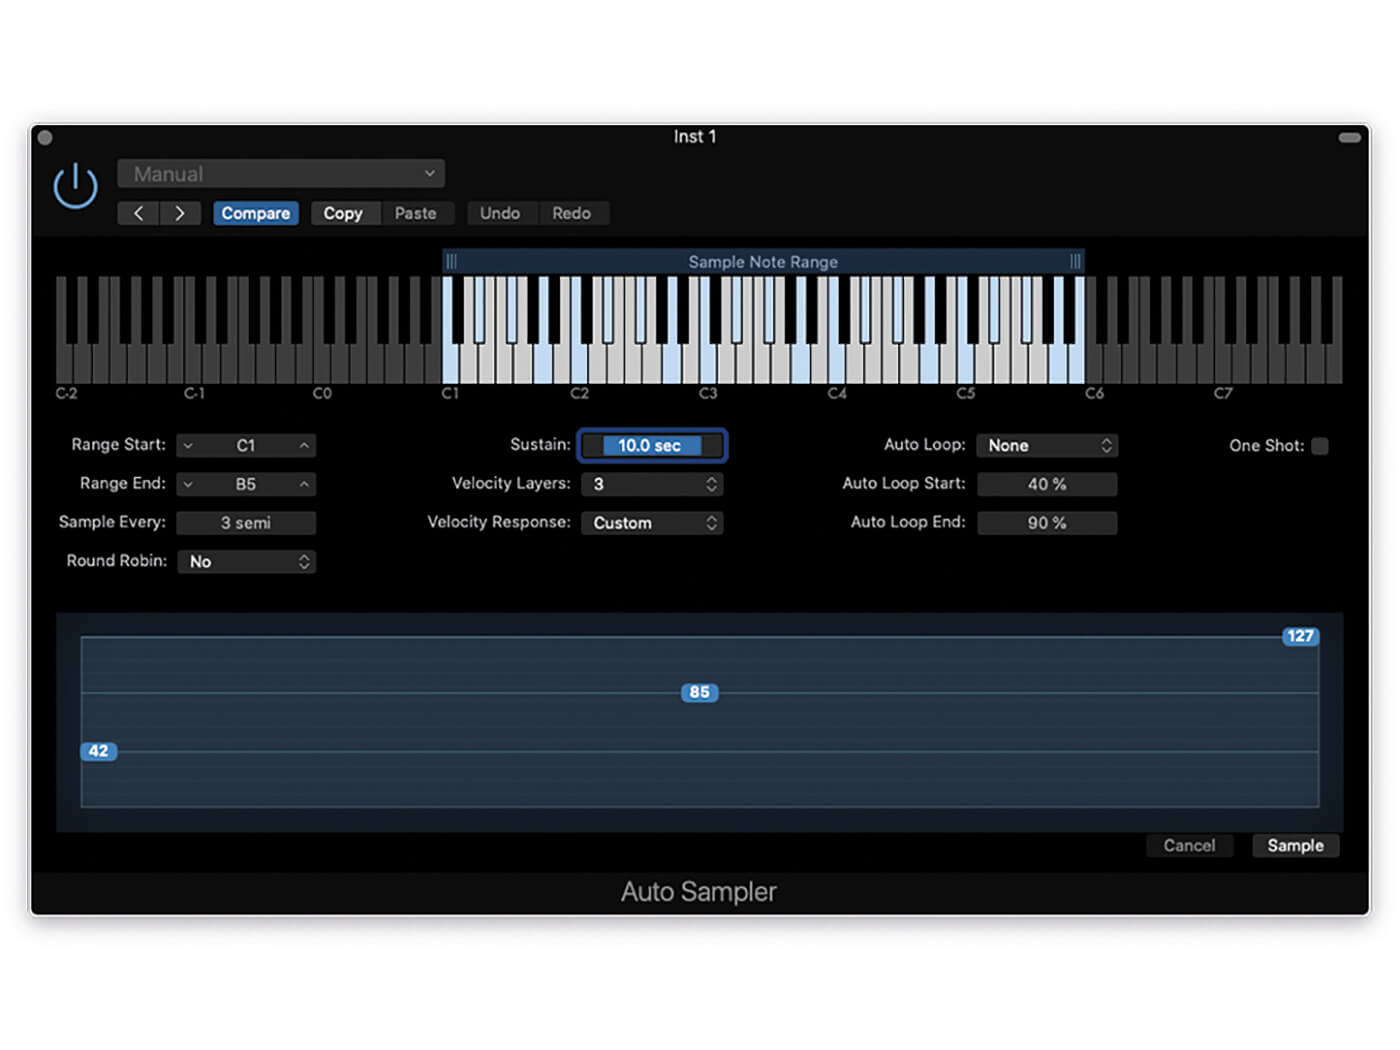
7. If your source responds to velocity, consider adding velocity layers. Three layers is a smart starting point – you can set the range on the bottom of the interface – but consider adding more if detail is important.
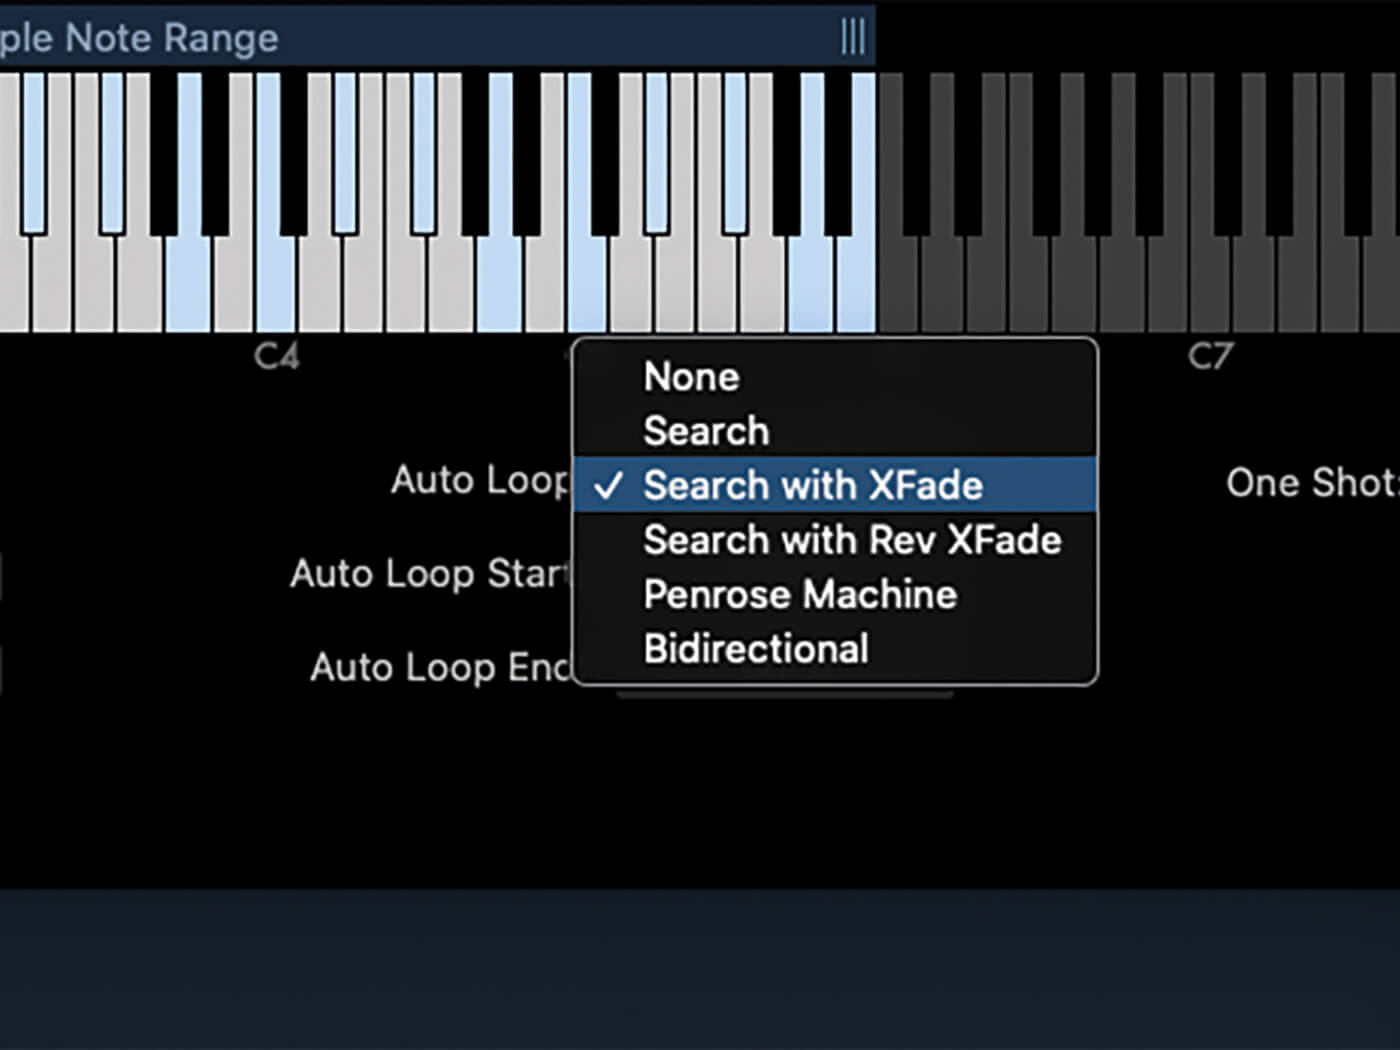
8. If your sound has a sustain phase, activate the Auto Loop feature using the Search with XFade Mode. Assuming you have a long sample, the default start and end points (40 and 90 per cent) are fine.
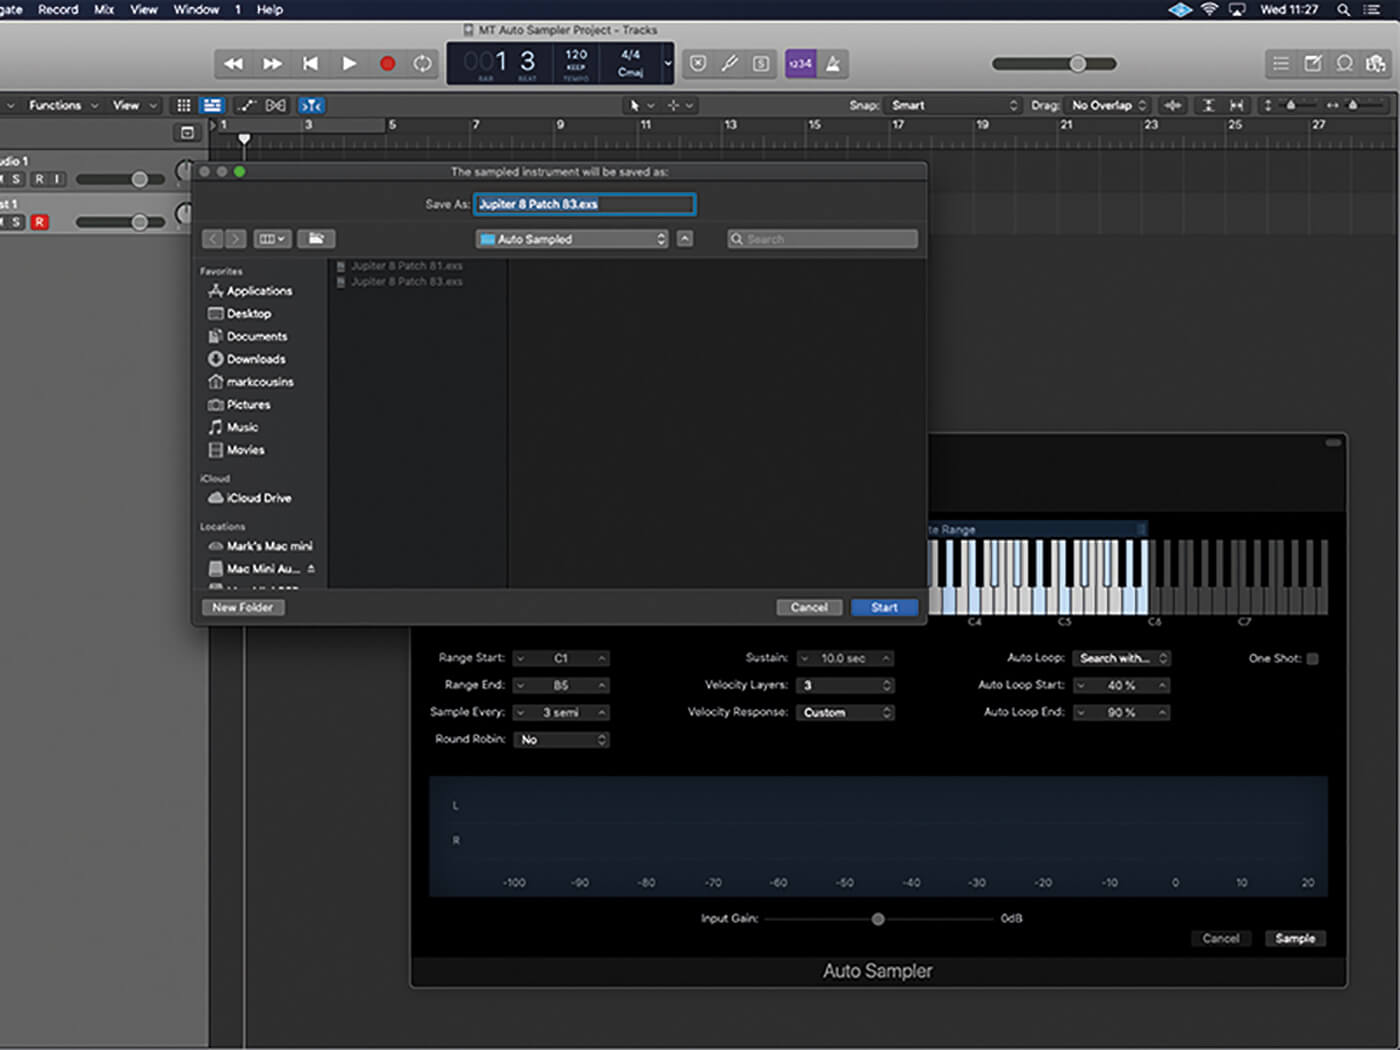
9. Press Sample to initiate sampling. Logic will ask where you want to save the EXS instrument. The default location – in a folder called Auto Sampled – will ensure you can find the instrument later on.
![]()
ONE SHOT If you’re sampling percussive sound sources, consider using the One Shot option. One-shot samples play for their full duration, irrespective of the length of the trigger note, so they make a lot of sense with sampled drum sounds. The One Shot option doesn’t affect the sampling though. It’s just a parameter in respect to the mapping in Sampler, and can be turned off at any point.
10. Once you’ve specified a destination, Logic will turn dark and Auto Sampler will go about triggering and sampling your hardware synth. Typical instruments take a few minutes to be sampled.
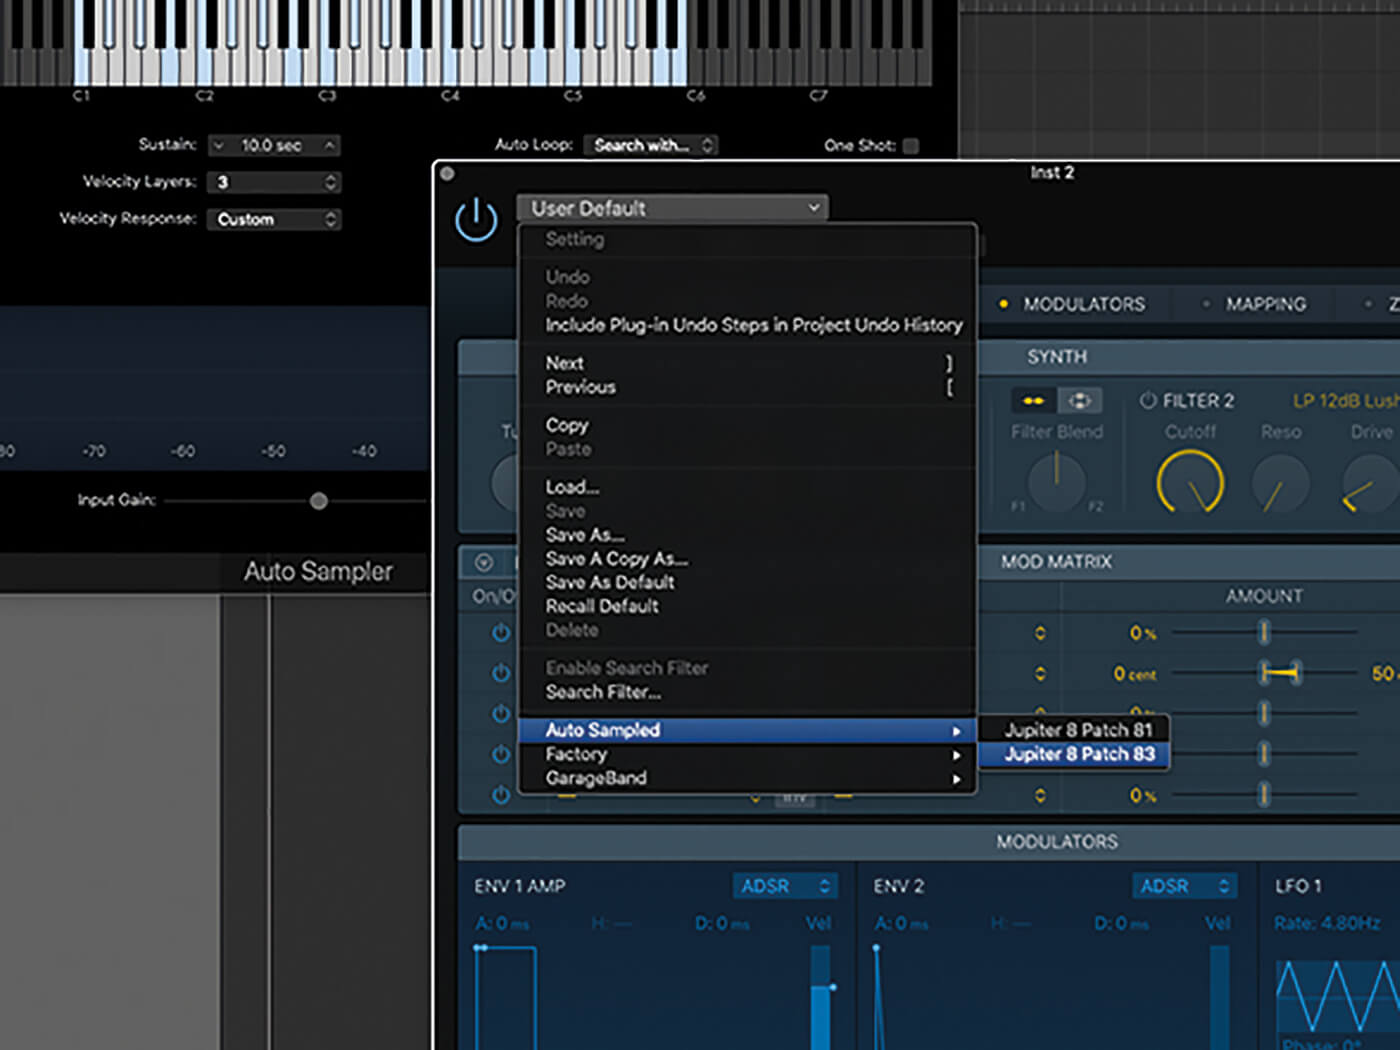
11. To audition your finished instrument, open an instance of Sampler. All instruments captured by Auto Sampler should appear in a folder called Auto Sampled. Load the patch you’ve just created in Auto Sampler.
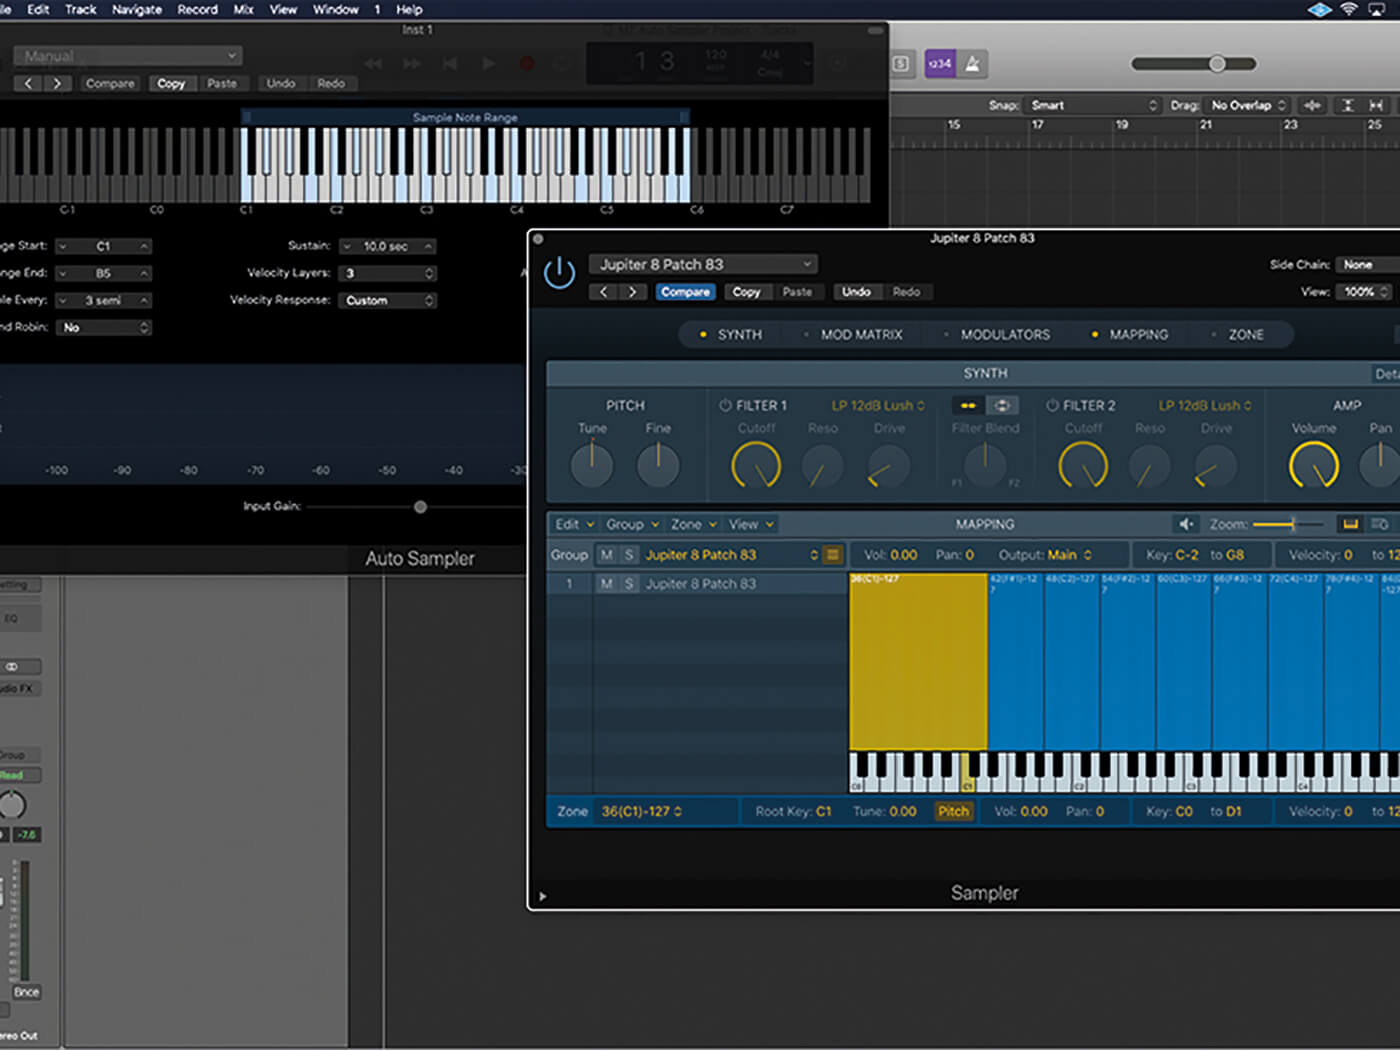
12. You can see the work Auto Sampler has done by clicking the Mapping tab in Sampler. A common tweak involves extending the key range of the lowest and highest samples so that they cover the full keyboard range.
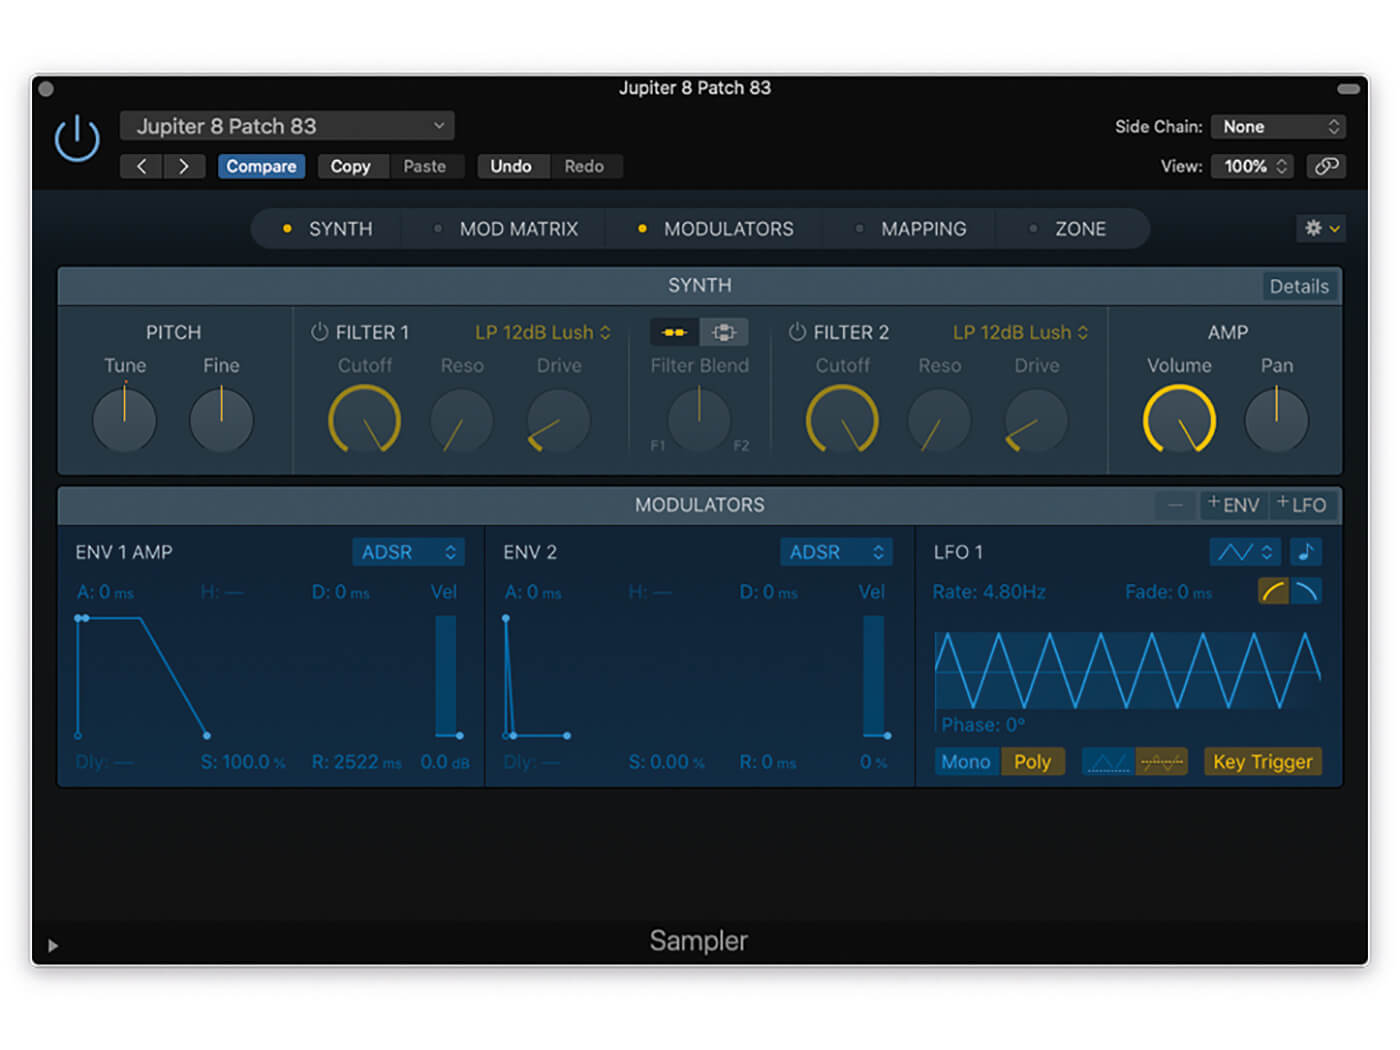
13. Other areas worth tweaking include the Amp Envelope and the response to velocity, found on the Modulators tab. Adjust the ENV 1 AMP’s release and Vel settings to best match those in the source.
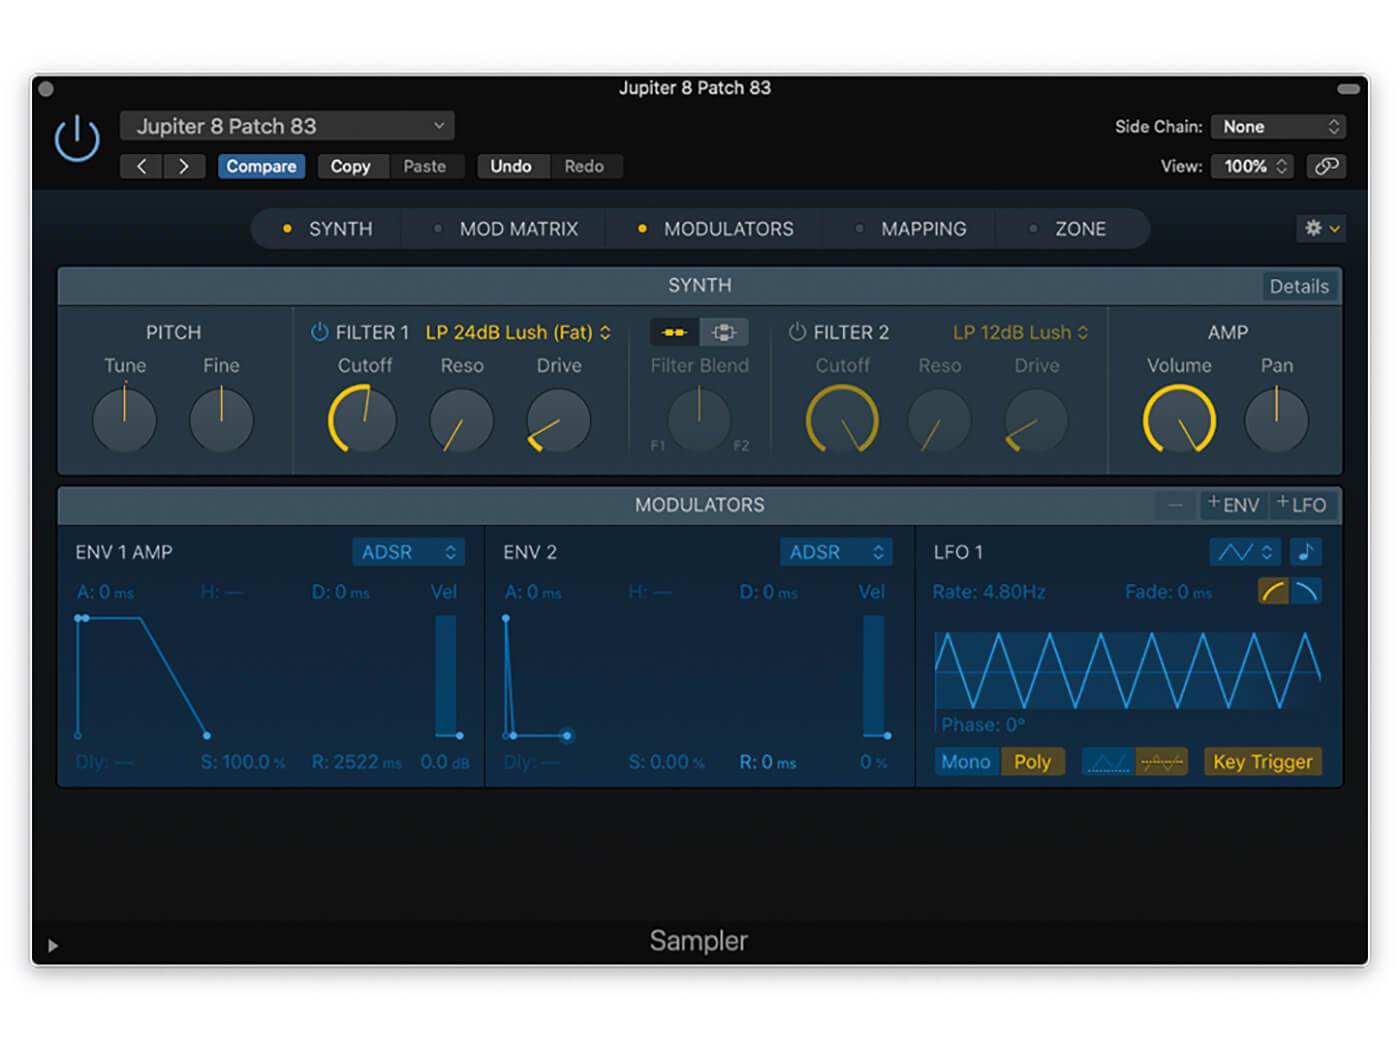
14. If you want to get more creative, consider using the Sampler’s Filtering options and part of the Synth tab. Select the LP 24dB Lush (Fat) mode and activate the filter, lowering the cutoff to create a darker sound.
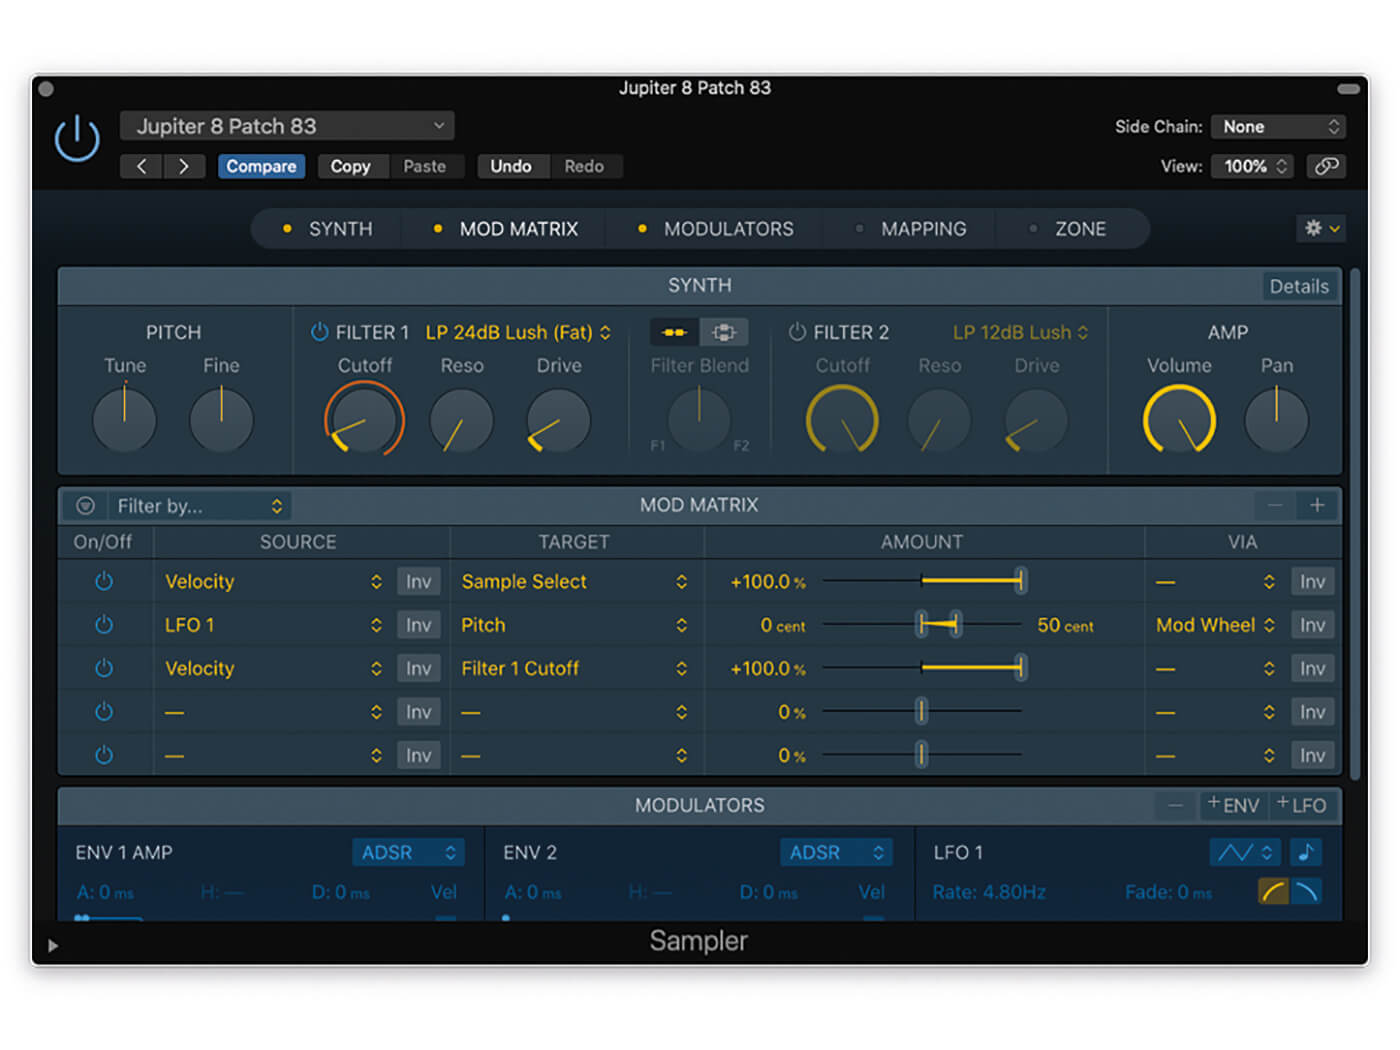
15. The Filter is more interesting if it responds dynamically to your playing. Open up the mod matrix and create a routing from Velocity to Filter 1 cutoff. Set the amount to 100 per cent.
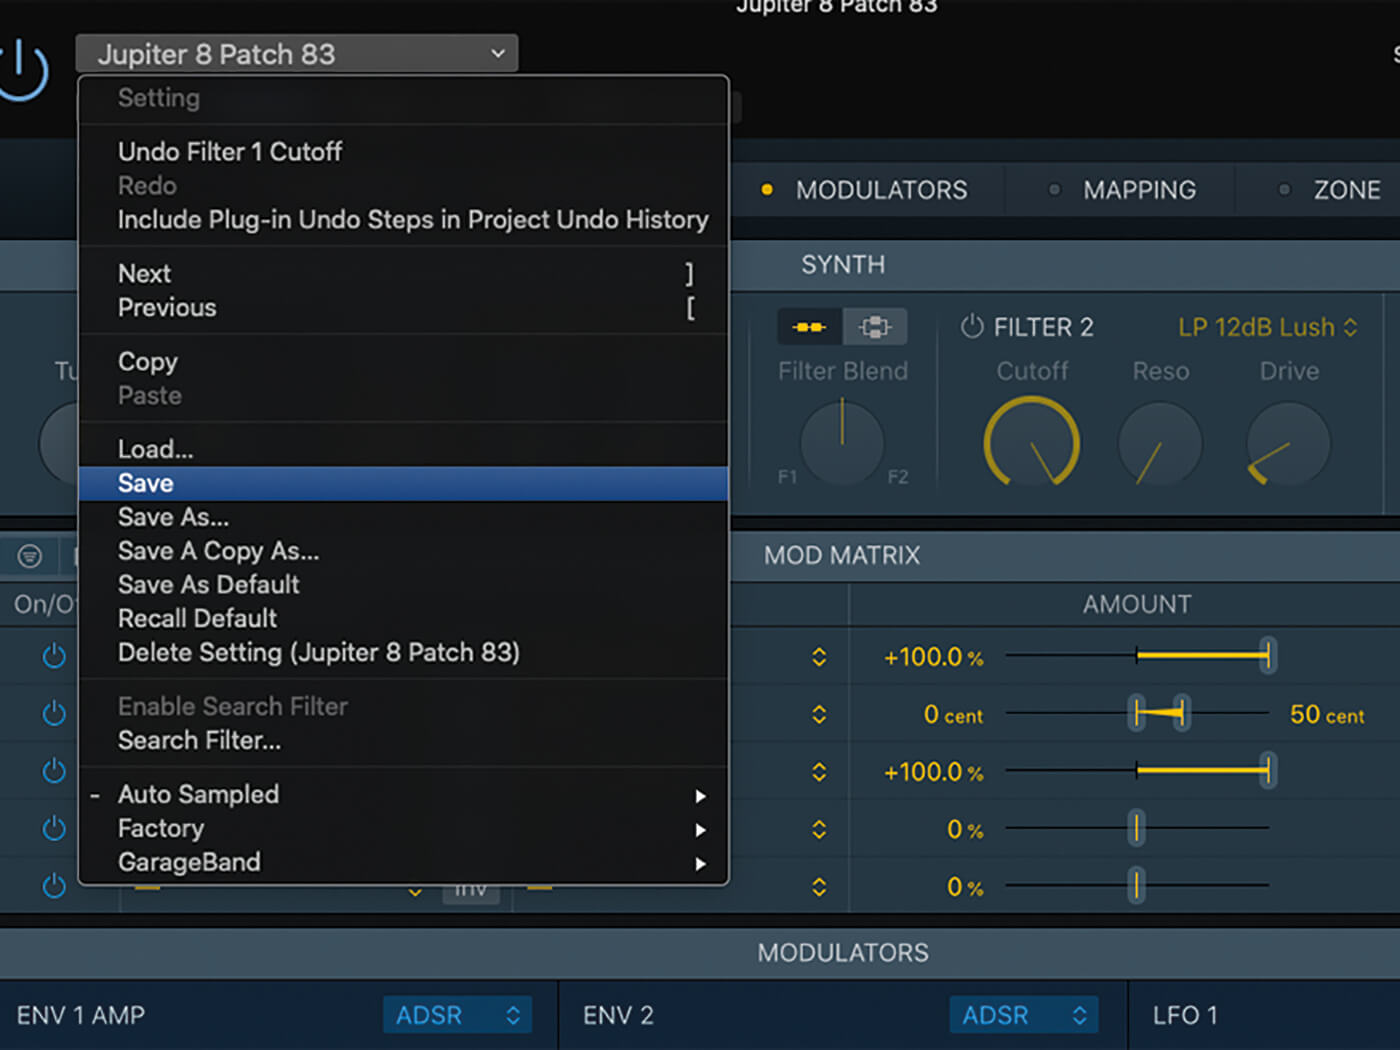
16. When you’ve finished making edits, use the save command from the Instrument Settings menu to store your changes, otherwise the instrument will be left as Auto Sampler created it.
17. If you’re interested in more creative sampling, experiment with effects plug-ins ahead of your instance of Auto Sampler. In this example, reverb (from ChromaVerb) will be printed with each sample.
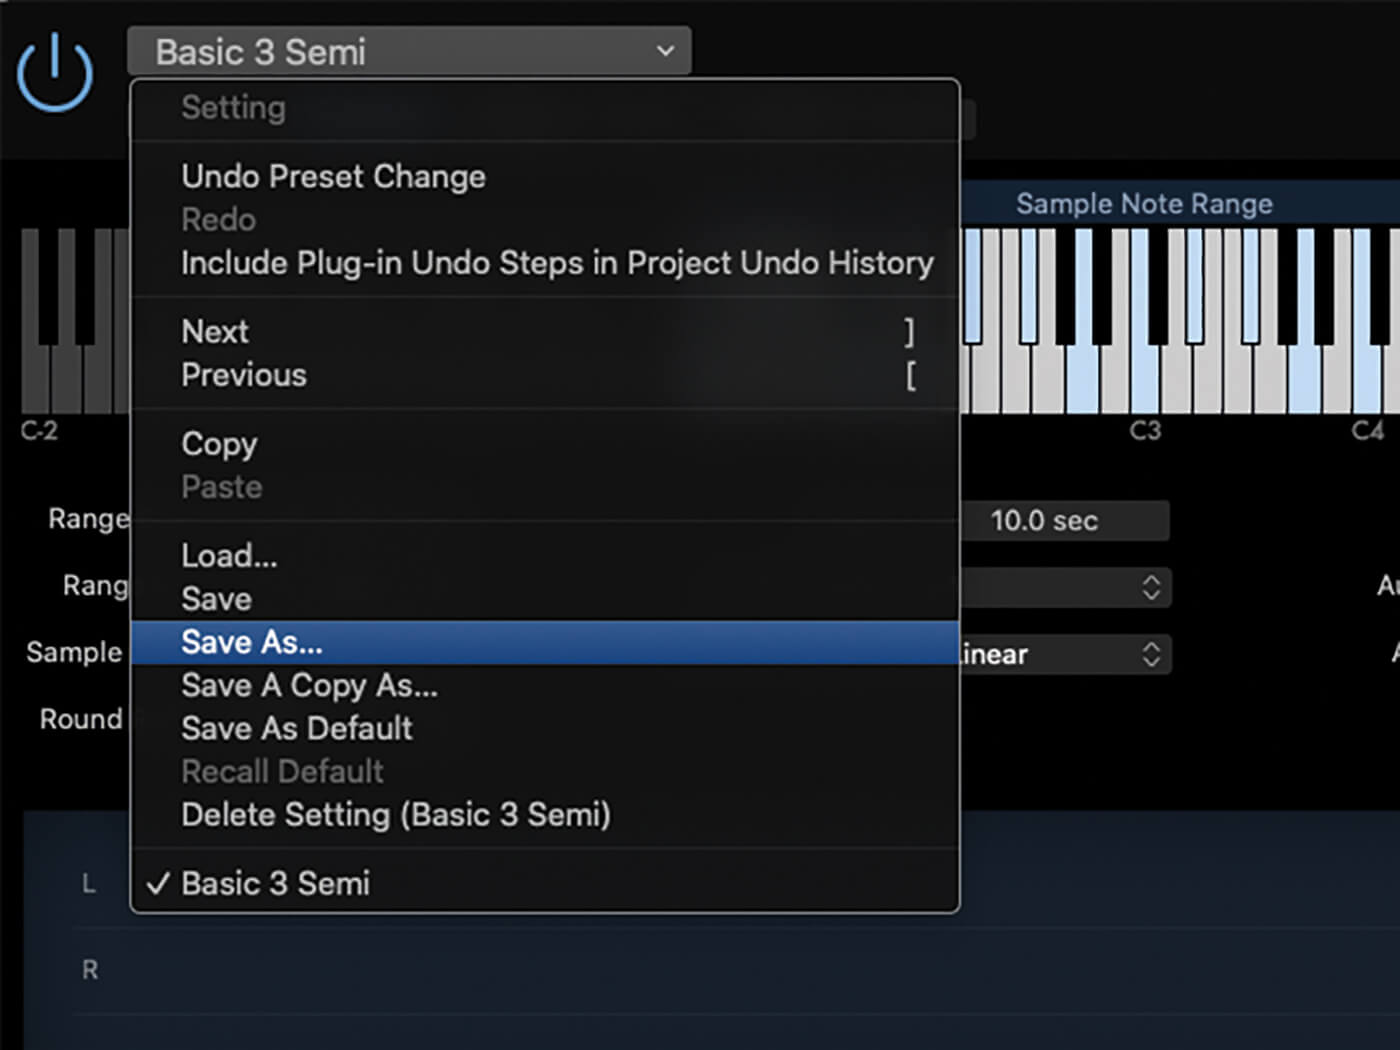
18. To save time with Auto Sampler, consider saving a collection presets based on varying levels of detail – maybe a high-quality preset with samples every three semitones, as well as a low-quality setting.
For more Logic tutorials and workshops, check here.