Programming drums with Logic’s new step sequencer
Apple has stepped up its beat-making abilities with Logic Pro X 10.5, with the new Step Sequencer making it much easier to build barnstorming grooves.
It’s fair to say that drum programming in Logic Pro X was never the most elegant or versatile aspect of the application – until 10.5, that is. With the inclusion of its new Step Sequencer, Logic has really stepped up and got into the groove.
Bread-and-butter note entry is now much easier, thanks to a more drum-machine-like interface. But the update also provides a range of additional features that make the entire process more creative. From multi-directional track lanes to increased plug-in control, the Step Sequencer can transform the way you work with drums in Logic Pro X.
Step to the beat
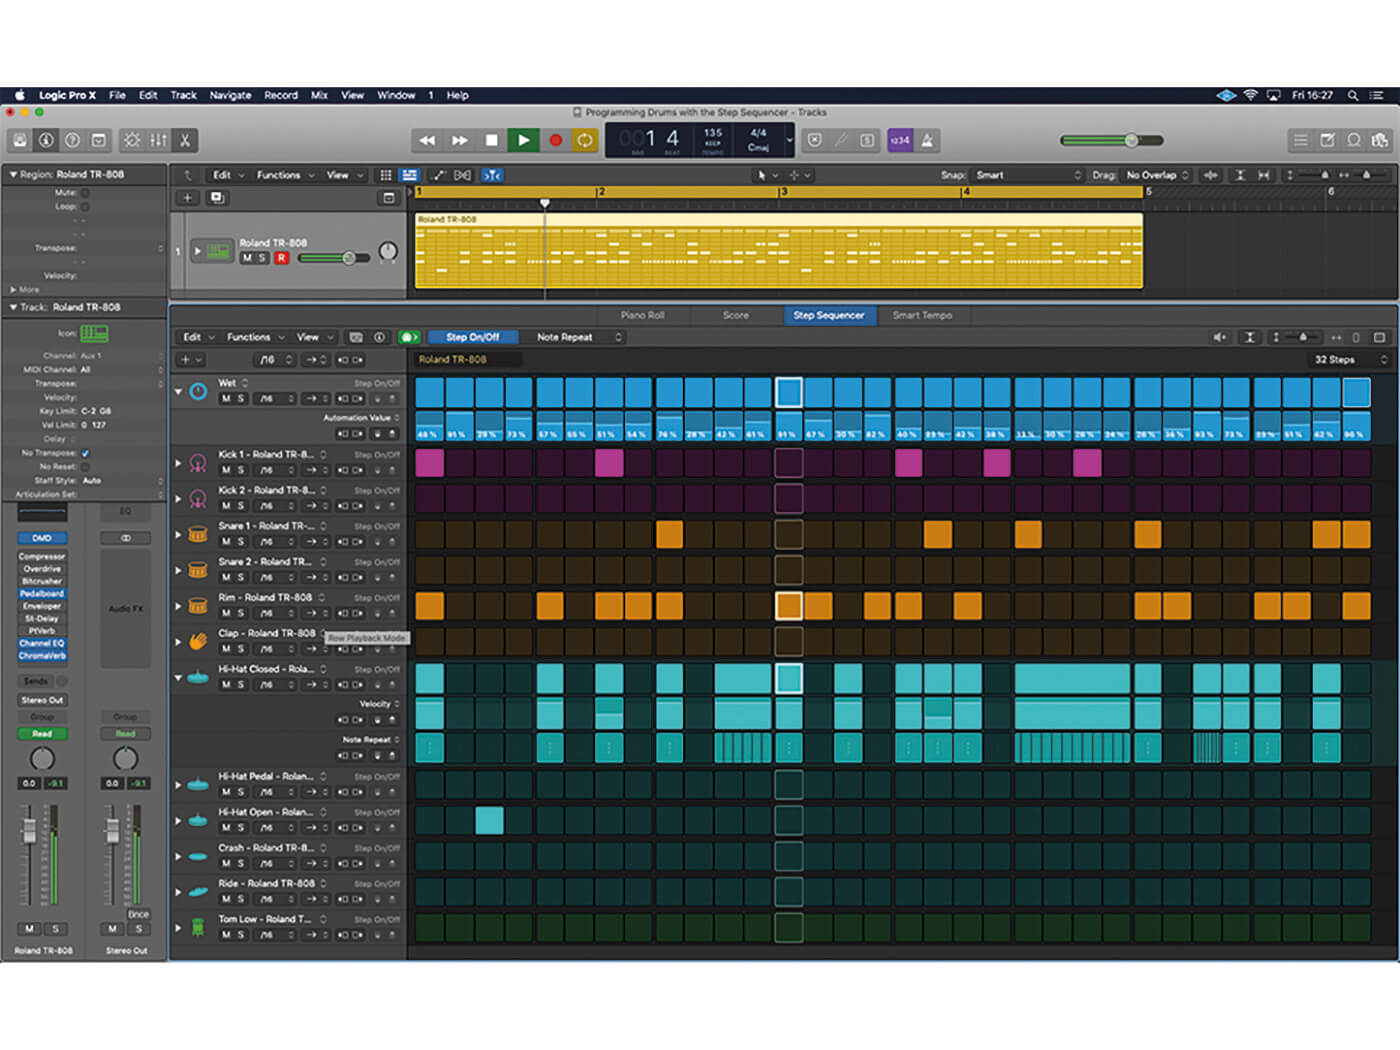
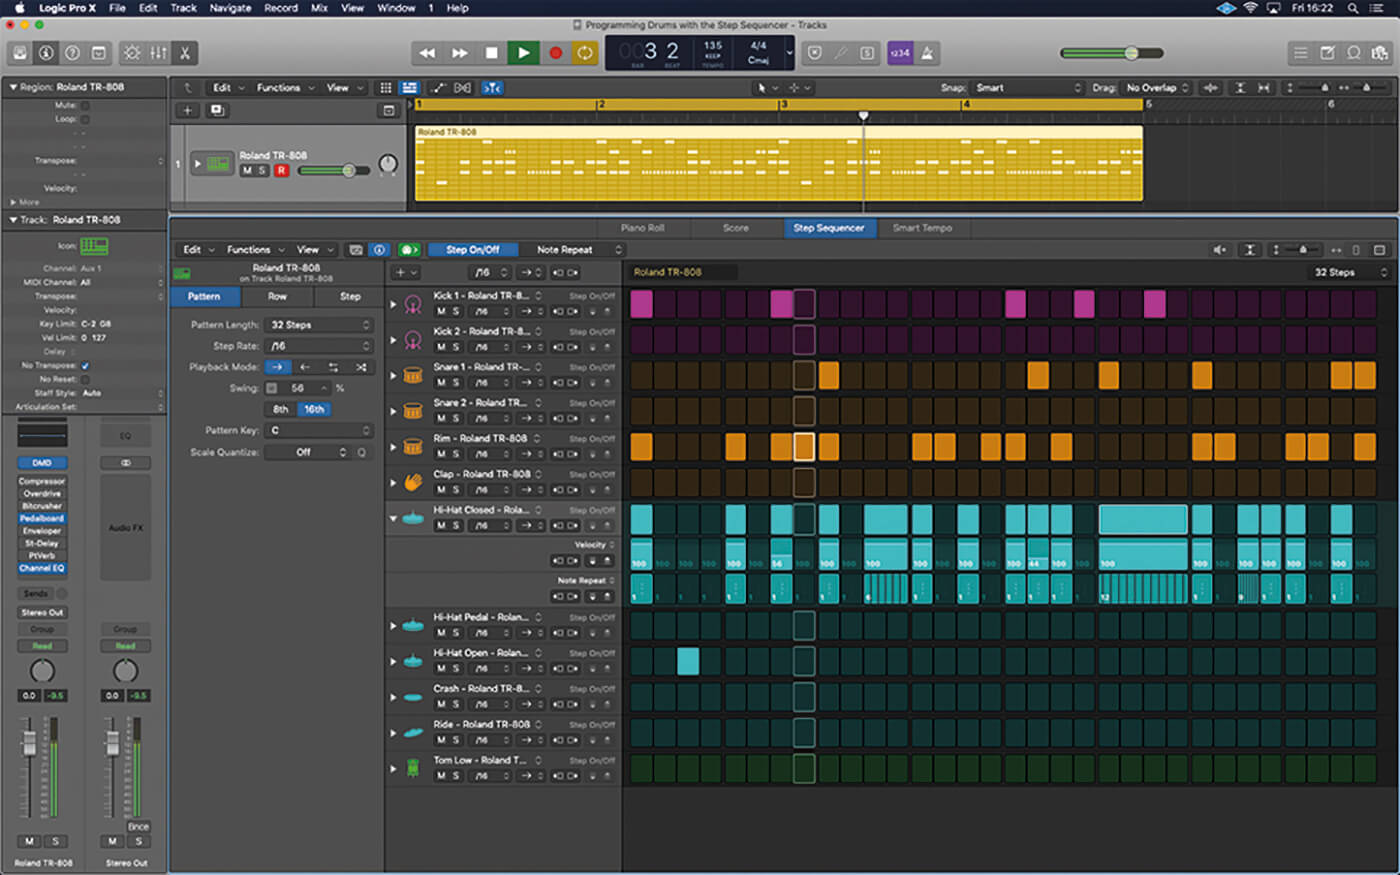
Though not exclusively designed for drums, there’s no doubt that the Step Sequencer pairs perfectly with drum-based virtual instruments, especially those included with Logic Pro X. The Step Sequencer displays its musical information in grid form, with a unique Row (much like a track lane) for each part of the drum kit. With this display, it’s easy to quickly identify what part of the kit you’re working – especially when compared to the piano roll editor – and, more importantly, you can program complex rhythm patterns across multiple drum voices.
For the Step Sequencer to work, it needs its own unique type of region, called a Pattern Region. These contain both the musical information and the mapping data that ties them to a given patch setting. Creating a new Pattern Region with an instrument from Logic’s library, therefore, creates a customised mapping grid that tallies with the drum kit you’ve loaded. Open the region and you’ll see rows with musical names (Kick, Snare, Hi-Hat, etc) rather than the cryptic note numbers common to the piano roll editor.
Knitting pattern
One of the first points to consider with your Pattern Region is the desired number of steps you require. By default, the Pattern Region will be four bars in length but have only 16 steps, meaning that the step sequence will repeat four times. If you want to program a two-bar drum loop, set the step sequence to 32 steps rather than changing Pattern Region’s length. Once you’ve set the number of steps, it’s simply a matter of inputting the note triggers into the step grid.
As well as being able to switch steps on or off accordingly, there’s also a number of additional parameters that can edited by switching the edit mode. The most logical place to start is the velocity/value edit mode, which lets you vary the MIDI velocity of each step, adding a level of dynamic variation and interest into the part. The use of velocity is, of course, important to the feel of the drum loop. A 16th-note hi-hat, for example, might have accents on the eighth notes, and a snare might make use of offbeat ghost notes with a lower velocity setting to the main backbeat.
Trap door
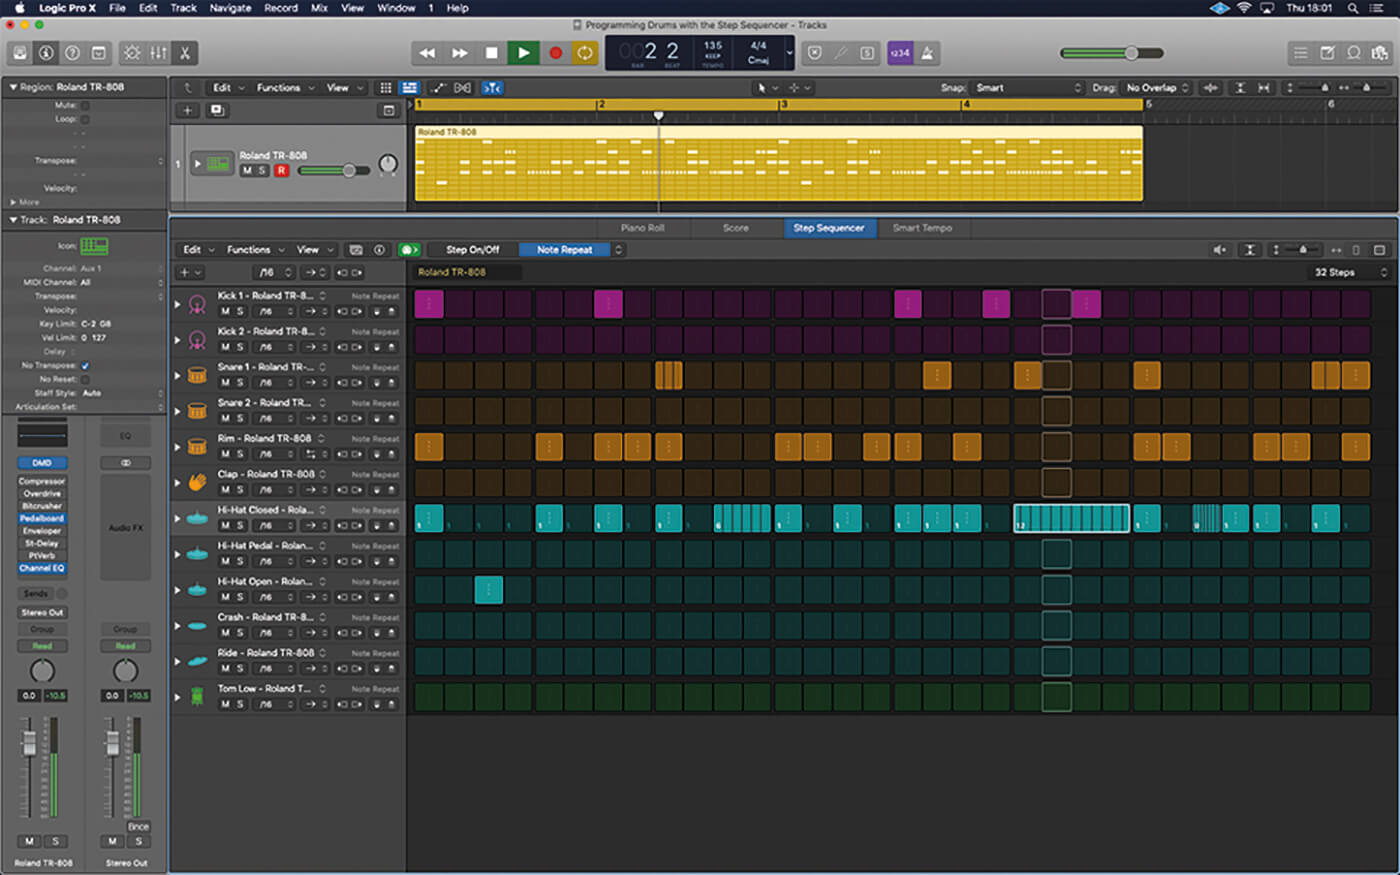
Editing velocity, though, is only the start of what can be unlocked via the edit modes, with notable additional features such as note repeat, tie and chance being particularly useful for drum programming. The note-repeat function, for example, is fantastic for trap hi-hats and glitch-type effects, letting you repeat the note a number of times within a beat. Use the slower settings for trap hi-hats and the higher note repeats (with up to 16 retriggers in a single step) for glitch-type effects. Tie is useful if you want to extend the duration of the repeat, so that it lasts for longer than a 16th step.
The Row concept in the Step Sequencer offers some interesting creative possibilities too, some of which go above and beyond what you might expect. One of the most intriguing options is the ability to change the direction on a row-by-row basis, which is superb for pseudo-random rhythmic events, created using the random or ping-pong playback options, which sees the row play forwards and backwards in succession. As well as controlling drum voices, the rows can also be assigned to automated parameters, so that you could, for example, have a different filter cutoff setting for each step or add effects such as reverb and delay on a step-by-step basis.
In situations where you’ve used complicated note repeat, velocity or tie settings, you can expand each row much like you would a track lane, to see different automation lanes. In this case, rather than seeing a single row, you’ll see concurrent rows, with each showing a different facet of that drum part.
Having been forced to program drums in Apple’s DAW the hard way, there’s no doubt that the Step Sequencer has radically altered rhythmic programming in Logic Pro X. Not only is it easier to visualise the musical building blocks of the pattern but, thanks to Logic Pro X’s deep integration and feature set, you can quickly program drum loops with a level of sonic interest that would once take hours and hours to achieve.
Programming drums with Logic’s new step sequencer: step-by-step
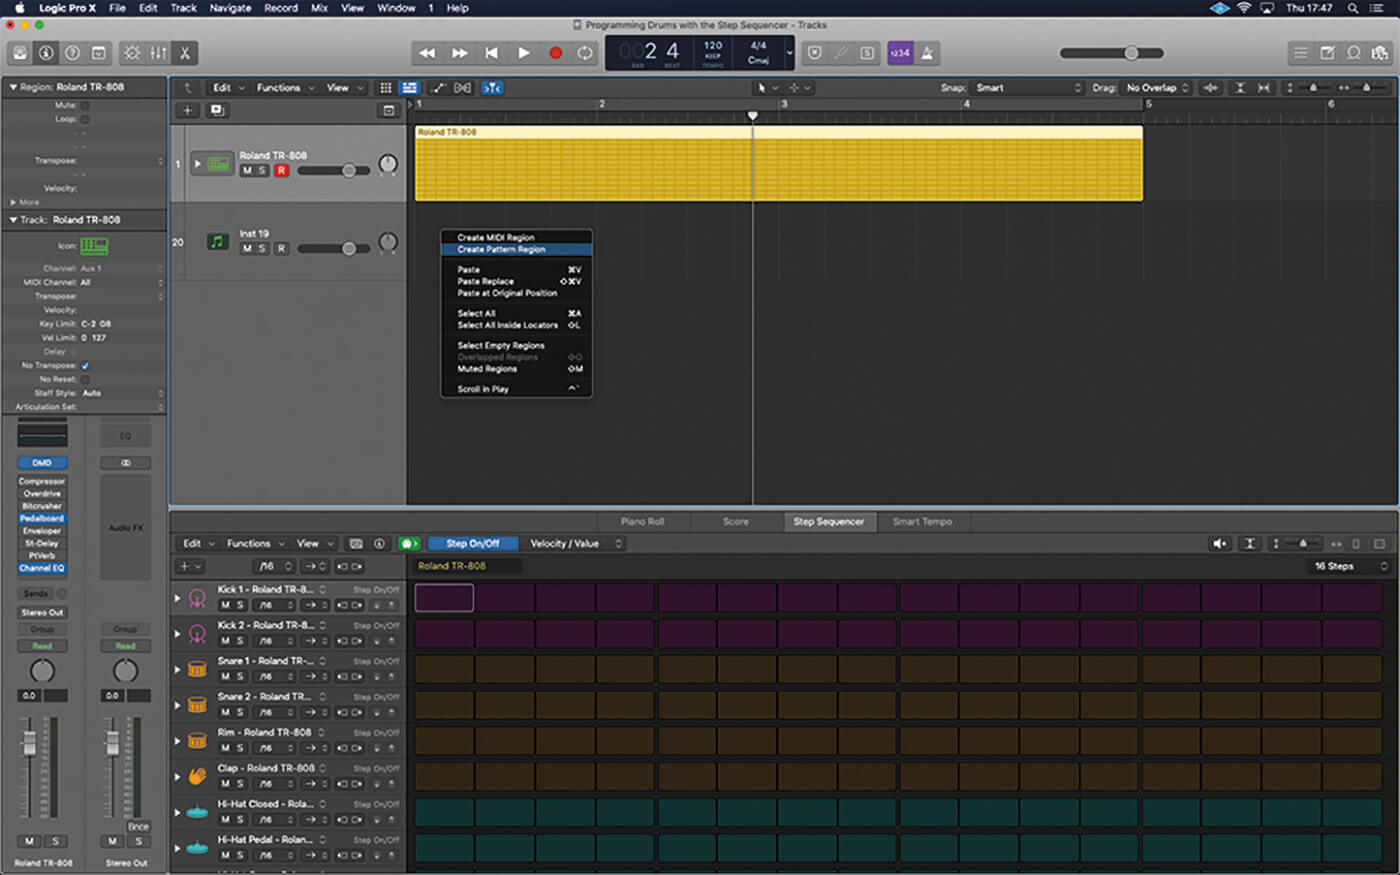
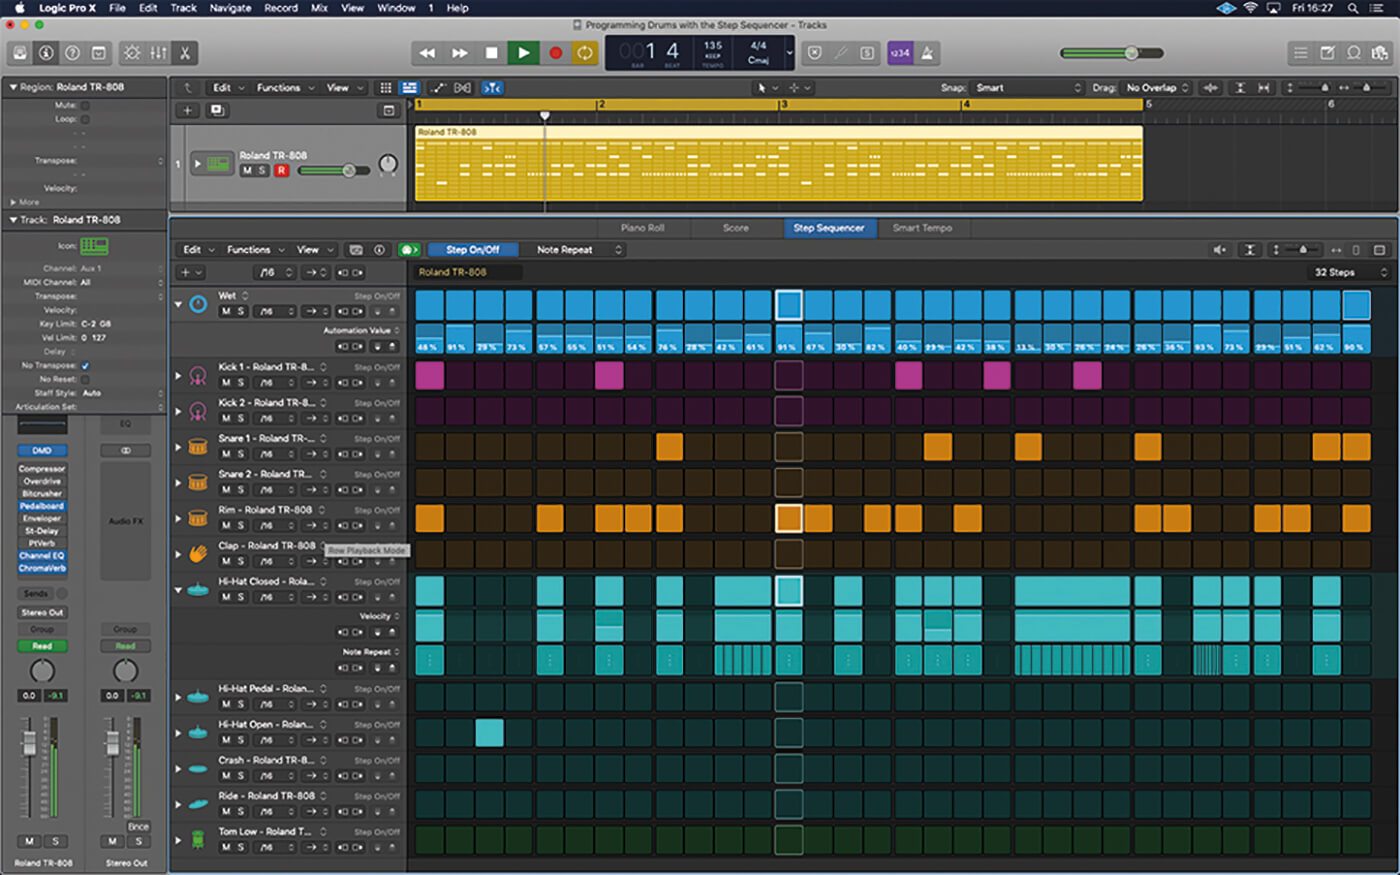
1. The Logic project has a pre-loaded instrument from Logic’s library. Ctrl-click in the Tracks area to create a new Pattern Region. When you open the region, note how all the drum sounds have been pre-mapped to the kit.
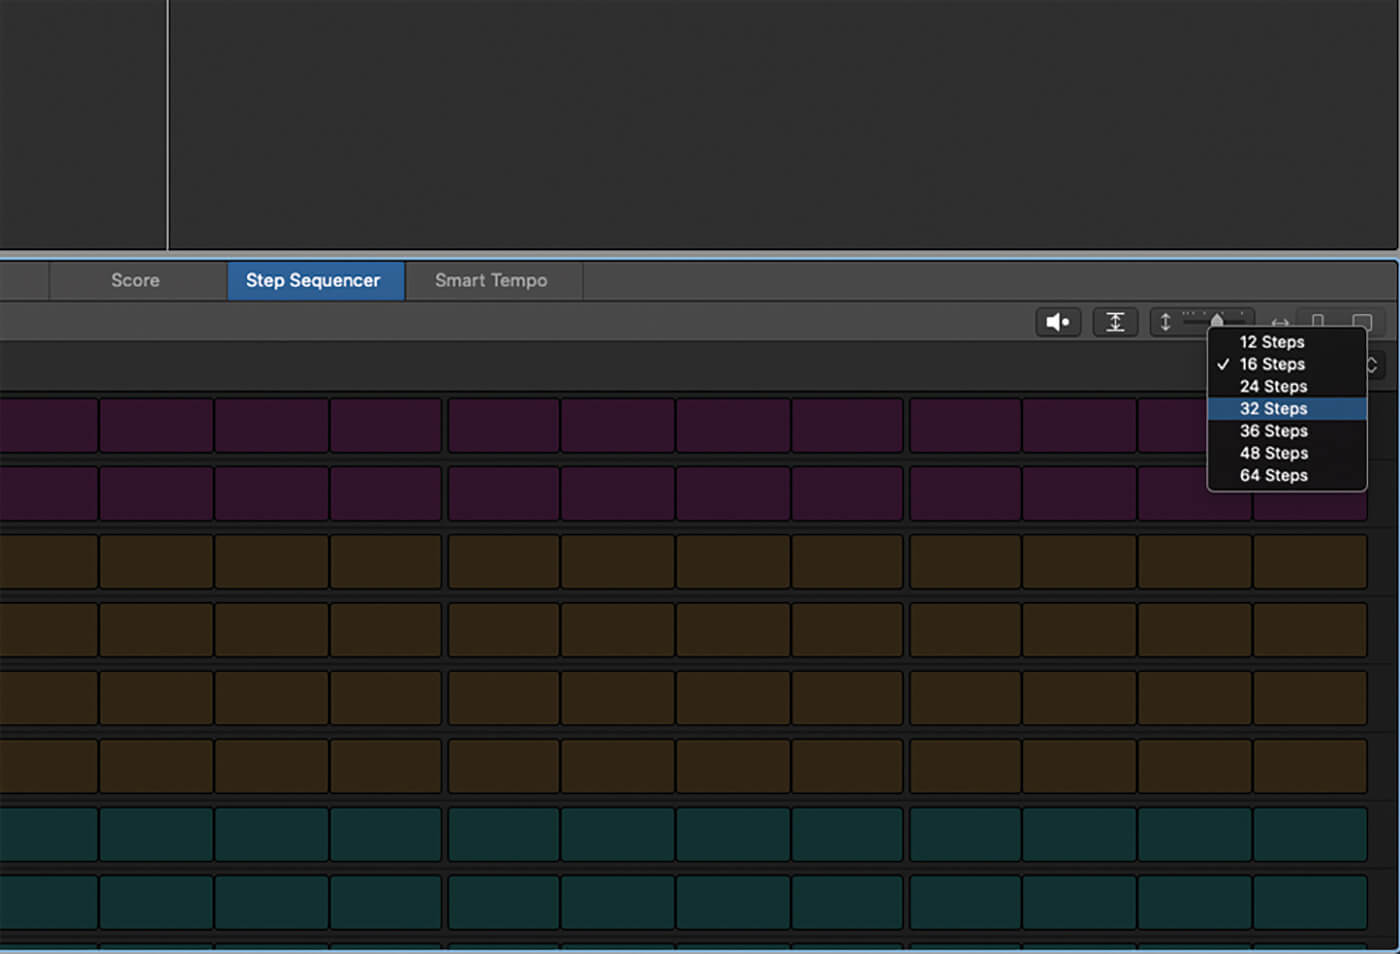
2. Set the step length to define the duration of the pattern. Selecting 32 steps will create a two-bar loop, which will repeat for a duration defined by the length of the Pattern Region, which is currently four bars.
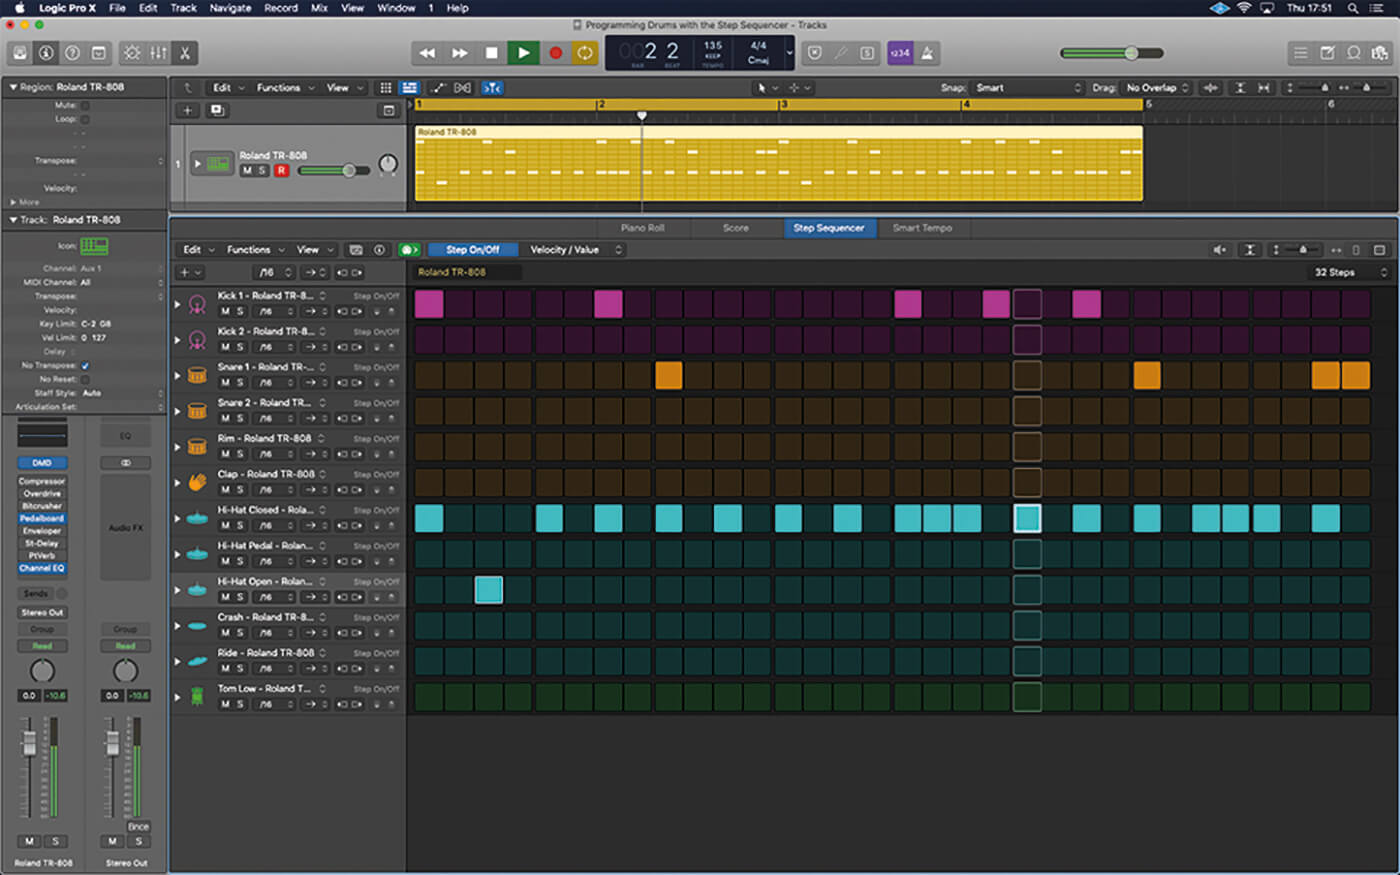
3. Click on the step grid to start programming the drum pattern. You can drag across the grid to populate it with 16th notes. Click on existing notes to remove them from the drum pattern.
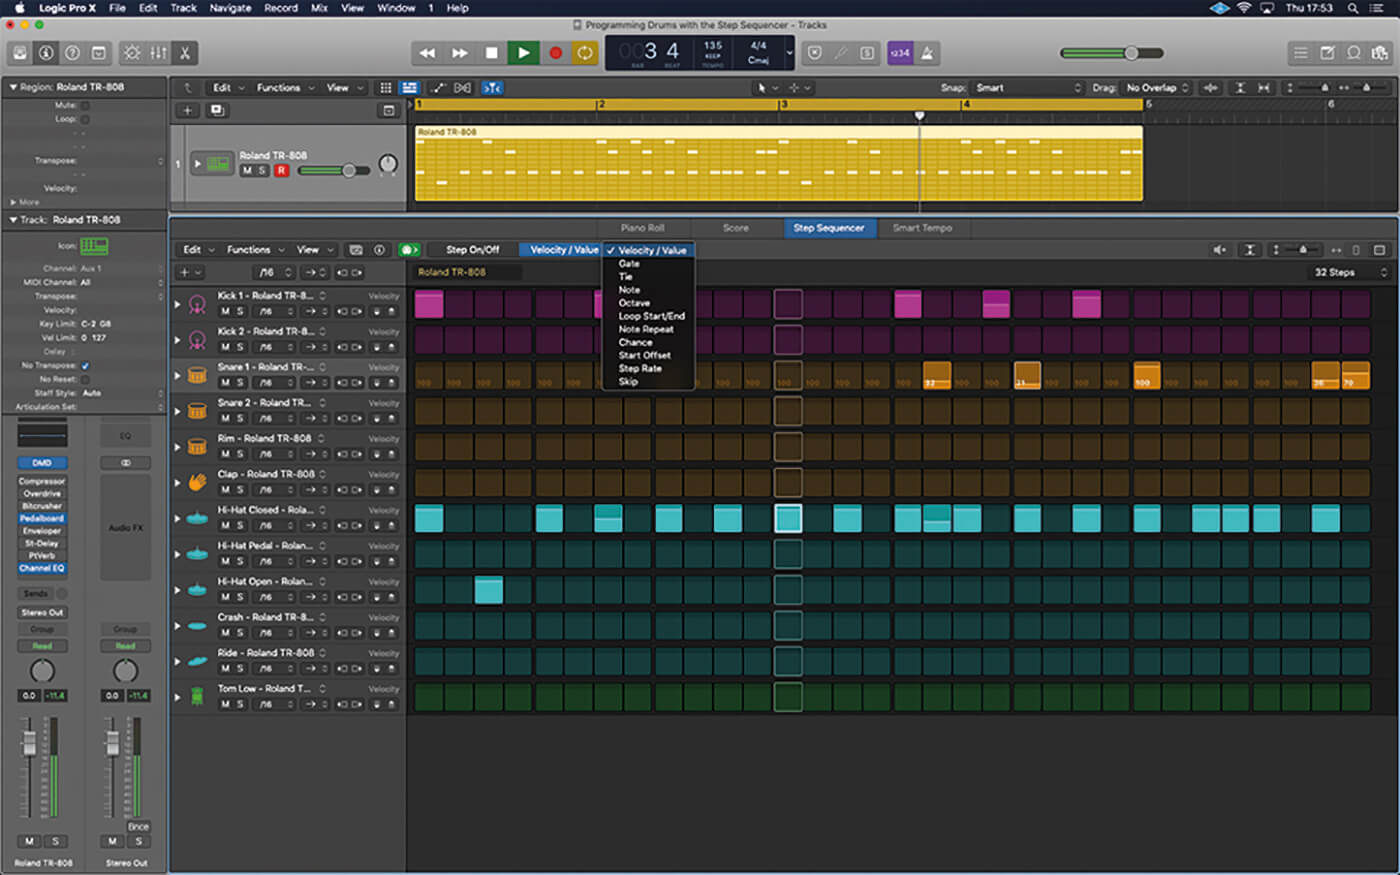
4. Click the velocity/value edit mode found at the top of the grid. The grid now displays the velocity setting for each step, defaulting to 100. Attenuate the hits that aren’t on the main beats of the pattern.
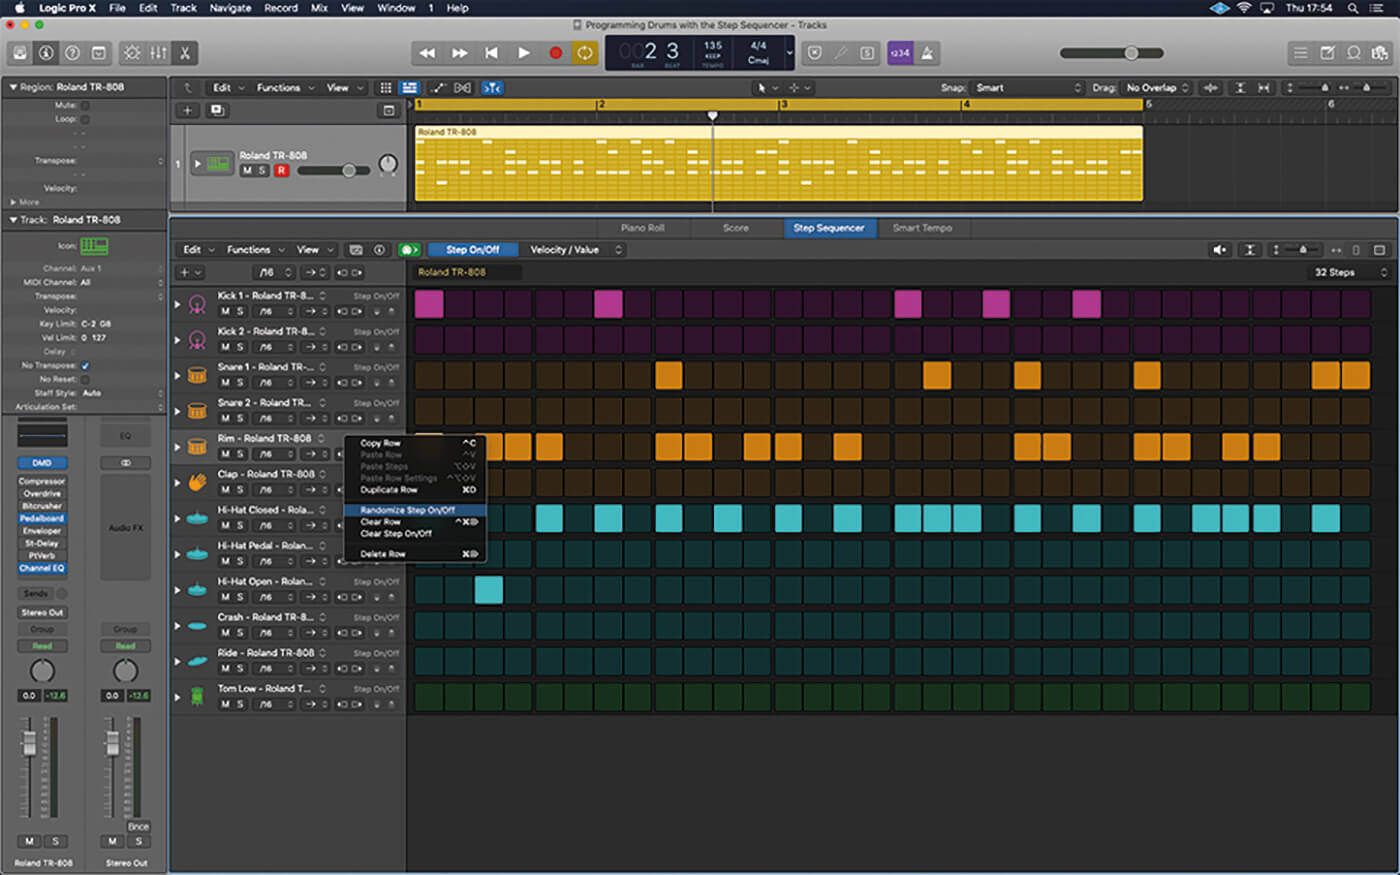
5. Move back to the step on/off edit mode. Ctrl-click on the row header for the Rim Shot instrument and select Randomize Step On/Off. You should now have a completely random pattern for the rim shot.
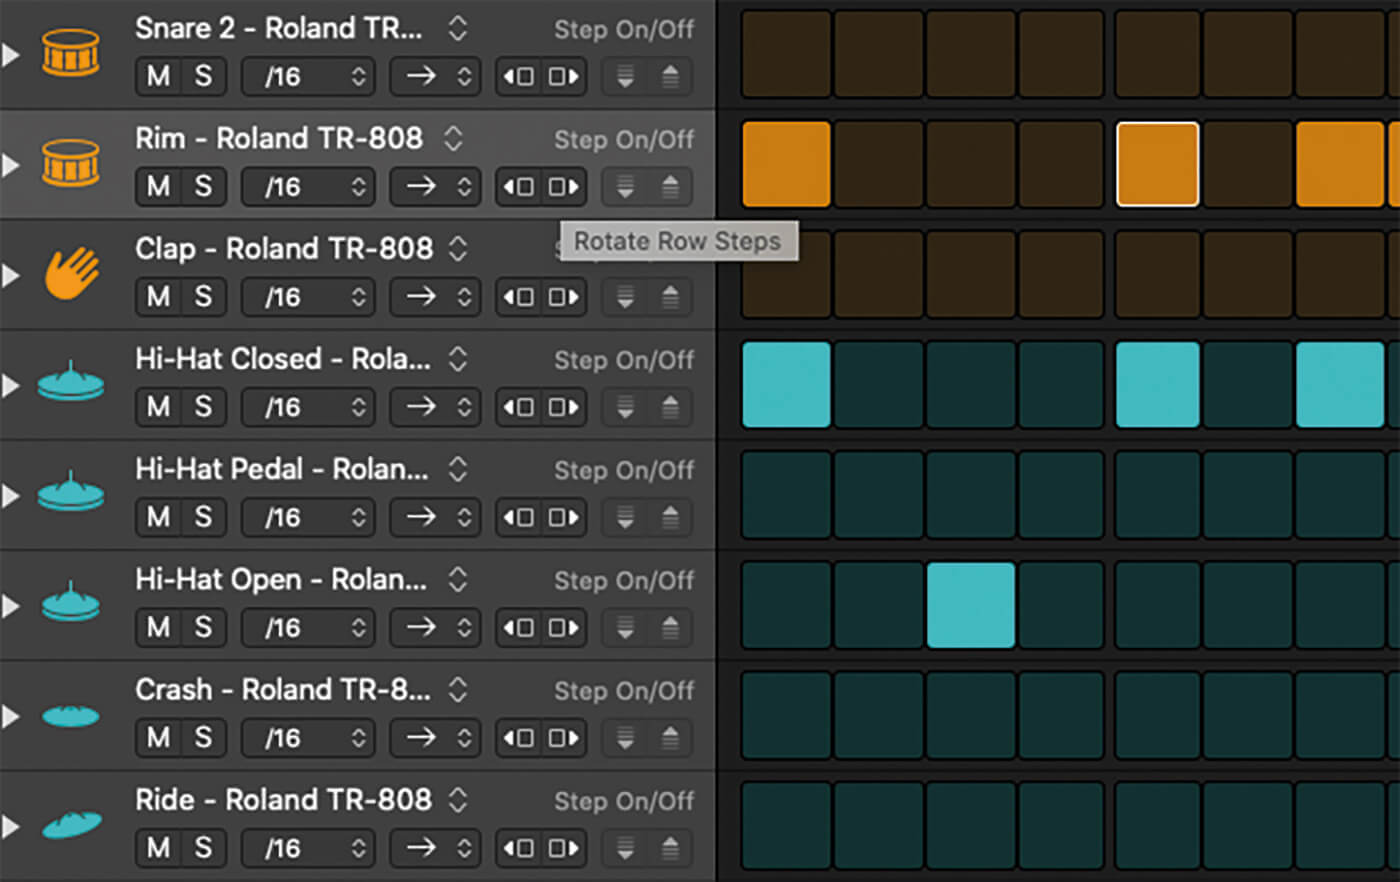
6. Using either of the two Rotate Row Steps buttons you can shuffle the random pattern backwards and forwards in 16th steps. This is an exciting way to explore different effects from the initial row’s pattern.
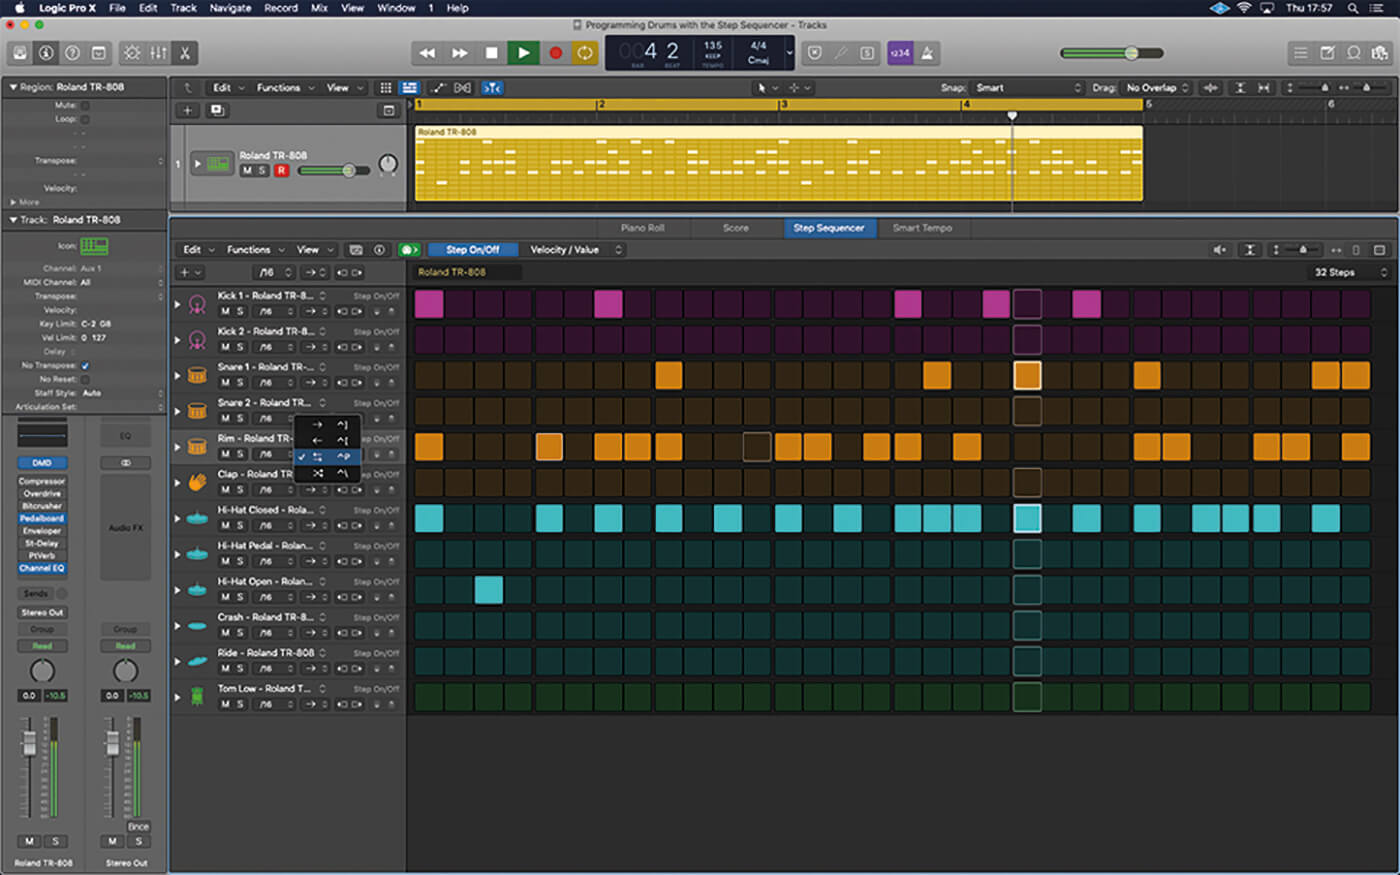
7. One of the most intriguing parameters is the Row Playback mode. Try this on the randomised rim shot pattern, using the two arrows option so that the row alternatives between forwards and backwards playback.
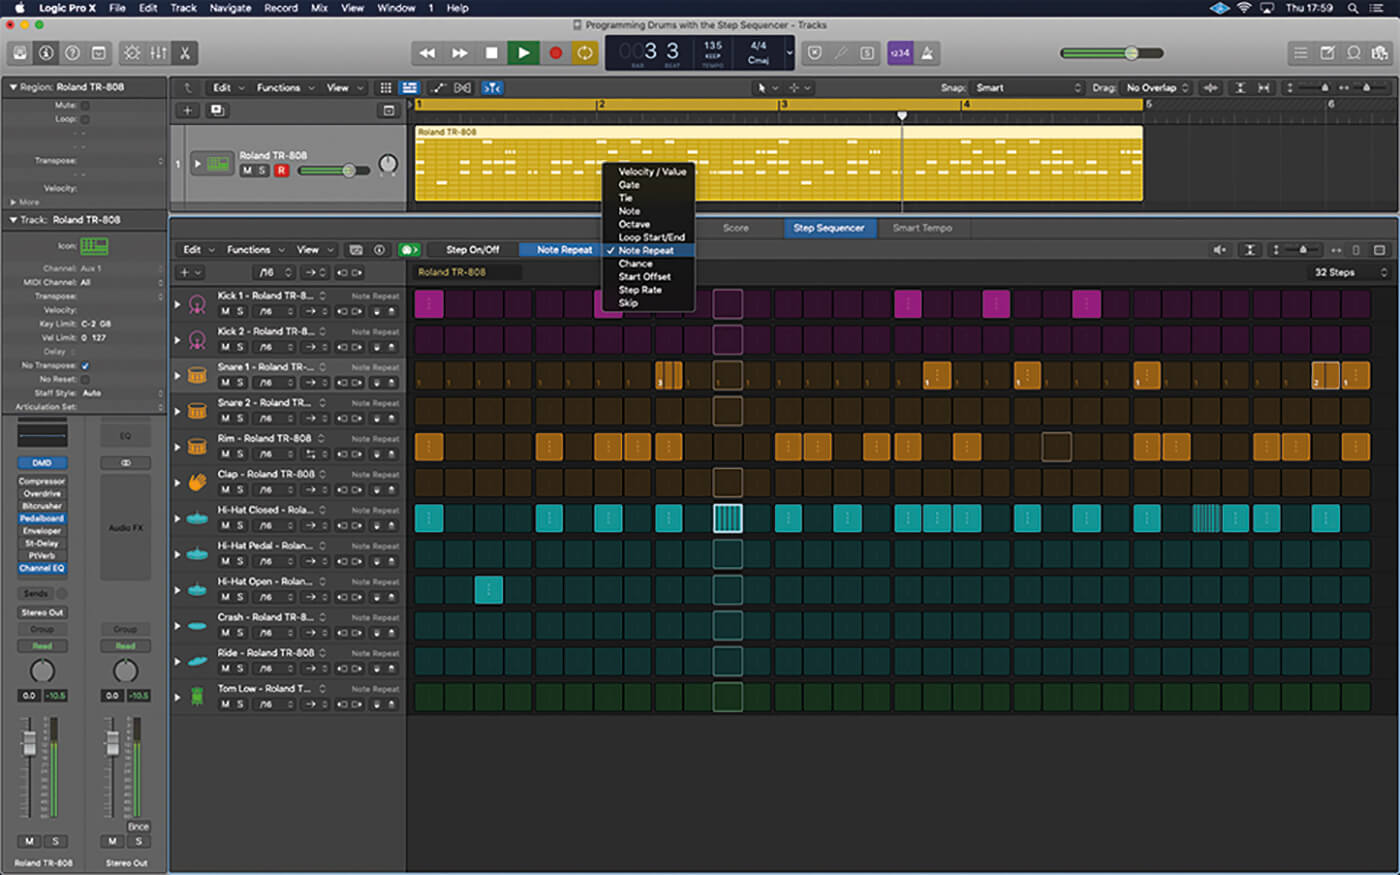
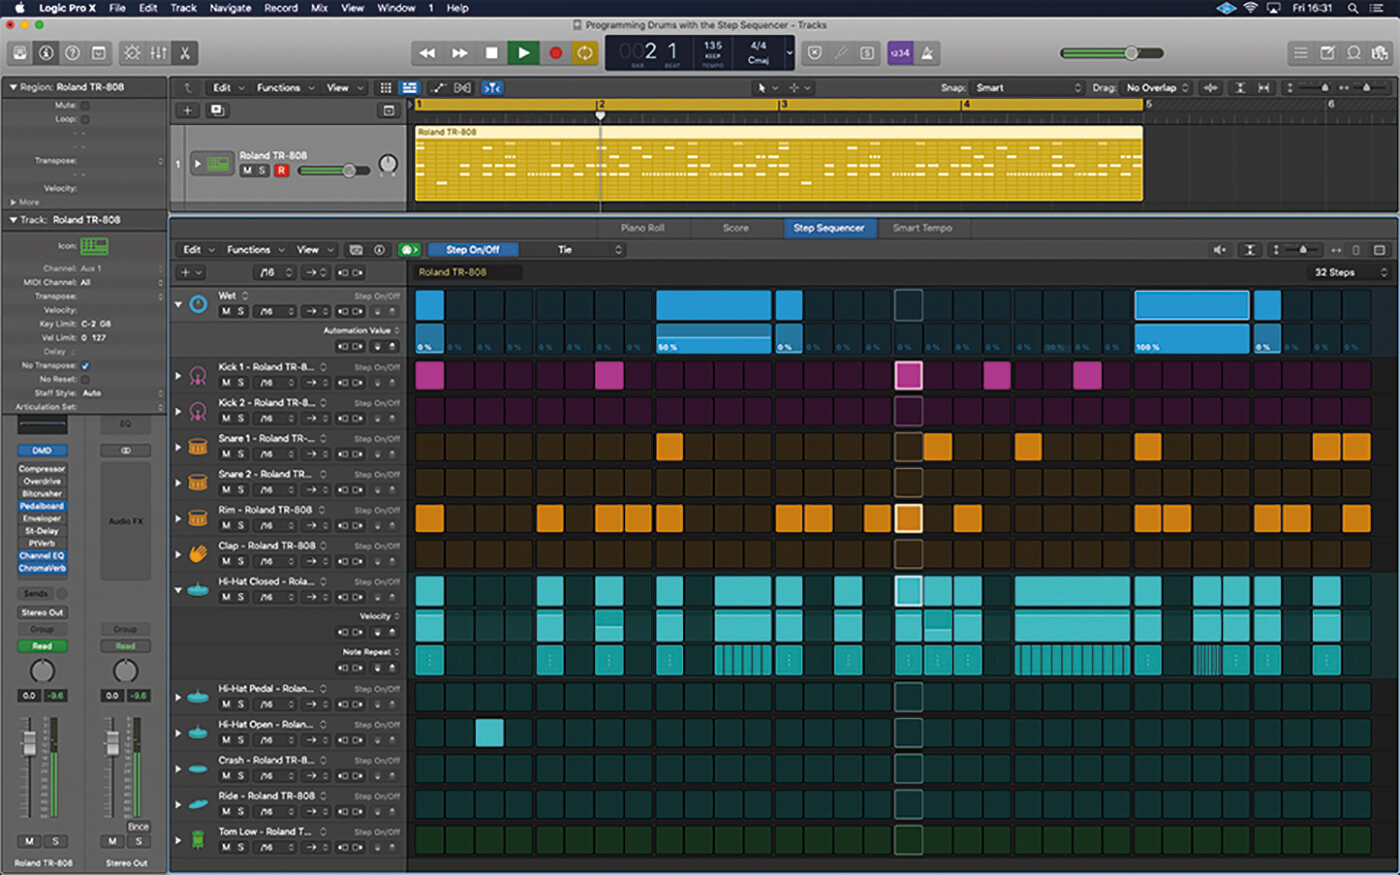
8. Change the second edit mode from velocity/value to note repeat. Increase the setting on selective notes with the snare drum and hi-hat, creating shuffling trap-like hi-hats or glitch effects with higher settings.
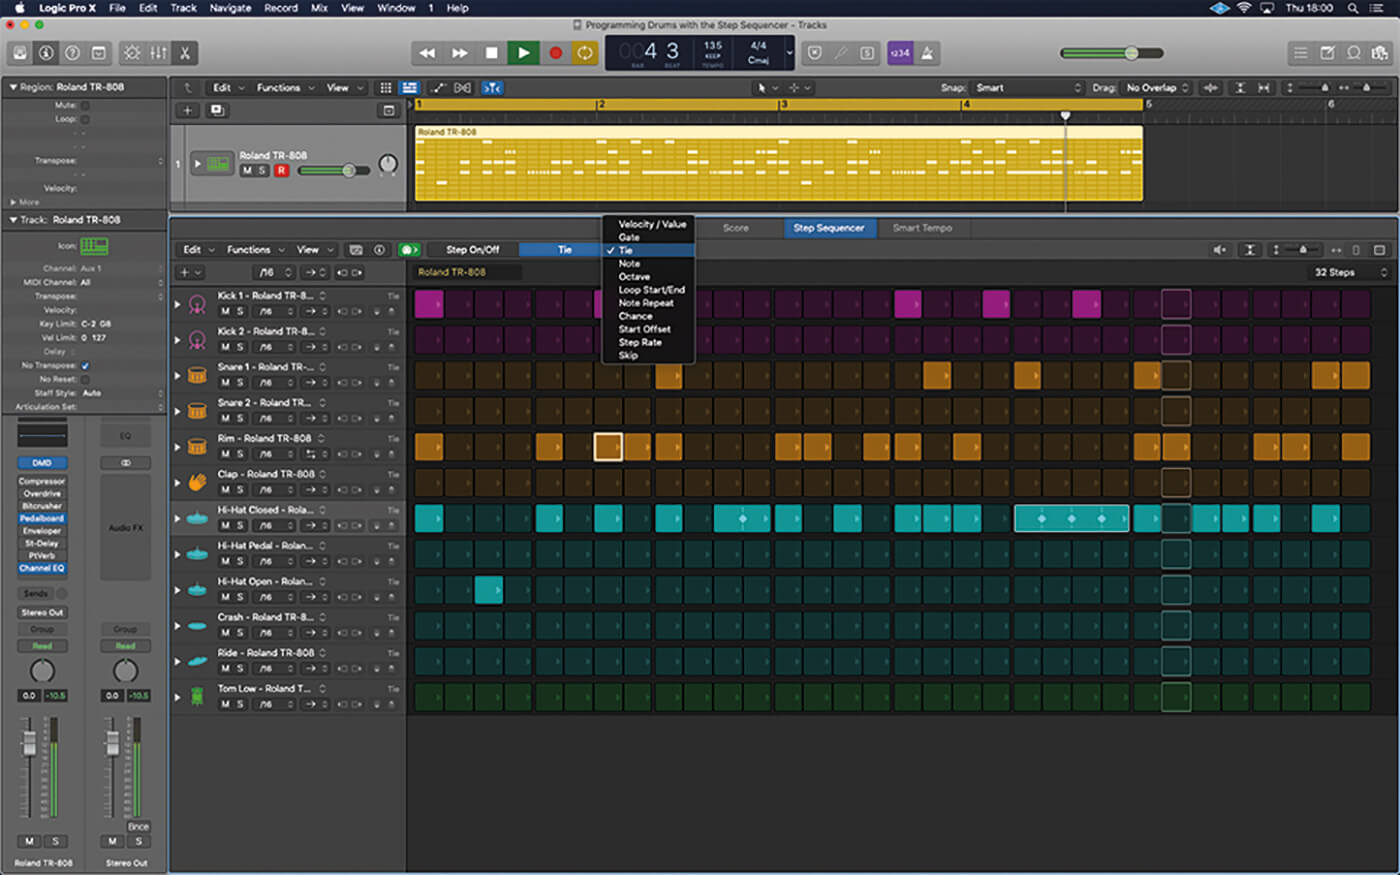
9. Experiment with the tie edit mode for the trap hi-hats. The tie mode increases the step length, so that the note repeat occurs over eighths, for example, or a whole beat, rather than the default 16th division.
![]()
FLEX YOUR MUSCLE The Chance parameter can lend a more human-like feel to rigid and repetitive beats. Add ghost notes to parts such as the snare, kick or hi-hats but turn down their chance to 50 per cent. As the pattern loops, these ghost notes will be added to some bars but not others, creating a pattern that’s slightly different from bar to bar.
10. Connecting two steps together with the tie feature halves the note repeat value. Having tied some steps, therefore, you might need to reappraise your note repeat values, and increase them accordingly.
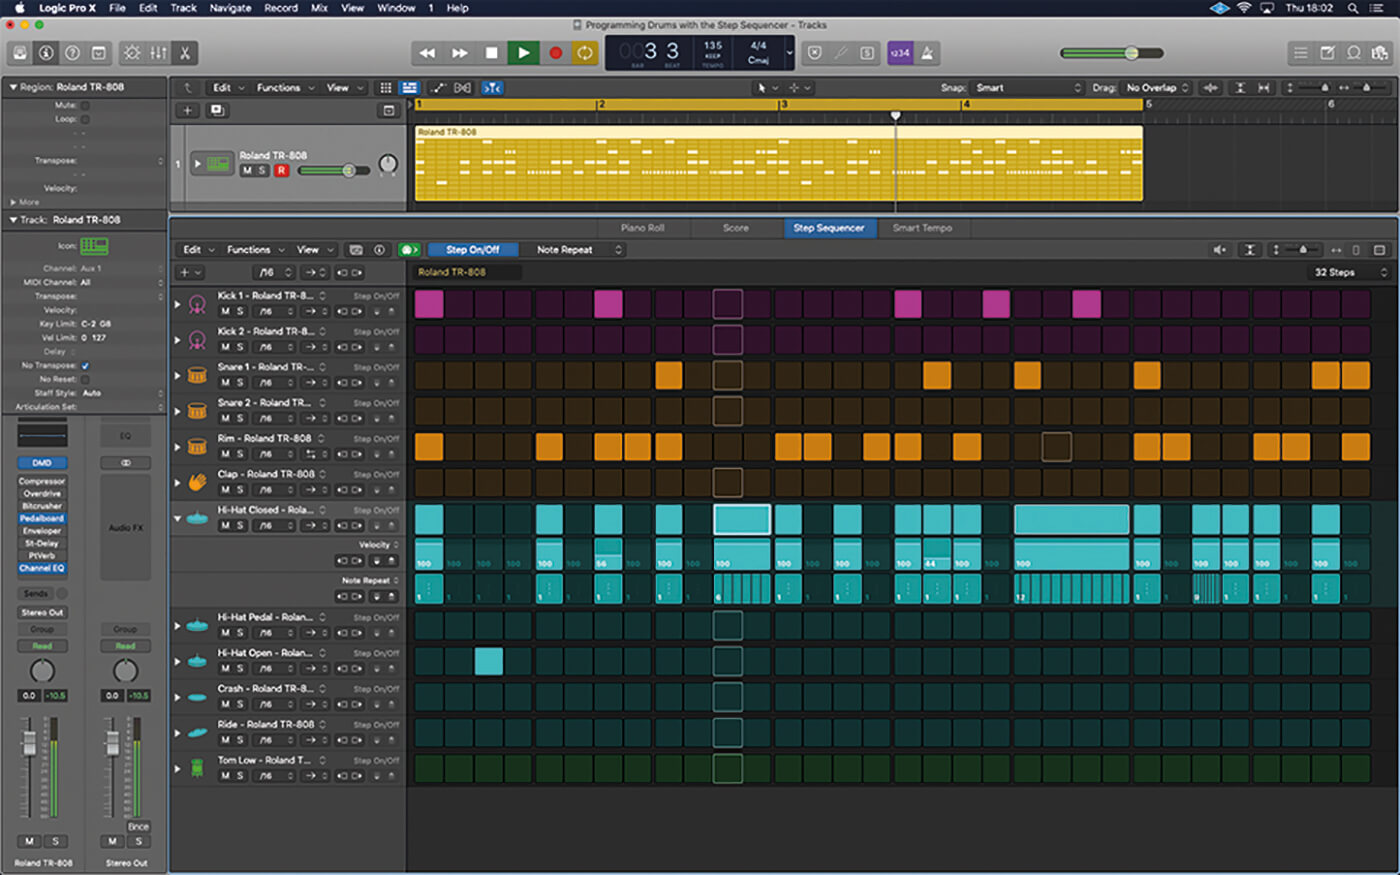
11. As your programming becomes more involved, consider clicking on the small arrow to expand the row. The expanded row shows all the information – step, velocity, note repeat – for the selected part of the kit.
12. The Step Sequencer has its own inspector, which includes settings for the pattern, rows and steps. Some of these parameters are duplicates from elsewhere but the pattern settings include a useful swing option.
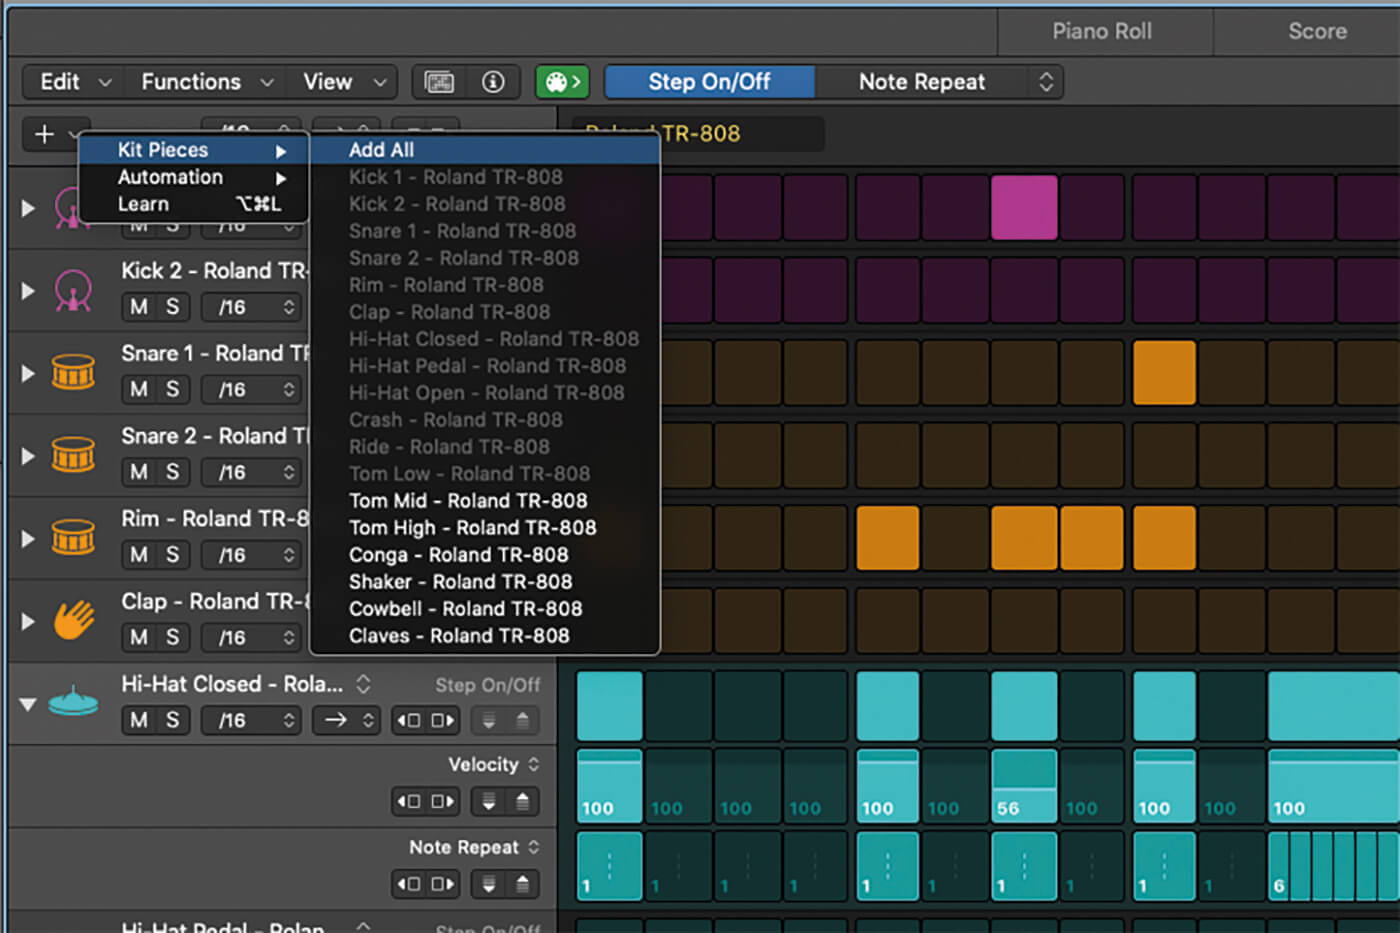
13. Click on the + in the upper left-hand corner and select Kit Pieces > Add All from the menu. You should now have access to the full kit. Click on an empty row and hit the delete key to remove a kit piece.
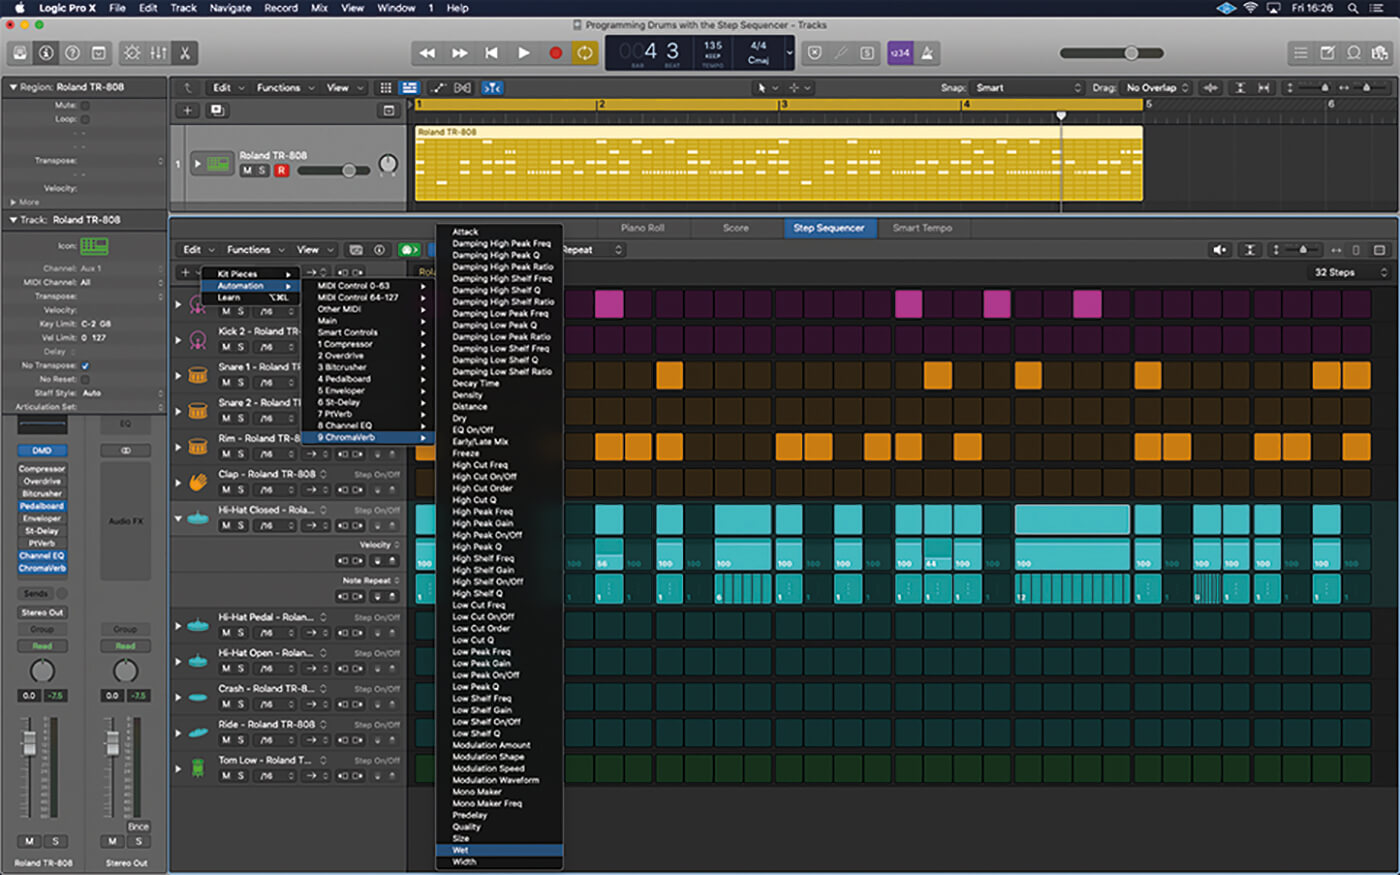
14. As well as kit pieces, you can add automation into the grid. Add ChromaVerb’s Wet parameter by clicking the + and selecting Automation > 9 ChromaVerb > Wet.
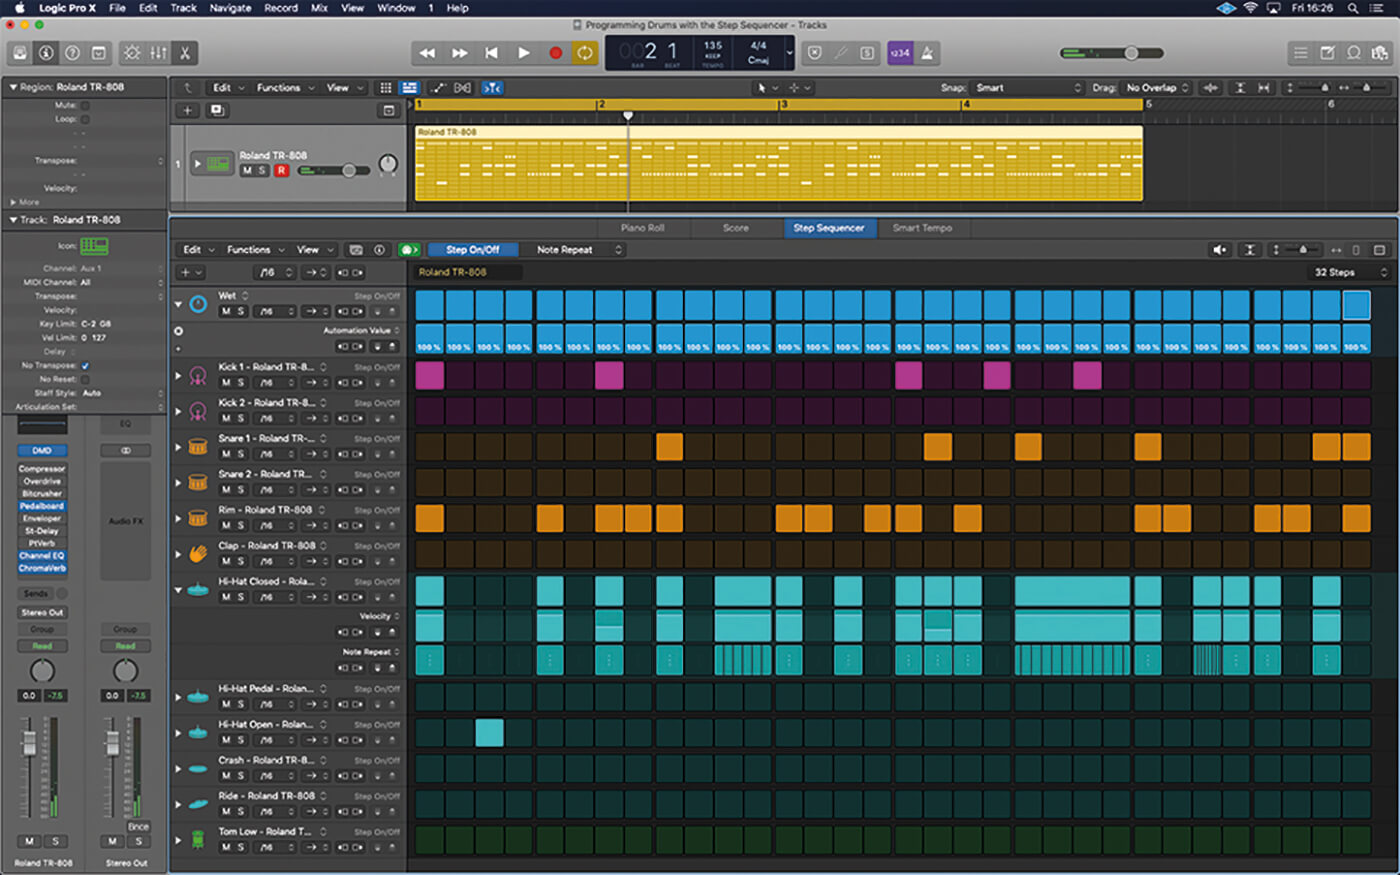
15. Expand the wet row and create 32 steps to run the duration of the loop. You now have an automation event for each 16th step, each with its own unique setting for reverb amount.
16. Ctrl-click on the header for the Automation Value Row and select the randomised values option. You should now have a reverb with stepped wet settings that create random amounts of reverb in time with the drums.
17. This next setting uses the tie feature to create a gated reverb effect on the main backbeats. The additional steps at the end of the gated reverb ‘close down’ the reverb to its dry setting.
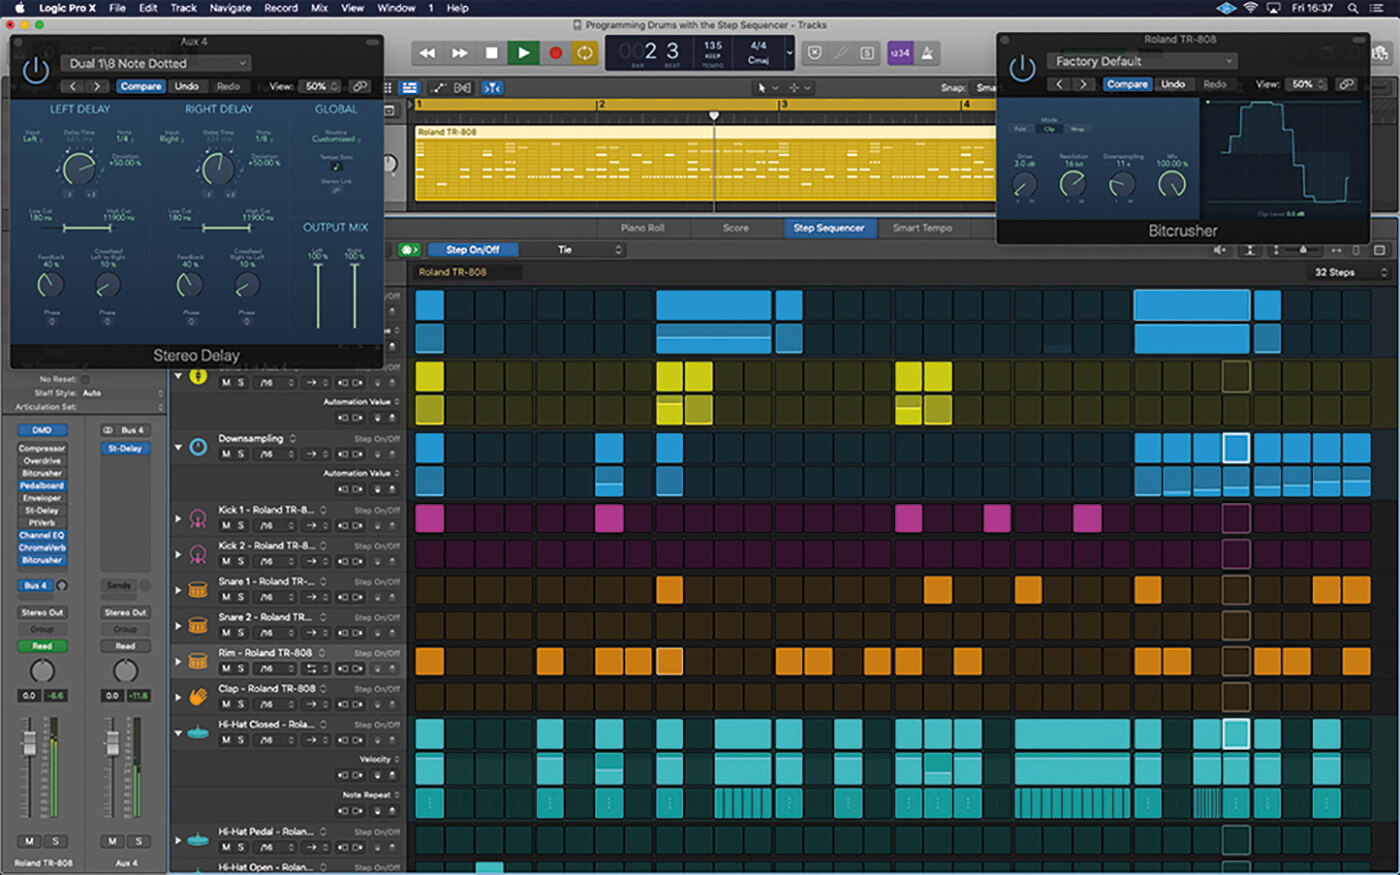
18. Here’s the finished loop (included as a Project Alternative), which also includes an automated delay send, as well as an automated bitcrusher plug-in, where the downsampling steps down over the last two beats.
For more Logic tutorials and workshops, check here.