How to build super-warm synth pads in Logic Pro X
The use of studio effects like Chorus and Flange formed a big part of the ‘warmth’ we associated with retro synth pads. Find out what Logic Pro X has to offer.
As the soundtracks to the massively popular Netflix series Stranger Things and the critically adored Safie brothers’ joint Uncut Gems illustrate, the sounds of classic analogue synth pads are very much in vogue. In recreating these stylish 1980s-type tones and textures, though, composers and sound designers rely largely on the magic of effects. Listen to a raw Solina String Machine, for example, and you’ll be surprised by how thin and insipid the source sound is. These days, of course, it’s not terribly difficult to get thick synth pads without having to turn to effects. But if you’re after an authentic 1980s-style aesthetic, there’s much merit to be found by exploring effects such as chorus, flanger and ensemble.
To illustrate the importance of effects, this tutorial uses a simple single-oscillator sawtooth sound. In many ways, this replicates the raw sound of many early string machines, which used divide-down oscillators rather than a collection of VCOs and filters found in true polyphonic synthesizers. This way, you’ll be able to hear the full contribution of the effects rather than the sound-widening options such as detuned oscillators and pulse-width modulation that could be applied via the synth itself.
Chorus line
The classic thickening effects are chorus, flanger, phaser and ensemble, all of which Logic groups as part of its modulation effects. In essence, these effects are primarily based on a modulated delay line (hence the modulation grouping) where the delay time is changed by an LFO, which in turn creates subtle variations in pitch and/or phase. When combined with the original sound, the effect of this is somewhat similar to a single violinist being transformed into string section, whereby the players are operating at slightly different pitches. In the case of Stereo Chorus, two different delay lines are used (one for left-hand side, the other for the right), which in turns forms a thick stereo image.
The chorus plug-in is a solid springboard from which to launch quick and easy audio treatments, especially given the simplicity of its controls. The rate and intensity control relate to the LFO used to create chorus effect, although in this case you’ll want to imagine them as a form of vibrato, with rate being the speed of vibrato and intensity being the pitch-drift amount. The most musical settings seem to sit at about a rate of 1Hz, with the intensity not so pronounced that you start to hear the pitch moving. Likewise, the mix control is best with both wet and dry present in the mix, although the fully wet version (activated with the D-Mode switch) arguably has the greatest amount of width.
Mod revival
Technically speaking, the flanger plug-in is similar to chorus plug-in, with a few exceptions. Firstly, it uses much shorter delay times, so the effect is a form of moving comb filter, heard as a distinctive whooshing sound. Secondly, the delay line also includes feedback that makes the aforementioned whooshing sound increasingly pronounced. In comparison to the chorus plug-in, which emulates the natural effect of doubling, the flanger plug-in tends to sound more artificial, although it retains that all-important stereo enhancement and lends additional movement and depth to sounds.
For an even more pronounced sweeping effect, explore the phaser plug-in, which uses modulated all-pass filters rather than delay lines to create its sweeping effect. Musically speaking, it’s similar to the flanger plug-in, but it has a more pronounced edge, recalling the early oeuvre of Jean-Michel Jarre and such studio albums as Oxygène and Équinoxe, as well as the work of Daft Punk, who made extensive use of the phaser effect on their Ensoniq DP/4 processor. As with chorus and flanger, with the phaser plug-in you’re able to add width to mono sources using nothing more than a single oscillator.
Ensemble performance
The ensemble effect sounds like an amped-up chorus, with up to eight separate voices combining to create rich detuning and stereo interest. You can see that many of this effect’s sonic attributes come from its layering of three LFOs, two of which offer a standard sine wave, while the third provides random movement. If you’re looking to apply a sizable chorus effect, reach first for ensemble plug-ins. Sometimes, though, the extra heft of the ensemble effect might clutter your mix, in which case you’ll be better off with a comparatively pared-back chorus.
This walkthrough explores these key widening effects, as well as some notable companion effects such as reverb and alternative modulation effects that can be helpful for sculpting retro-style pads. As you’ll see, the effects used to craft retro-synth sounds are often just as important as the parameters of the synths themselves.
Naturally, there’s no reason for you to only apply these modulation effects to synth pads. Slap a flanger plug-in on a drum track and pass the entire mix through a phaser, for example, to access instant French house flavours.
How to build super-warm synth pads in Logic Pro X: step-by-step
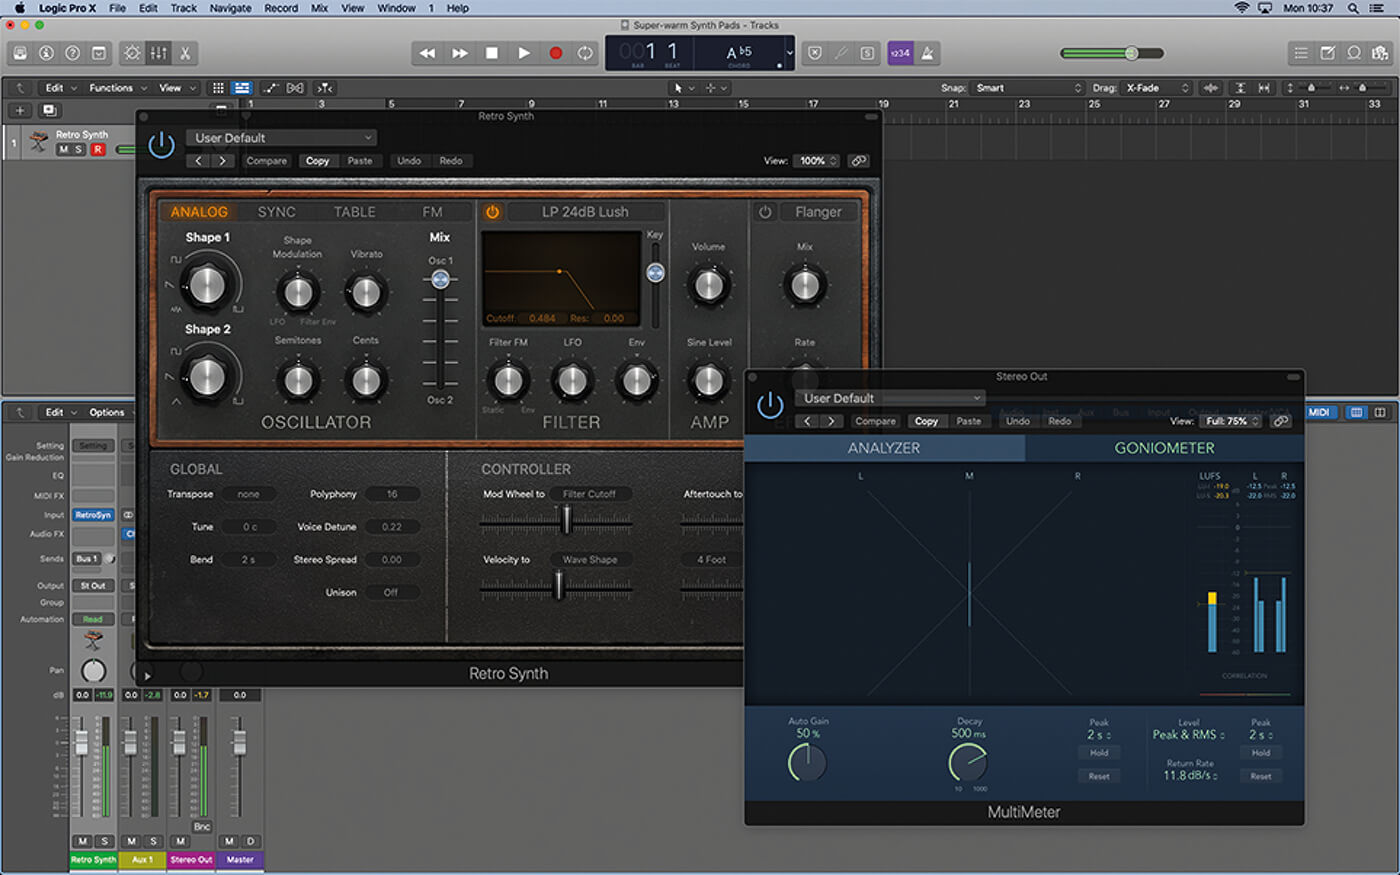
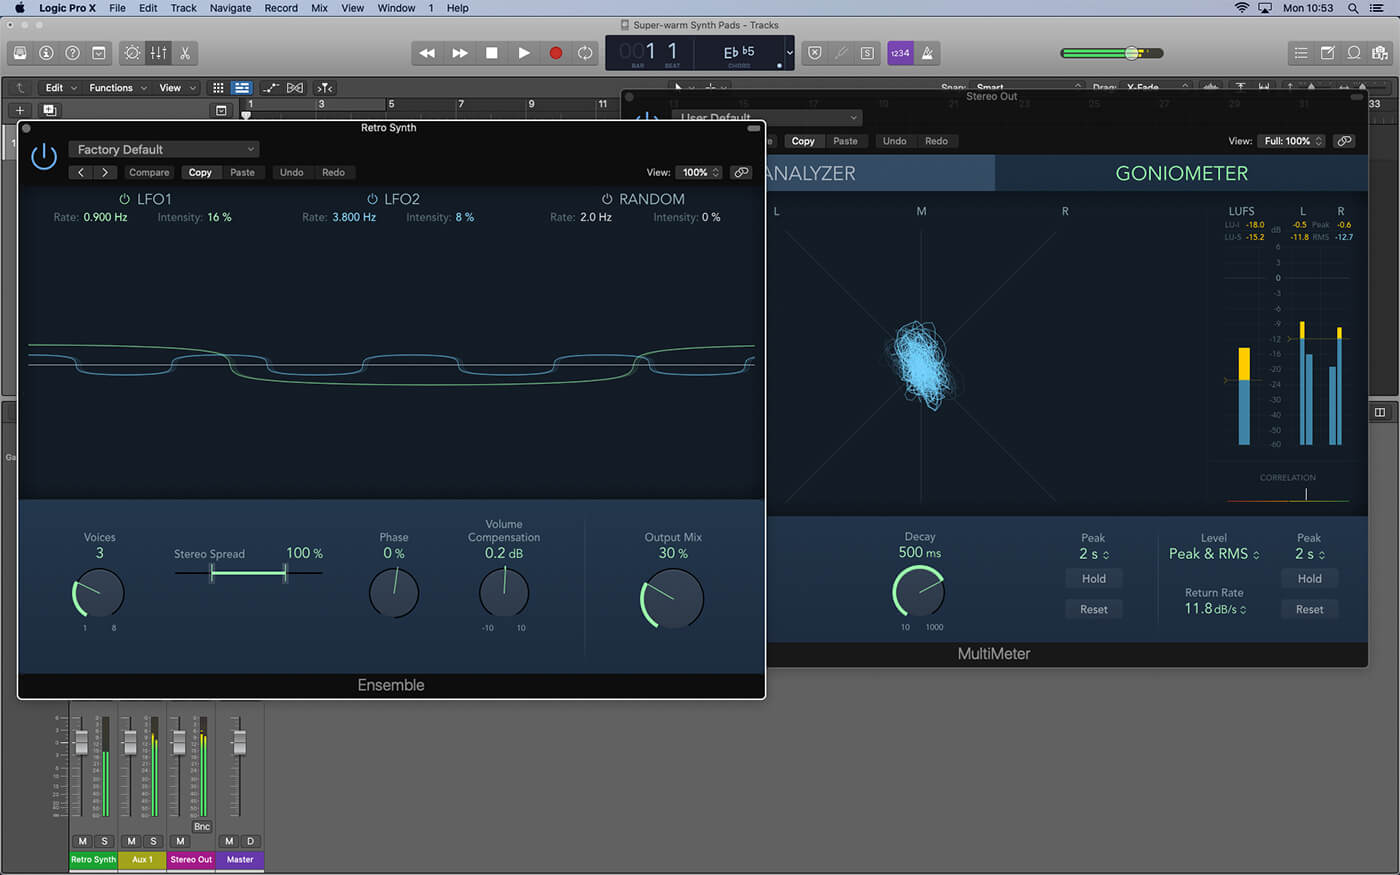
1. Begin with a simple one-oscillator pad sound on Retro Synth. Notice how the MultiMeter shows no stereo image, with the sound being little more than a sawtooth waveshape shaped by a pad-like envelope.
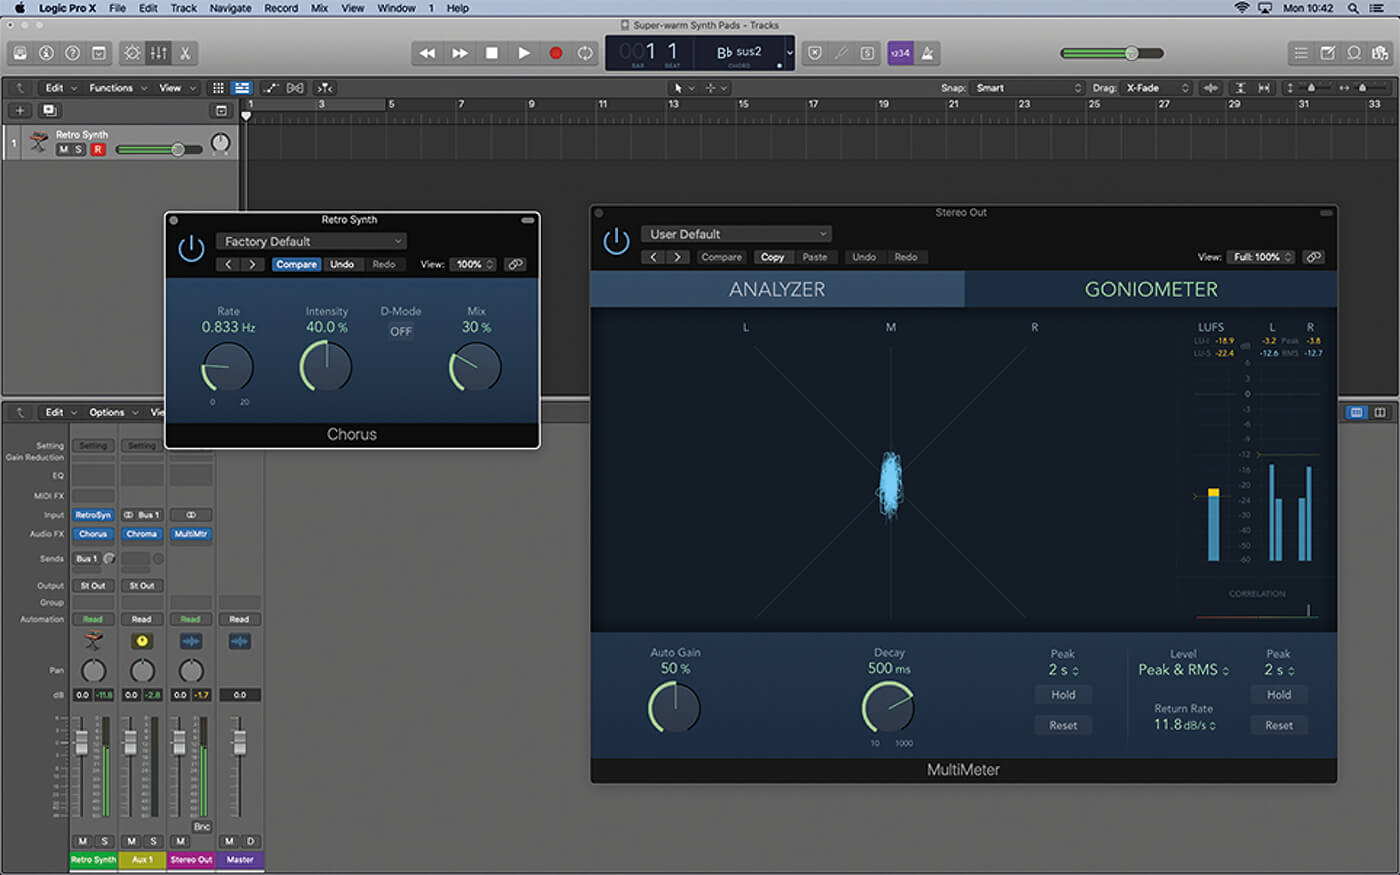
2. Insert the Chorus plug-in and note the change in stereo width. To establish the ideal settings, raise the intensity control so that you can hear the LFO movement.
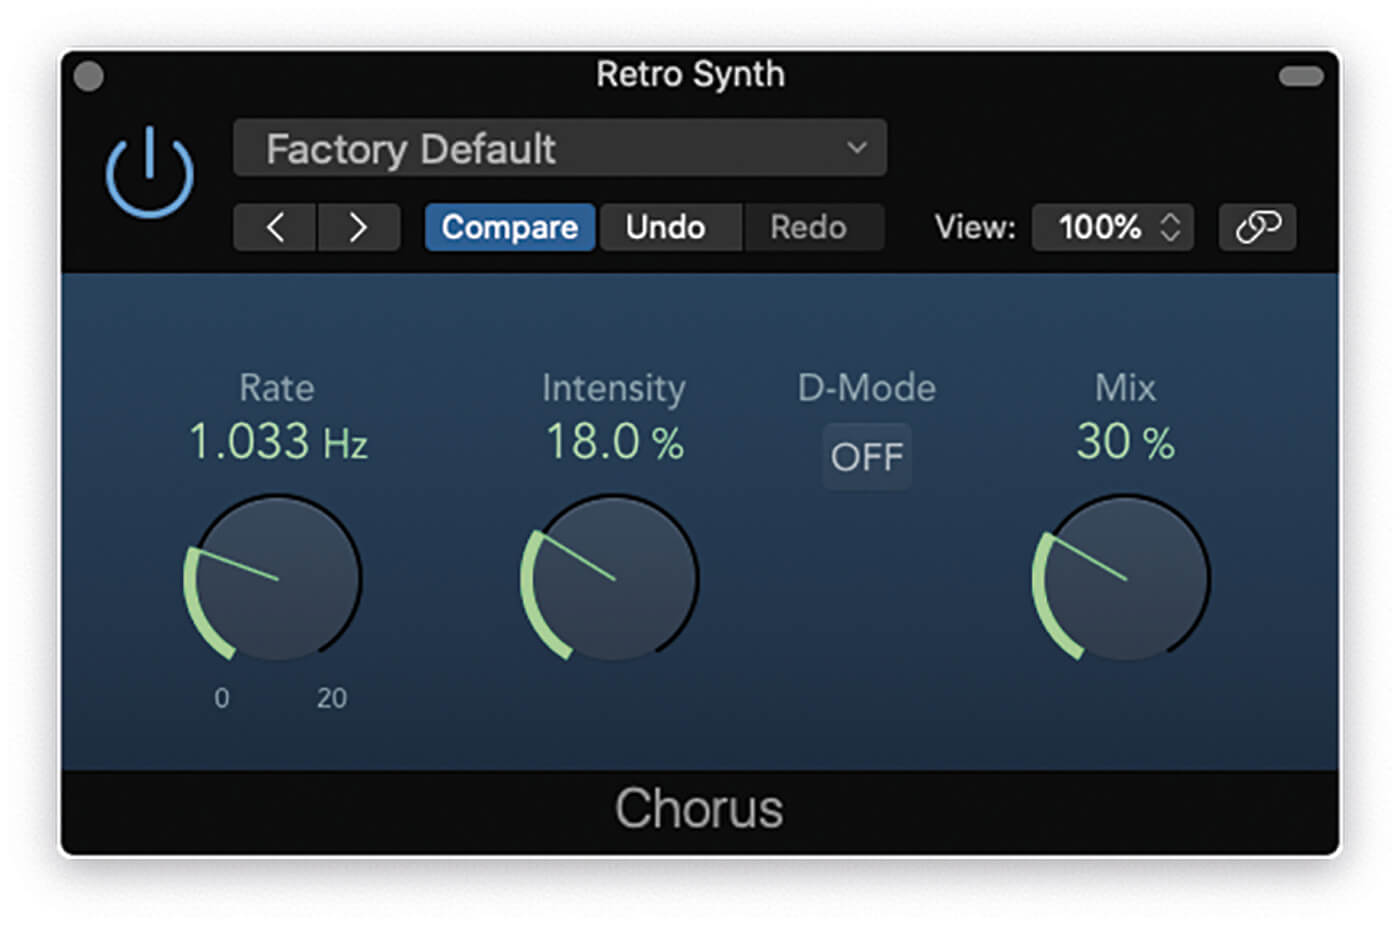
3. With the intensity raised, adjust the rate by ear, as if you were adjusting vibrato on a synth. With the rate set at about 1Hz, lower the intensity to about 18 per cent so that the chorus effect is more musical.
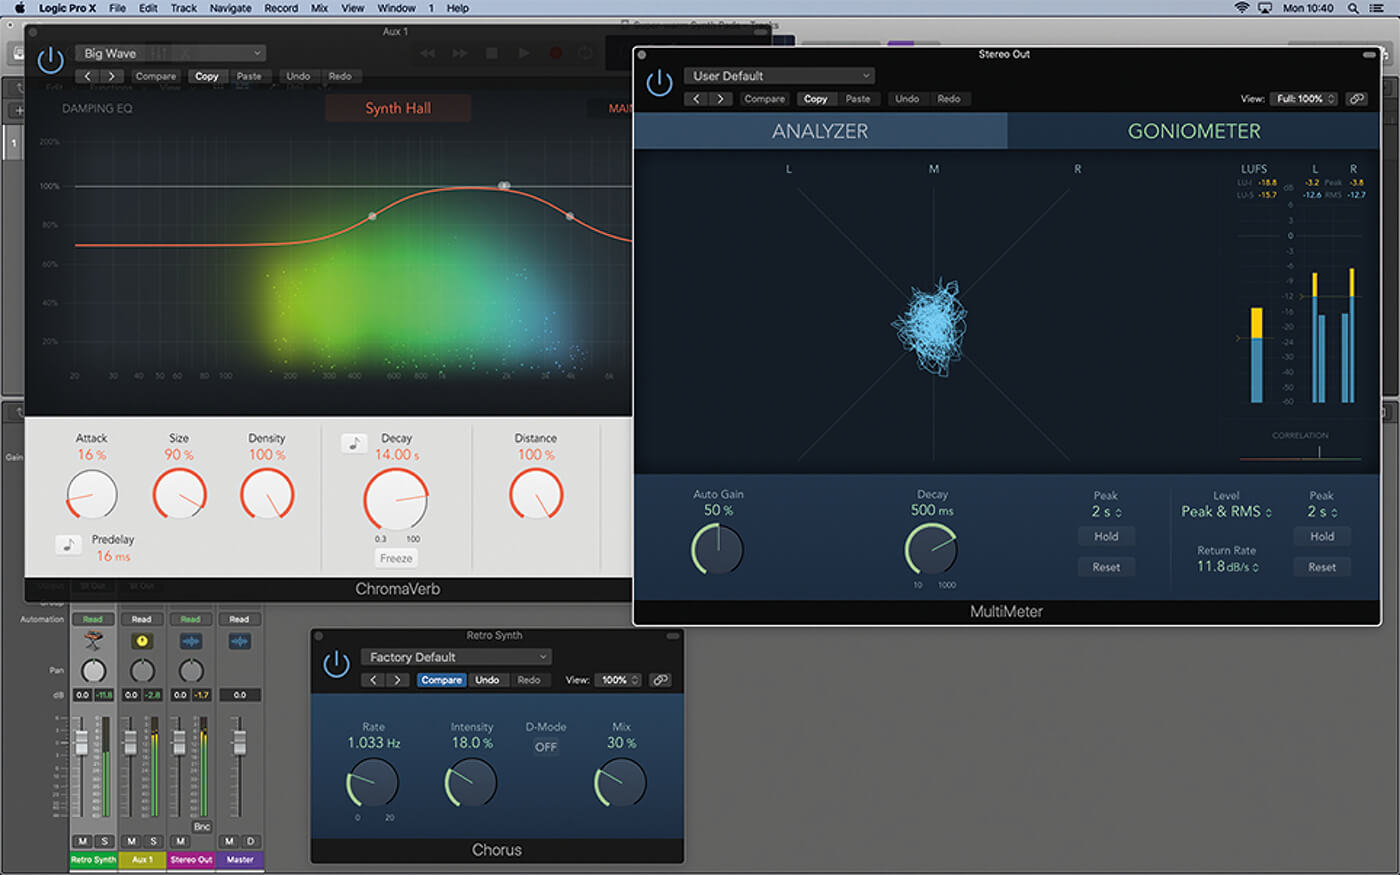
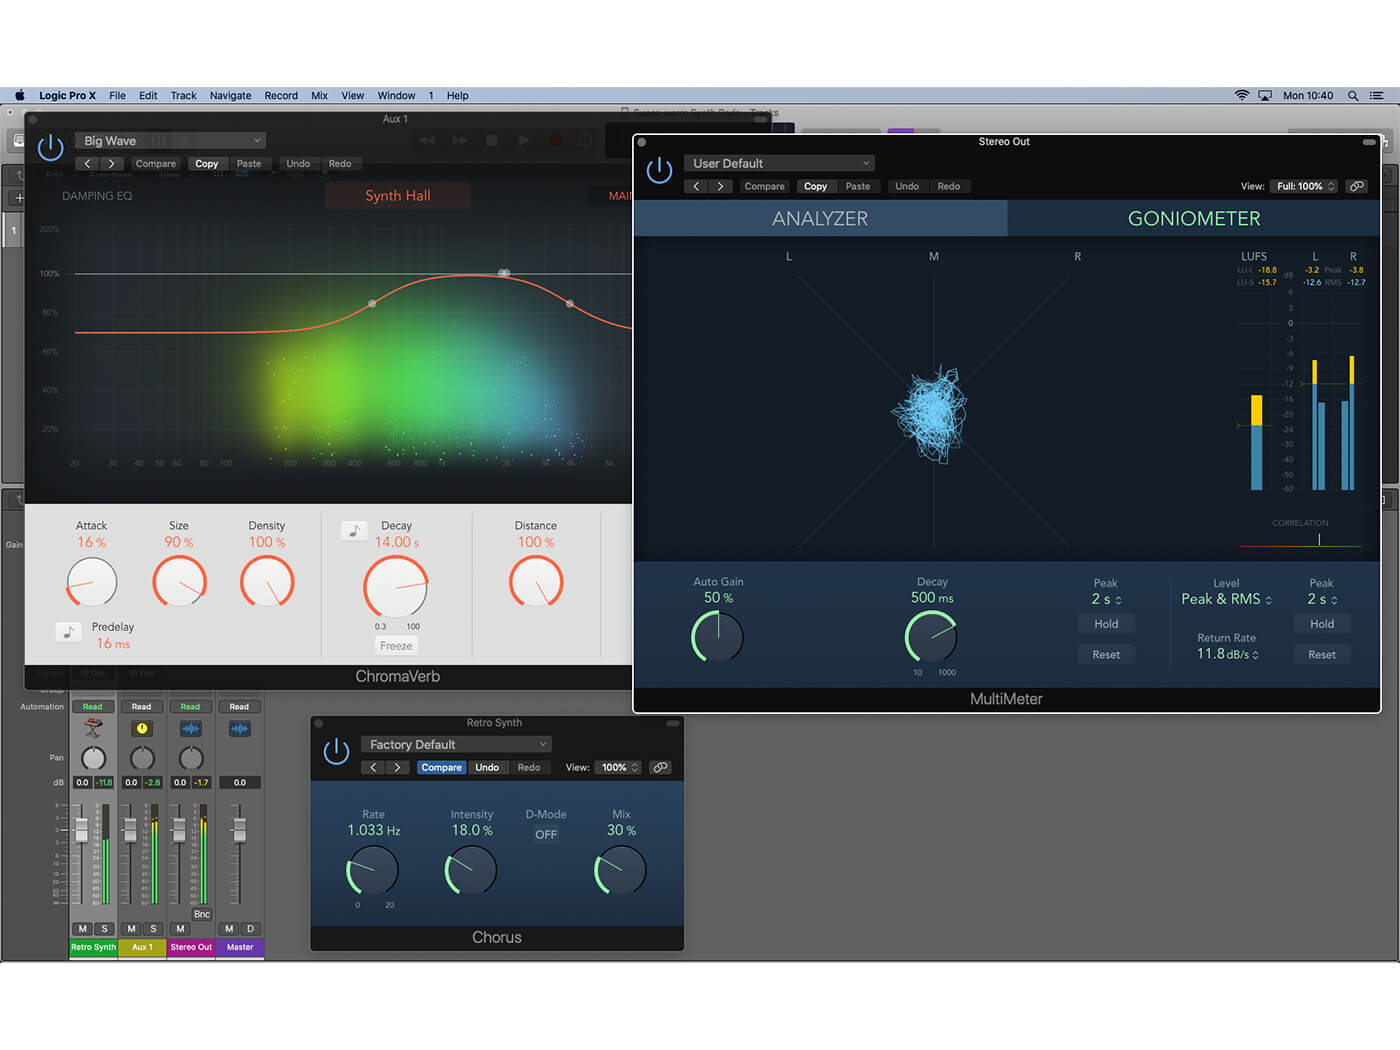
4. The complete effect is a combination of chorus and reverb, both of which create movement and add stereo width to the sound. Turn up the aux send to make use of the expansive ChromaVerb setting.
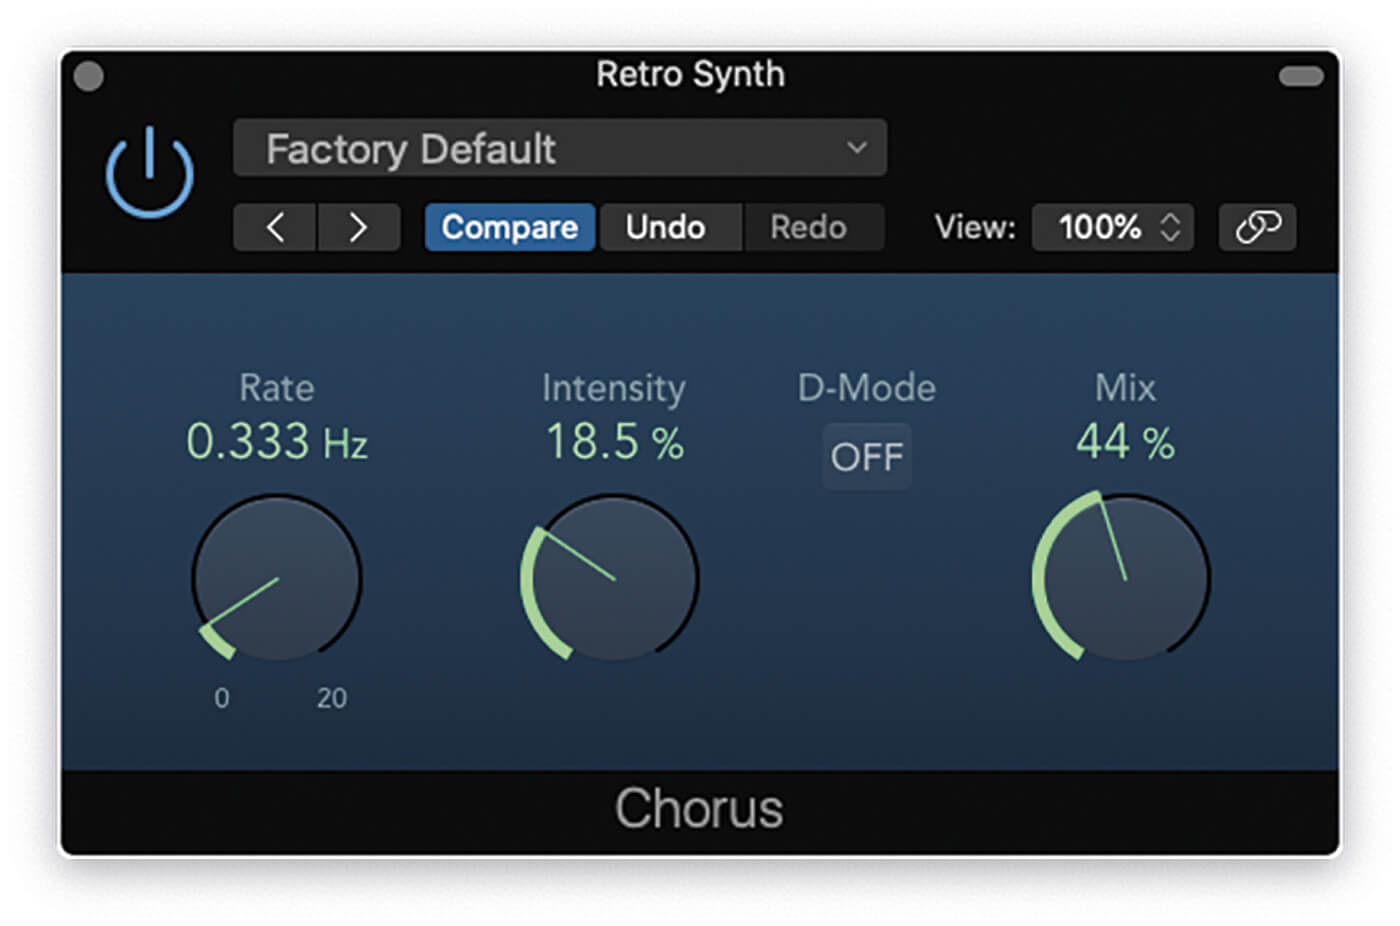
5. For an alternative chorus setting, use a deliberately slow rate of about 0.333Hz and a lower intensity combined with a more prominent mix setting. The resulting chorus will have a different quality, still warm but with less movement.
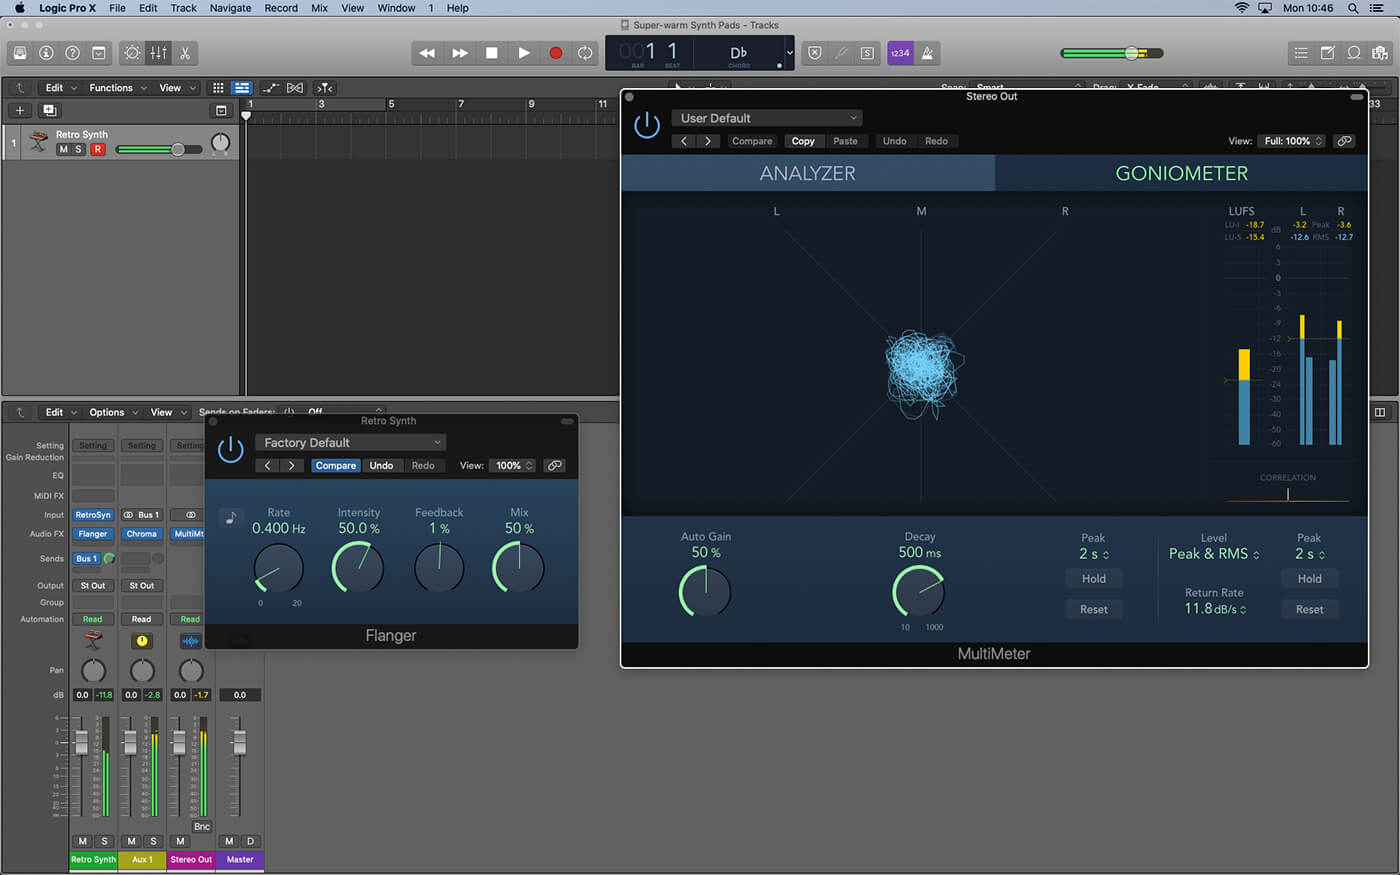
6. The flanger plug-in has some similarities with the sound of our chorus effective. Working from its default setting, raise the rate to about 0.400Hz and lower the feedback to 1 per cent. The result should be somewhat chorus-like at this stage.
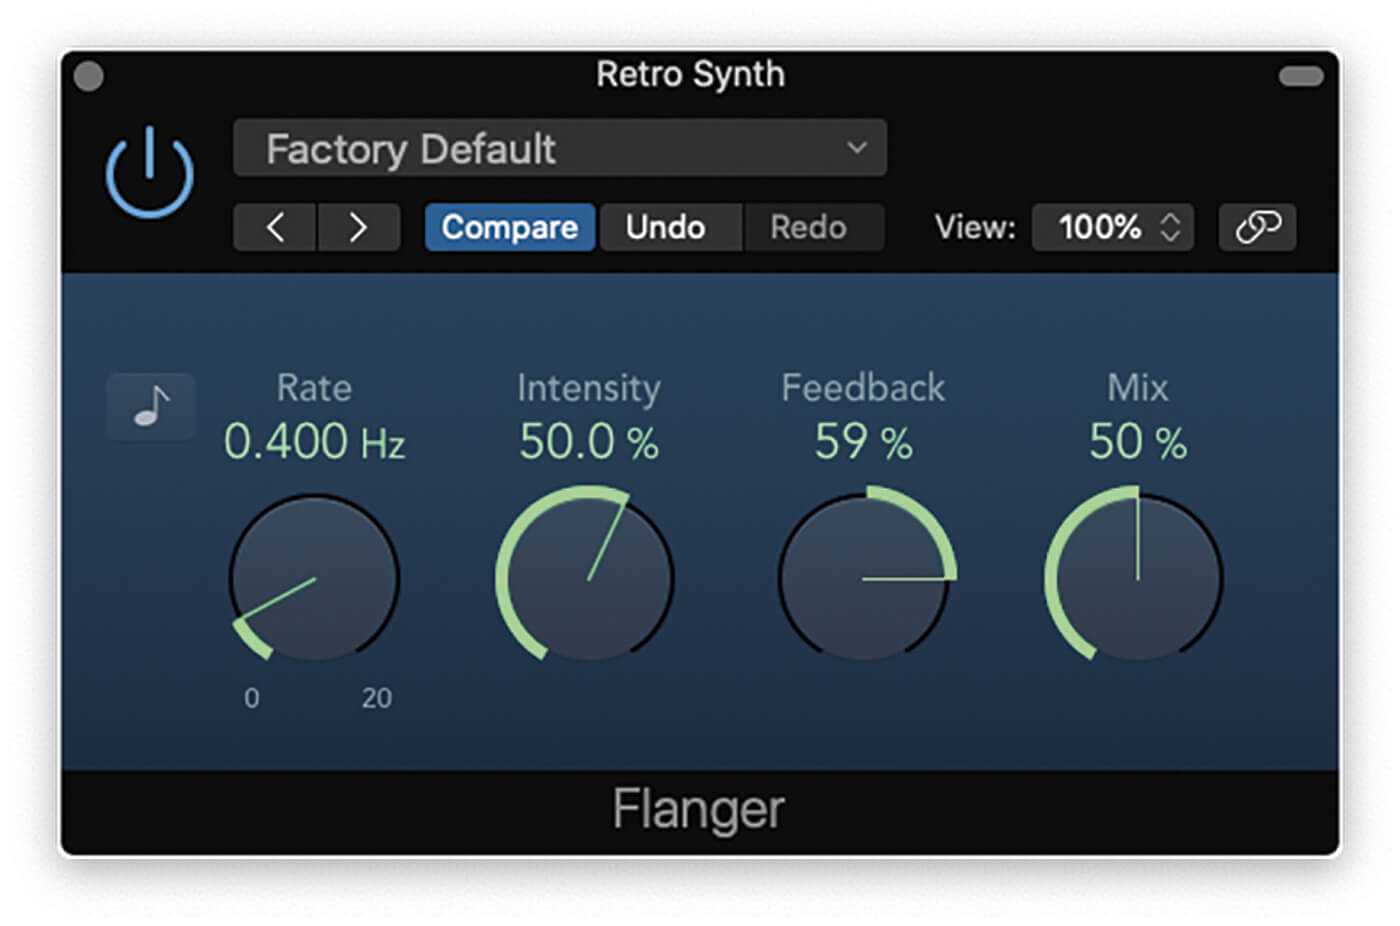
7. Feedback routes a proportion of the signal back on itself, which in this case makes the flanger effect more pronounced, and creates a noticeable sweeping effect. As with chorus, the flanger creates stereo information.
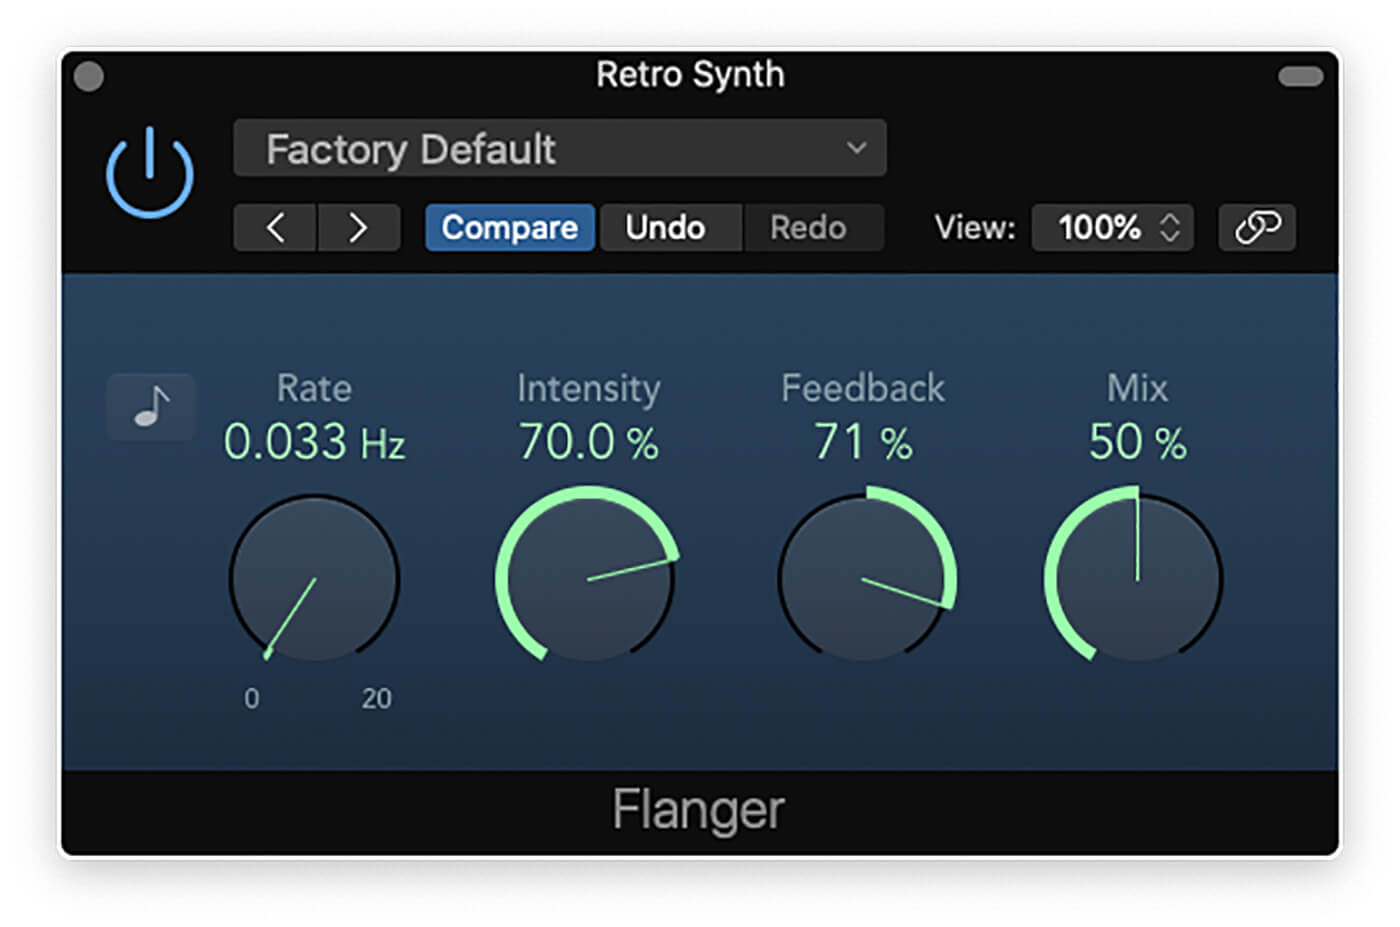
8. One quintessential flanger effect involves using a deliberately slow rate to have it slowly undulate over a bar or so. Set the rate to 0.033Hz and increase the intensity and feedback to about 70 per cent.
9. If you like the sweeping effect, experiment with the phaser plug-in, which has an even more pronounced sweep. Switch between stages and notice how the notched nature of the effect evolves.
![]()
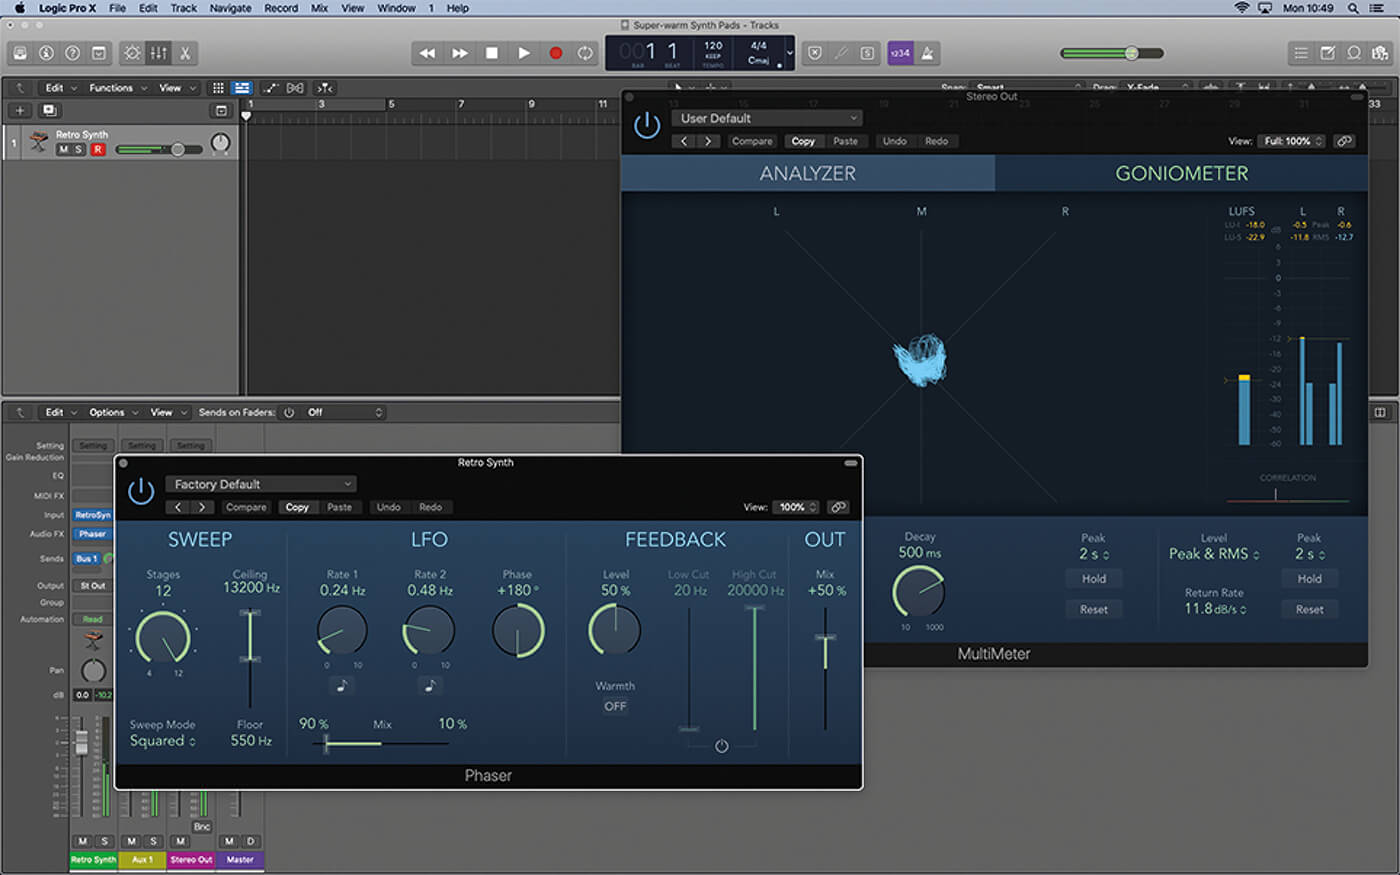
DANCING JELLYFISH
The Goniometer found as part of the MultiMeter plug-in is a useful way to monitor your stereo image. Mono signals can be seen as a straight line. If the mono signal is panned, the line will tilt to the right or left accordingly. When the signal is stereo, the display transforms into something we can only liken to dancing jellyfish, with the spread of the pattern indicating the width of the image.
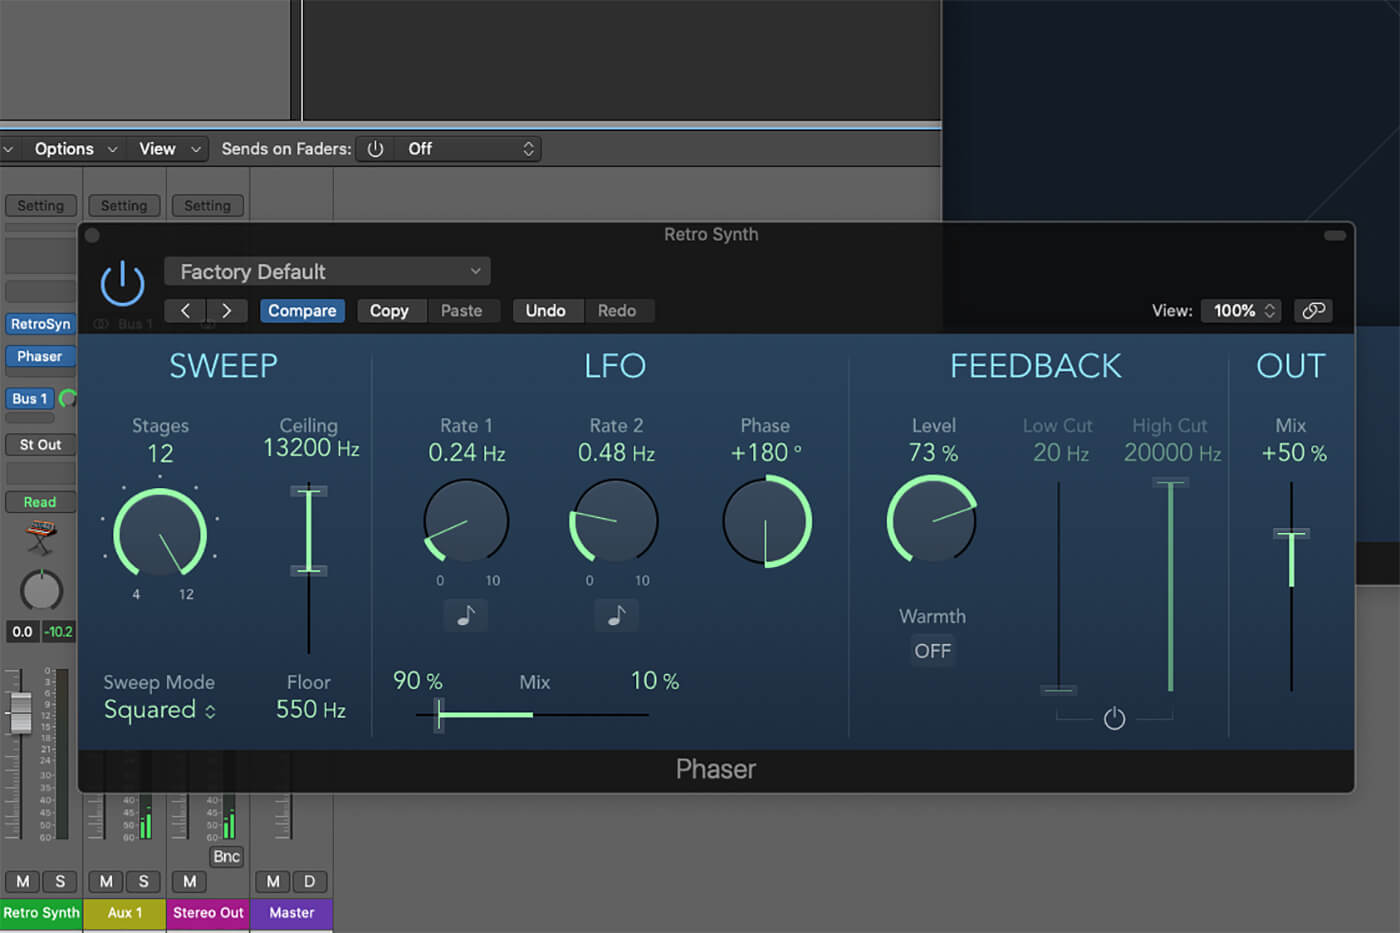
10. As with the flanger plug-in, the amount of feedback alters how pronounced the phaser effect sounds. Higher feedback settings emphasise the movement, whereas lower settings will help you retain a chorus-like warmth.
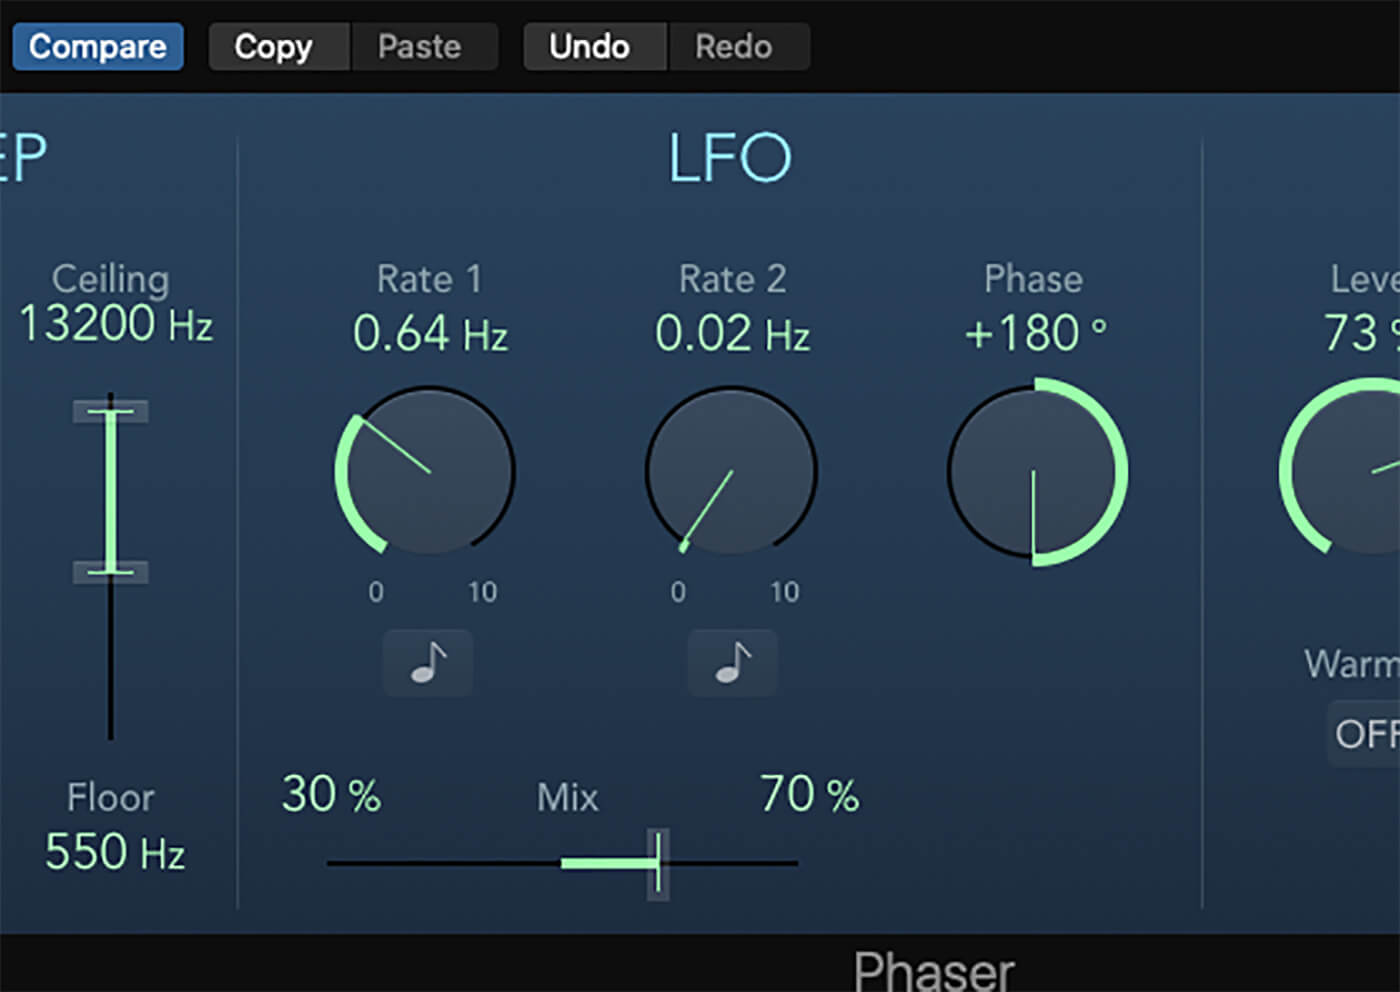
11. The phaser incorporates two LFOs. Try setting two contrasting rates – one slow, the other fast – and using the mix slider to set a blend between them. The result is a more complex shape.
12. The ensemble plug-in is the equivalent of eight chorus plug-ins. Using the default setting, though, it doesn’t sound all that expansive, due to its low voice count and subtle modulation.
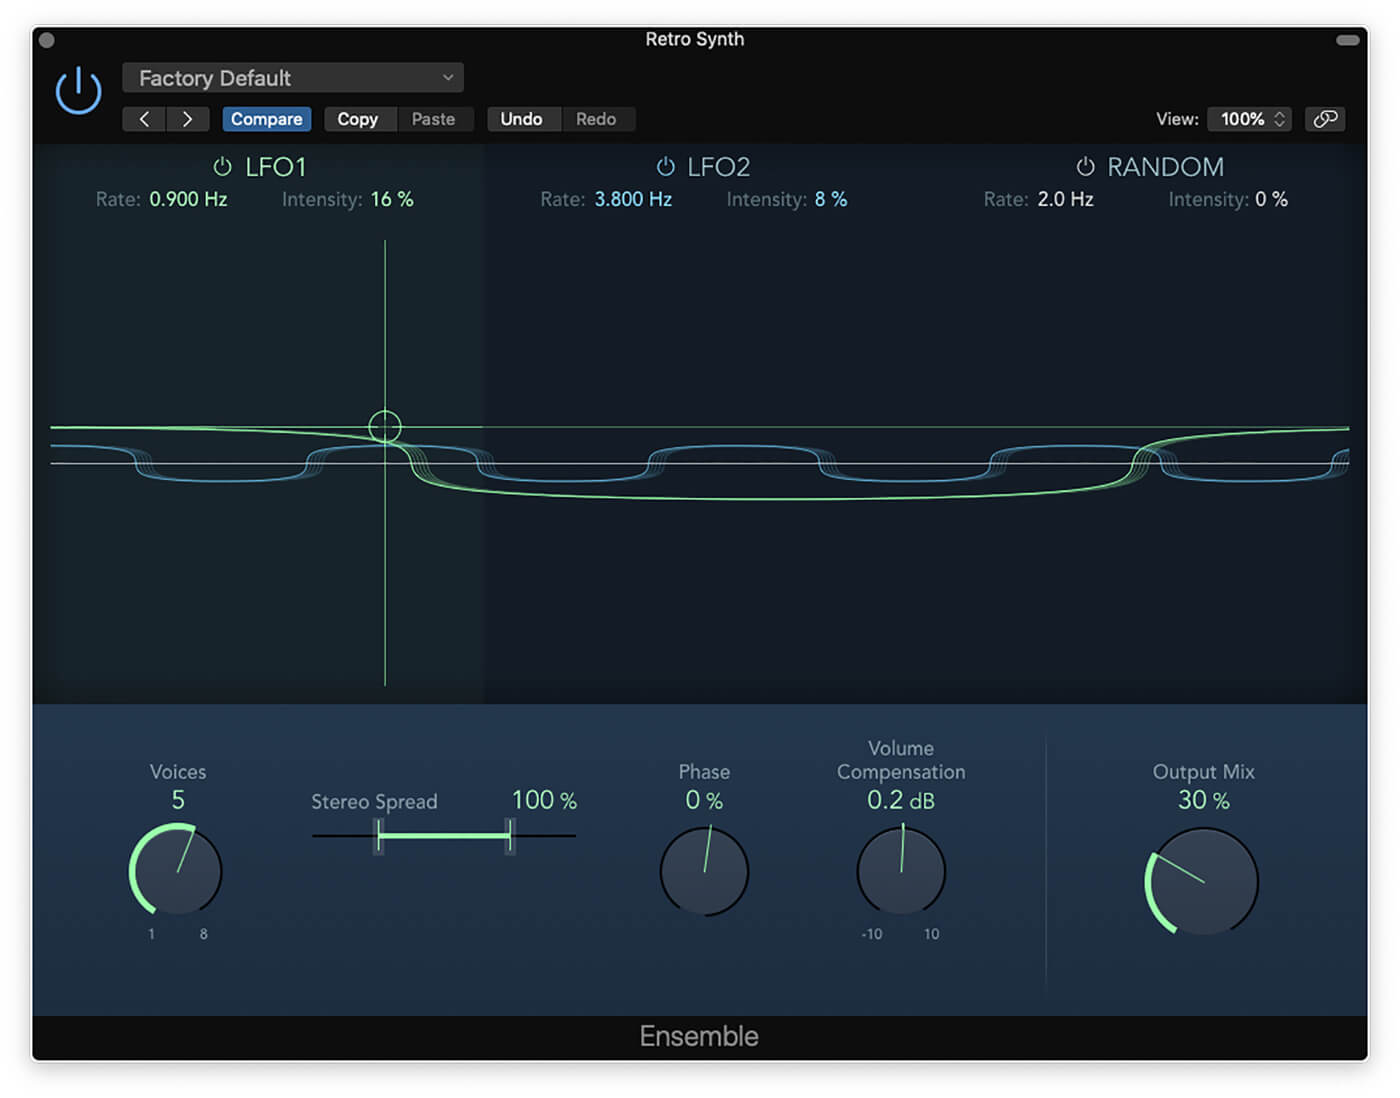
13. To increase the scale of the ensemble effect, raise the voice setting. You could go for the full eight voices, Here, we have exploited the distinctive sound of odd-numbered voice counts.
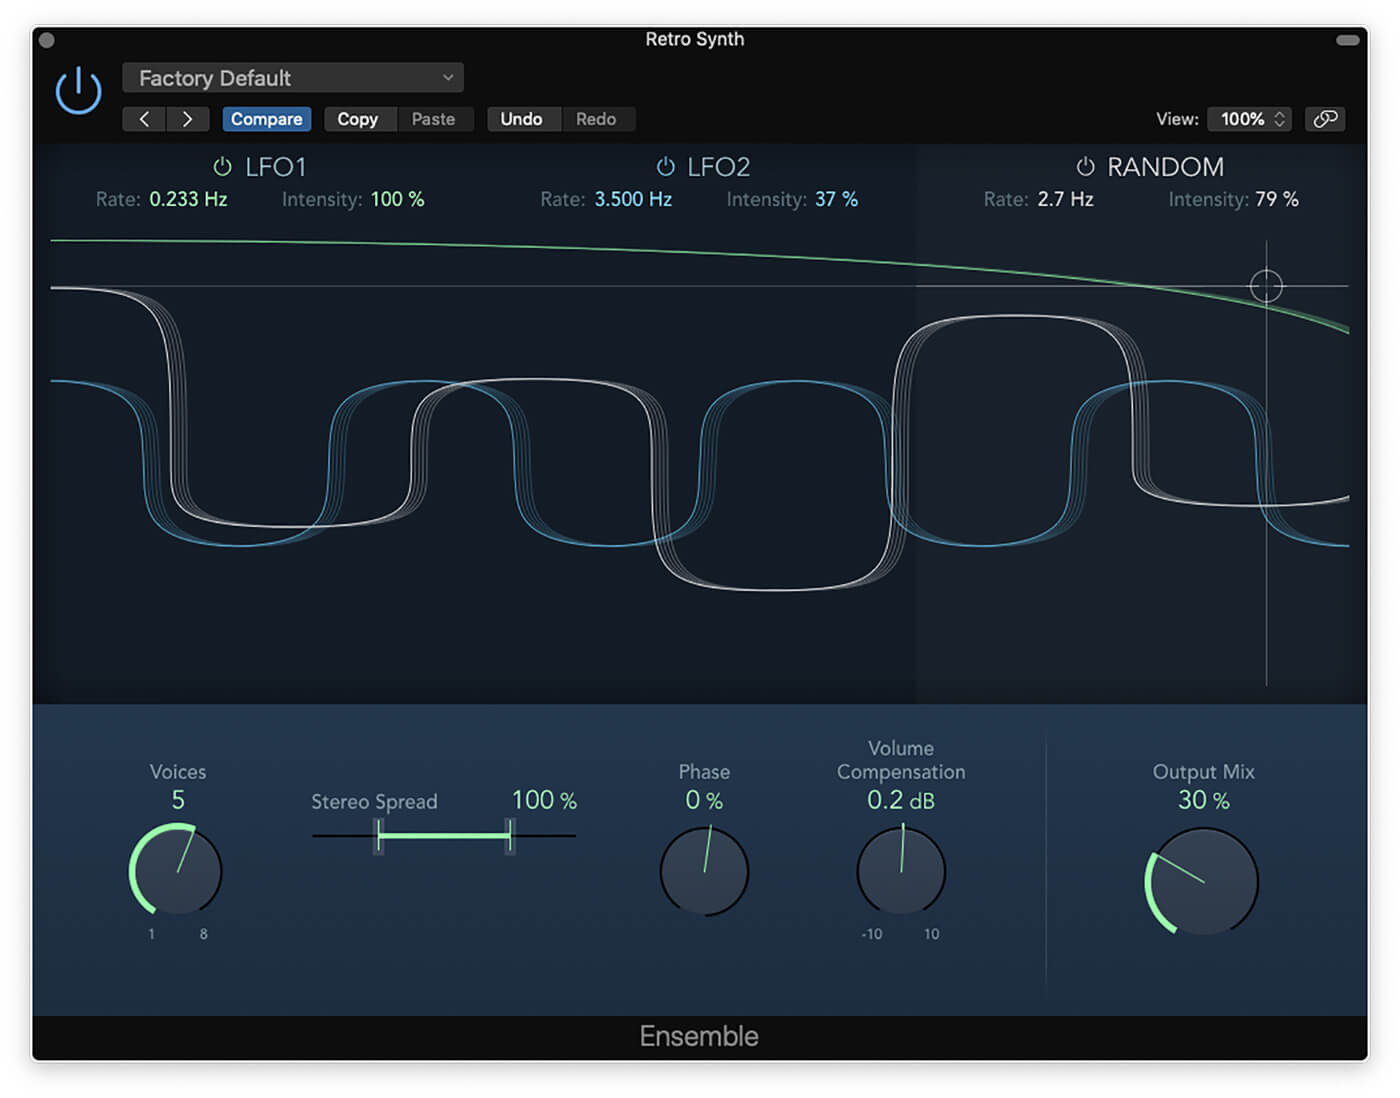
14. Create a more diverse and interesting shape for the modulation. Give LFO1 a low rate and maximum intensity, set LFO2 to 3.5kHz at 37 per cent, and the random LFO to 2.7Hz with an intensity of 79 per cent.
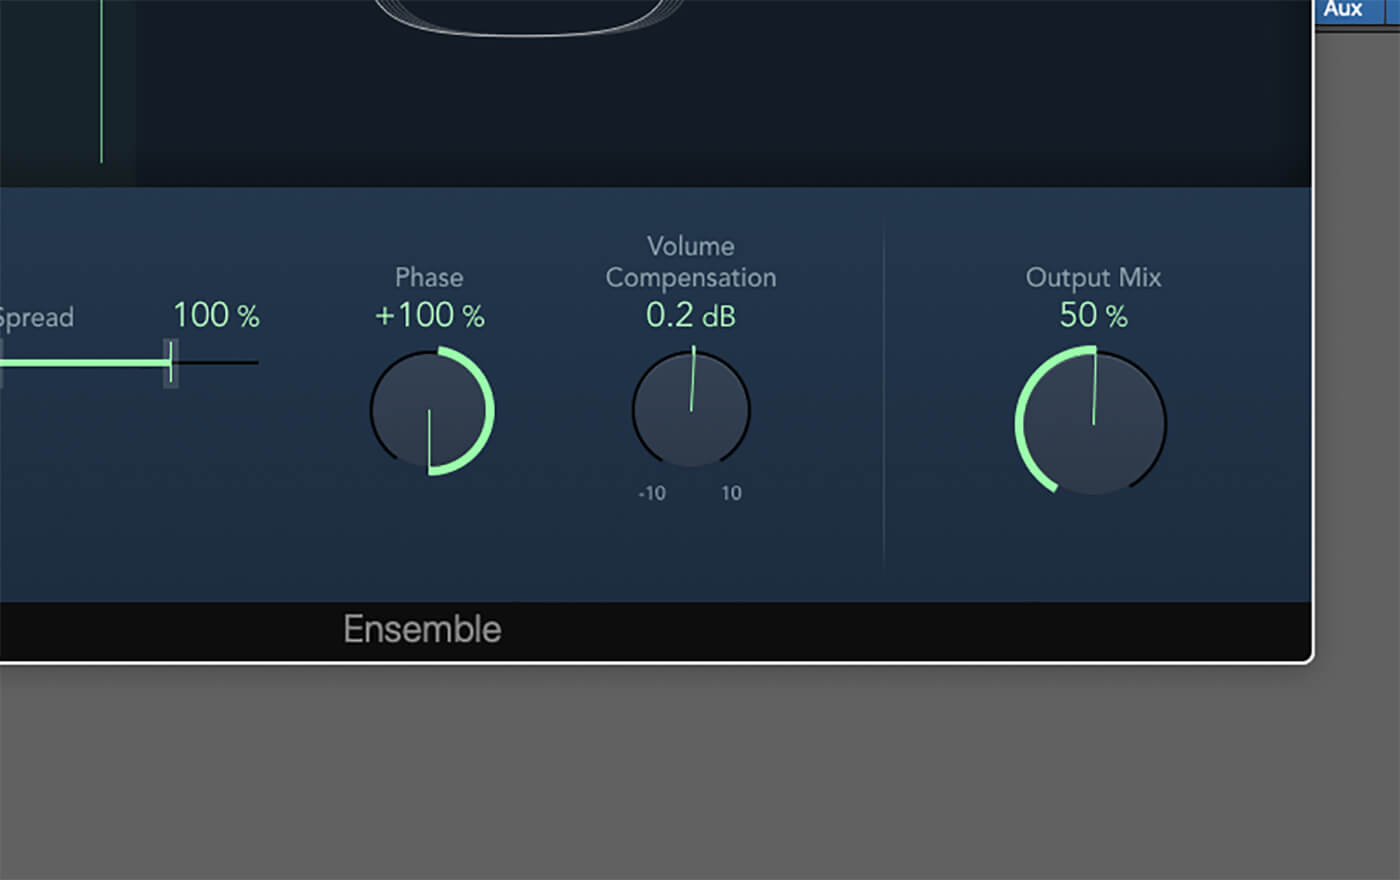
15. The final stage to creating a rich ensemble effect involves setting the phase to 100 per cent so that the voices are out of phase with one another, and the output mix to 50 per cent. The result is similar to a Unison Saw setting.
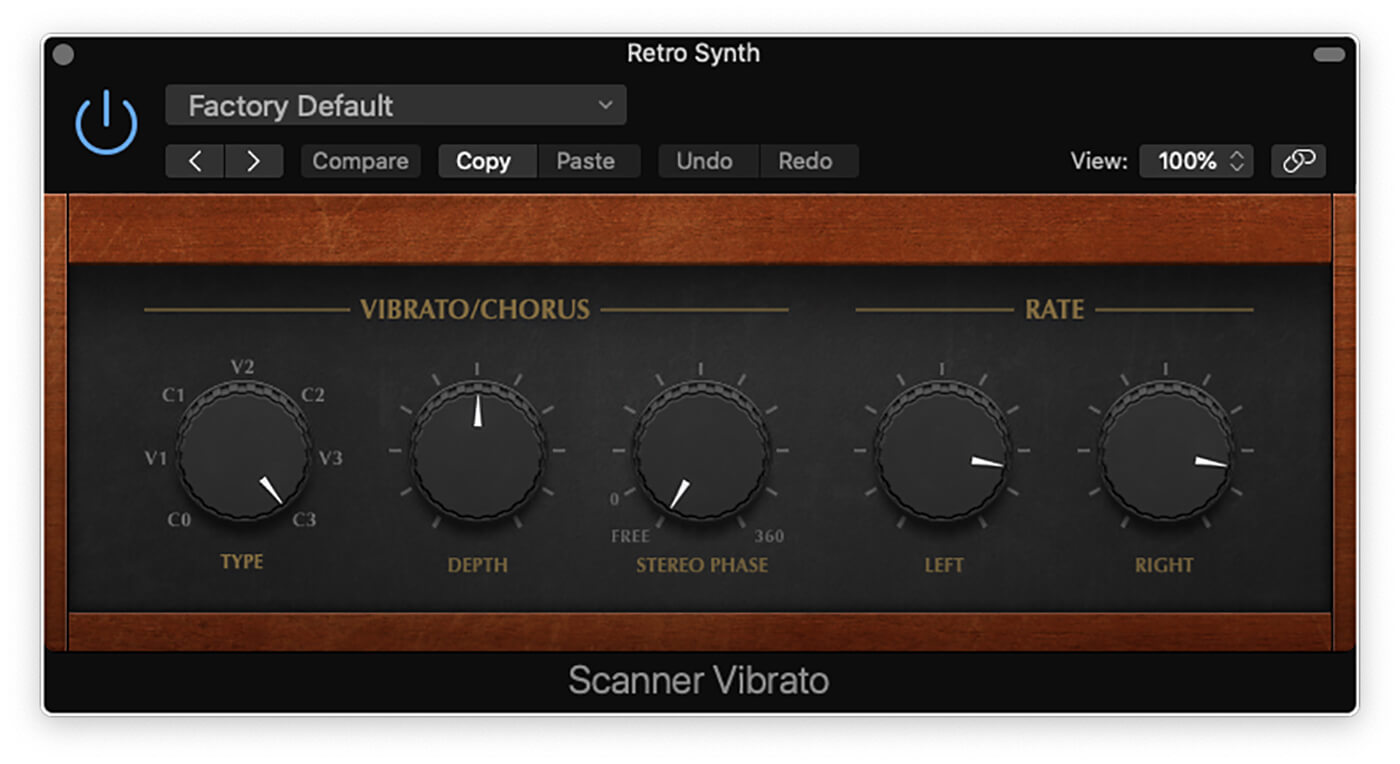
16. For a lo-fi chorus effect, try the Scanner Vibrato. Move between the different chorus settings – labelled C0, C1, C2 and C3 – to hear the various starting points you can work with.
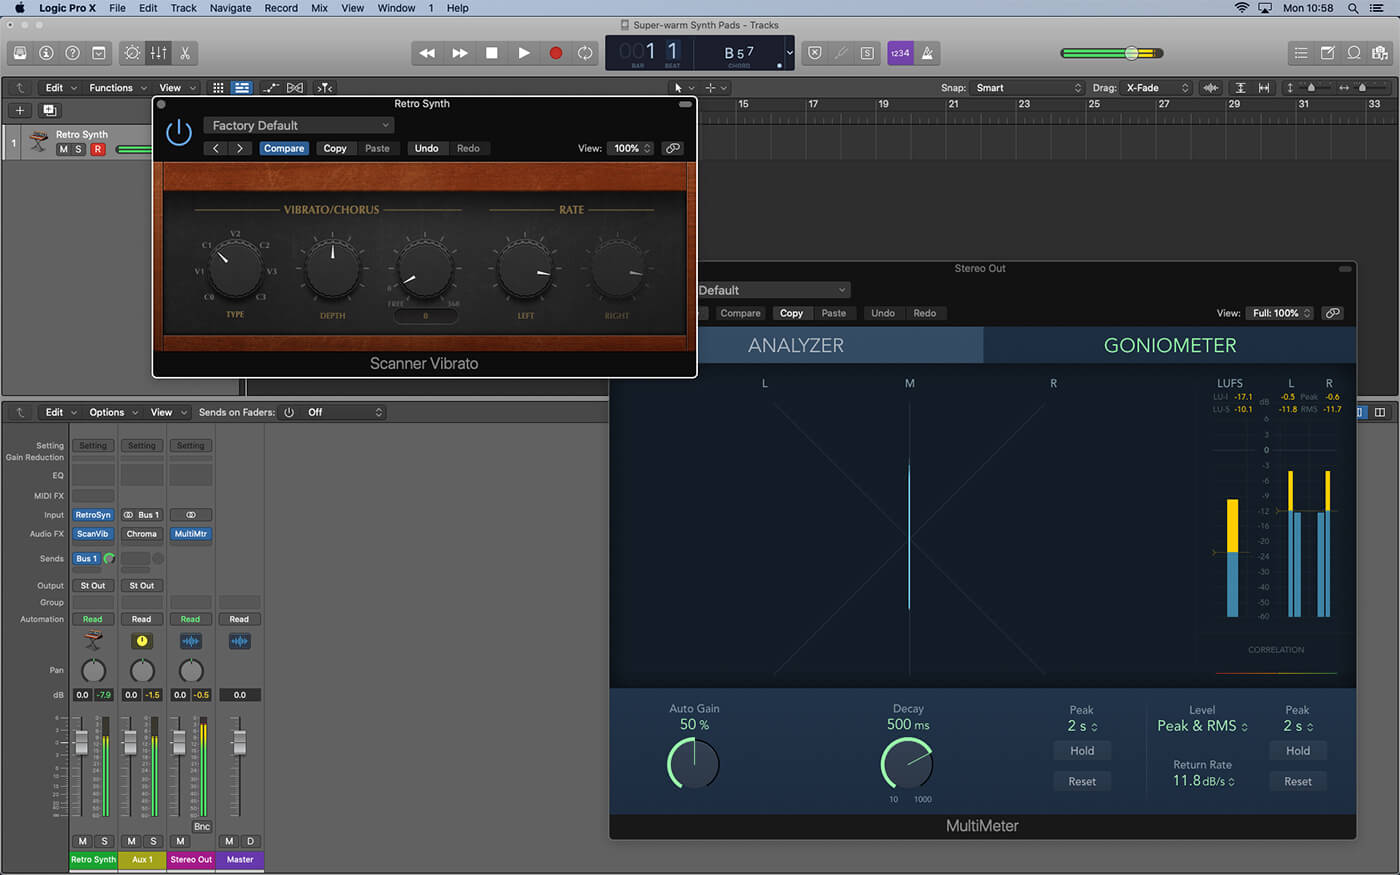
17. Scanner Vibrato sounds particularly effective (and retro), and produces a mono chorus effect. In this case, set the stereo phase to 0 so that both the left and right signals are completely in phase with one another.
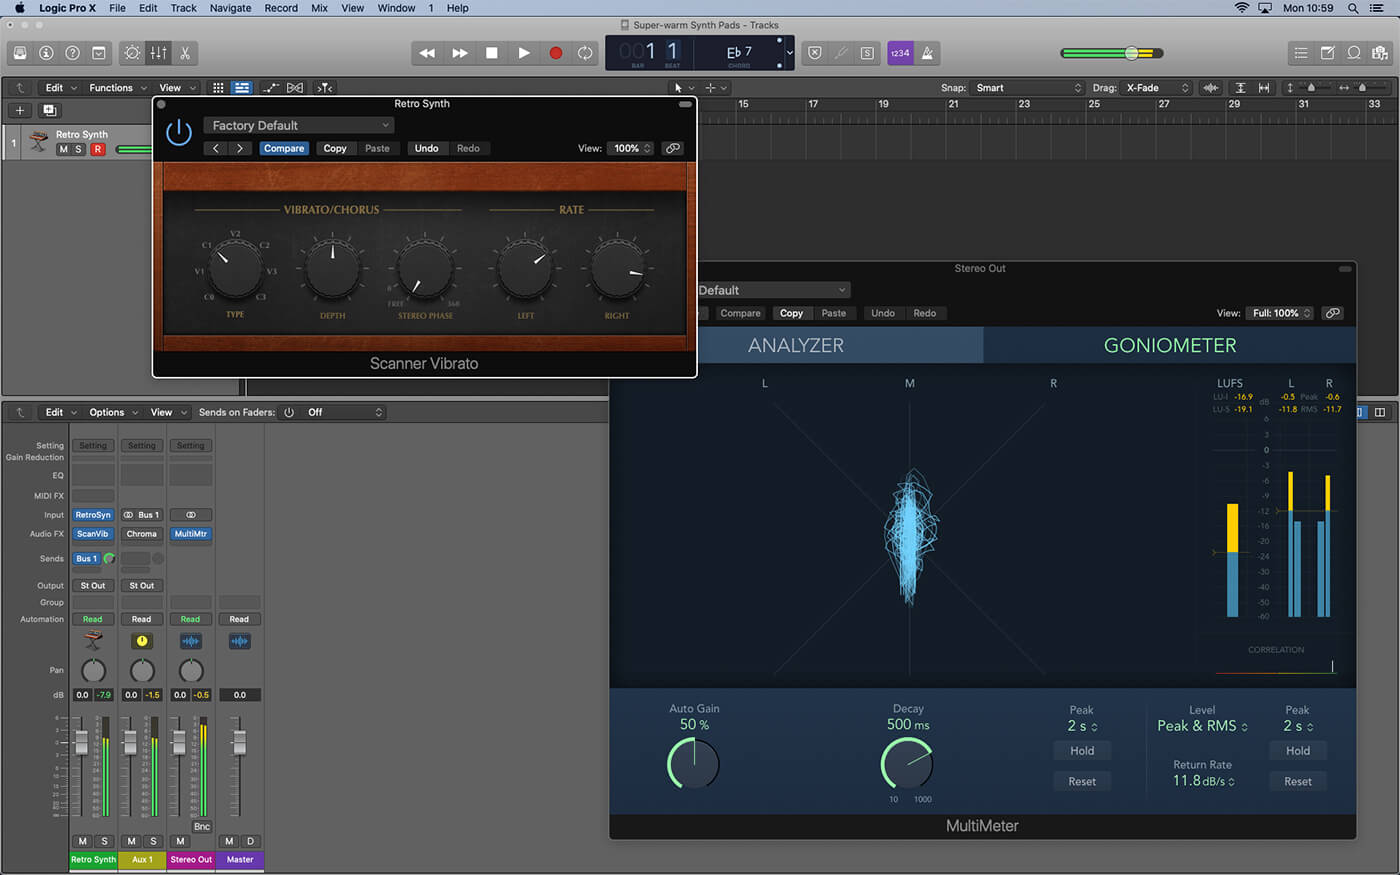
18. Now add stereo width to the Scanner Vibrato effect by setting the stereo phase to free and adjusting the rate to the left and right channels to contrasting values. Alternatively, set the stereo phase somewhere between 1 and 360.
For more Logic tutorials and workshops, check here.