Logic Tutorial: Producing Music To Picture Part Three – Creating a Composing Palette
Putting together an initialised palette of sounds can significantly speed up your composition process. Mark Cousins forms his own band… Having dealt with some of the mechanics of writing music to picture, we thought it was about time that we explored some sounds that dominate screen music, and in particular, how best to work with […]

Putting together an initialised palette of sounds can significantly speed up your composition process. Mark Cousins forms his own band…

Having dealt with some of the mechanics of writing music to picture, we thought it was about time that we explored some sounds that dominate screen music, and in particular, how best to work with them. Given the complexity of working with orchestral samples (which generally form the backbone of a score), and the need to work quickly, most composers tend to start with a pre-built palette of sounds. We’re going to take a closer look at this process, examining strategies that are both time- and RAM-efficient.
Creating your own compositional palette is a matter of personal taste and preference, with composers often taking a variety of different approaches that are depending on their set-ups and compositional requirements.
Unless you’ve got plenty of RAM to spare and feel happy waiting three minutes for a cue to load, you’ll find it beneficial to take a more ‘modular’ approach to creating a composing palette, using a variety of techniques (such as Kontakt’s Multi Patches, DAW-based track imports, etc) that enable it to be customised on a song-by-song basis.

While the modular approach is slightly less time-efficient, you can ensure you’re only loading the instrument groups you need, and that everything benefits from a degree of pre-organisation.
First Kontakt
One key ingredient in the process of building your compositional palette is deciding how you want to work with Kontakt. The lazy approach is to use a separate instance per instrument or articulation, which can soon lead to a cumbersome and overbearing track count.
Alternatively, use a combination of Kontakt instances and strategically built Multi Racks inside of Kontakt, either to group related instruments (a wind section, for example), or what I find most useful: a grouped set of related articulations.
Although some composers prefer using keyswitching for articulations, the Multi Rack approach has the benefit of level control for each articulation, for example making it easy to lift the amplitude of a spiccato sound while reducing the legato.
The benefit of using the Multi Rack system (as well as loading complicated banks of sounds quickly) is that you can also think strategically about mixing. As well as the aforementioned control over the articulation level, you also have the benefit of using signal processing across your selected group of sounds. For example, where you’re moving between different articulations on-the-fly it’s interesting to note how the application of compression can really help knit the performance together. Where you still need to split elements out, consider using a Multi Output version of Kontakt so that you can direct one or more instruments to individual outputs.
Once you’ve pre-assembled your collection of Kontakt Multis, you then need to consider how best to work with them. Saving the project as a whole is one solution, although of course this means the complete sound palette is loaded every time you start a new cue. A more RAM-efficient solution is to save the template on a per-Multi basis, either using Kontakt’s own Multi Save feature, or an equivalent function in your DAW that stores the current channel strip setting. Once saved, you can import complicated banks of sound with relative ease and efficiency.
For a solution that bridges the per-Multi approach and a complete RAM-heavy template, consider using a feature that lets you import or recall multiple tracks. Most DAWs feature some form of multiple track import from another project, so that your master template can be imported in a more piecemeal way, eg, adding just the string tracks rather than the complete orchestra. In Logic Pro X’s case there’s the Track Stack feature that enables you to save and recall groups of tracks rather than individual channel strips.
As we’ve seen from previous workshops, the skill of writing music to picture is as much about the intricacies and polish of your workflow as it is about your ability to write a good melody. Removing the barriers to your composition process – even if that’s as simple as quickly finding the correct sound – ultimately gives you more time to concentrate on musical decisions, which should really form the heart of your creative workflow.
Investing time in building your own compositional palette is time well spent, and will reap dividends every time you use it to start a composition!

Building a Palette in Kontakt

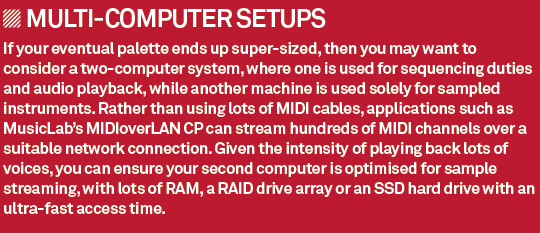
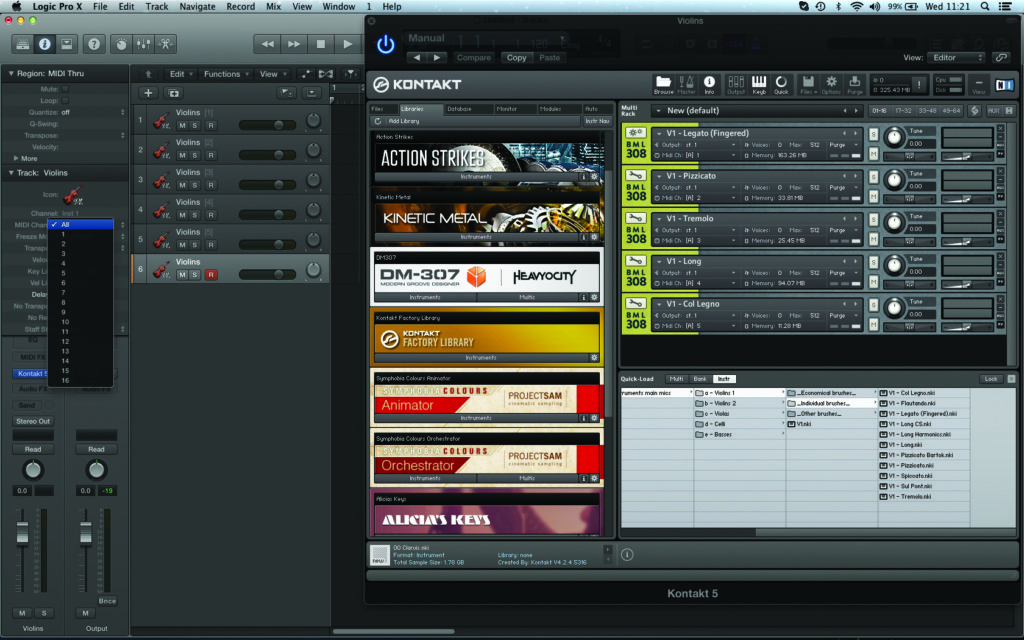
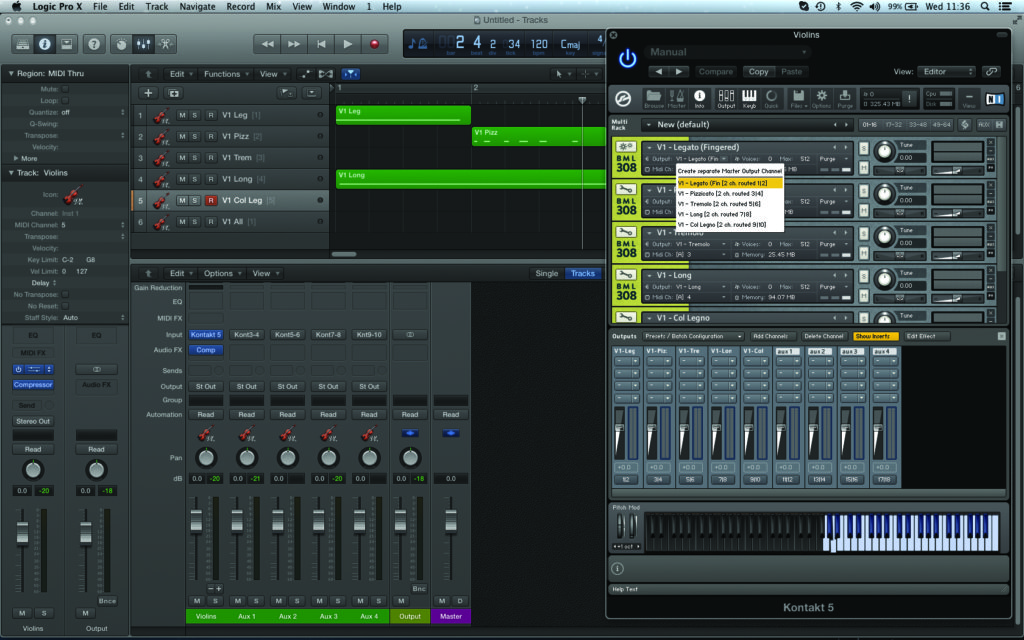
1: Create a new instrument track, assigned to MIDI channel 1. Open an instance of Kontakt, which we’re going to use to create a Multi for our Violin section complete with multiple articulations to cover a range of playing styles
2: It’s worth noting Kontakt’s Quick-Load tab, which can be a useful way of accessing favourite patches (dragged across from the Libraries section), or as a means of browsing libraries that don’t support Kontakt’s Library system.
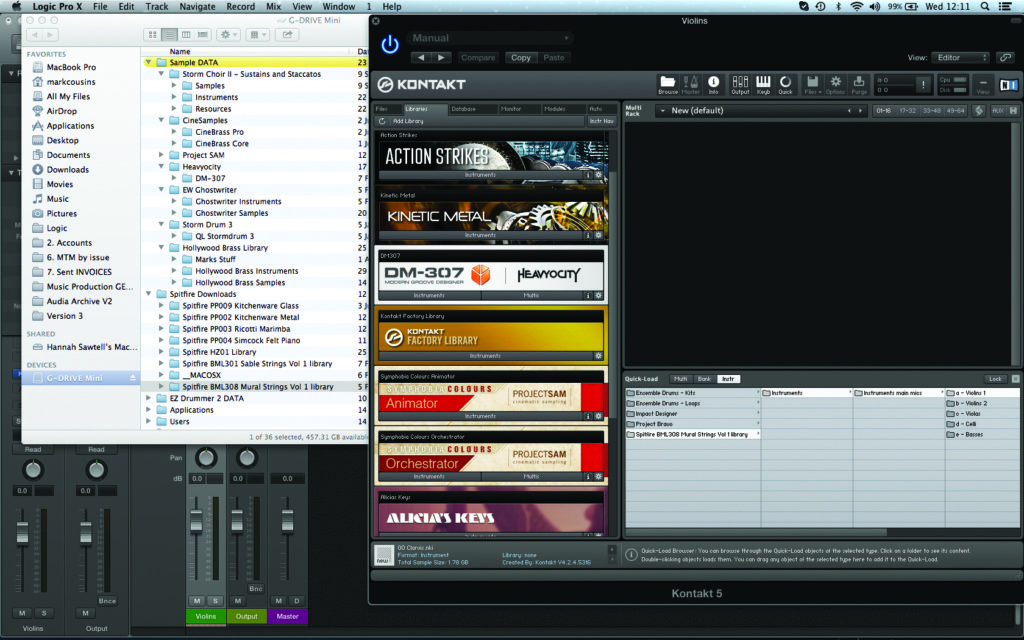
3: Start assembling your Kontakt Multi by dragging instruments into the Multi Rack area. In this case we’re using a series of Violin articulations – found in the Individual Brushes folder – from Spitfire Audio’s Mural (loaded from the Quick-Load section)
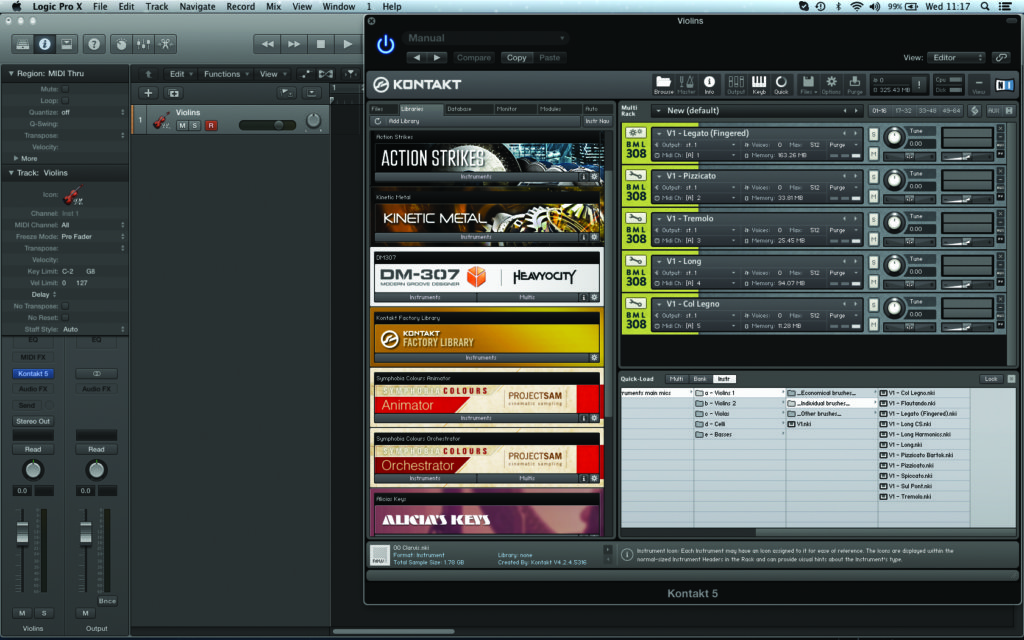
4: Now create a series of tracks (with an incremental MIDI assignment) that correspond to the instruments in Kontakt’s Multi Rack. In Logic Pro, for example, you’d use the menu command Track > Other > New Track With Next MIDI Channel
5: One interesting option, which we’ll explore in a future workshop, is to leave one of the tracks in an ‘All MIDI channels’ setting. This is useful if you want to move dynamically between articulations in the same musical part
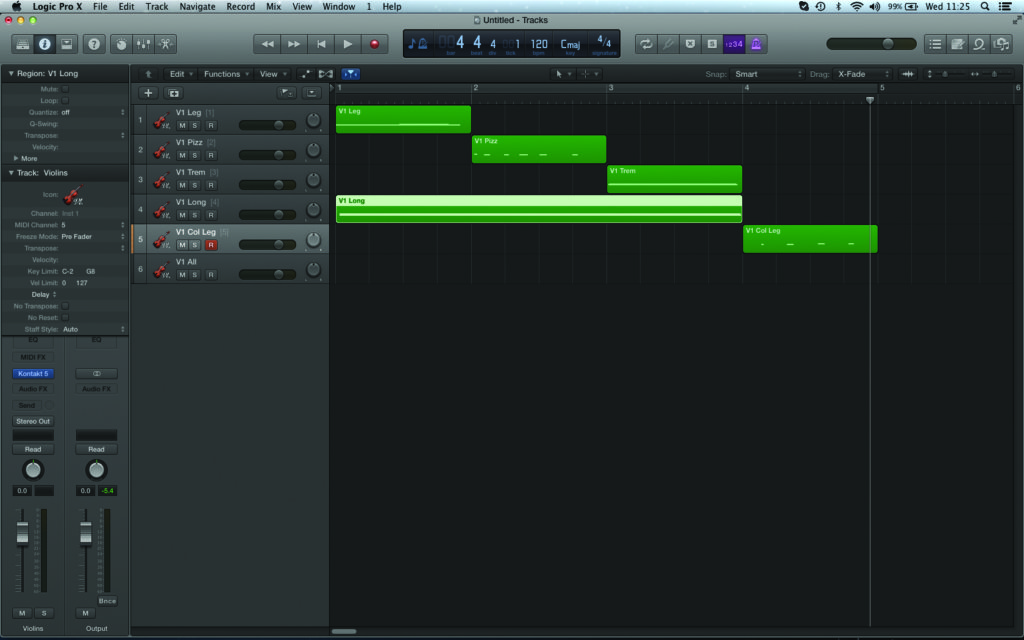
6: With the other tracks named, you should be able to record your music using the various articulations, moving between tracks to select the desired playing style. Regions are then automatically named, making it clear to see how the music is being played
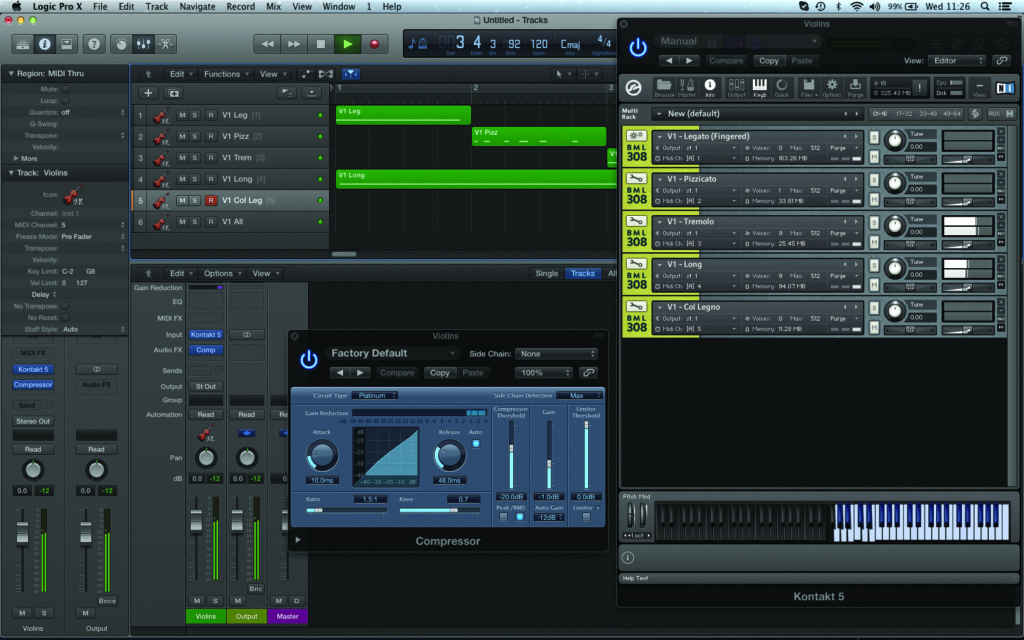
7: The advantage of working in this way is having control over the various articulations using Kontakt’s mixer, while the instrument as a whole travels down a single DAW channel strip. Add compression, for example, to ‘knit’ the articulations together.
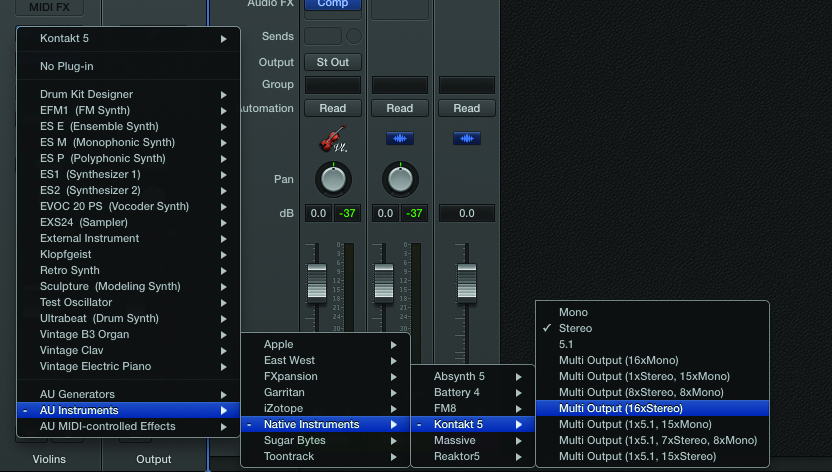
8: There are situations where you may want the articulations to address individual outputs, maybe to add some treble to the pizzicato, for example. To do this, you’ll need to add a Multi Output version of Kontakt from your DAW’s mixer.
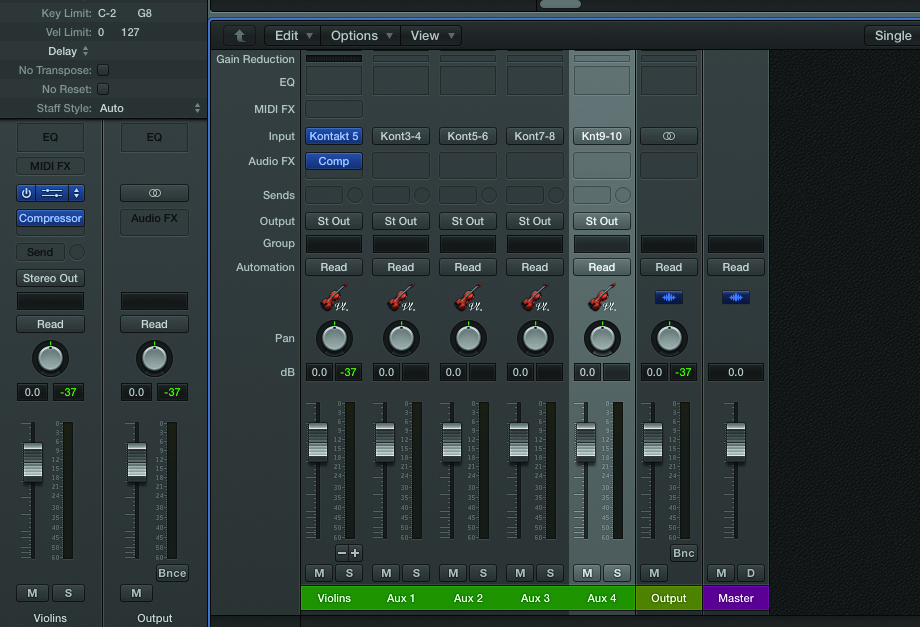
9: Once you’ve added the Multi Instrument version of Kontakt, you’ll then need to create additional auxiliary mixer channels in your DAW for the corresponding number of outputs. In Logic Pro X, this is achieved by clicking on the small + sign
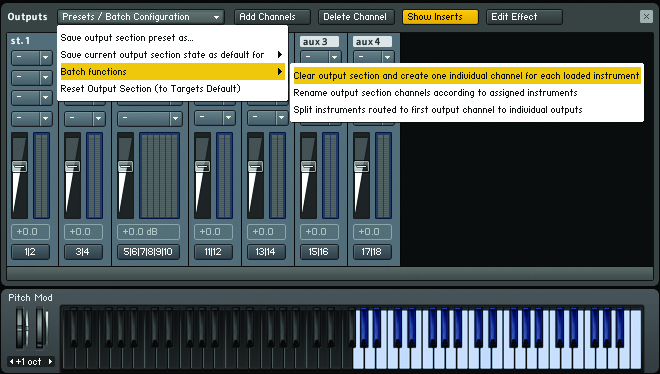
10: Now we need to route the instrument in Kontakt. Open the Mixer screen and from the dropdown menu select Batch Functions > Clear Output Section And Create One Individual Channel For Each Loaded Instrument in order to route all the articulations.
11: As well as creating new Kontakt mixer strips for the instruments, note that Kontakt has also routed each individual instrument in the Multi Rack. If you want, you can change this assignment, possibly to route two articulations down the same path

12: Once you’ve created your Multi, consider the best way of saving the template. In Logic we’ve saved the set-up as a Track Stack, but you could also choose a selective track import, saving an individual channel strip setting, or saving the Kontakt Multi

