Integrating External Effects and Synths in Cubase 9.5: Step-by-Step (Continued)
Adam Crute returns with a slightly mathematical bent as he continues his guide to using external effects and synths in Cubase. Calculators at the ready… 7. Close the MIDI Device Manager, and select Audio Connections from the Studio menu to open the Audio Connections panel. Click on the External Instruments tab and then click the […]
Adam Crute returns with a slightly mathematical bent as he continues his guide to using external effects and synths in Cubase. Calculators at the ready…
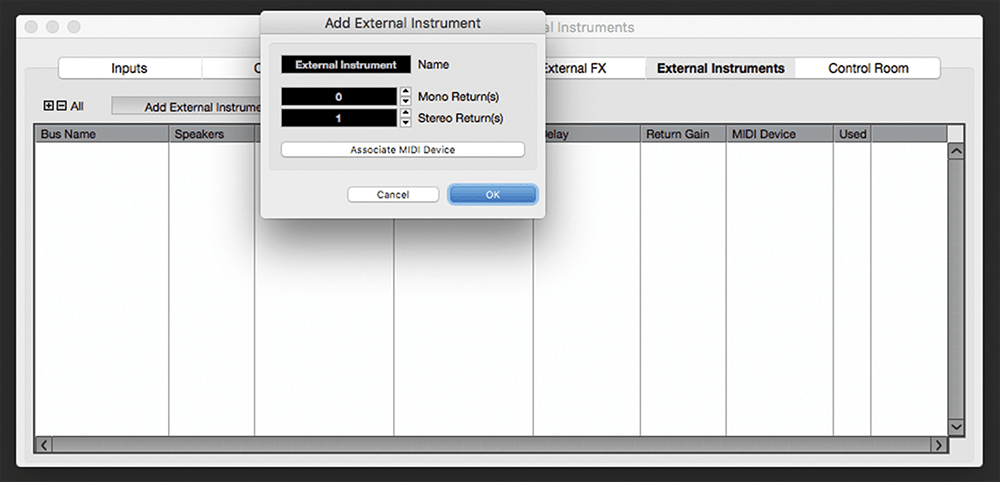
7. Close the MIDI Device Manager, and select Audio Connections from the Studio menu to open the Audio Connections panel. Click on the External Instruments tab and then click the Add External Instrument button.

8. In the panel that opens, enter your instrument’s name and appropriate values in the two Returns fields – what you put here depends on your hardware and what audio connections you have made to Cubase.

9. Click the Associate MIDI Device button and select the MIDI device that we have just created. Click OK to add the instrument and return to the Audio Connections panel where the instrument will now be listed.

10. Use the Audio Device and Device Port columns of the instrument’s list entry to specify the audio interface ports the it’s connected to. When done, close the panel and create a new empty project.

11. Create an Instrument track and assign your instrument to it. Play some notes – your synth should be audible within Cubase. If it sounds ‘doubled’ use your control panel to disable input monitoring for the return channels.

12. Load a percussive sound into the synth. Right-click on Cubase’s timeline and switch to Samples and create a few short notes on the instrument’s track. Export this as audio and re-import it to a new track.
![]()
Gotcha! Beware the input monitoring mixup If your audio interface input-monitors the return signals arriving from your hardware, those signals will ‘double’ with the signal being fed to and mixed within Cubase. Disable input monitoring on channels that are fed by external hardware.

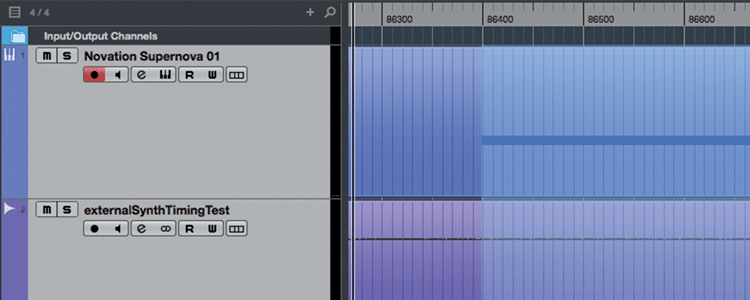
13. Zoom the view in very close so that you can see the offset between the MIDI note start and the corresponding audio. Use the Range Select tool to measure this offset and make a note of the value.

14. Convert the range length from samples to milliseconds by dividing the number of samples in the range by your project sample rate; for example 486 / 44.1 = 11.02ms. (Measuring in samples and converting ensures accuracy.)

15. Re-open the Audio Connections panel and switch to the External Instruments tab. Enter your calculated plugin delay into the Delay column – it’s ready to be used anywhere a software instrument can be used.

16. Let’s add an effects processor. Create a MIDI Device for the processor (if MIDI equipped) using the same method as previously. Then, switch to the External FX tab of the Audio Connections panel and click Add External FX.

17. Enter a name, select appropriate Send and Return configuration settings and specify a MIDI Device (if relevant). Click OK to return to the Audio Connections panel and specify which ports the device is using.

18. Close the panel, create a new audio track and add the new plugin as an insert effect. A small plugin control panel will open – click the small button in the panel’s upper-right to calculate automatically the plugin delay.