Weekend Workshop: Master wavetable synthesis for free with Surge
Discover the advanced sound-generation capabilities of this powerful open-source synth.
Weekend workshop Surge wavetables
In the first part of our guide to plug-in super-synth Surge, the now open-source brainchild of Bitwig founder Claes Johanson, we looked at the much of the instrument’s functionality including analogue-style oscillators, waveshaping, filtering, frequency modulation and ring modulation capabilities.
This time we’re going to dive into Surge’s wavetable modulation features, and see how we can make some rich-sounding stabs, leads and grungy modulating bass tones.
Wavetables are a series of waveforms that you can smoothly morph between to create complex timbres. Wavetables tends to sound more complex than traditional analogue-style oscillator waveshapes. The wavetables in Surge contain up to 4096 single cycle waveforms ranging from samples and recordings of vintage gear to entirely new creations.
While Surge’s wavetables are pretty easy to use, we do recommend you follow the previous tutorial before tackling this one, to get an idea of the instrument’s basics. Remember this plug-in is entirely free, so you don’t need to splurge to Surge!
What you’ll need:
- A DAW.
- Surge – free download available here.
Setting up simple wavetable modulation
We’ll start by loading Surge up on a MIDI track. If you haven’t already, you might want to resize its dinky interface by dragging any of the interface window’s edges or corners, or by clicking the Zoom button in the Status panel at the top of the interface and selecting a new Zoom level.
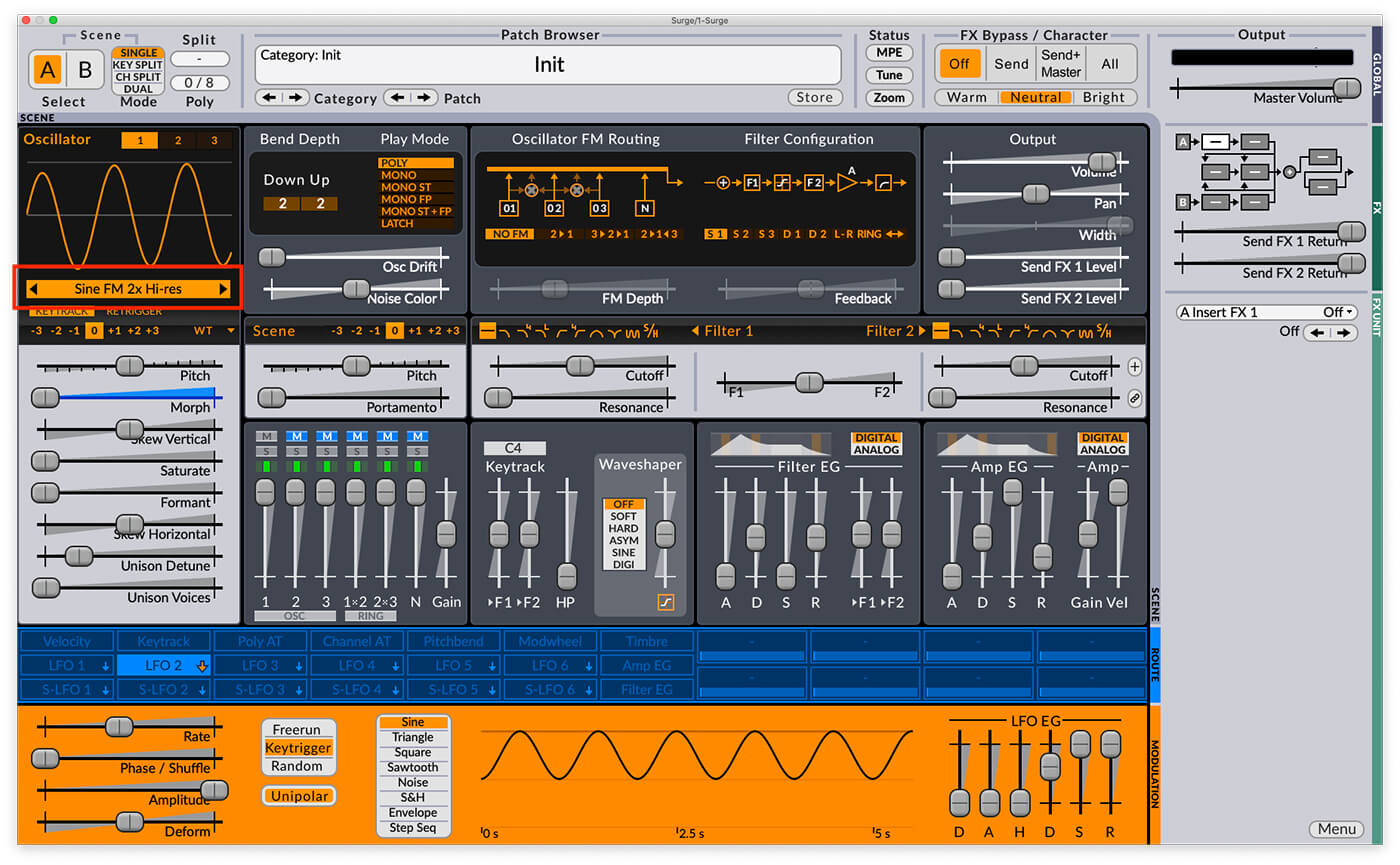
Surge’s initial patch has a single active oscillator that’s set to the analogue-style ‘Classic’ mode by default. Click where it says Classic to bring up a menu of the various available oscillator types.

Select Wavetable, and a new sinusoidal waveform will appear, along with the name of the currently loaded wavetable, ‘Sine FM 2x Hi-res’. Play a note and sweep the Morph fader. You’ll hear the sound change as you move the fader, and the waveform display will give you visual feedback too.
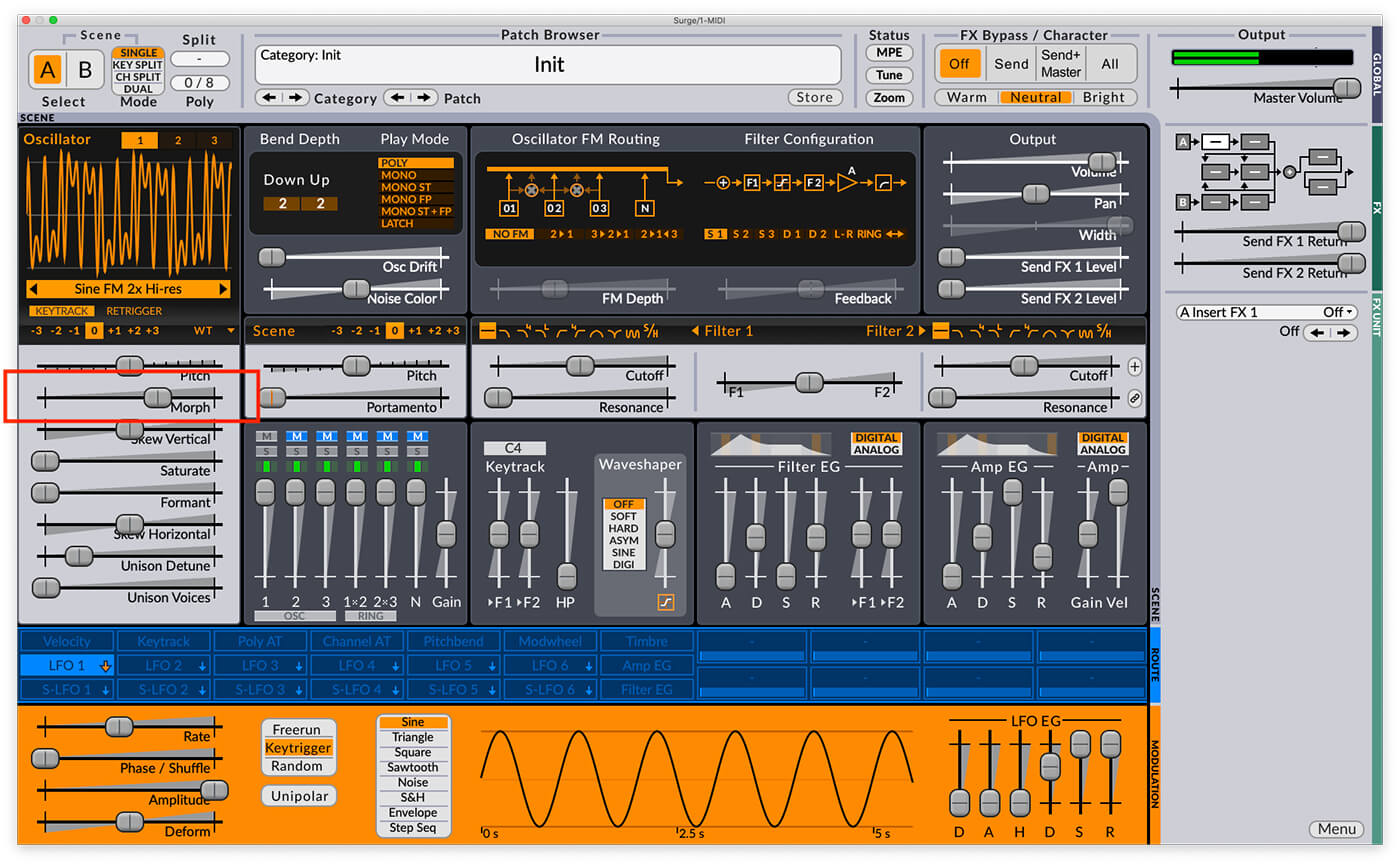
Sweeping the Morph parameter in this manner is a great way to hear the spectral content of the wavetable, but let’s set things up so we can audition each wavetable with less effort. Return the Morph fader to 0%, then double-click the LFO 2 button in the Route panel – it will turn green which means it’s ready to be assigned to a destination. Drag the horizontal Morph fader to the right to set the LFO 2 > Morph modulation level to 100%.
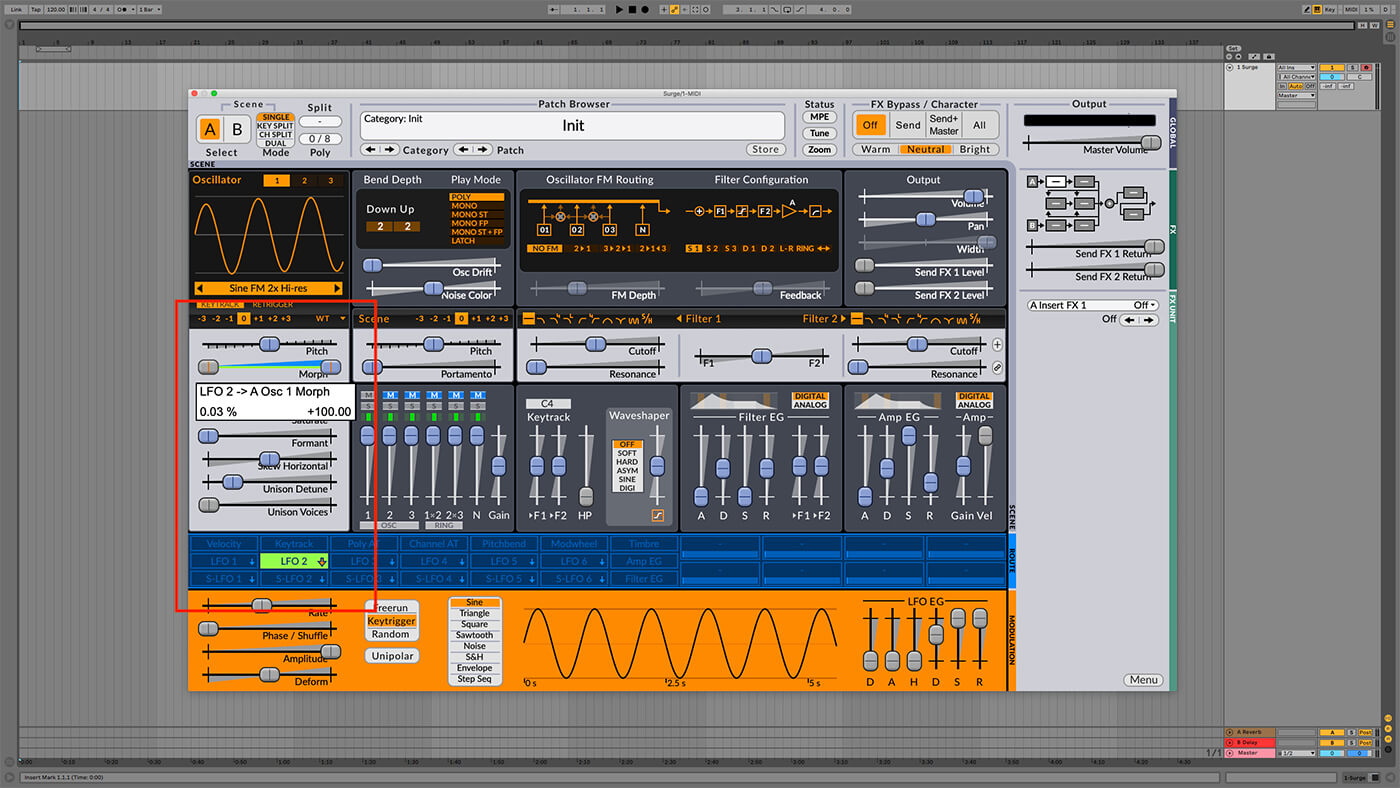
Then, click the LFO 2 button again to leave the modulation assignment mode.
Now when you play a note, you’ll hear the wavetable cycle automatically, but you’ll notice that for half the time it’s at the pure sine position.
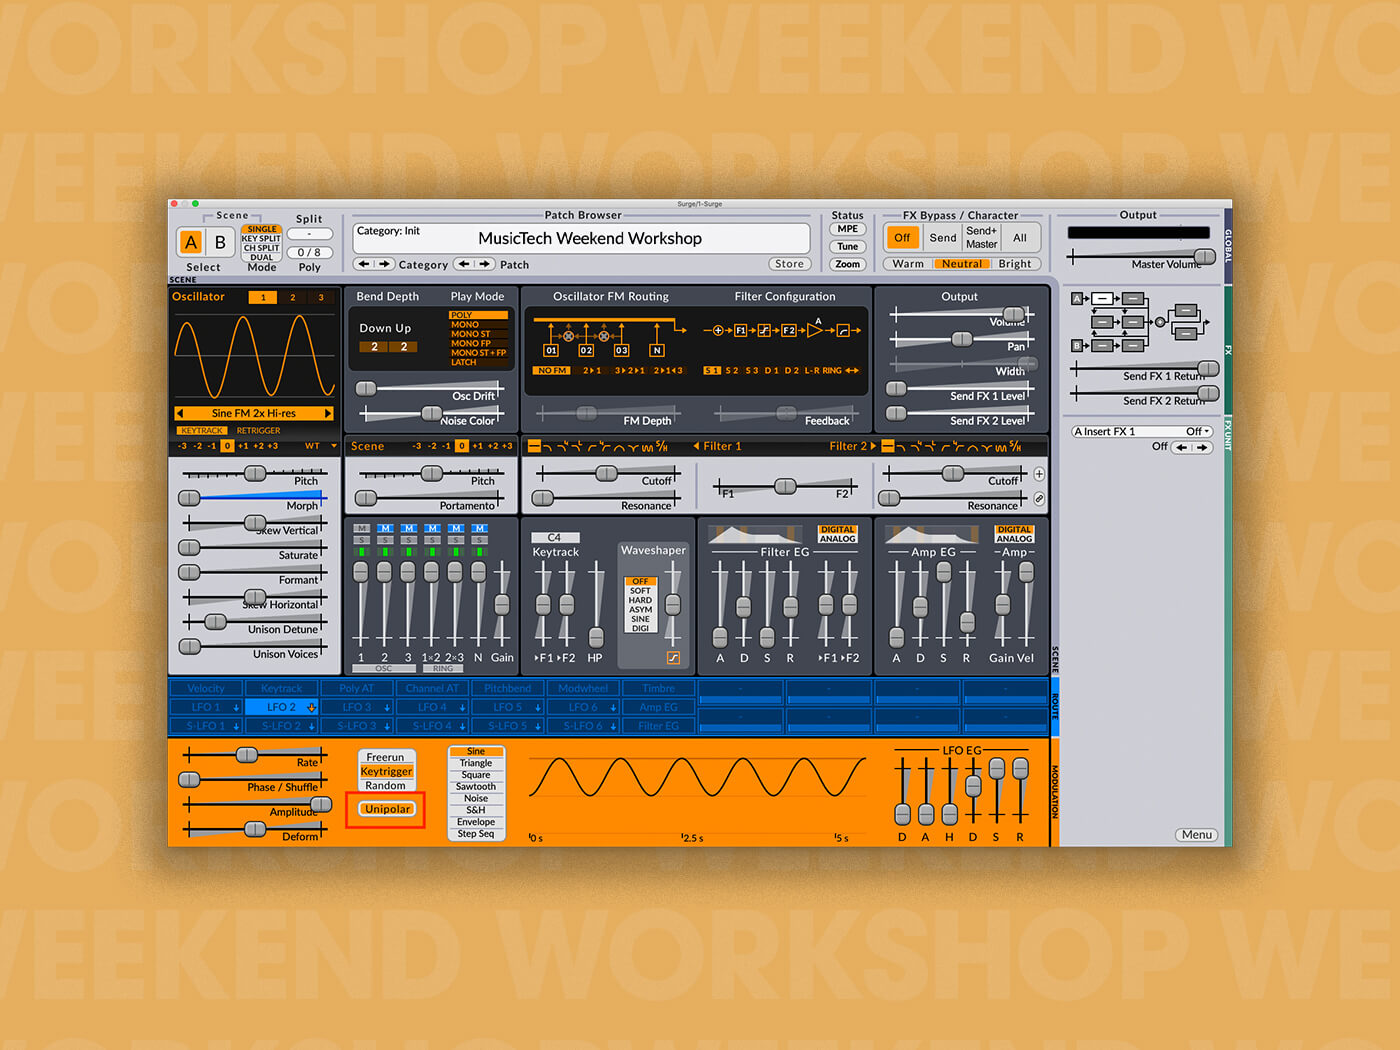
That’s because LFO 2 is currently set to bipolar mode, which means the wavetable scanning position cycles between -100% and 100%. Click the Unipolar button in the Modulation panel and the wavetable will be scanned between 0% and 100%. This gives us smooth, always moving wavetable scanning that allows us to hear every wave in the wavetable.

Exploring the available wavetables
Now we can conveniently hear the spectral content of each wavetable in a few seconds without having to move any parameters manually. That means it’s time to audition some wavetables. You can load a new wavetable by clicking the wavetable name to bring up a menu of wavetable options. Alternatively, click the arrow buttons on either side of the wavetable name to cycle through the available wavetables.
Try cycling the left-hand button to try out a few wavetables. You’ll see that wavetables can recreate common virtual-analogue techniques such as PWM (pulse width modulation), oscillator hard sync and detuned sawtooth oscillators. They can also recreate more specific sounds such as Yamaha CS-80 sawtooth filtering and formant filter sweeps.
Open the menu and select Sampled > Glissy.
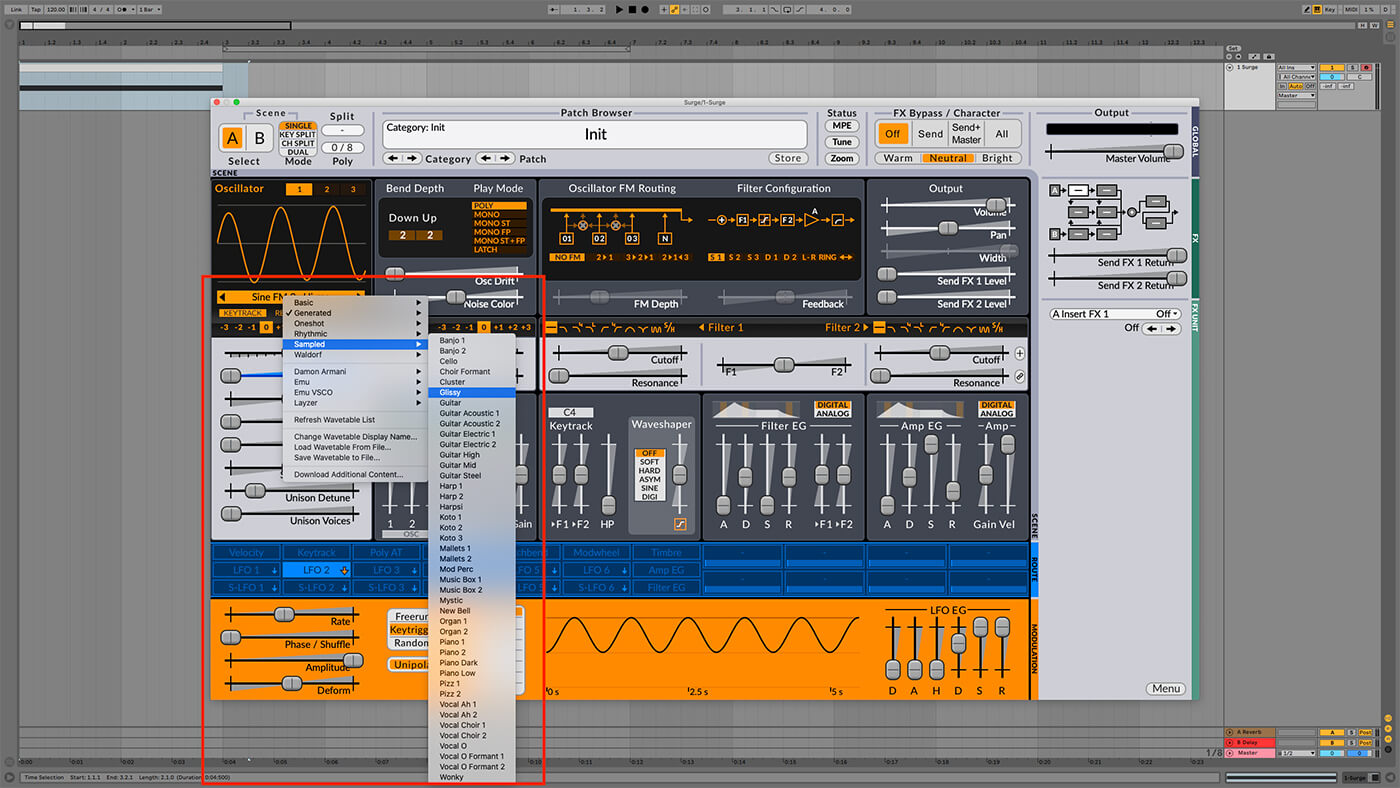
This gives us a natural, organic-sounding tone that you could use to create electric piano-style tines.
At the other end of the spectrum you have wavetables such as Layzer > Morphs > Morph 9. This wavetable sounds less natural but has much more harmonic complexity.
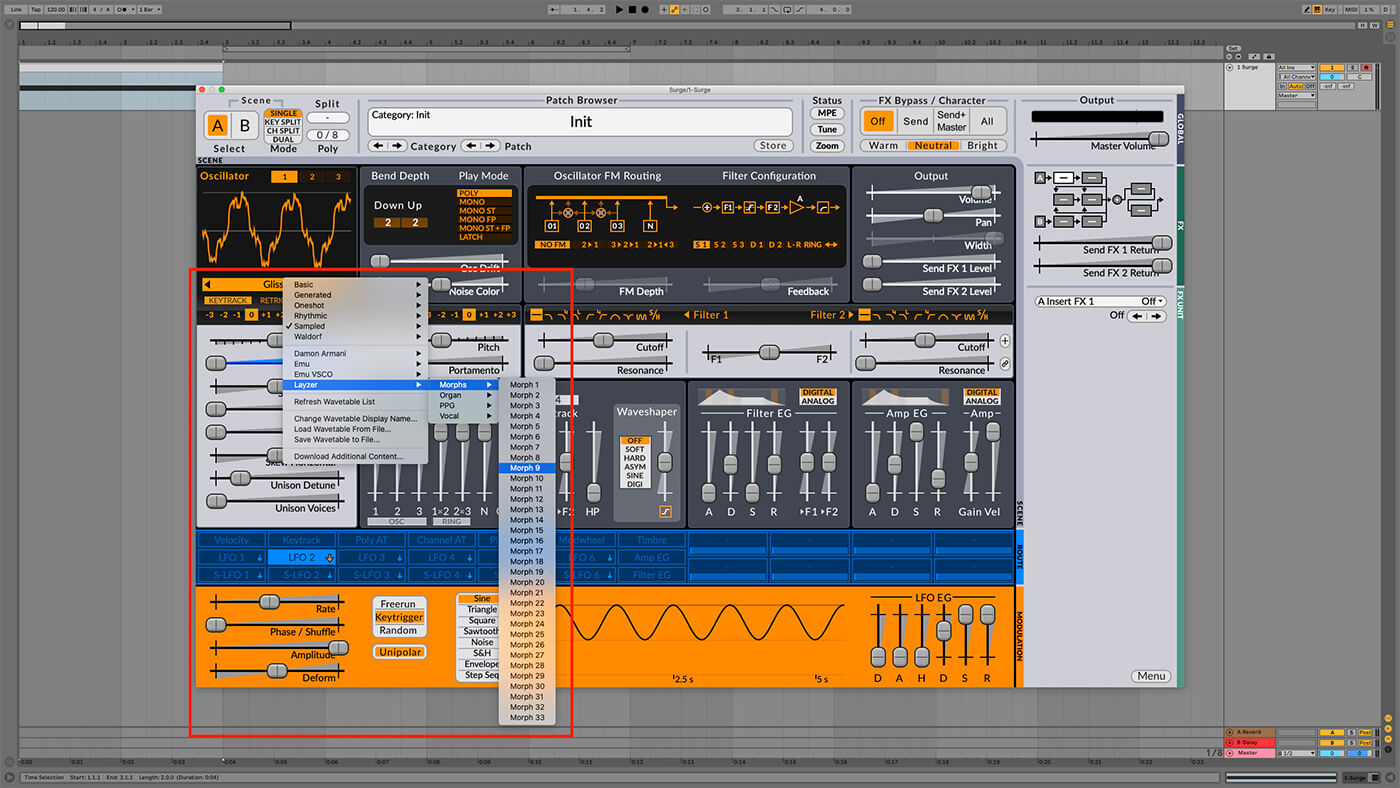
Let’s see how far we can take this sound.
Adjusting wavetable parameters
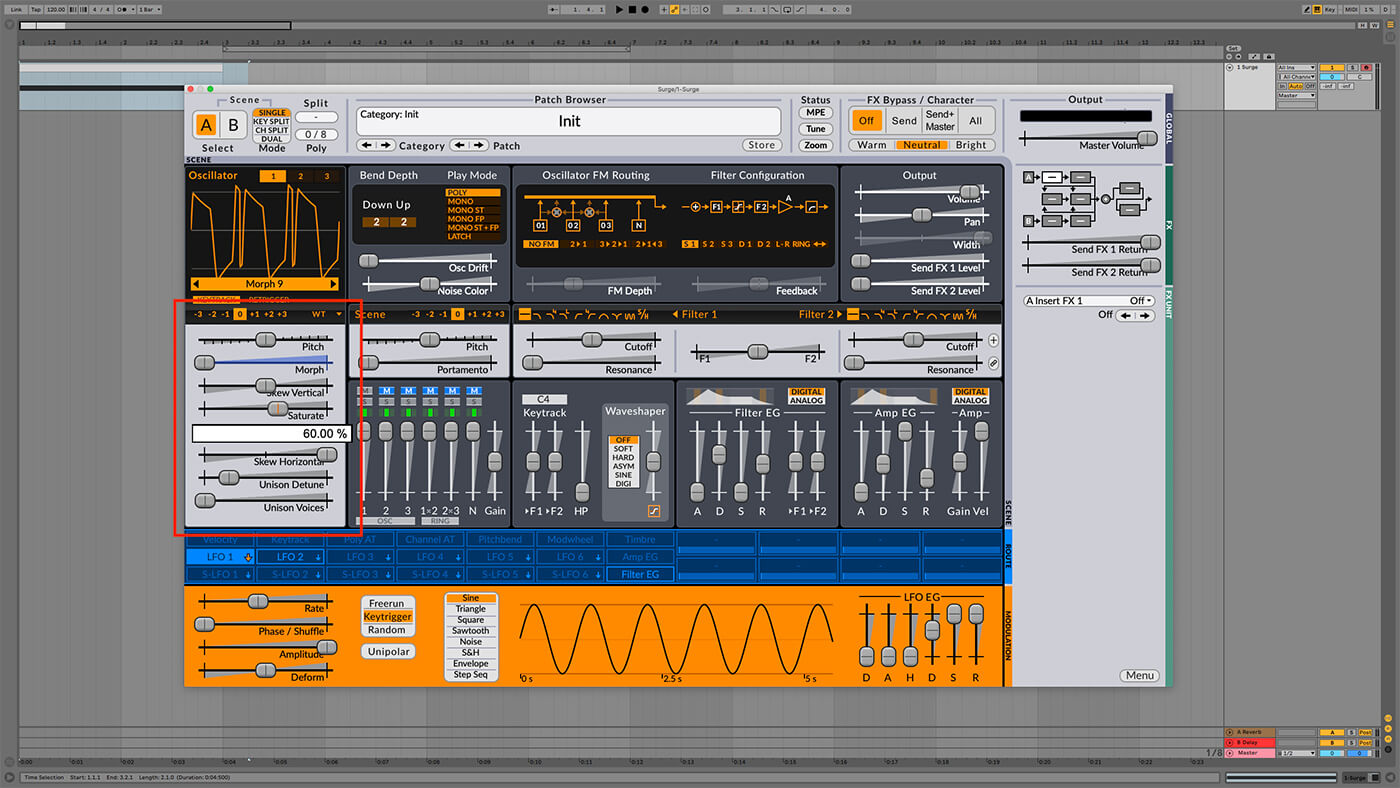
Alongside the horizontal Morph fader In the Oscillator panel, you’ll see various parameters for adjusting the sound of the wavetable playback. Let’s start by checking out Skew Horizontal. This works a bit like a pulse width control, and turning this up to 100% gives us a more ‘present’ sound.

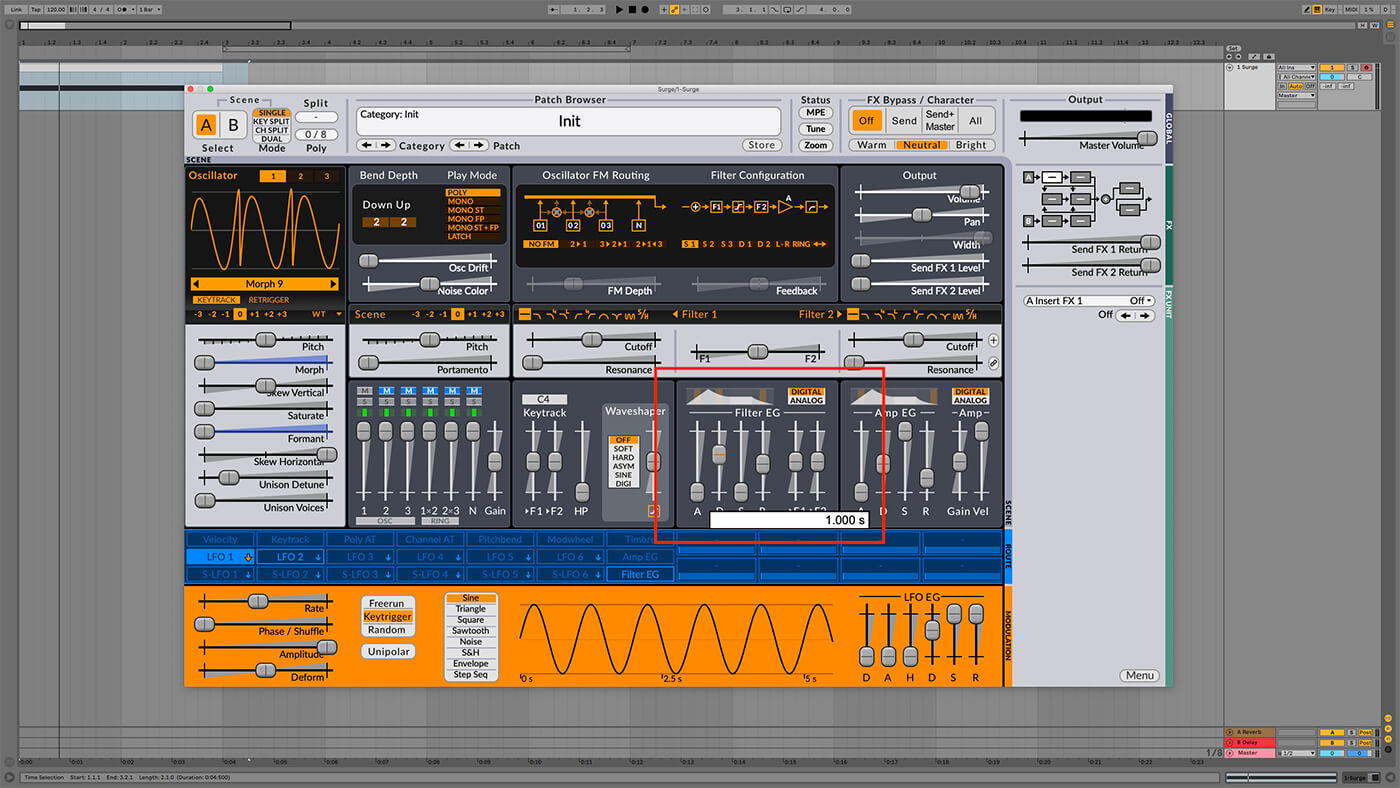
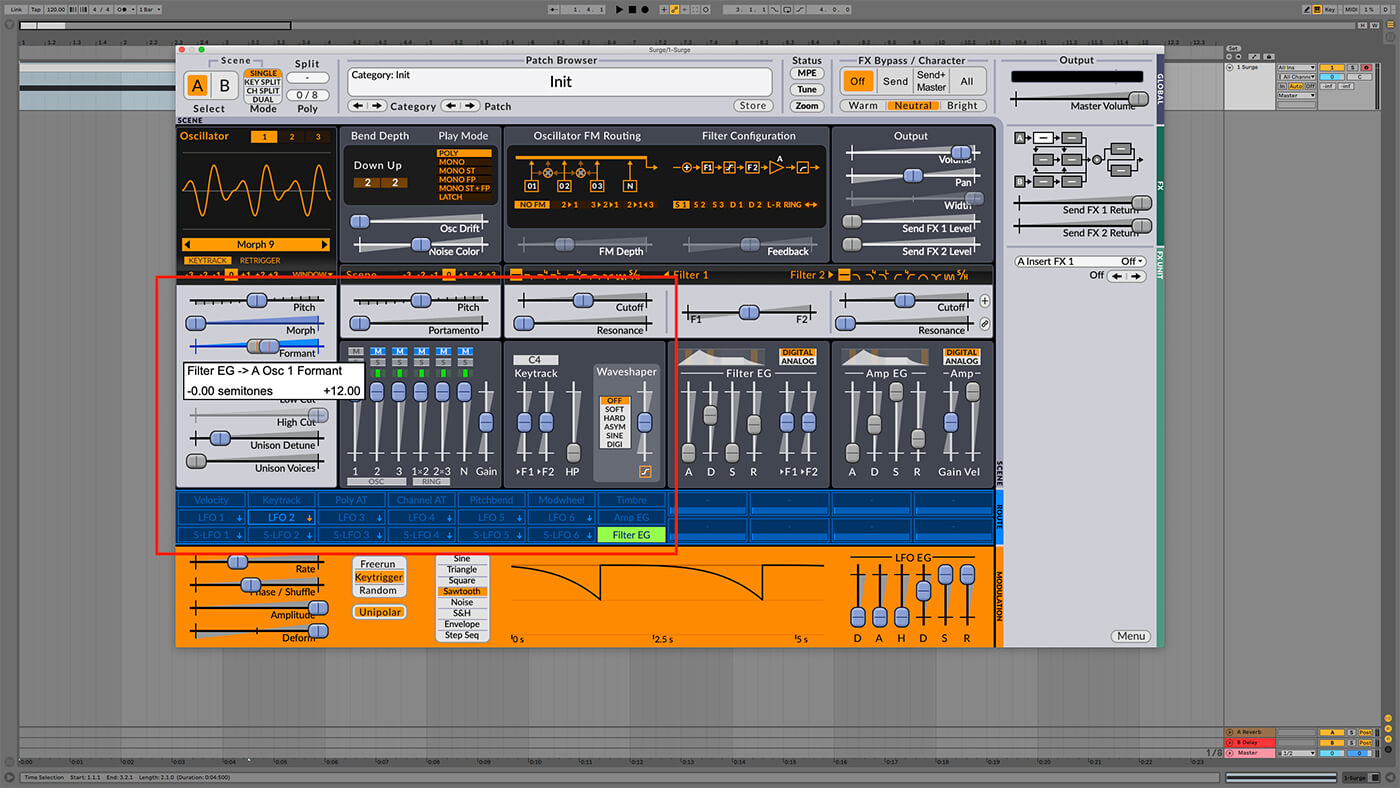
According to the synth’s manual, the Formant control “compresses the waveform in time but keeps the cycle-time intact”, so again this is a little like a variation on a pulse width control, and we can get a dynamic effect if we sweep this rapidly as the sound plays. Let’s use an envelope to modulate this parameter for us. Double-click Filter EG in the Route panel to put it into assign mode, then drag right on the Formant fader to set it to +12.00 semitones.

Click Filter EG again to leave modulation assignment mode. You can now control the speed of the Formant parameter movement using the D (Decay) fader in the Filter EG panel. Set this to about 1 second, so the movement takes a little longer. The first second of the sound is significantly different.
The wavetable oscillator also has a Saturate fader that soft saturates the waveform. Turn this up to 60% or so to rough up the sound a bit.
Adjusting the LFO modulator.
We now have a sound that’s harmonically rich with a dynamic movement, and we can adjust this movement to our whims using LFO 2’s parameters in the Modulation panel.
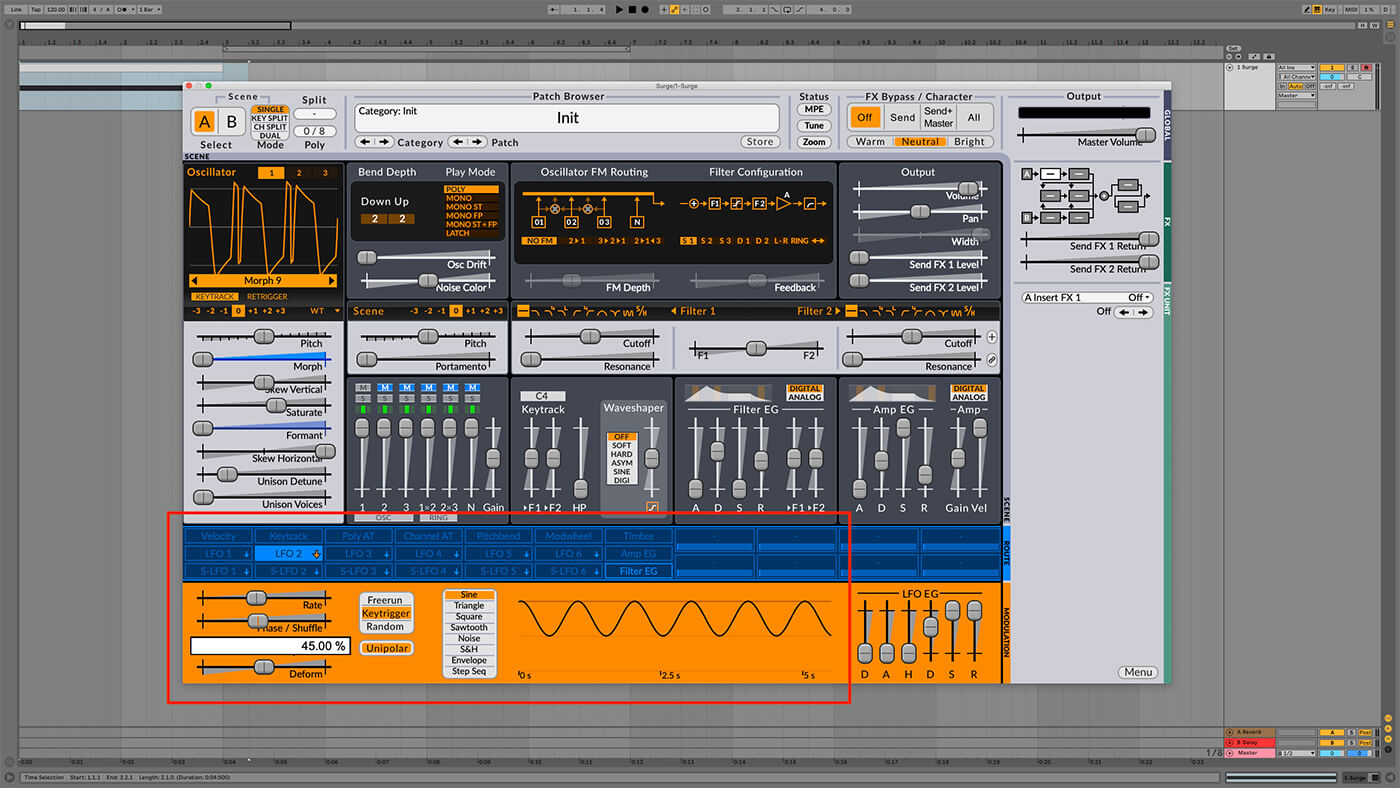
Currently, LFO 2 has sine shape, and we can adjust the LFO’s start point on the sine by using the Phase / Shuffle fader. Click LFO 2 in the Route panel to make sure it’s selected, then set the Phase / Shuffle fader to 45° so that it starts when the sine is at its peak, giving us an aggressive techy stab if we play staccato notes.
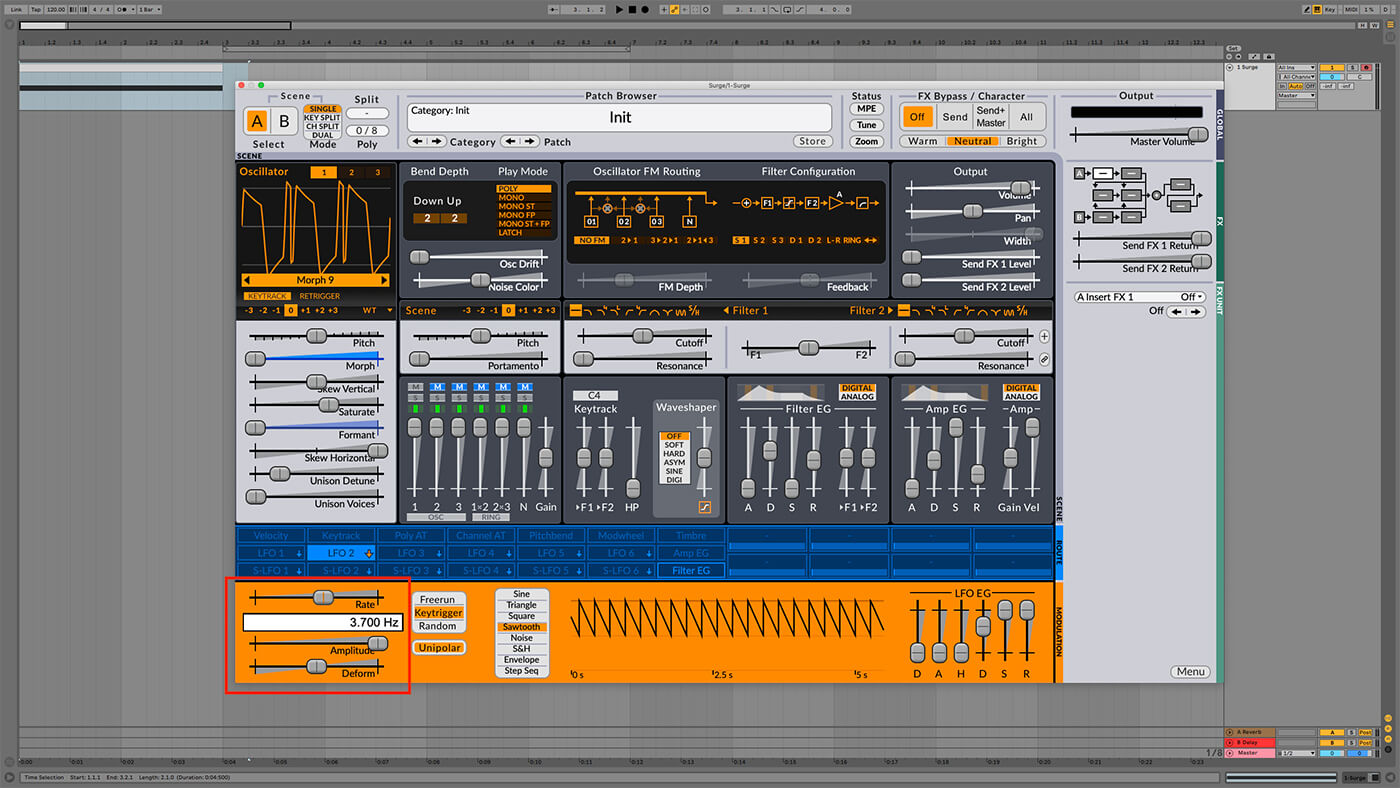
Change the LFO shape to Sawtooth. Starting at the 45° point on this sound misses the initial peak, which then comes in later if you played sustained notes.

This gives us a satisfying rhythmic movement. You can control the speed of teh LFO with the Rate fader. Turn this up to 3.7Hz or so to get a dirty dubstep feel.
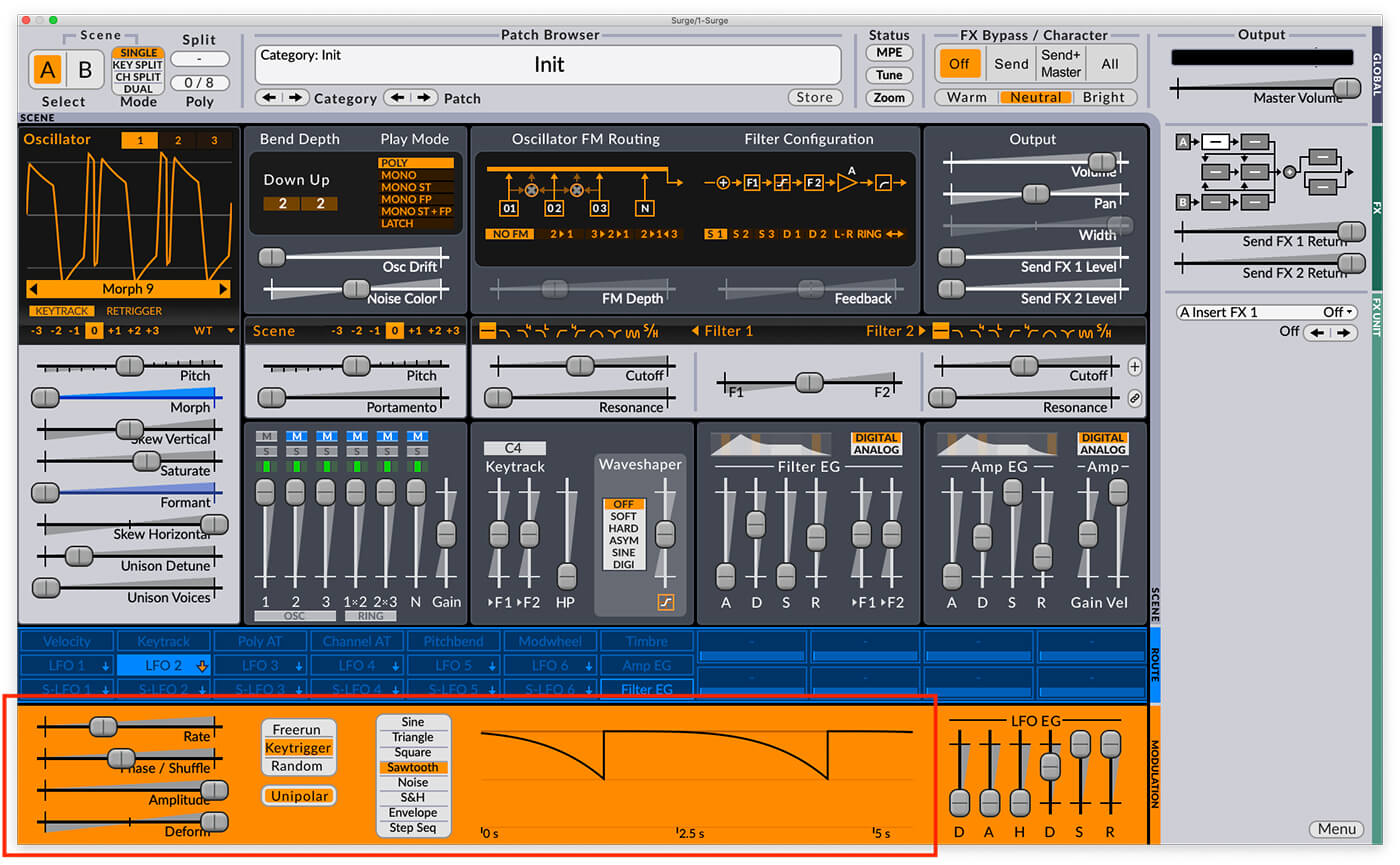
In the case of the Sawtooth LFO, the Deform fader makes the shape of the waveform increasingly convex. Turn it up to 100% and turn the Rate down to 0.35Hz or so to get a really grungy FM-style sweep.
Windowed Mode
In addition to the regular Wavetable mode, Surge also features an alternative ‘Window’ mode. Let’s check it out now. Change the oscillator mode from Wavetable to Window using the drop-down menu.
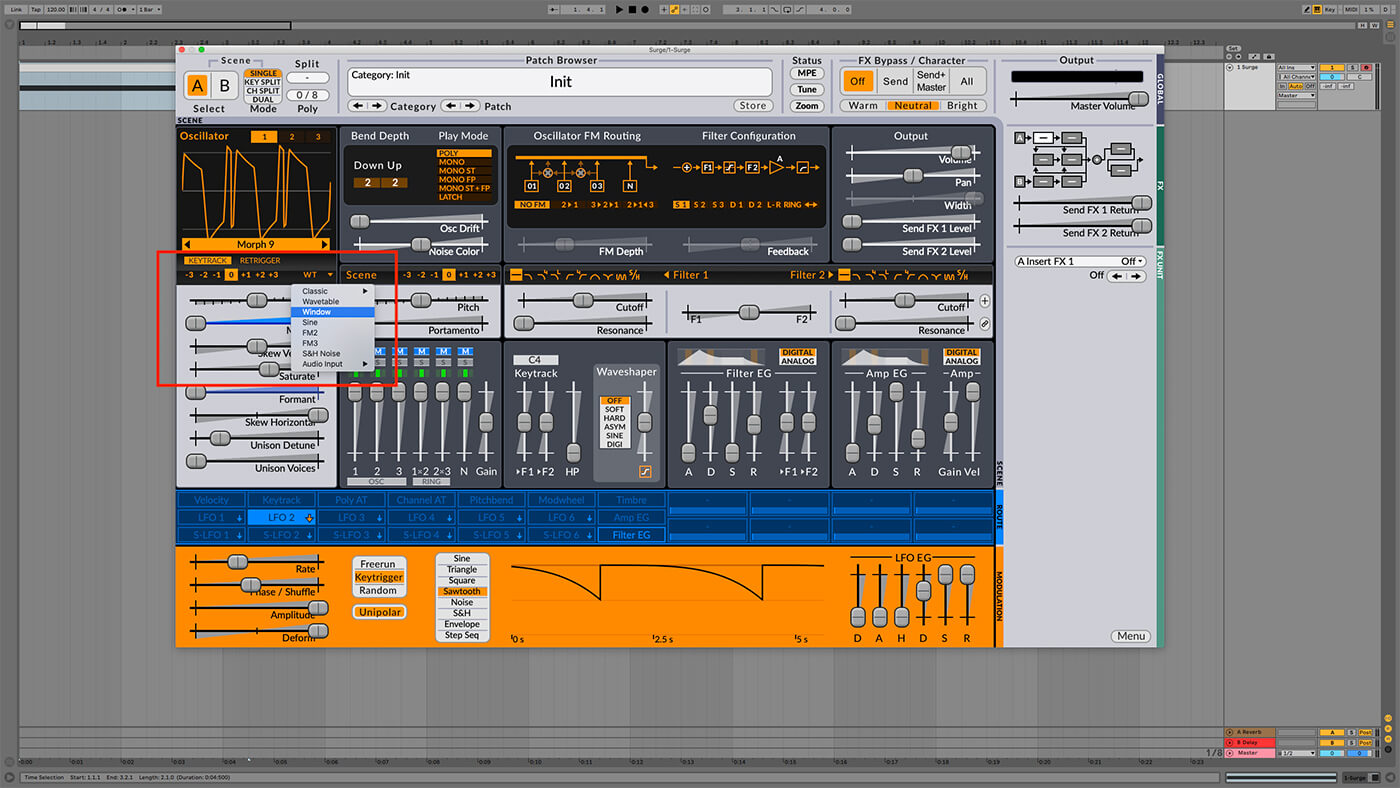
Window mode multiplies the current wavetable by one of nine ‘window’ waveforms. Set the Window fader to Sine, and try sweeping the Formant fader as you play a note. In Window mode, the Formant parameter controls the pitch of the wave independently of the window, giving us a hard sync-style effect where the timbre of the sound changes rather than its pitch. Set the Formant to 0.00 semitones, and set the Filter EG > Formant modulation amount to +12 semitones.
This sweeps the Formant parameter giving us that hard sync-style sound automatically.
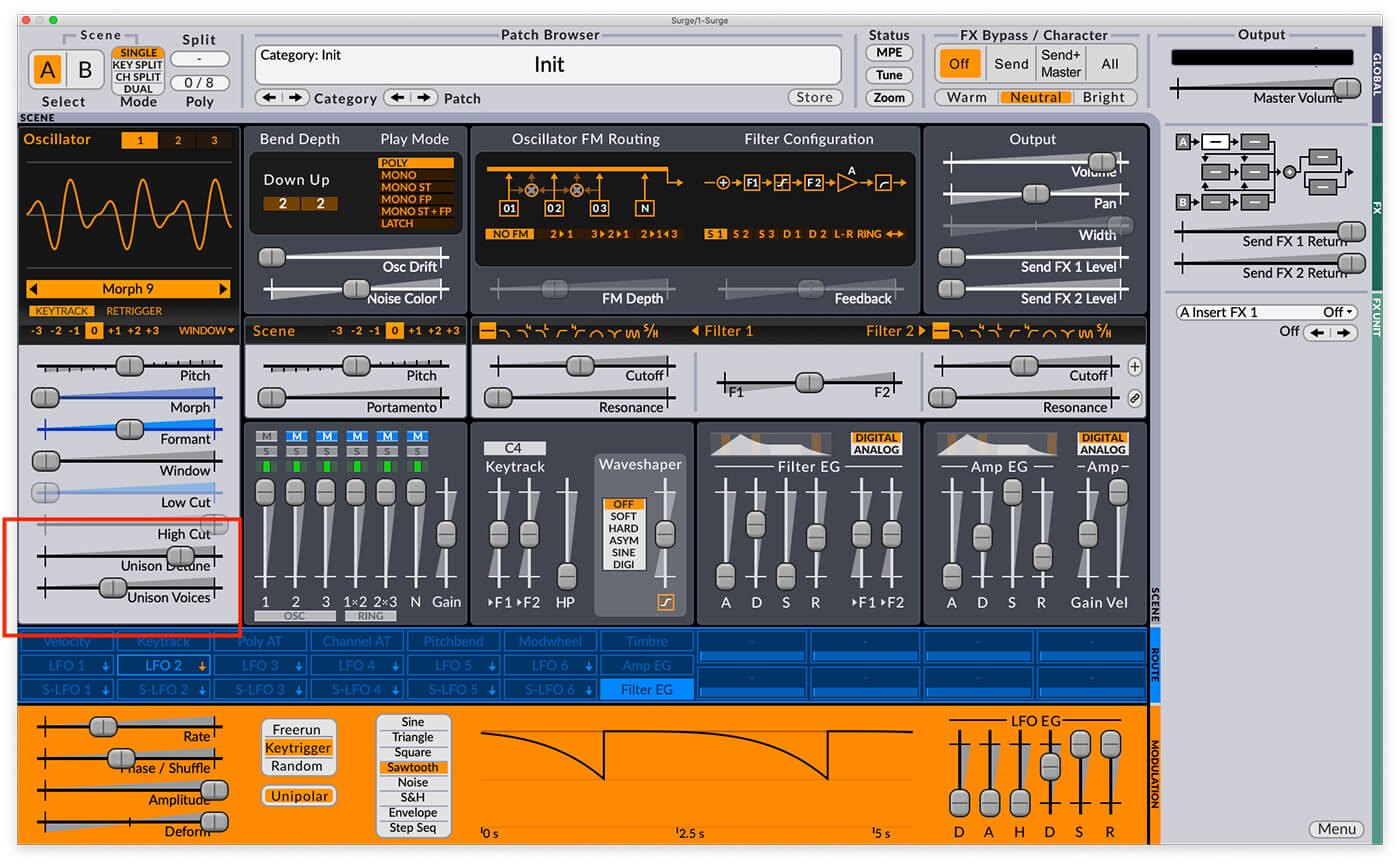
Unison Detune
One of Surge’s features that’s great for adding character and movement to sounds is its unison detune ability. This is applied per-oscillator, and to activate it all you have to do is turn up the unison Voices fader at the bottom of the Oscillator panel. Set the number of voices to 7, and turn up the Unison Detune fader to around 80 to increase the pitch spread of the unison voices.
Further adventures in wavetables
If you’re keen to explore more of Surge’s wavetable-based possibilities, then you’ll be pleased to know you can download additional wavetables here. You can even make your own wavetables with wt-tool or WaveEdit. However, these require the use of the programming language Python, so steer clear unless you’re ready to get techy.
Happy wavetabling!
We’d love to know how you found this workshop – and if there’s a topic you want us to cover in a future Weekend Workshop, let us know via our social media channels, or in the MusicTech Creator Community Group on Facebook.
Check out more Weekend Workshops here.