Weekend Workshop: Cinematic sound design with Odin 2
These four cinematic sound design techniques will elevate your potential film score or trailer music.
Cinematic Sound Design
Cinematic sound design, and trailer music, in particular, can seem like mysterious arts, and they are at the heart of our Weekend Workshop this time. We often get asked how to build and combine sound design elements with musical cues to create high-energy, exciting scores. We’re talking the sort of sounds that accompany action trailers, where the world is at stake.
The key is layering elements such as huge thuds, scary risers, aggressive synthetic percussion and heart-stopping sub bass drops. In this tutorial we will be looking at four of the most useful sound design techniques that can help elevate your potential film score and trailer tracks into powerful cinematic stompers.
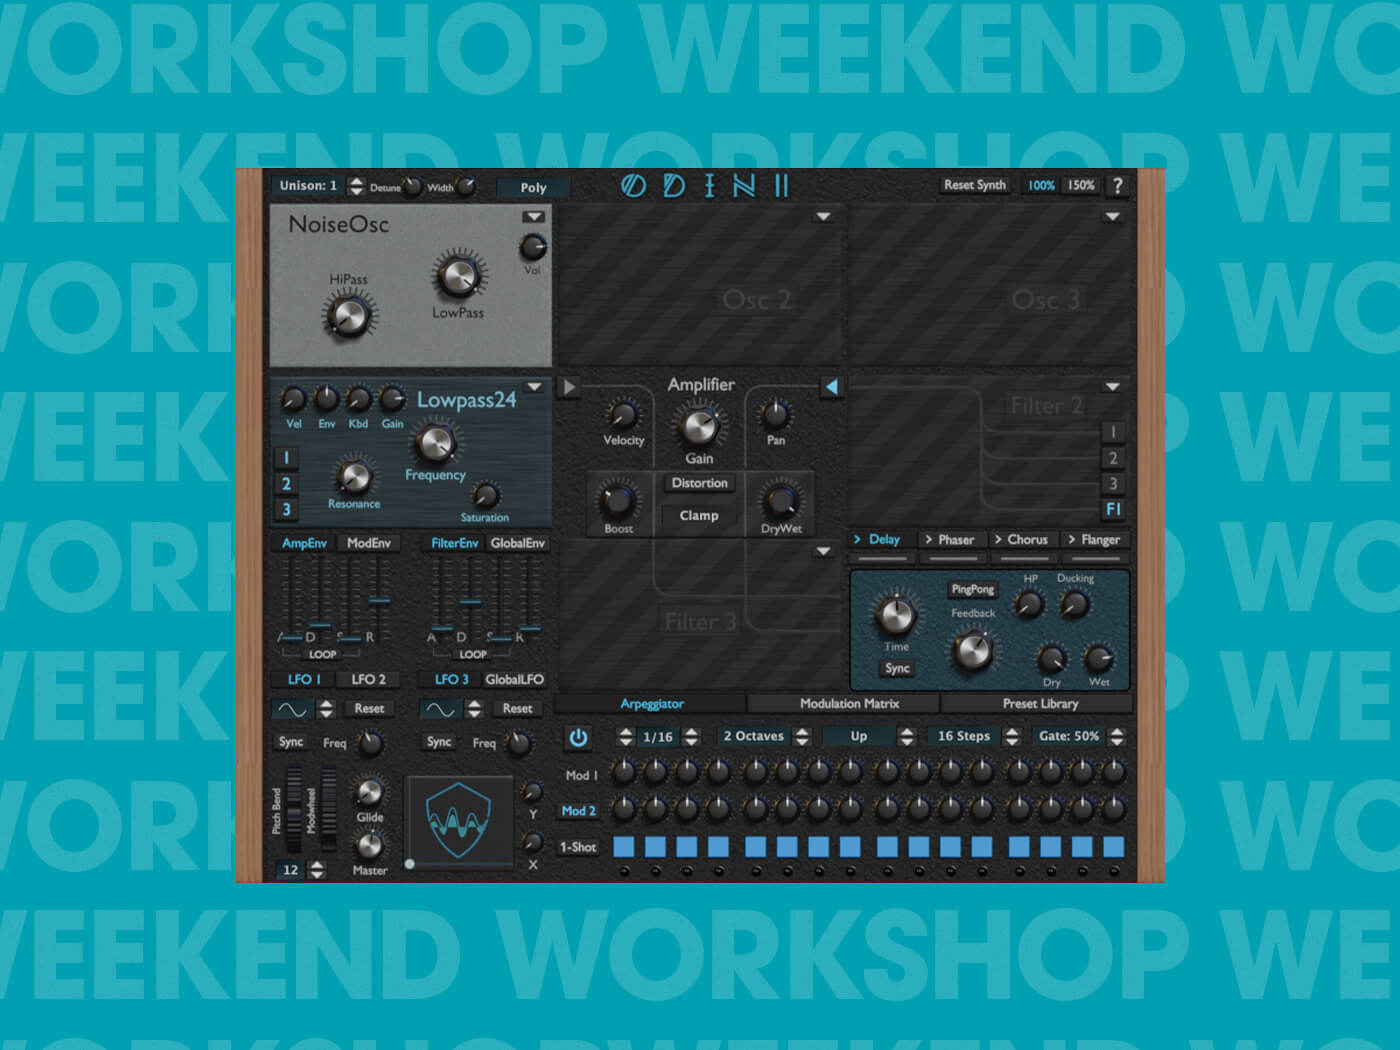
To achieve this, we will be using the freeware synth Odin 2 by The Wave Warden. It’s a hugely powerful 24-voice polyphonic synth with a lot under the hood, and we have chosen it for this workshop because you don’t have to do a lot of tweaking to get great results. It also has a built-in arpeggiator which is super useful in the trailer music world – as we will soon see.
This workshop aims to give you a starting point of making your own piece of trailer music, and this sonic foundation could hopefully take you in several different directions. We have supplied a 16-bar drum/percussion bed that we will be using as a foundation, but feel free to replace and layer as you see fit with your own cinematic drums.
What you’ll need
- A DAW
- A copy of Odin 2 by The Wave Warden (available for free here)
1.The sub drop
The most used tool in the trailer composers sonic toolkit is the sub drop. You know those moments when you’re in the cinema, and that low boom hits you like an underwater atomic explosion – that’s the sound!
Start by opening your session, setting the tempo at 127 BPM and importing our “action” drum loop that we have prepared for you (download here).
Next, open Odin 2 and select a sine wave from the waveform selection in Oscillator 1.
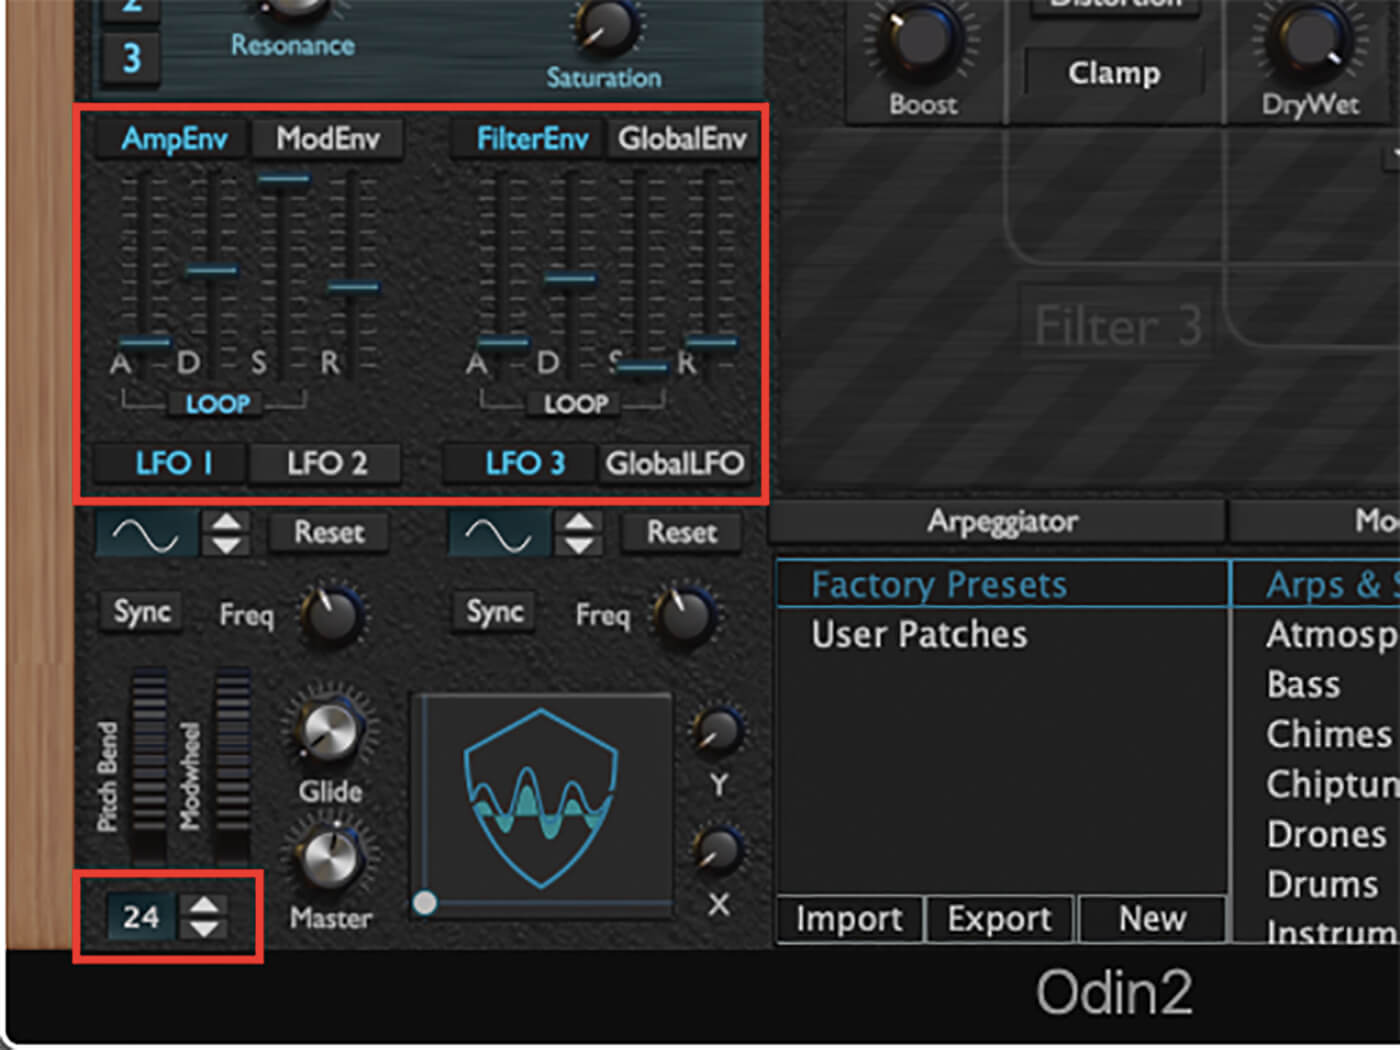
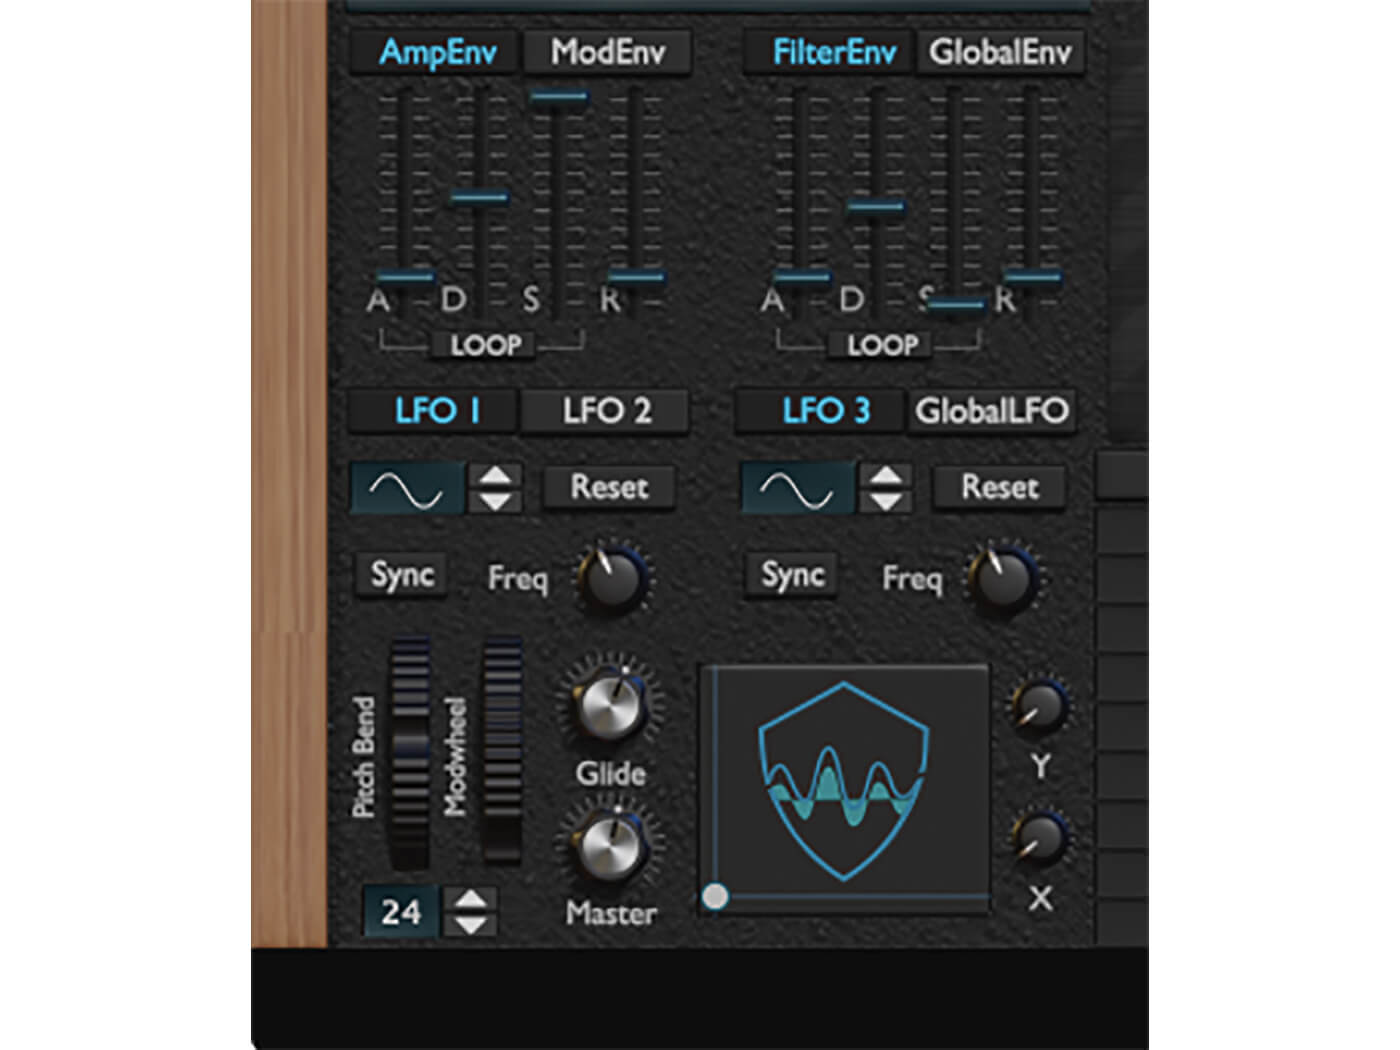
We need to check that we have a pitch bend range of 24 semitones selected (bottom left under the pitch wheel). Then in the Amp Envelope, turn the sustain to its maximum value and move the Release slider to just under halfway. In my session, the Release is 0.482, but anything between 0.400 and 0.500 should be fine).
Play in a note that lasts for two bars – we are using G1 here. In your DAW, automate the pitch with a single diagonal line that goes from 0 down to – 64. This is giving is a full two-octave descent. Add a little reverb to taste (a small plate works well as a thickener) and feel free to play around with the length of the note and how fast it drops in pitch. Copy and paste this sub drop every four bars, so we get some regular low-end excitement in our piece.
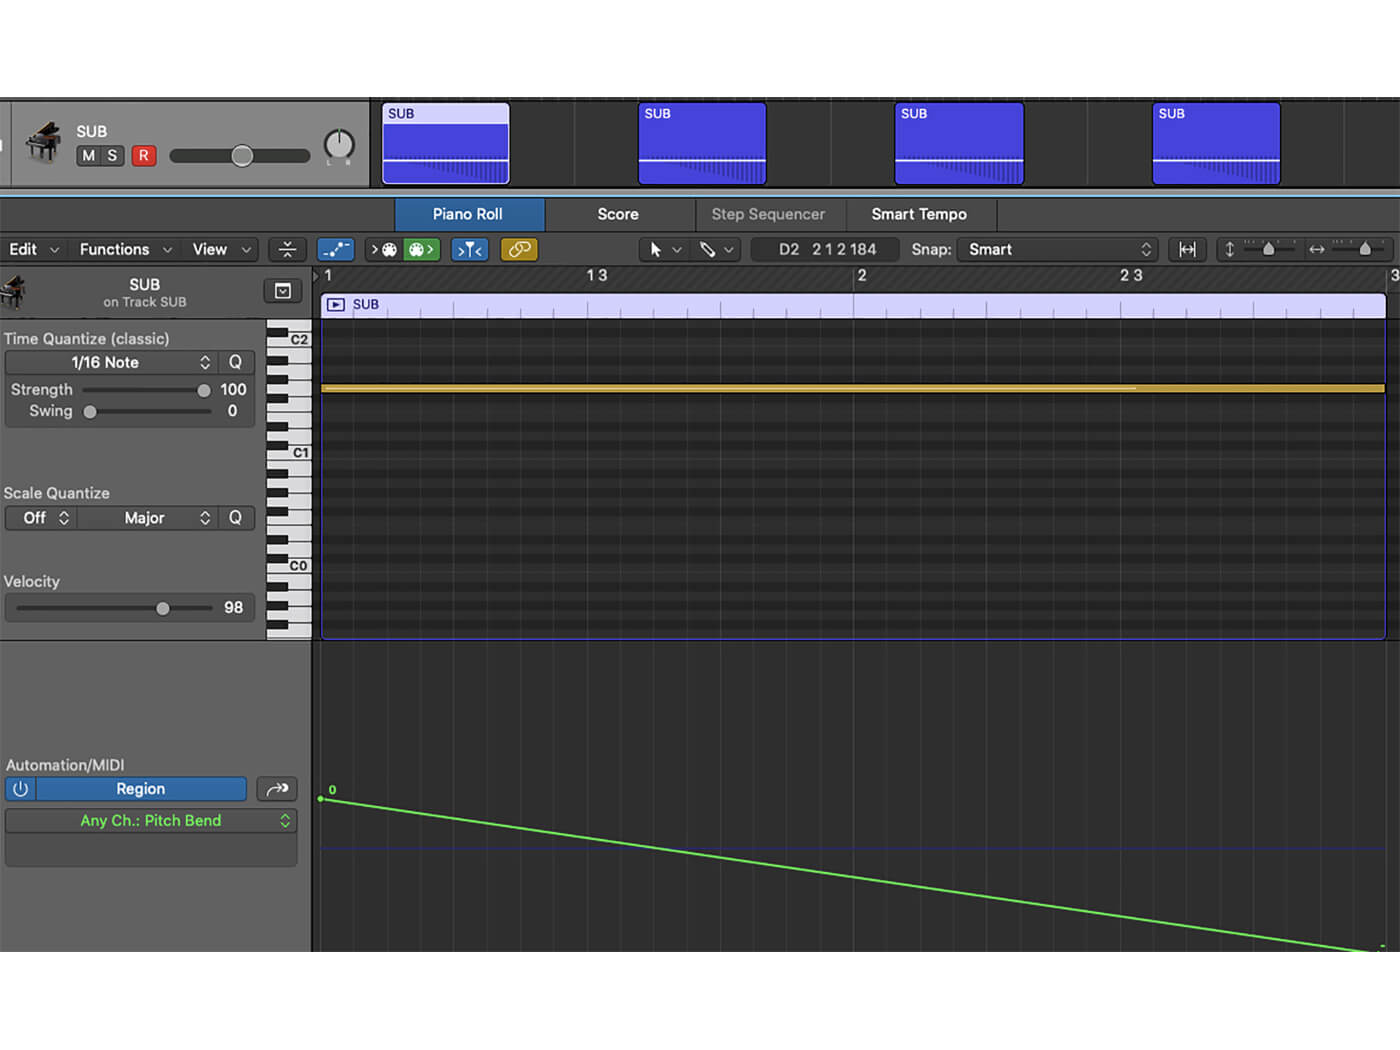
This is what it should sound like with the pitch automation.
2. Adding a bass pulse
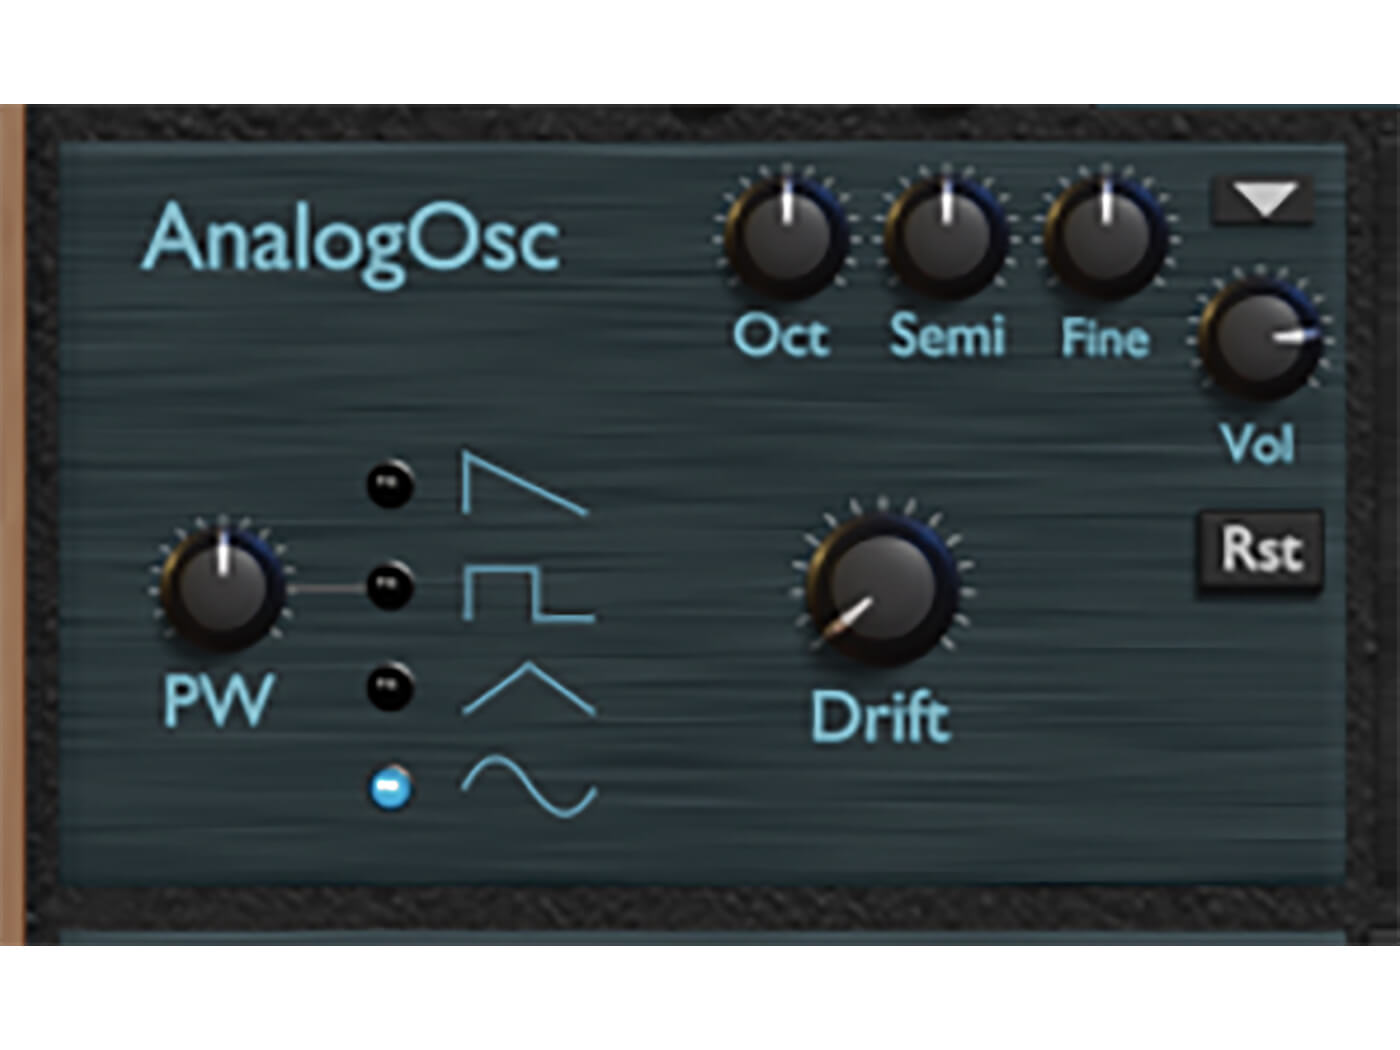
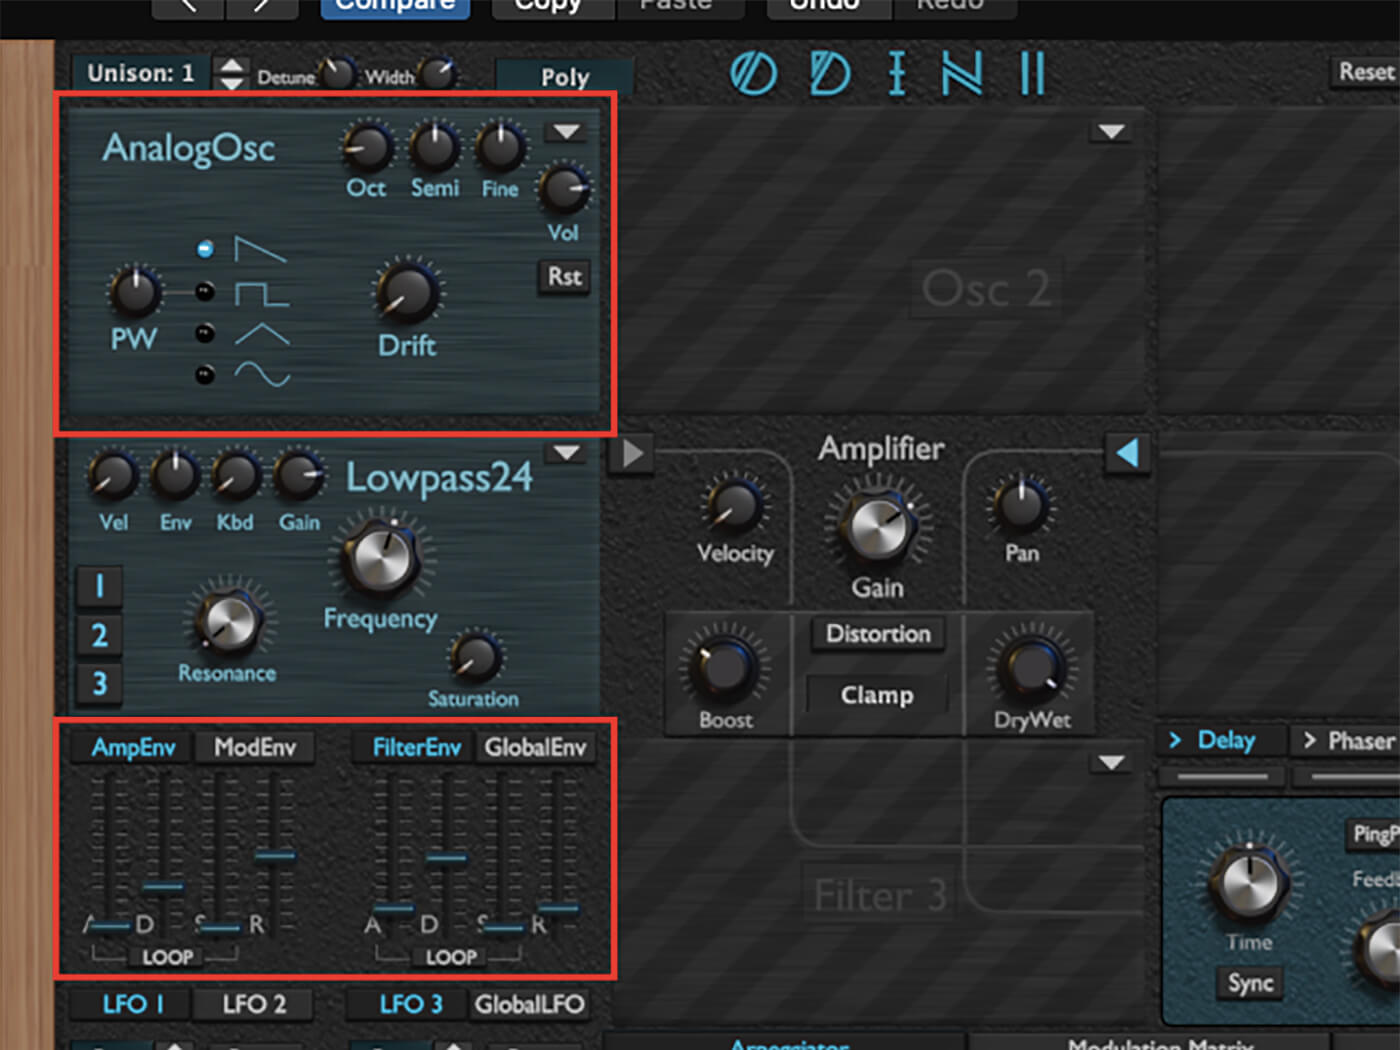
Now that we have our sub drops in place, it’s time to tie up the rest of the low end. To do that, we’ll create a simple bass pulse that makes use of Odin 2’s arpeggiator. Bass pulses work well in film and trailer music because they generate momentum and add a percussive element that helps to drive the track. For our bass sound, we are going to use just the first AnalogOsc in Odin 2. And, after some rough adjustments to the Amp Envelope, we are going to set the Arpeggiator to play 16th notes. Replicate the patch below.
Here’s the arpeggiator in closer detail.
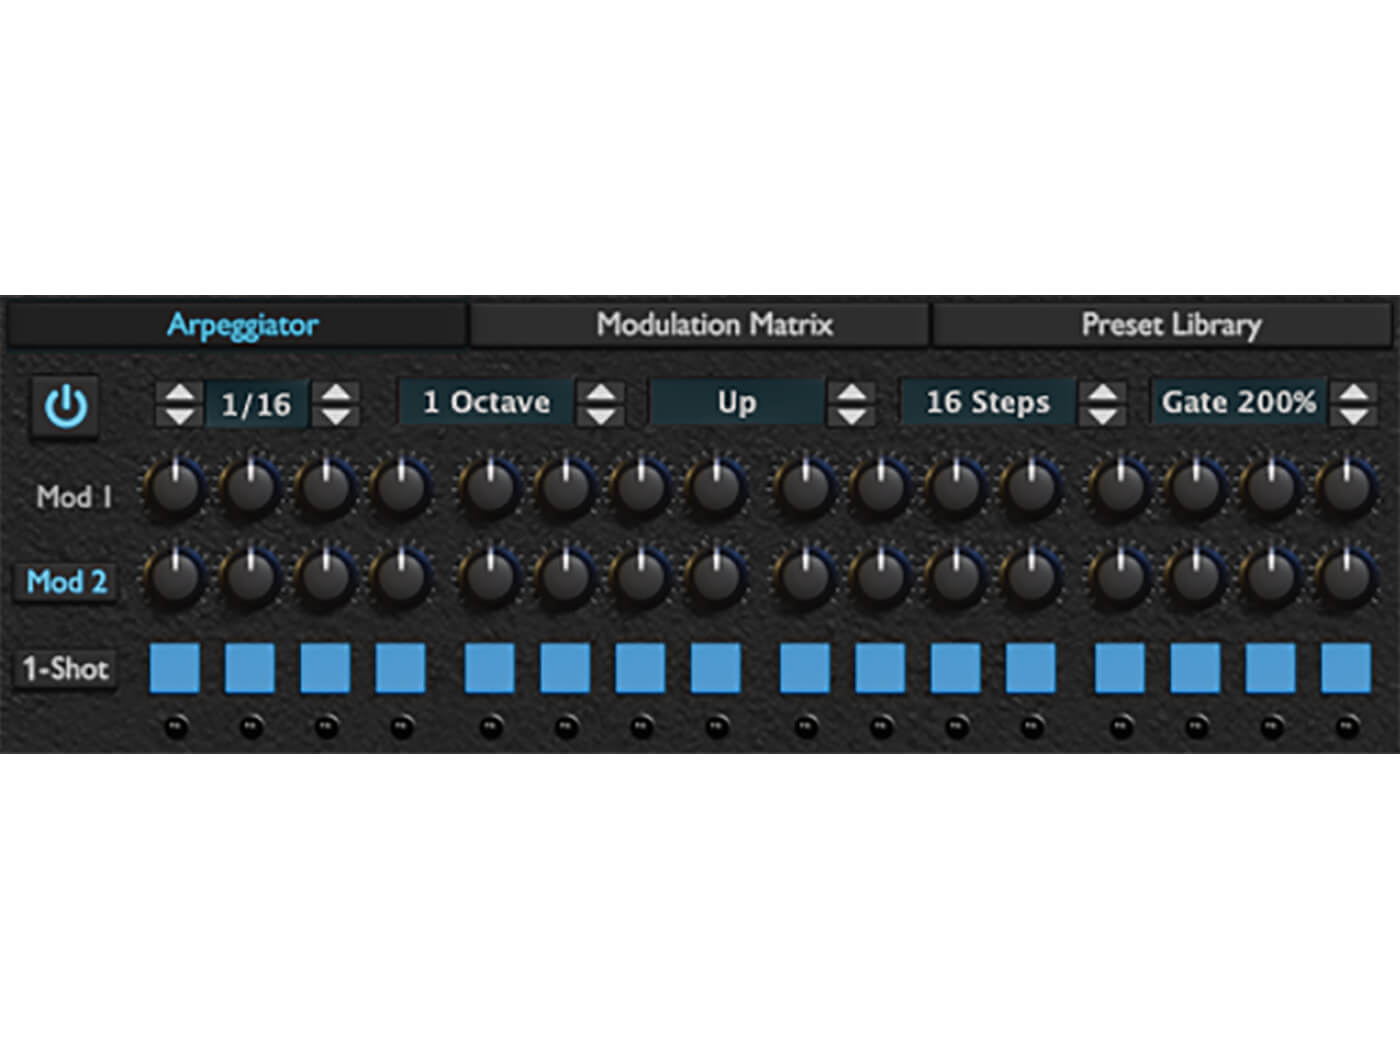
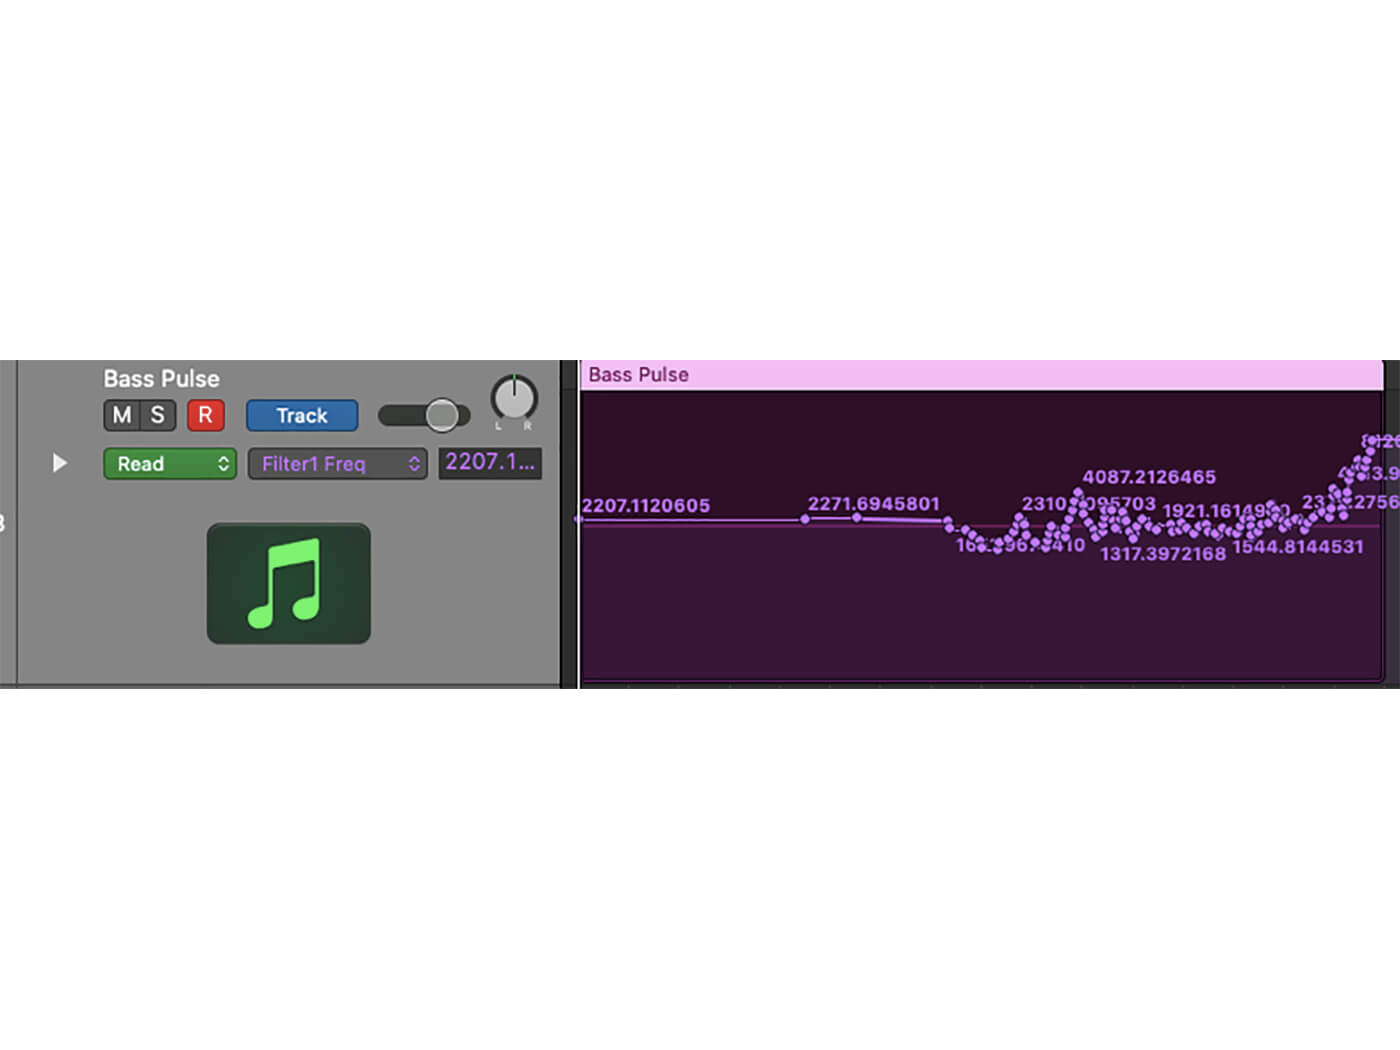
In this example, we will be keeping the bassline very simple, repeating the same note (G3 in this case) in the same octave. Feel free to experiment with steps, notes, direction and numbers of octaves to add melodic interest if you wish. To add some extra interest to the bassline, we are going to automate the cutoff frequency of Odin 2’s low-pass filter. The intention is to give the sound enough character that it will hold its own in the track during sections of underscore – basically when there is no significant melodic content. Our preferred approach is to control the cutoff frequency in real-time using an external controller with the track automation set to Latch Mode. If you’d prefer, you can draw automation in, as it only has to add subtle movement. Here is an example of our automation. As you can see, it starts with tiny adjustments and builds in intensity towards the end.
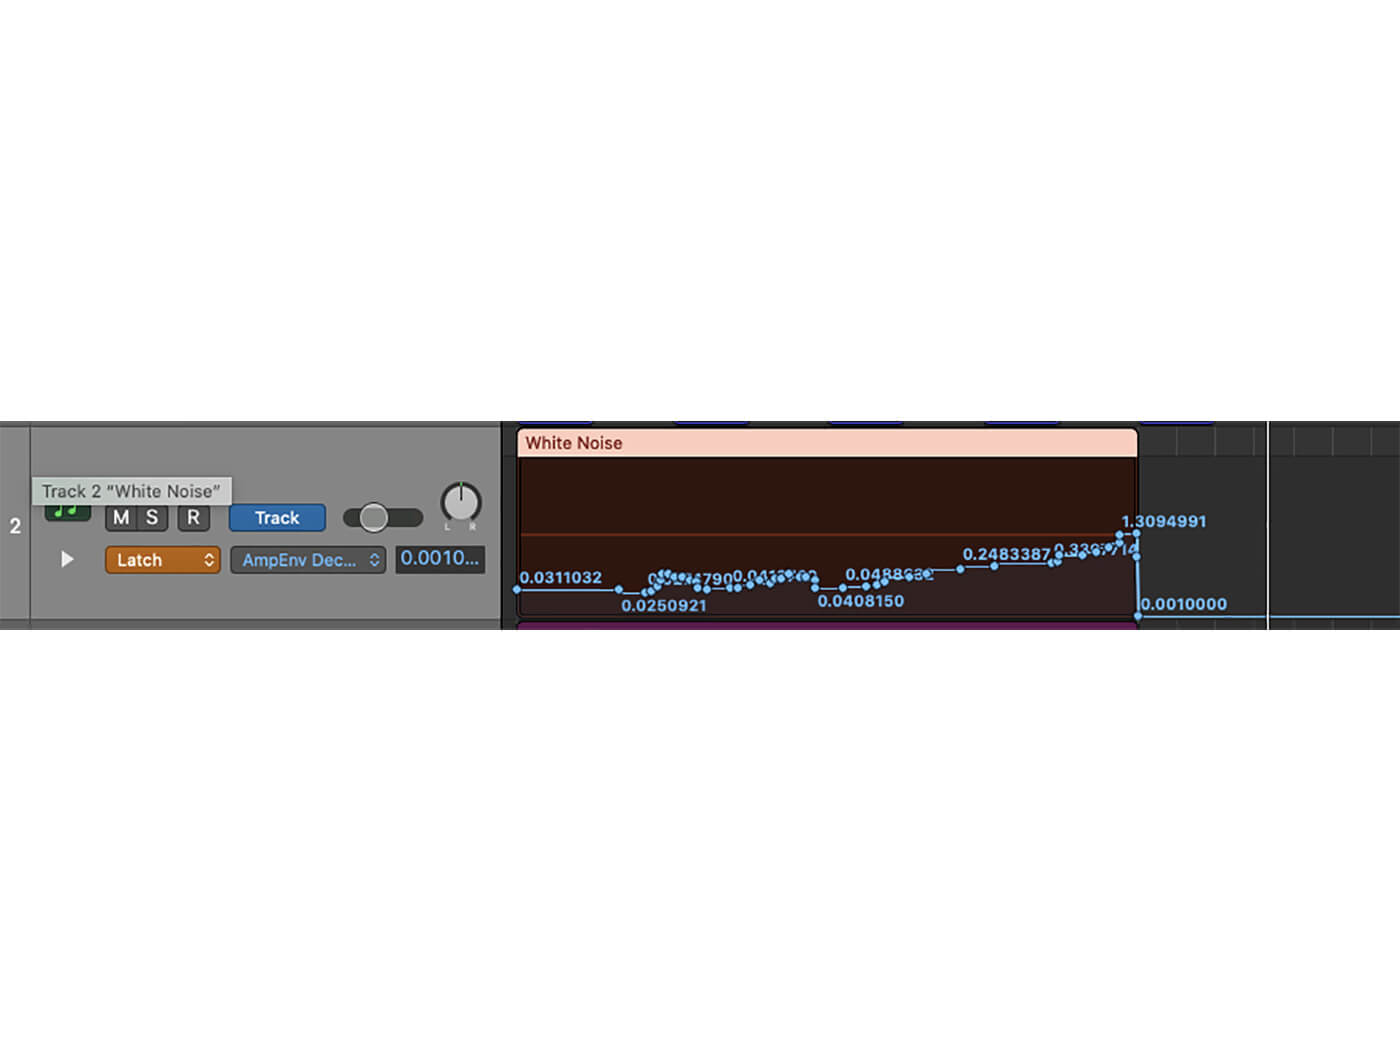
3. White Noise Percussion
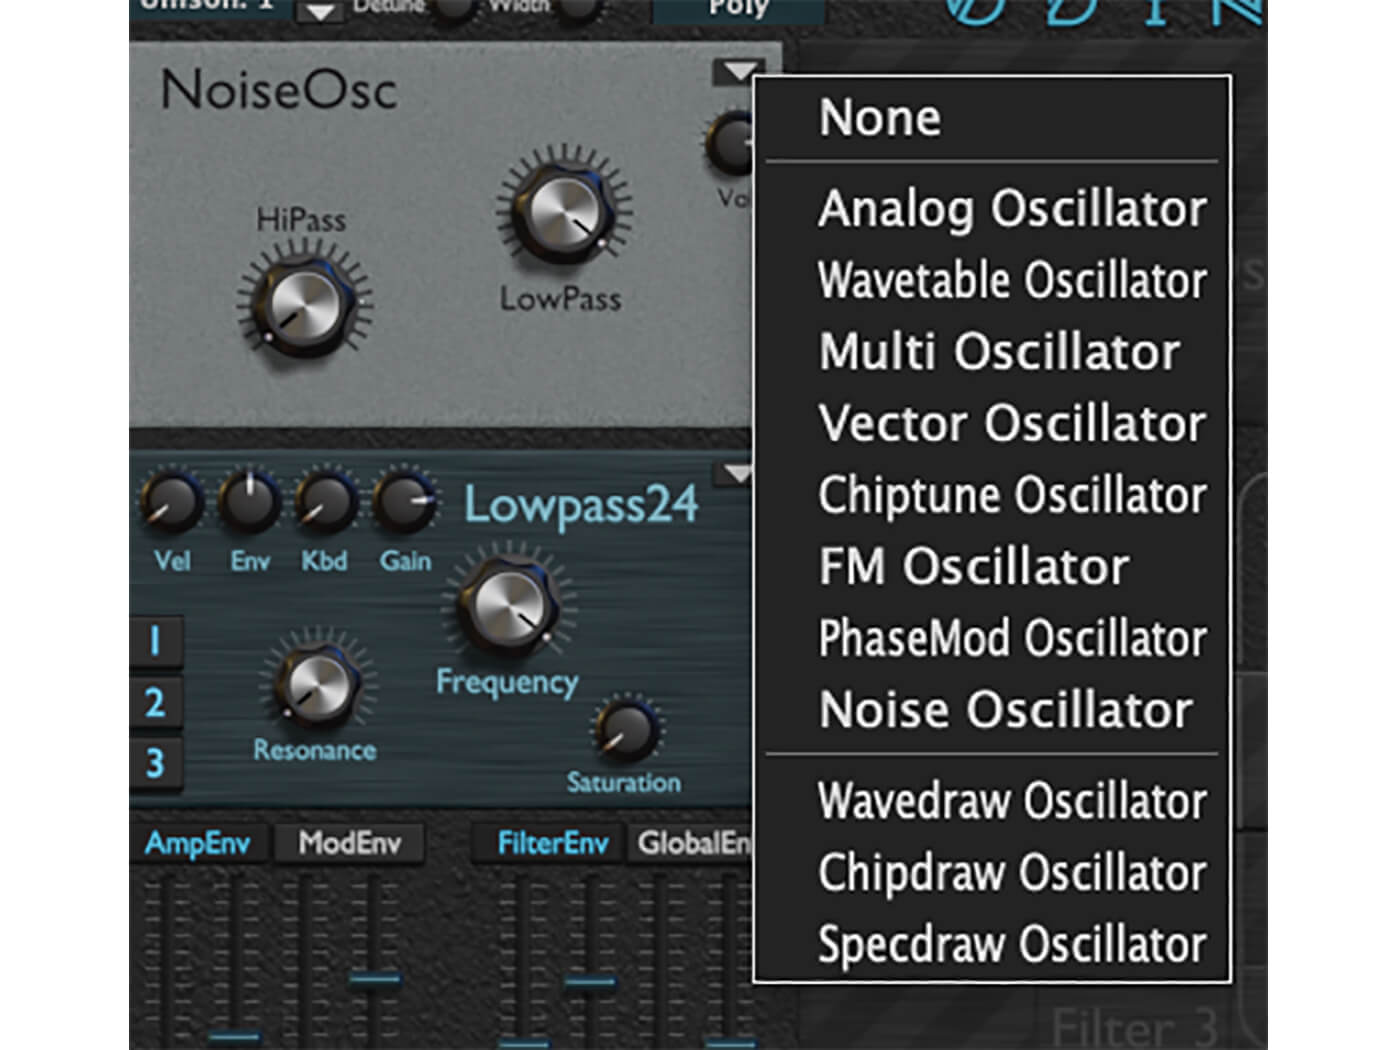
Adding synthetic percussion into your trailers is an easy way of filling out the top-end of our mix, but it also gives us some extra flexibility to build and drop dynamics. If we make some hi-hats out of white noise, we can also automate the sound over time so that it’s building intensity in step with the track. We are going to approach this in a similar way to our bassline. However, instead of using the Analog Oscillator, we’ll use a Noise Oscillator which you can select from the drop-down menu at the top right of Oscillator 1.
We’re then going to adjust the Amp Envelope, so it has a short, sharp decay – like a closed hi-hat – and then we can copy the Arpeggiator setting from our bass sound.

Once again, we are going to use automation to build some intensity. This time we will be automating the Amp Envelope Decay to give the illusion of this Hi-Hat opening up, but towards the back end it will open up so much that we should get lovely pulsing white noise mirroring our bass rhythm. Here is the automation we have gone with. As you can see, we’ve taken it way down to almost 0 Decay at the end so we have short sharp stop.
4. The Pitched Riser
In film and trailer music, there’s another element that’s just as commonplace as our good friend the sub drop—the pitched riser. The pitched riser is an excellent tool for building tension whilst letting our viewers know that the climax of a scene or trailer is approaching. Have a listen to any action/horror trailer and there’s a good chance you’ll hear it – it’s simple but effective.
To create our pitched riser, we are going to make use of two oscillators. Both will be set to a Sawtooth wave, and the only difference between the two will be tuning. As you can see below, I have set the fine tuning of the second Oscillator all to way to the left (-50.00 cents) which gives us a bit of thickening, but more importantly, it’s just enough to tip us over in the realm of slight sonic unpleasantness. If you play with the fine tuning on Oscillator 2, you’ll notice that any less detuning than this strays slightly into the Chorus land. That’s useful for other sounds, but right now we want some chaos.
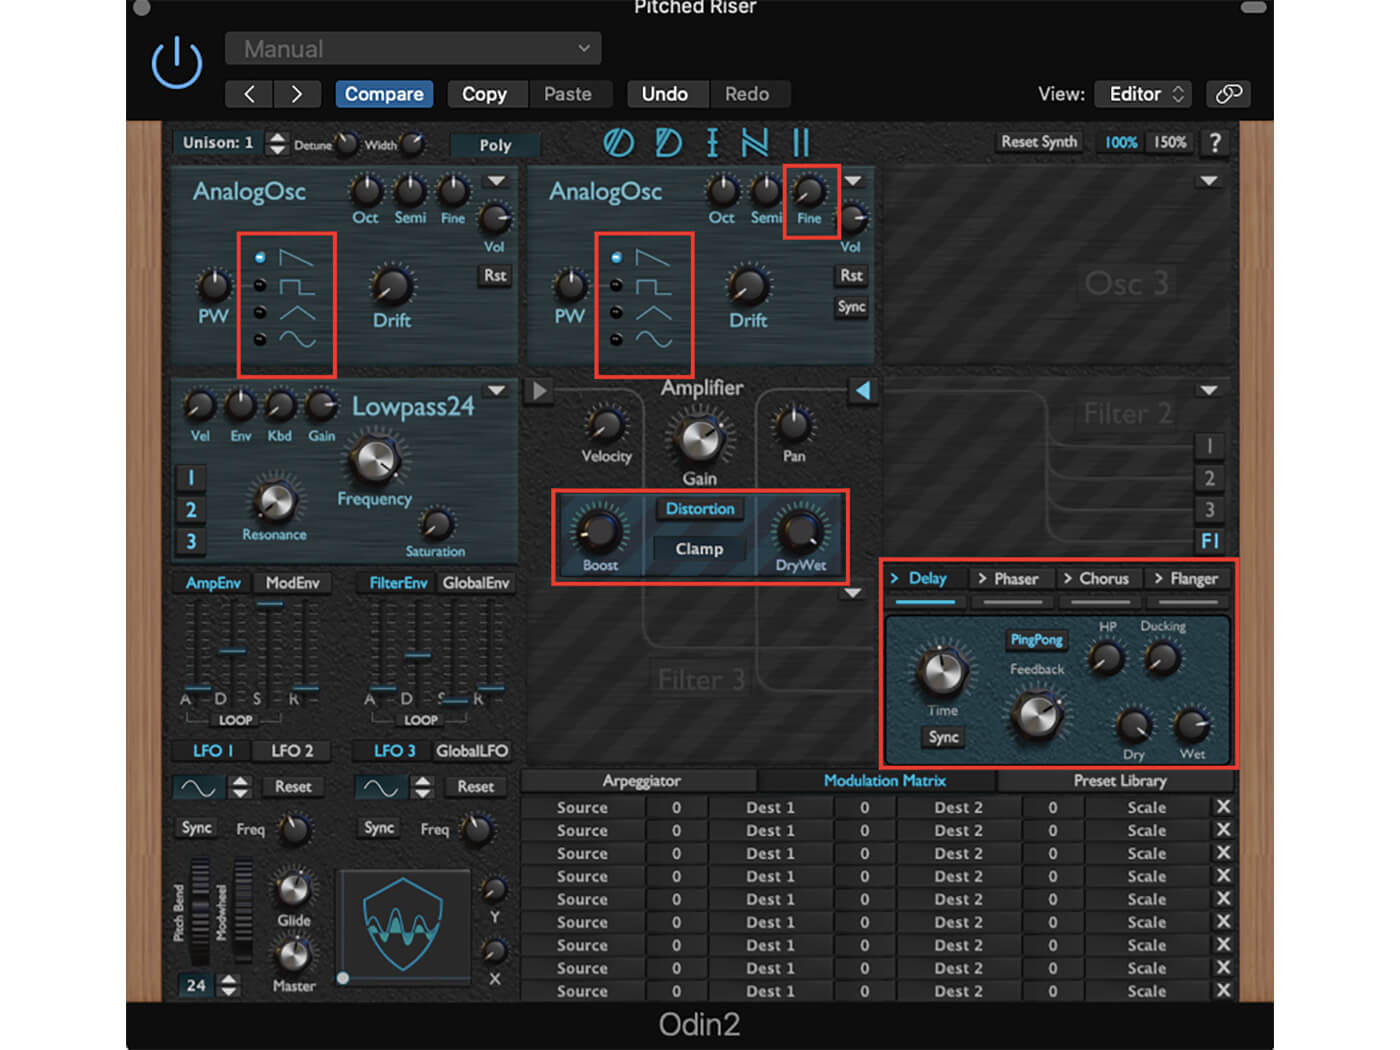
We’ve also added a little bit of Distortion within Odin 2, which should make it sound brighter and bring out some extra harmonic interest. In the effects section, we’ve added a little Delay that is repeating on the quarter notes. Finally, set the Amp Envelope Sustain to its maximum so that it produces a consistent long note whilst it’s being played, and set the pitch range to two octaves (24) as we did with the sub drop.
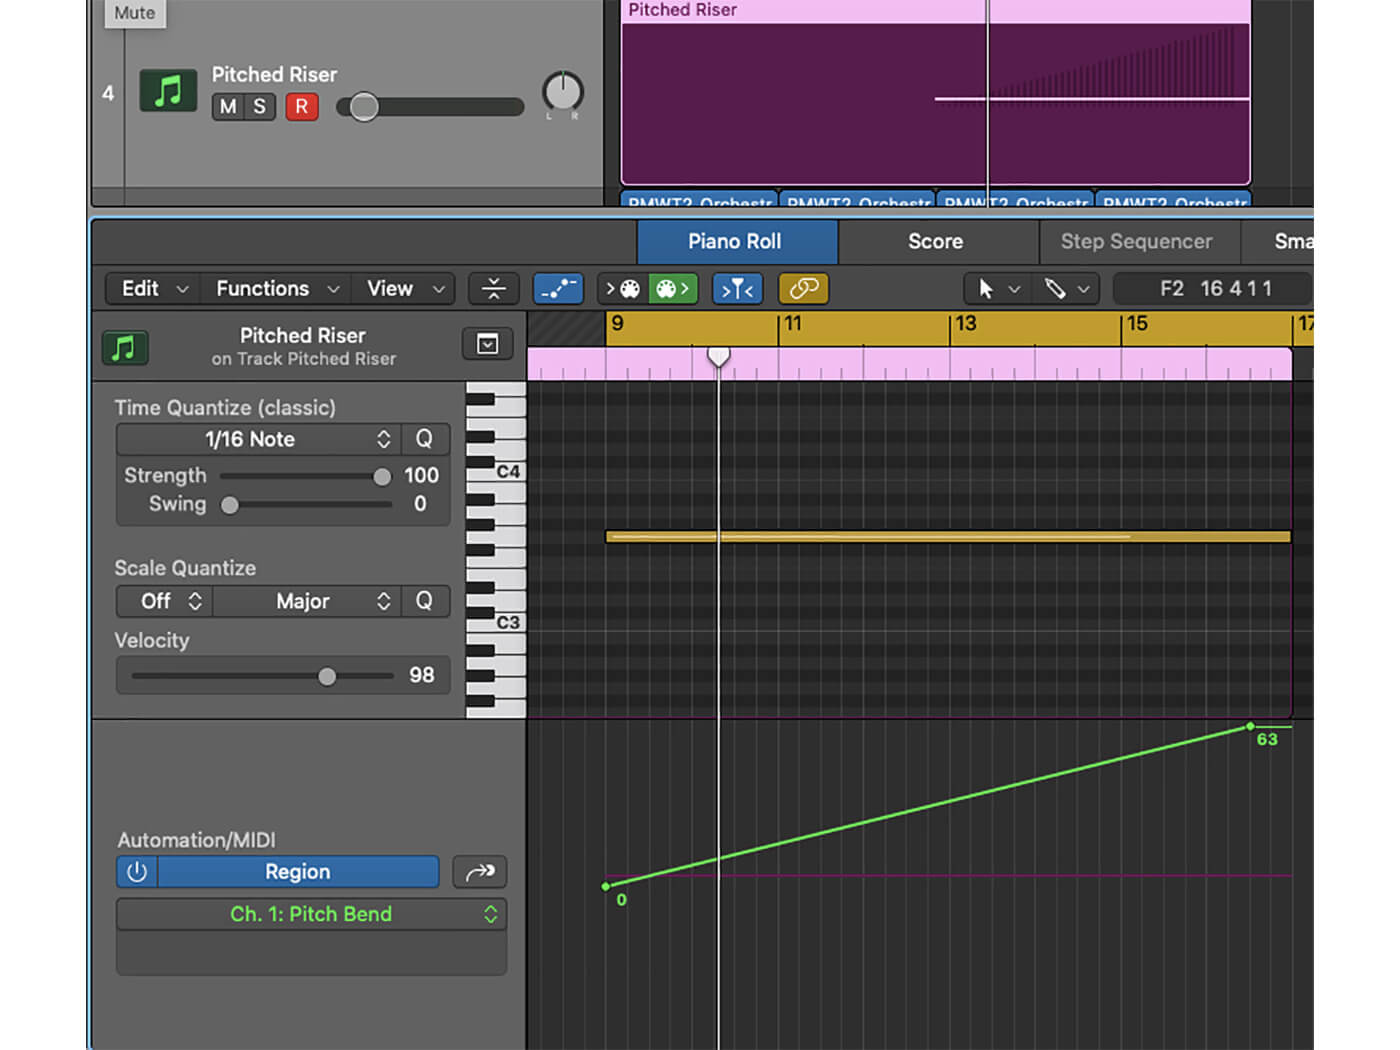
Halfway through our 16-bar piece, play or draw in one long note from bar 9 to the end. The note G3 works best in this instance. After this, open your automation lane for the region and automate the pitch up across the whole length of that note from 0 to +63 – the opposite direction that we did for our sub drop earlier on.
To finalise the riser sound, try adding a touch of reverb in your DAW to give it a little extra atmosphere.
5. All together now
And there you have it – this is a really good template for the final third of a trailer piece or just a high octane scene for a film.
Delays, reverbs and distortions with Odin 2 are, of course, optional extras but definitely try and have some fun with these effects if you feel like you want to make things more interesting. For example, I turn off the Sync function on the Delay and adjust it by ear to a position that sounds good – the delay repeats may not be entirely on the grid, but it sounds more interesting. A large part of sound design is about exploration and trying things out, so get tweaking, add some melodic content and have fun. Keep exercising your cinematic sound design muscles and your music could be coming to a cinema near you!
Share your results and tell us what tutorials you’d like to see in the MusicTech Creator Community on Facebook.
Check out more Weekend Workshops here.