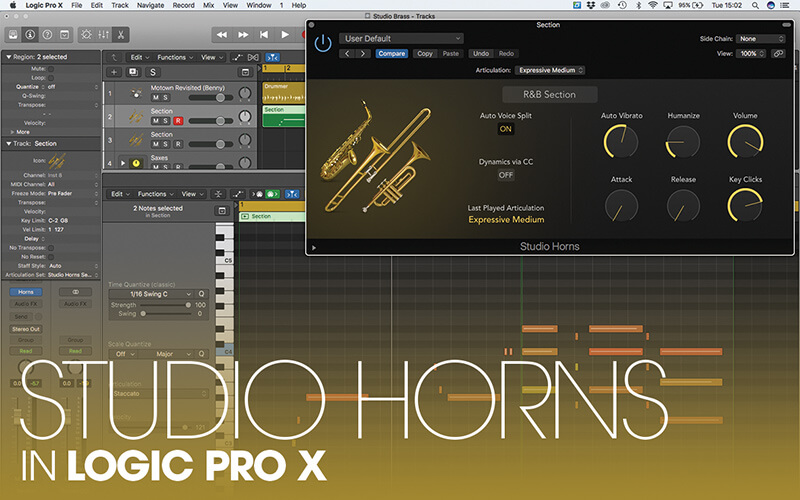
Studio Horns in Logic Pro X
Studio Horns is Logic Pro X’s finest sounding ‘studio’ instrument and a great way of creating realistic brass lines. Mark Cousins polishes his Brass. Having explored the impressive Studio Strings in last month’s MusicTech (read it here), it’s only fair that we extend our exploration of Logic’s ‘Studio’ instruments with a closer look at Studio […]
Studio Horns is Logic Pro X’s finest sounding ‘studio’ instrument and a great way of creating realistic brass lines. Mark Cousins polishes his Brass.

Having explored the impressive Studio Strings in last month’s MusicTech (read it here), it’s only fair that we extend our exploration of Logic’s ‘Studio’ instruments with a closer look at Studio Horns.
Unlike the Studio String instrument – which could easily switch between pop arrangements, classical strings and contemporary cinematic trailers – Studio Horns is firmly planted in the area of Pop, Jazz and R&B brass parts, encompassing trumpets, trombones and saxophones.
This more focussed approach pays dividends, with a range of expressive articulations (including doits and falls, among others) that lend themselves to this form of musical application.
If you’ve paid close attention to our exploration of the Studio Strings instrument you’ll notice a fair amount of crossover between the instruments, although of course, there’s a number of unique features, as well as an adapted working methodology, that suits a slightly different set of musical objectives.
Blow your own trumpet
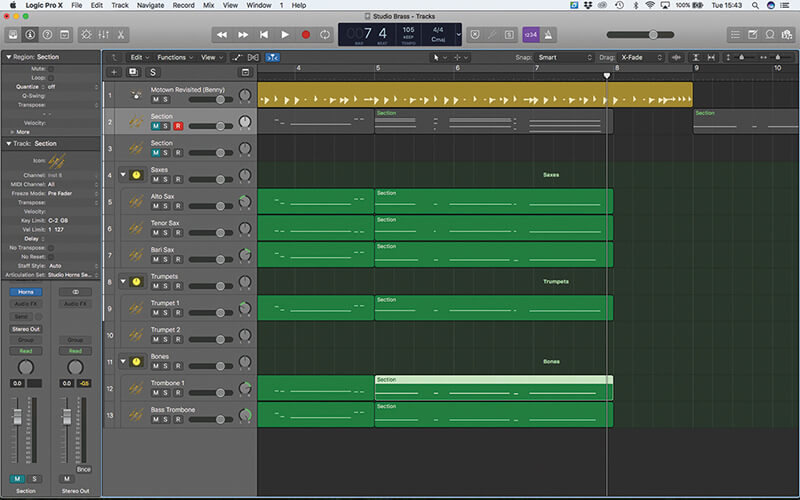
As with Studio Strings, the Studio Horns instrument is split between single instrument patches, for example a trumpet, and full-sized ensemble patches that blend a combination of trumpets, saxes and trombones.
Ensemble patches are great for quick-and-easy brass lines, especially on pop and R&B tracks that traditionally use a blend of instruments, rather than distinct voices, whereas more involved jazz arrangements (like a big band, for example) may want the distinct and separate instruments. Of course, you might also want to use a single instrument – like trumpet or sax solo – in which case you’ll turn to the single instrument patches.
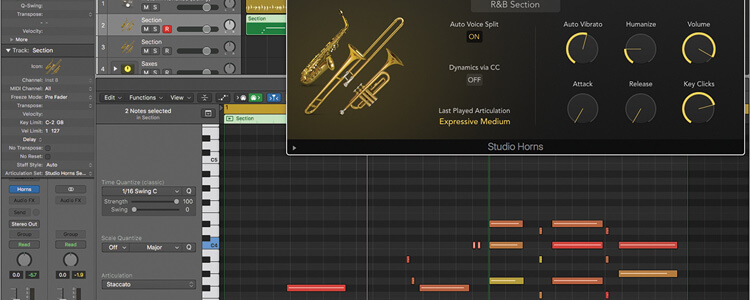
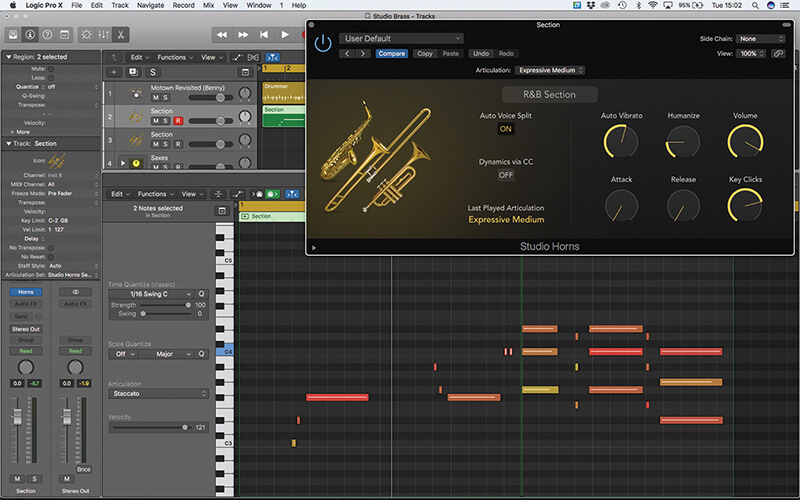
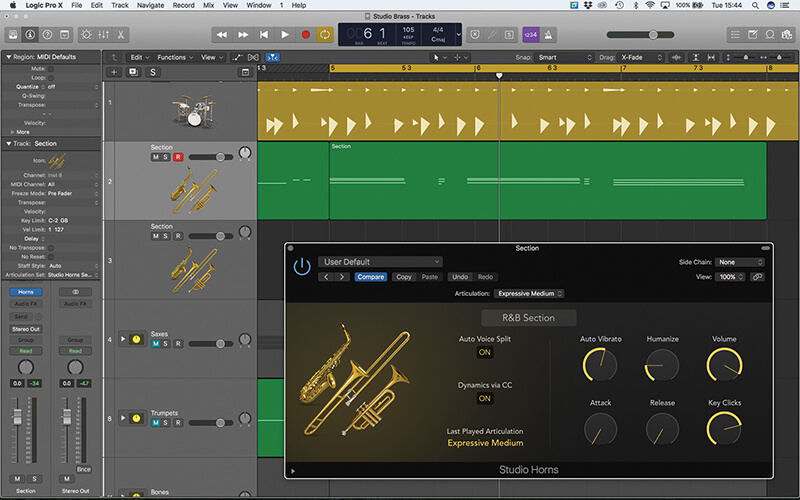
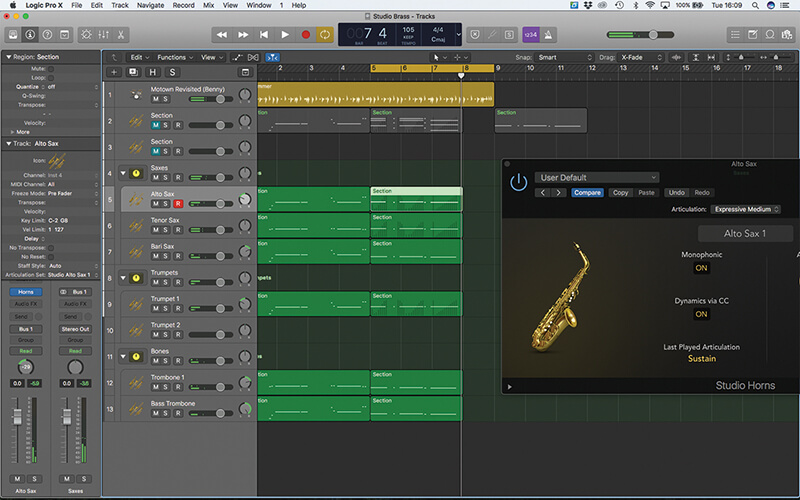
The main controls for Studio Horns share many similar features to Studio Strings, although you’ll soon notice some differences here as well. The principle controls – including Monophonic triggering which is useful for realistic ‘single instrument’ performances, and Dynamics via CC; which is essential for realistic dynamics on long articulations – are the same.
To the right of the GUI, however, you’ll find a mix of familiar (Attack and Release) and new (Auto Vibrato, Harmonize and Key Clicks for the saxes). The new controls are largely self-explanatory: varying the amount of performance vibrato, creating subtle timbral difference between notices and controlling the level of key click noise that
a sax naturally produces.
Brassed off
For quick, off-the-peg horn lines, the ensemble patches work surprisingly well, and given the distinction between the instruments, it’s easier to discern the ‘behind the scenes’ scripting than with Studio Strings. The killer feature is the Auto Voice Split option. With Auto Voice Split deactivated all the instruments – trombone, trumpets and saxes – effectively play in unison.
This might be the effect you’re after, especially for strong single-lined brass parts, but the results quickly become artificial when you play chords. By comparison, the R&B Section, for example, plays just the lead voice for single lines, dividing to the full section (with an instrument per voice) when you play a chord.
The result of Auto Voice Split is, of course, much closer to how a real horn arranger, or horn section for that matter, would play your music. Though impressive, it ultimately dictates how your music sounds and how you choose to blend instruments.
For example, a lead part could be played by a distinct combination – like trumpet and sax, or a combination of alto and tenor saxes – something that can be difficult if not impossible to force with Auto Voice Split. Equally, there’s little option to mix the brass section – maybe favouring one instrument group over the other or creating a more defined stereo image.
Making arrangements
If you’re serious about your horn arrangement, therefore, you’ll ultimately want to take the single-instrument approach that we outlined with the Studio Strings project last month. In this example there’s a host of workflow features that make this process far more amenable that you might first think.
It also makes it easier to explore your arrangement creatively – copying lines between instruments, for example, or using call-and-response elements between instrument groups.
We’ll also explore two of the most important factors behind a realistic performance (keeping the dynamic levels varied and applying a range of articulations) using different keyswitching techniques as well as region-based automation.
By comparison to Studio Strings, these techniques have a more noticeable effect, both because brass instruments tend to offer a greater range of timbres across dynamic level (from soft and muted through to bright and brassy), as well as making greater use of articulations mid-note, so that a sustained note might fall-off at the end, for example.
Harnessing the full sonic range of Studio Horns can yield surprisingly realistic results, that, in the context of a full mix, many will assume have been played by a living, breathing brass section.
Studio Horns: step-by-step
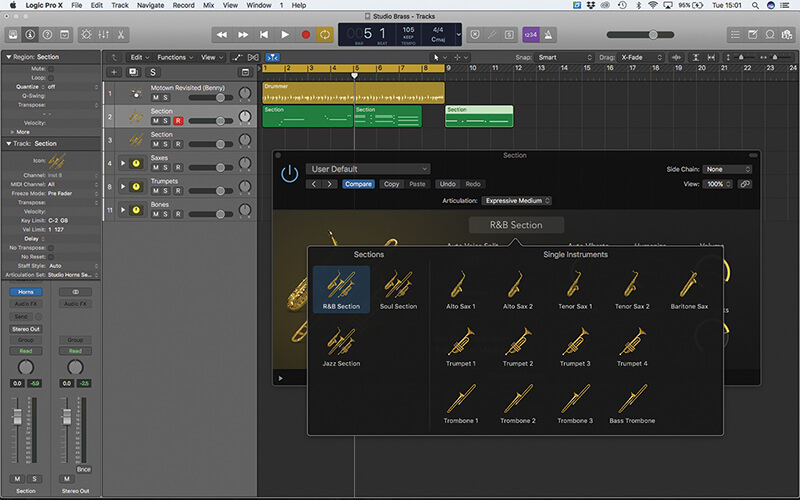
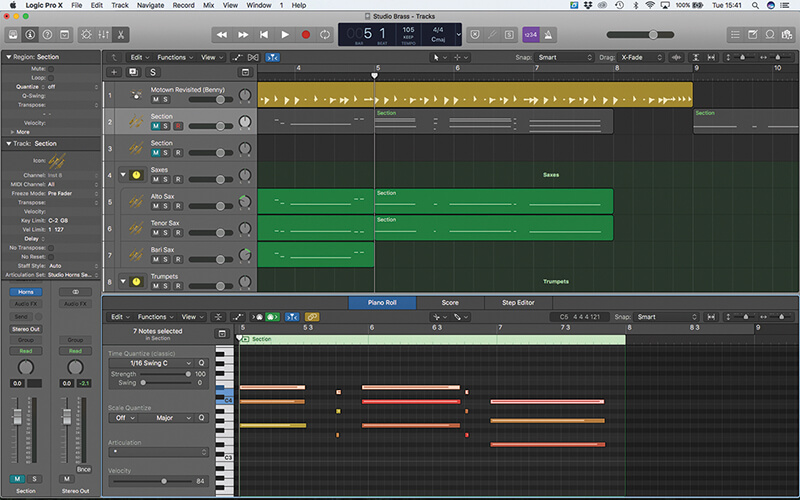
1. The Logic Project included on the DVD has a basic brass arrangement that we’re going to work with. Start by loading the R&B Section Instrument, which contains a mix of trombones, sax and trumpets in the one patch.

2. Play the sequence through with Auto Voice Split set to Off. For the single-line parts of the arrangement we hear a full, unison brass sound. The chords, however, sound somewhat artificial with too many instruments playing.
3. Now set the Auto Voice to On and playback the sequence. Notice how the single lines trigger the Trumpet alone, while the chords split each voice between trumpet, sax and trombone, just like real brass arrangement.
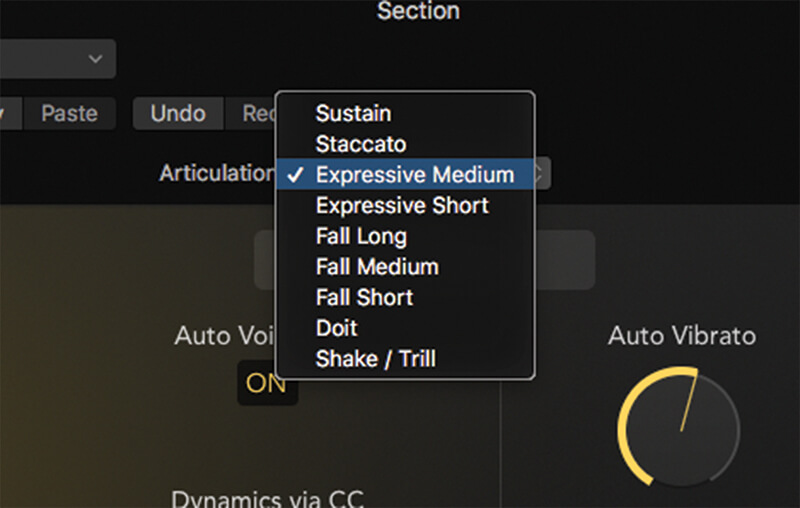
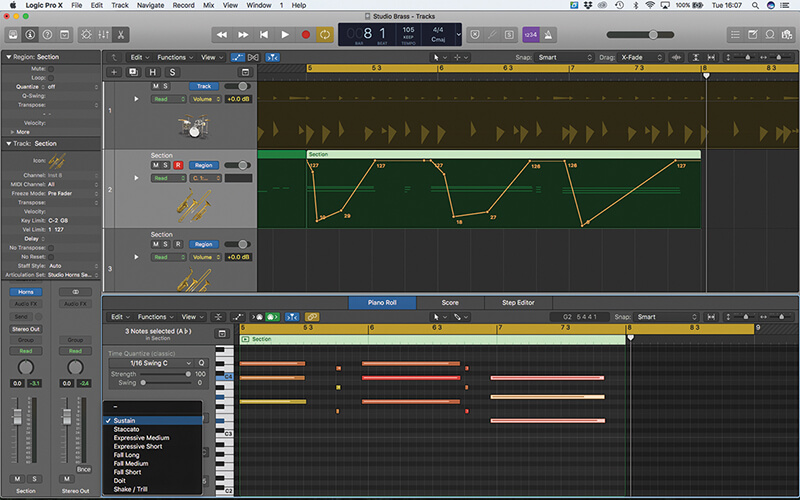
4. A drop-down menu at the top of the interface is one way you can access the different articulations. The two ‘Expressive’ options are good for quick applications and contain a degree of dynamic expression within each note.
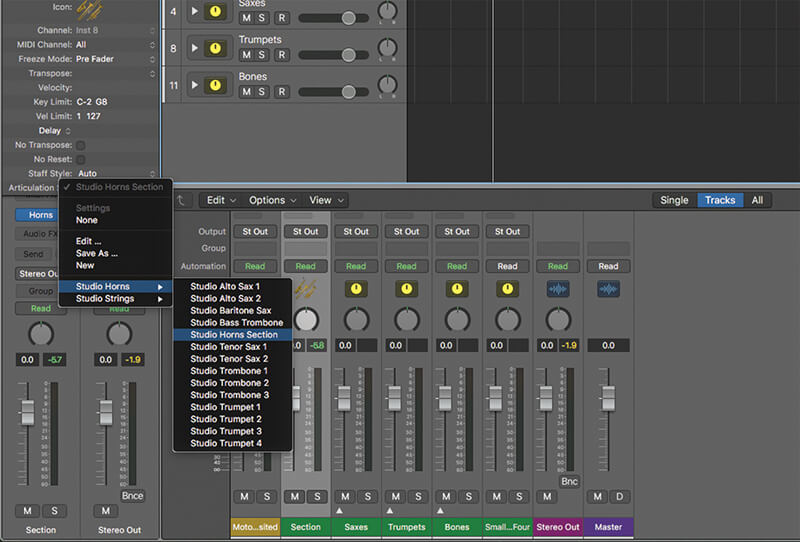
5. For a more integrated way of working with articulations, ensure you set the instrument’s Articulation set parameter (as part of the Track Inspector) to match the currently loaded patch – in this case, Studio Horns Section.
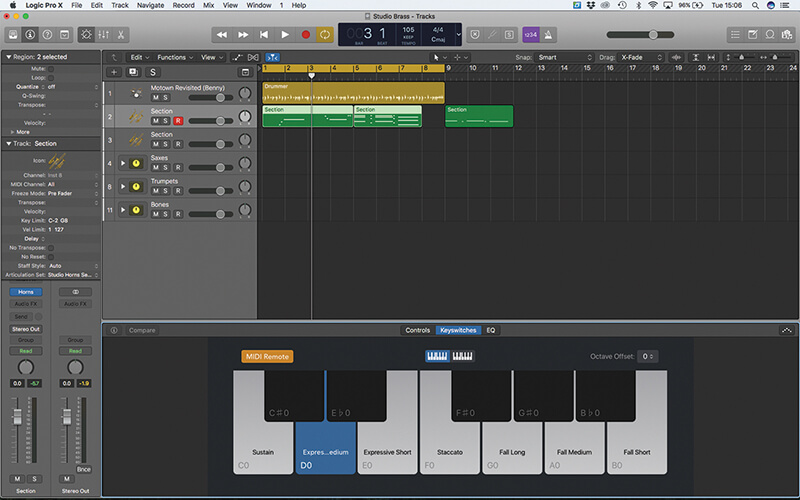
6. With the correct Articulation set established, you can use the Smart Controls area’s Keyswitches Display to see the current set and associated MIDI keys. This is good for quickly auditioning various articulations on-the-fly.

Region-based automation is a replacement for MIDI Draw in older versions of Logic Pro X. Unlike track-based automation, region-based automation can make extensive use of MIDI controllers and are attached to a region so can be easily moved around an arrangement.
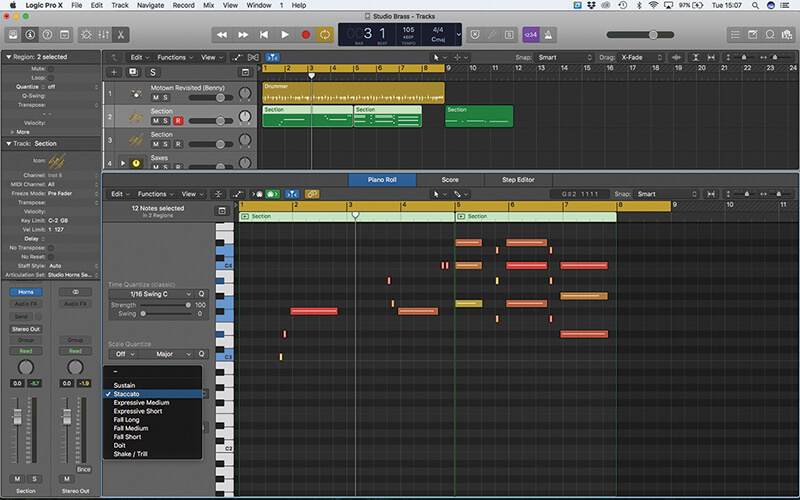
7. For more detailed articulation switching, use the Piano Roll editor. Working with our complete performance, try switching the short notes to Staccato. Select the required notes and use the drop-down menu to assign.
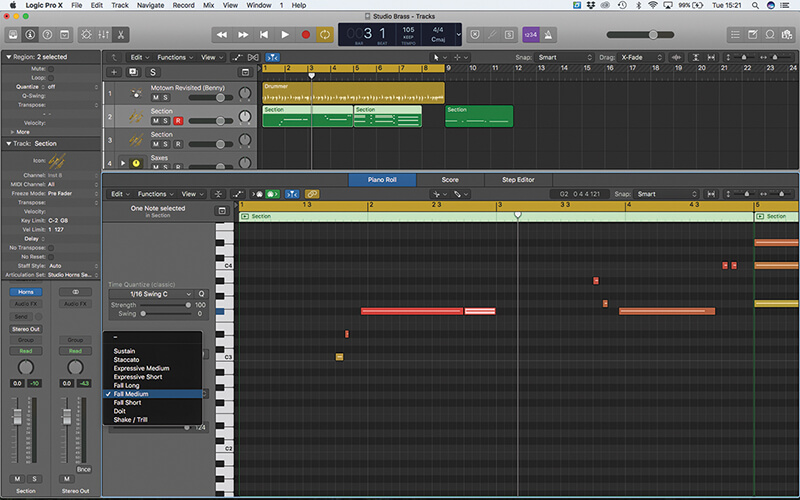
8. One of the useful roles of the Piano Roll is changing articulations at the end of the note – for a Fall or Doit. Cut the note at the point of change (Bar 2 beat 4), then re-map the articulation to Fall Medium.
9. For more control, consider using the single instruments, which we’ve organised into Stacks. In this case we’ve copied the part in Unison (to alto and tenor sax) and transposed the baritone sax down an octave.
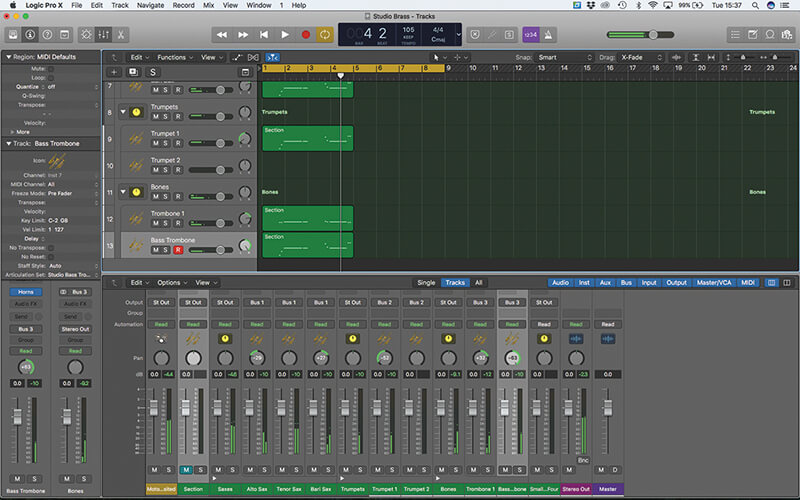
10. The next duplication uses trumpet and trombones at pitch, with bass trombone down an octave. The result is a powerful, octave unison line, which can be mixed (with reverb, pan and EQ) precisely as you want.
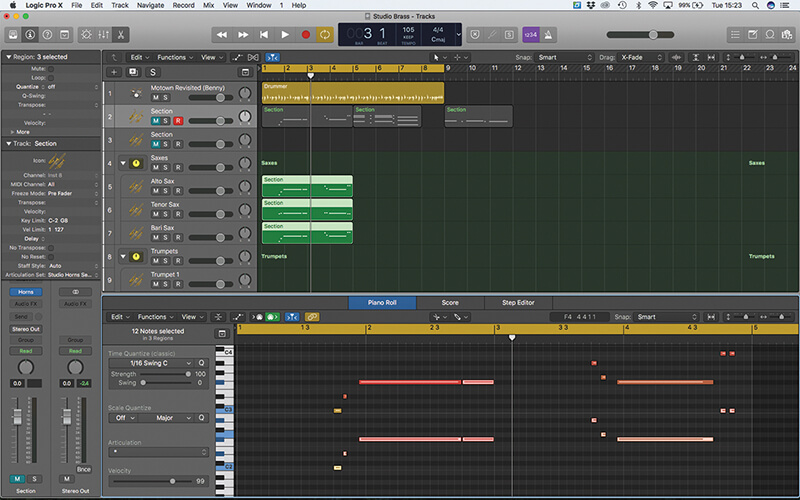
11. For the chord parts, consider how you voice the chord. This three-part chord makes sense split between trumpet (on the highest voice), alto sax (middle) and tenor on the lowest note. Copy the whole chord for now.
12. You can sift through voices using a few simply key presses. Shift + Up Arrow will select the top voice, then select invert (Shift + I) to change the selection to the notes you don’t want before hitting delete.
Adding Expression Wherever you use MIDI CC to add expression to a sample-based instrument, consider using the powers of region-based automation as a precise way of controlling these expressive changes of sound and performance over time.

13. The bottom note can be separated using the reverse of the above, while the middle note is separated by selecting the top notes and deleting them, followed by the bottom. Press play to hear the brass line correctly voiced.
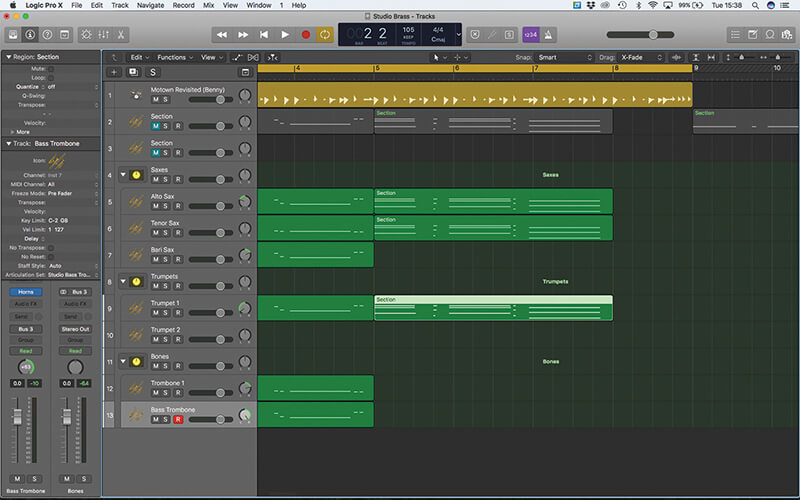
14. For added musicality, take the Low Brass region and distribute that between both trombones and baritone sax at pitch. What works well is sketching phrases on the Section track, then copying parts to create the correct voicing.
15. For greater control over the dynamics, try switching to Dynamics via CC (or the modulation wheel, in other words). To audition this correctly, let’s go back to the Section patch for now, muting the currently split brass.
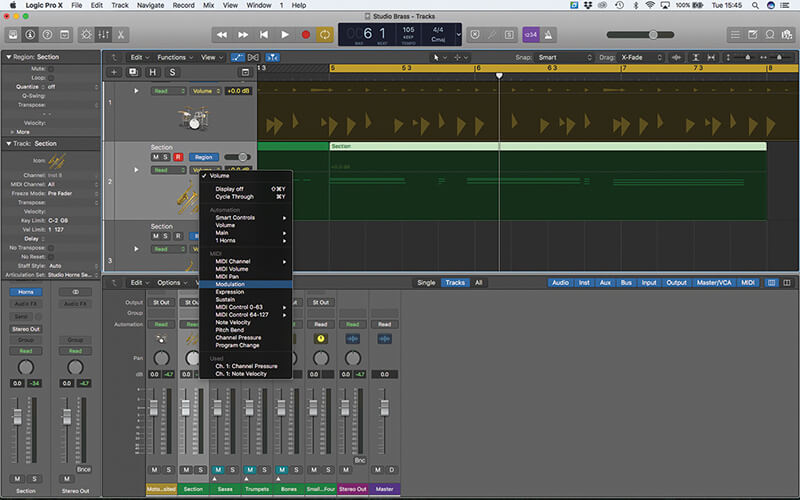
16. Modulation movements can be recorded on-the-fly, but it’s worth using region-based MIDI automation. Enable the Automation view, change the mode from Track to Region and select Modulation for the automation parameter.
17. Drawing the dynamic curve gives precise shape over the dynamics, although it’s also worth switching from the ‘expressive’ articulations to a straight sustain, to hear the dynamic range in full effect.
18. The track re-splits the chords as before, copying the same modulation movements created for our original Section track. Remember to change each instrument so that it’s set to respond to Dynamics via CC.
