Sound design with Grain in Reason 10 (Part Two)
It’s the latest episode of our Reason sound-design series, where we continue our sonic adventures with Grain, a synth and sampler with a lot of sonic power
In our last Reason sound-design episode, we turned our attention to Grain, one of the latest synths to be included with Reason 10. This granular synth rather lost out in the glory stakes thanks to Reason’s Europa, an equally fabulous synth, but arguably one with more instant appeal.
Grain is equally as interesting to our ears, though, thanks in large part to its sampling features. It’s a granular synth, which means it utilises audio as one of its two key components and blasts it into grains of sound, which you are then free to manipulate in several ways to achieve its granular-synthesis results.
However, before any of this takes place, you get to mess with the audio in many different ways: from how it plays back, to cutting, reversing and generally doing lots of sample-based editing. It takes Grain well beyond most synths, even before you’ve touched upon the main features!
In the first Grain workshop, we focused on that audio side of things and how you can change audio playback to get dramatic results. We also revealed how simply changing the audio file in a well-liked preset offers you all the sonic flavour of that preset – in that none of the other parameters are changed, so you still get its character – but this instantly gives you a different, customised sound.
Waves of Grain
Even though Grain offers a lot of power, it still has a relatively simple workflow, inherently running left to right, top to bottom in signal flow. It’s like a dual-layered synth, in that you get one part of granular synthesis, with the aforementioned audio, plus a more traditional oscillator. Both are fed into a filter section, then envelopes and effects, so it’s all familiar territory and not a synth you need fear.
Last time around, we got as far as the main granular section, and focused on Long Grain mode. We then started exploring what you can do with those grains in terms of panning, and how pitch jitter changes the sound from flanging to more random pitch effects. All the time, the GUI offers some visual feedback of what you are doing, and is especially useful with the Grain Length gating effects. Also try Rate, which determines the speed of grain playback, while also effecting timbre; and the Crossfade option, which tends to add popping effects.
The power of Grain
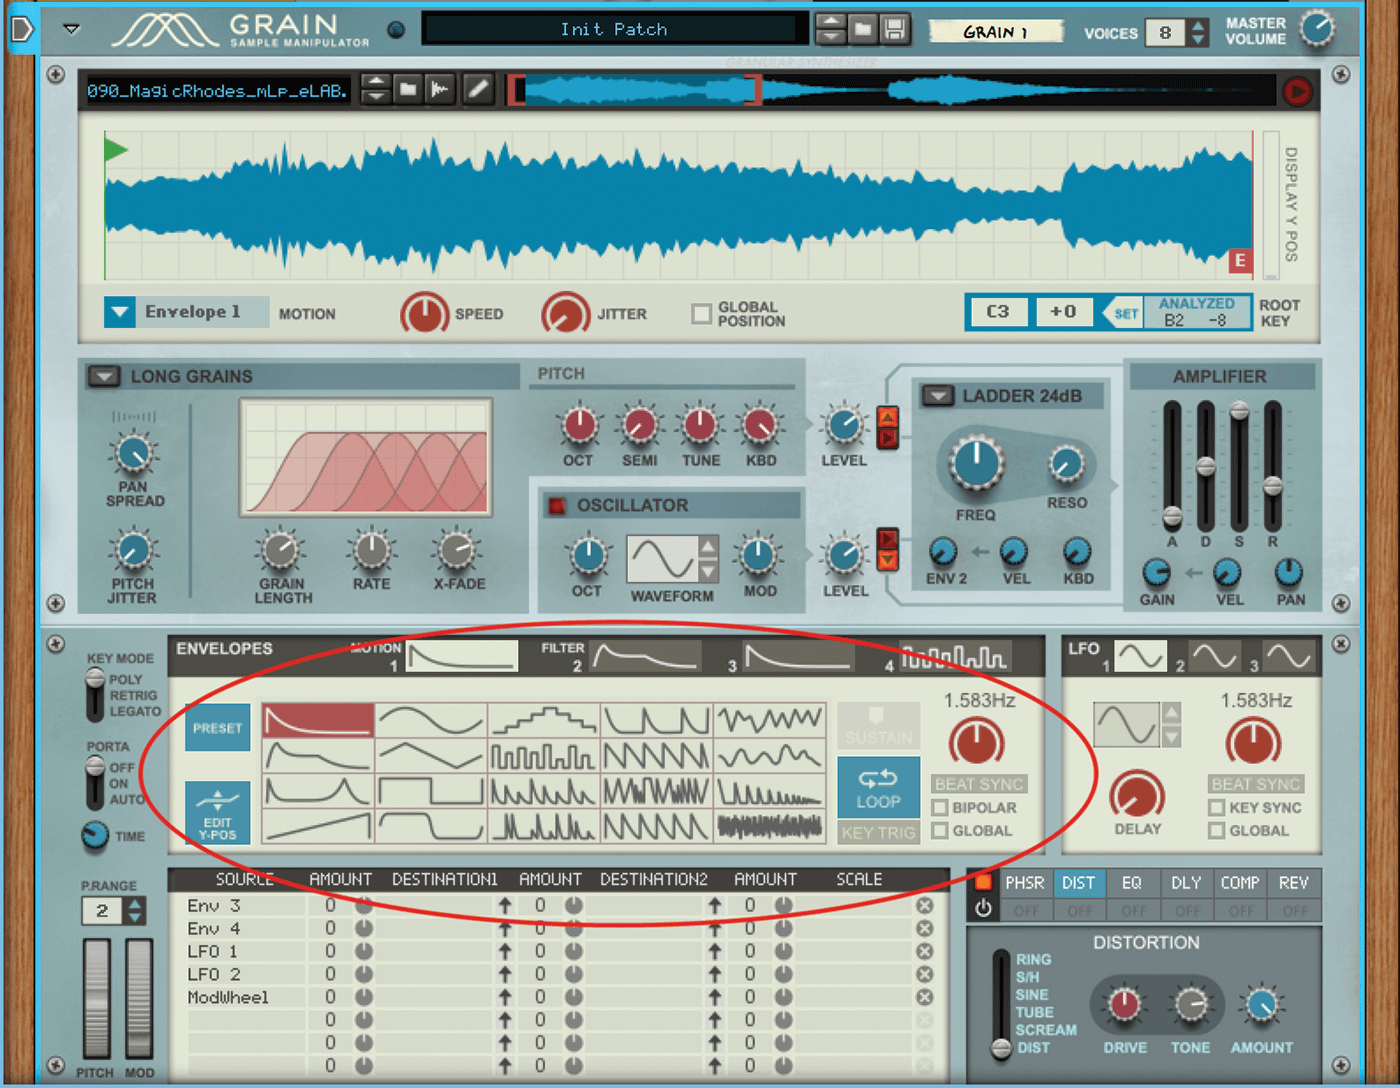
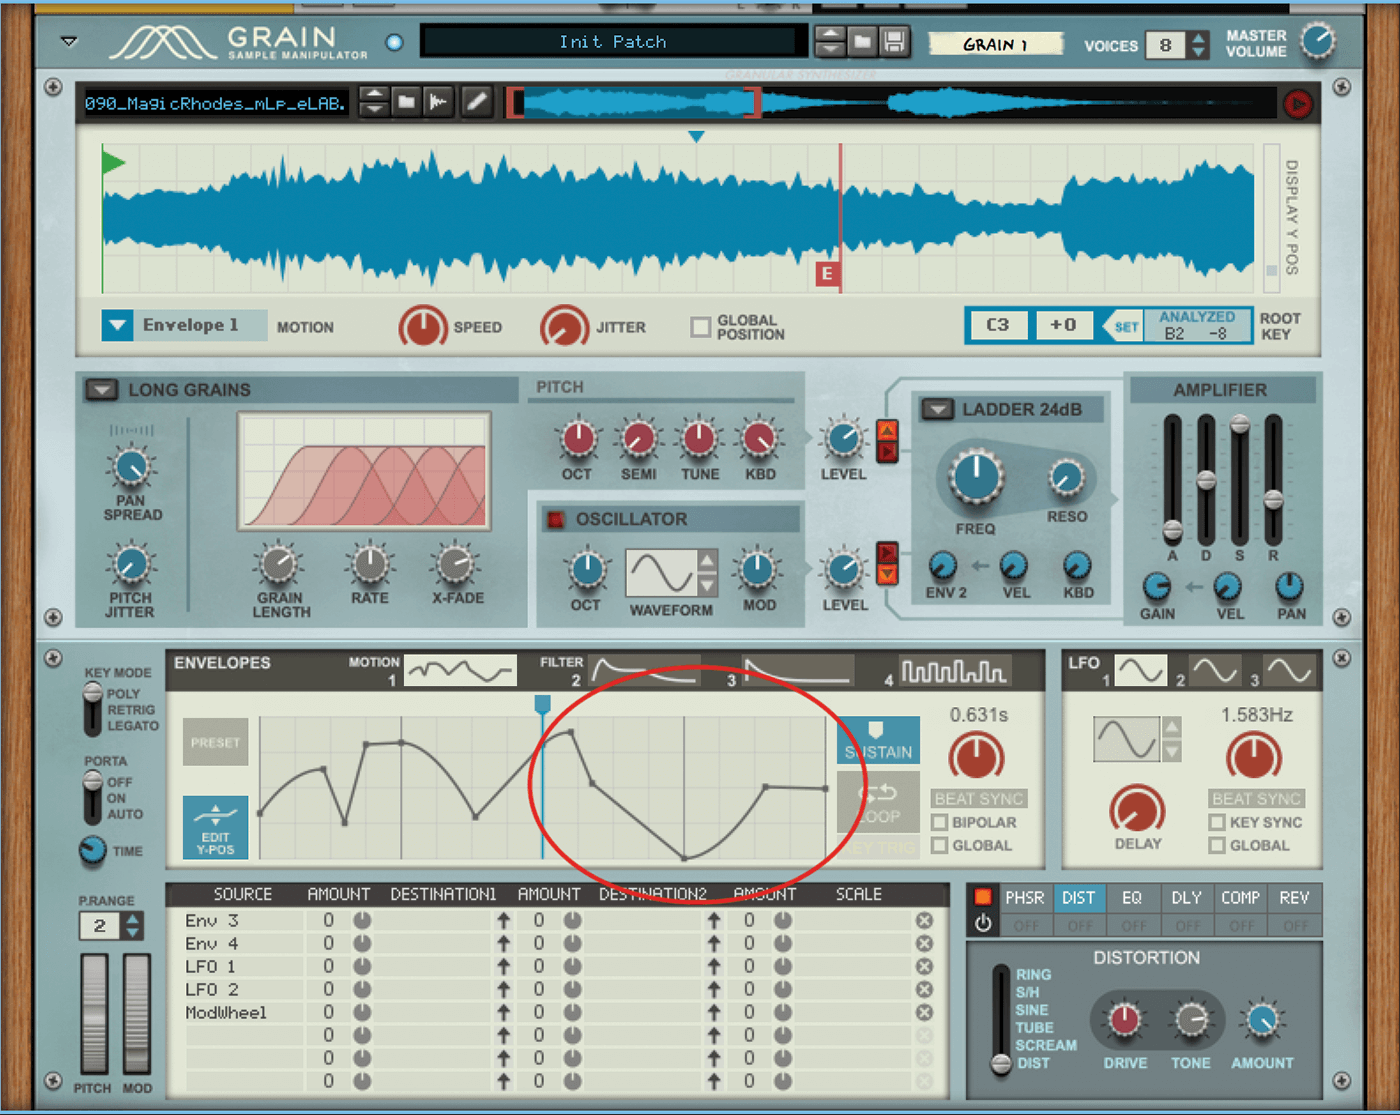
In this, the second workshop on Grain’s sonic potential, we’ll look at how the other main granular-synthesis modes offer more options to really get in and mess with your grains. However, before that, we’ll stay in Long Grain mode and turn our attention to Grain’s Envelope sections. These are among the synth/sampler’s most impressive features. There’s the standard amp envelope that sculpts the shape of each note, but it’s the more graphical section at the bottom of the GUI that is where most of the main fun lies.
In the first, Motion 1, you can decide the direction of playback of your grains, and not just forwards, backwards or looped – as we saw last time around with the Motion options in the audio window. In Motion 1, you can define as much movement as you like and even program a sustain point where your motion freezes until a key is released, which is particularly useful if you want to introduce after effects or swells on key release. There’s a library of presets to give you all sorts of options here, but it’s easy to create your own.
The second envelope, Filter 2, is assignable for the filter section. The filter output can then be modified in a similar way as described above for the motion of the audio playback, using either the library of presets or your own defined curves.
In the workshop, you’ll quickly learn that the dynamic power of Grain lies in this Envelope section, as it really does introduce a great deal of movement and sonic interest. It’s an area you should spend time exploring or learning about, by loading up different Grain presets and observing how the envelopes interact with the sound.
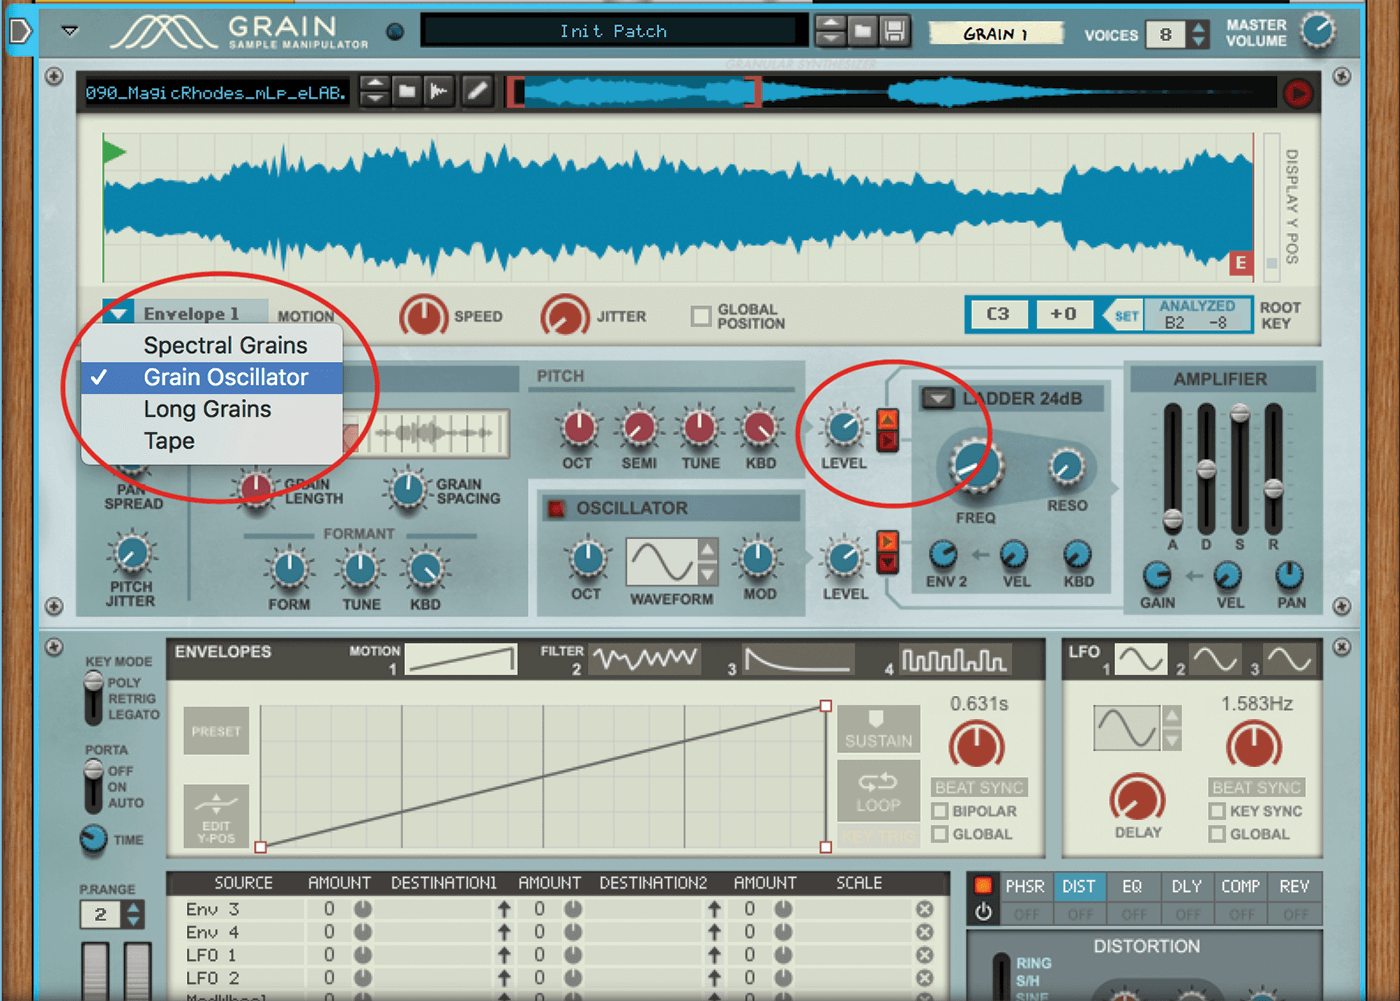
Finally, we’ll return to the granular synthesis section of Grain and move away from Long Grain mode to both the rather more complex Spectral Grain mode and the more analogue-synth-styled Grain Oscillator option. This latter option does what it says on the tin and turns the granular feed into an analogue-style oscillator with all the fun that brings,
but by using grains as source material.
We hope our tutorial will demonstrate the power of Grain in terms of both its audio and synth capabilities. Join us next time around for more granular and other synthesis journeys in sound design…
Before that, make sure to catch up with part one of the sound design tutorial here.
Sound design with Grain (part two): step-by-step
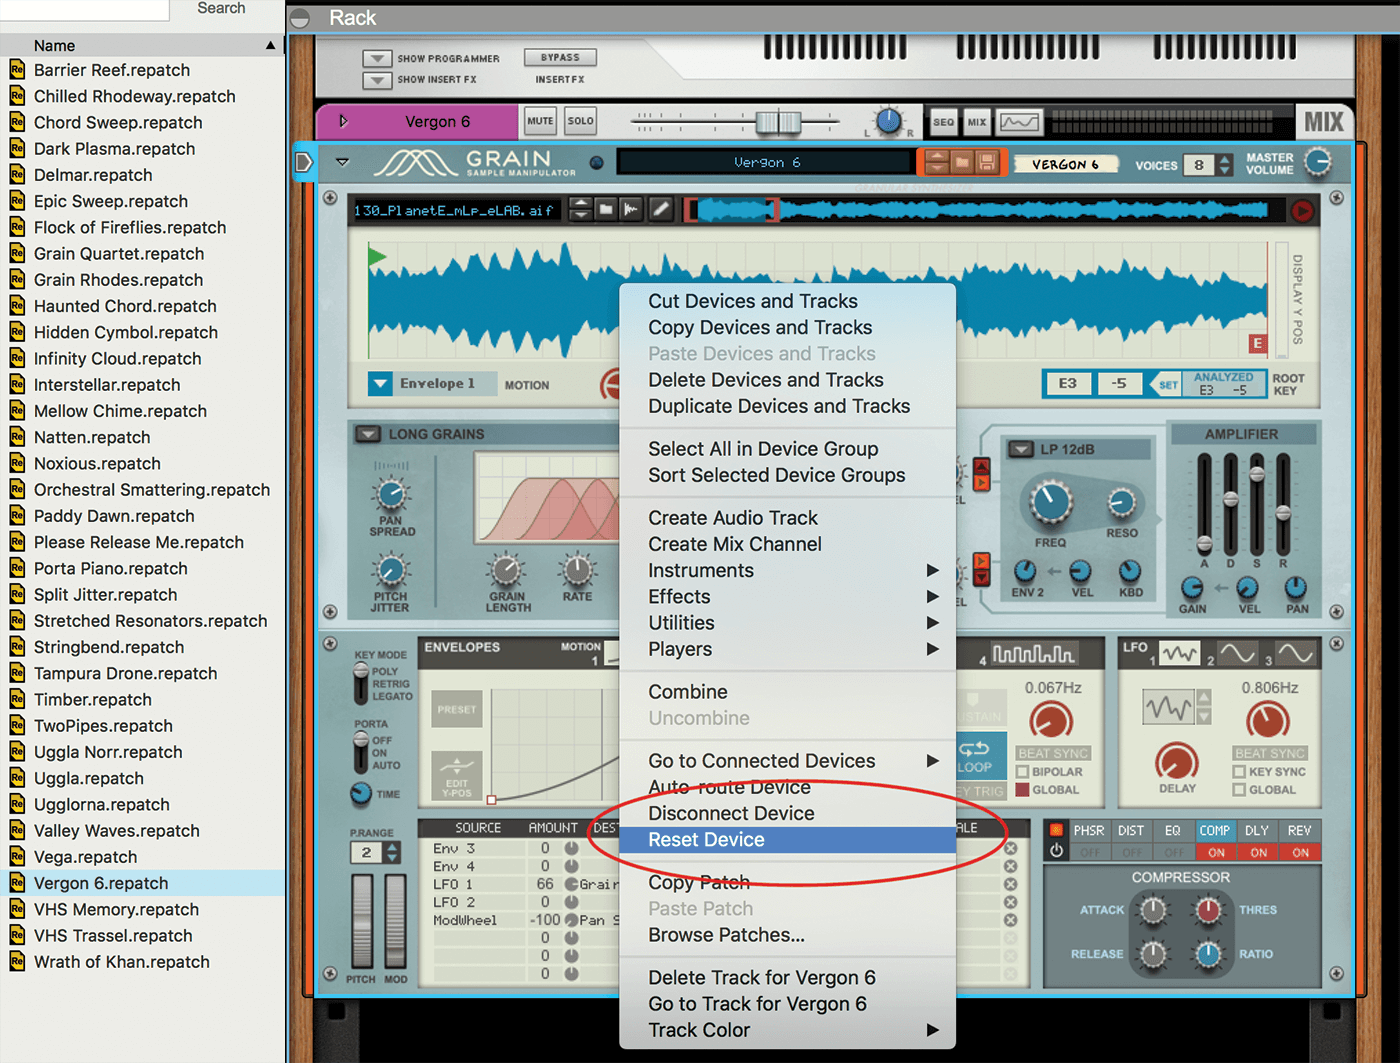
1. We want to start this workshop from scratch, so drag an instance of Grain in and reset the device. Initialise it by right/Control-clicking on it and selecting Reset Device (or select the same option from the Edit drop-down menu).
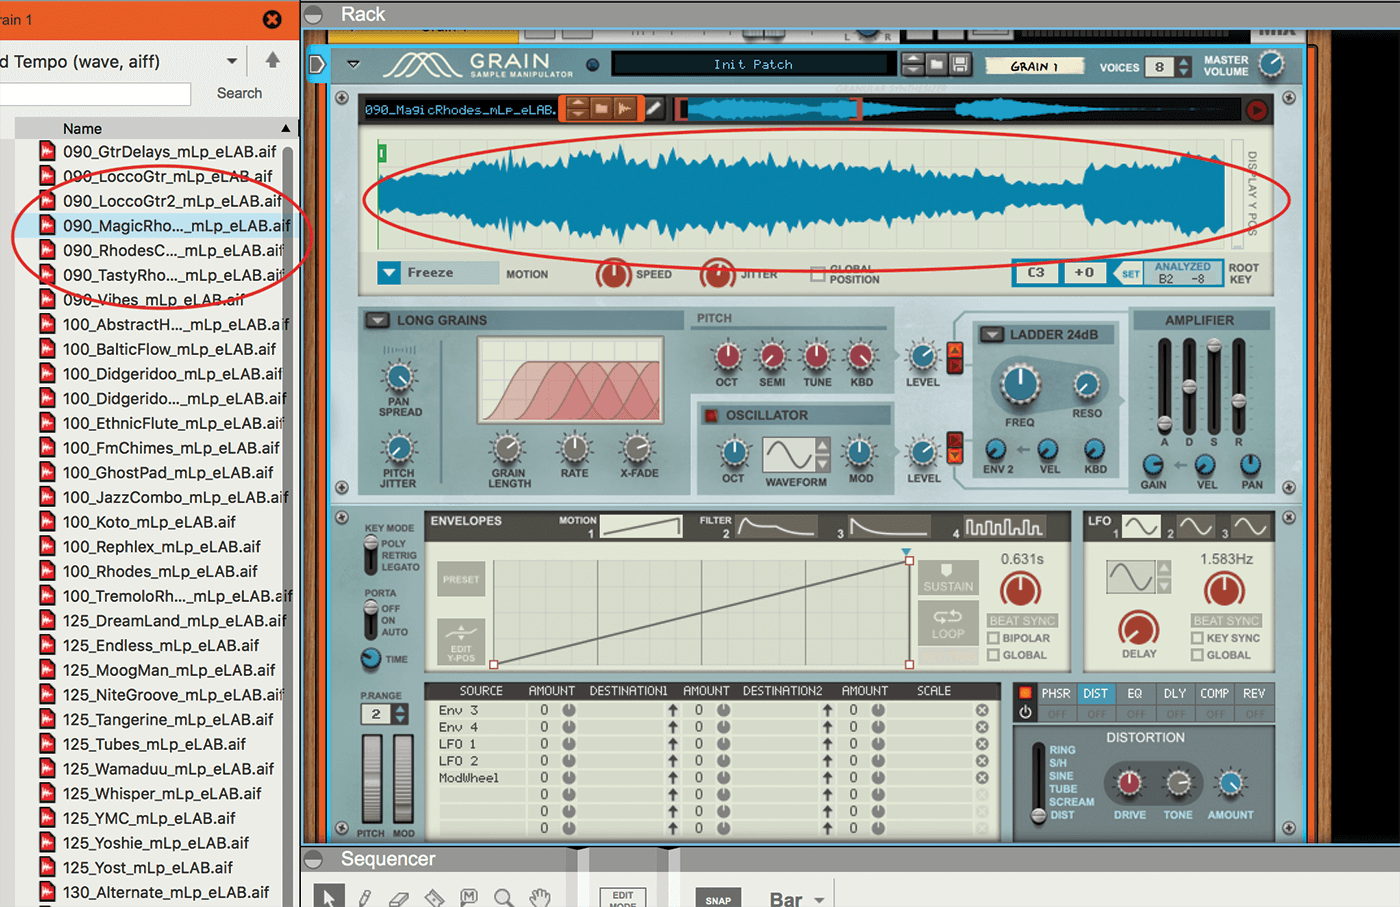
2. Load in a recognisable sound from Reason’s sound bank. We’ve loaded in a mellow electric-piano sound. We say ‘recognisable’, so you can hear exactly what each step does to the sound, so don’t use anything too fancy!
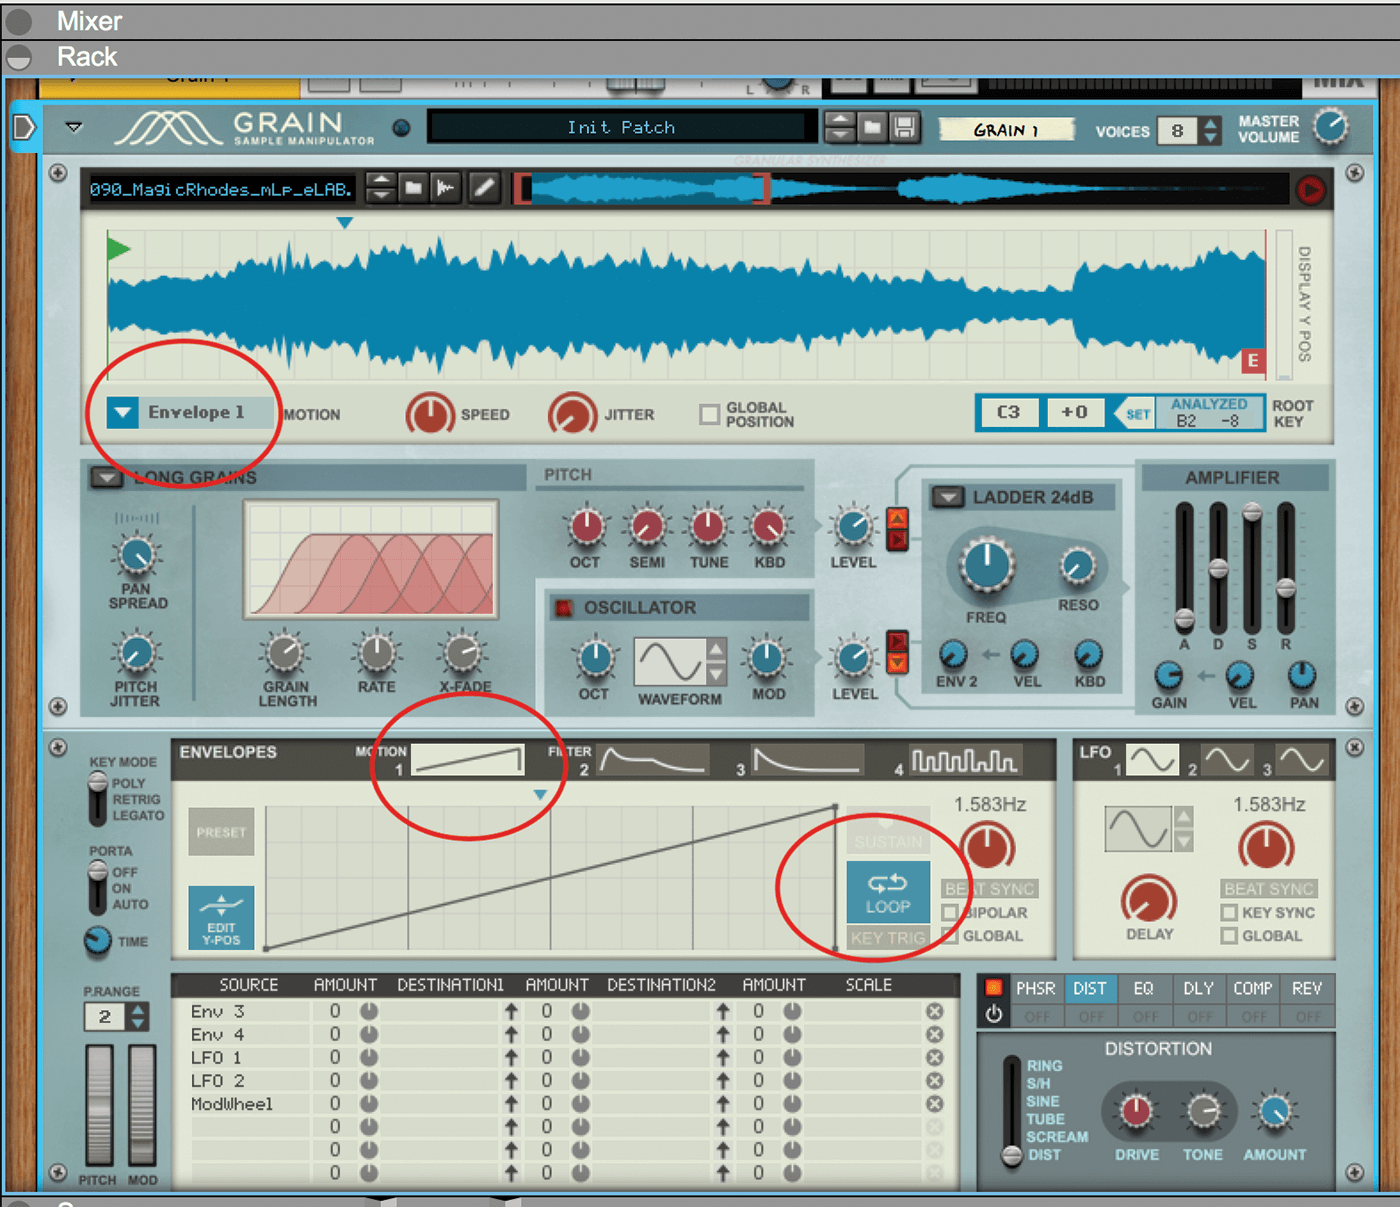
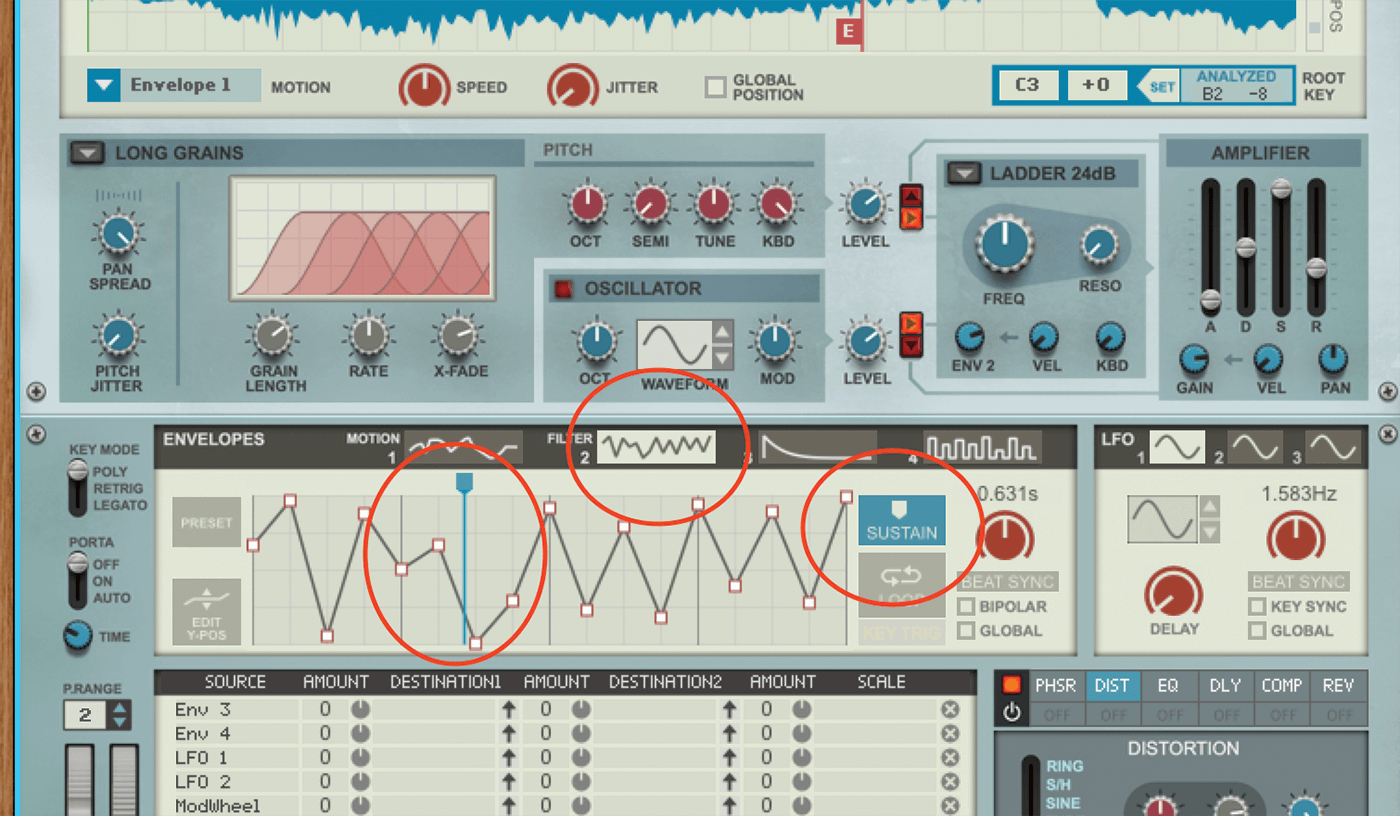
3. Stay in Long Grain mode, so make sure that is still highlighted and also select Envelope 1 from the Motion drop-down menu. Select Motion 1 in the Envelope window. Your audio is now being affected by the envelope loaded here.
4. Highlight the Preset option and all of the different envelope presets are shown. Load in the top left one, as shown which is an envelope running from top to bottom.
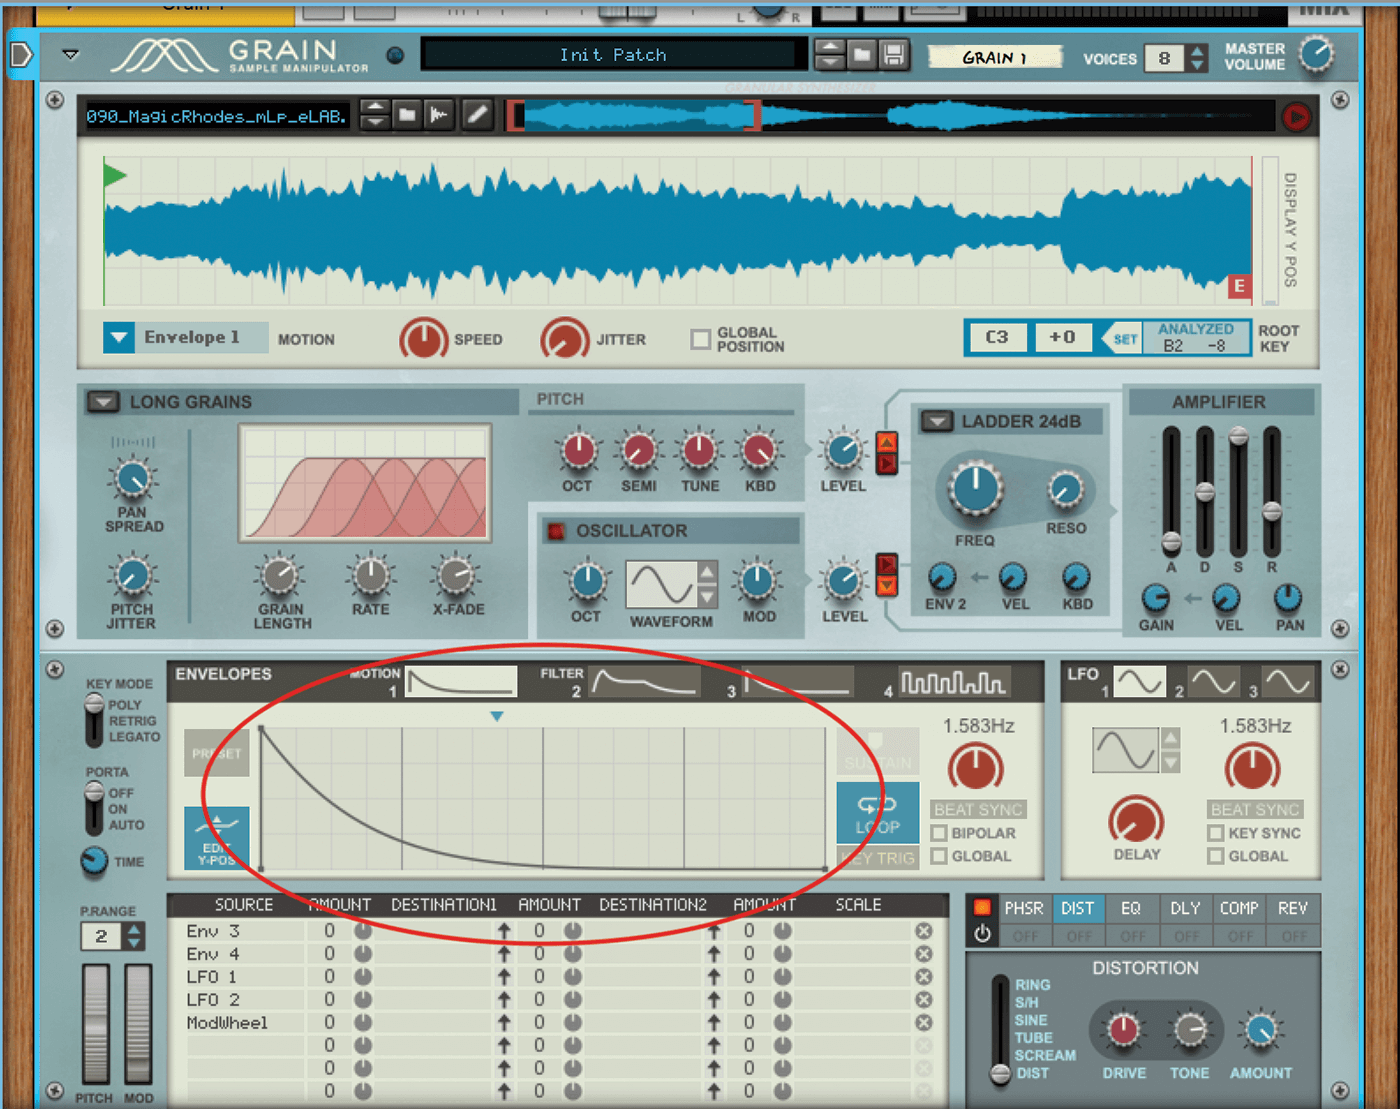
5. Previously, in step 3, the envelope was bottom to top, which played the sample forwards. So, guess what? This plays the audio backwards, as it’s the opposite shape. This is just the start of the fun.
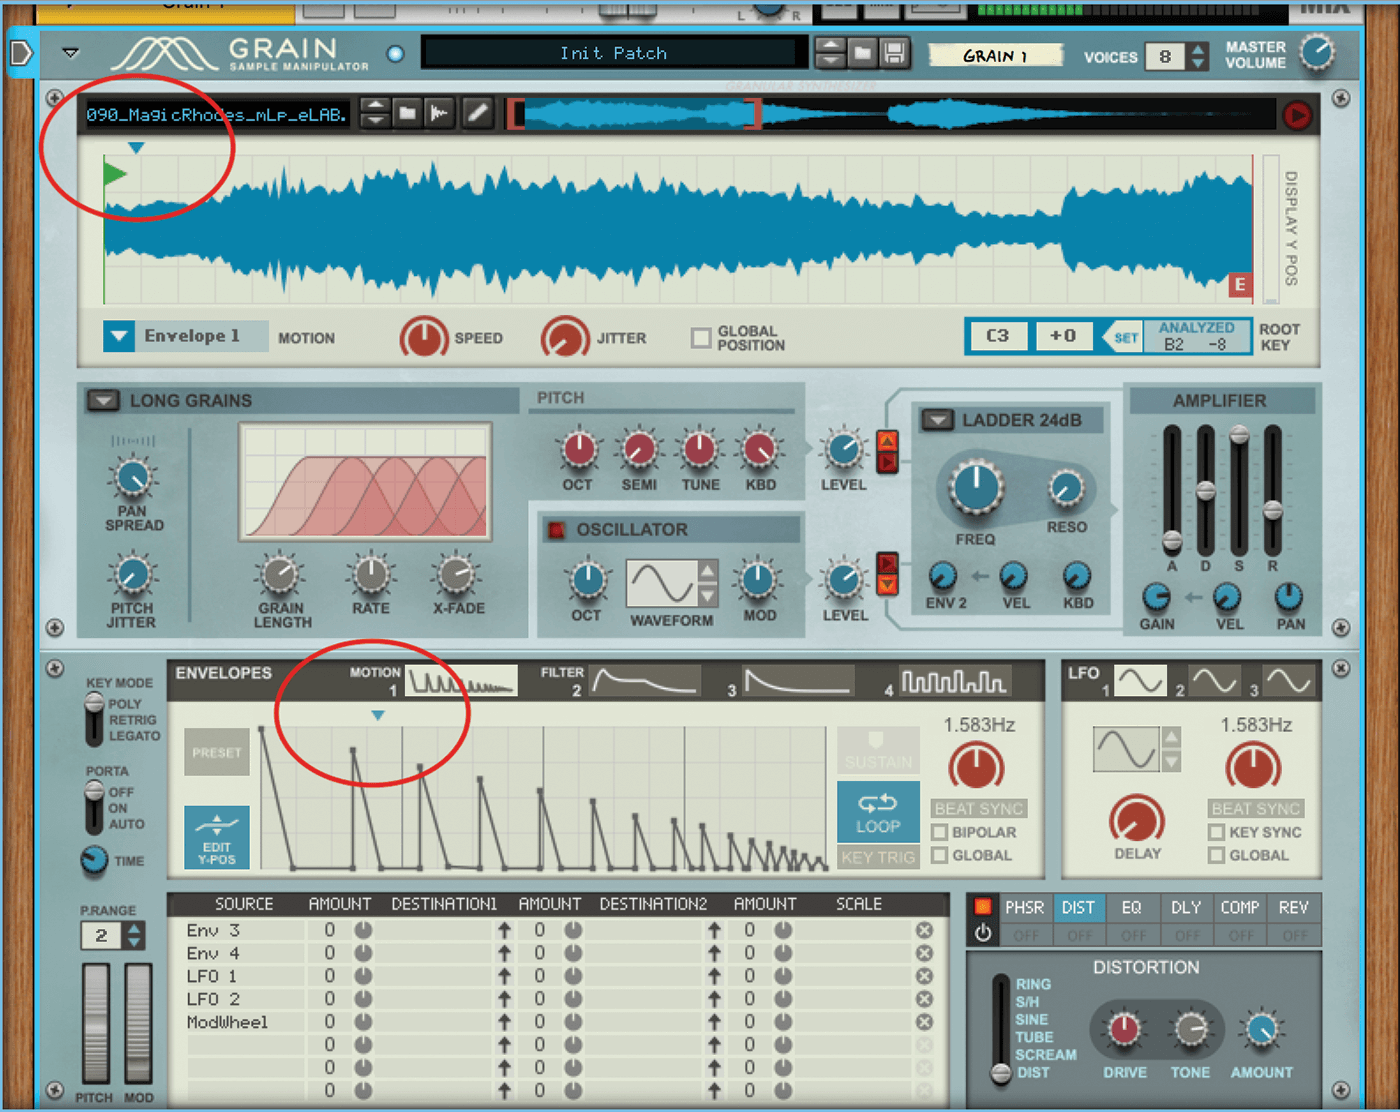
6. Load in a more complex waveform from the presets, such as the one shown and watch how the playback matches this more crazy shape as the bottom playhead moves forward through the envelope.
![]()
ENVELOPE ACTION The main Granular modes are the heart and soul of Grain, whereas the envelopes supply the movement – the icing on the cake, if you like. It’s important to learn that the envelopes can have more of an impact depending on the mode you are in, Long Grain being the best.
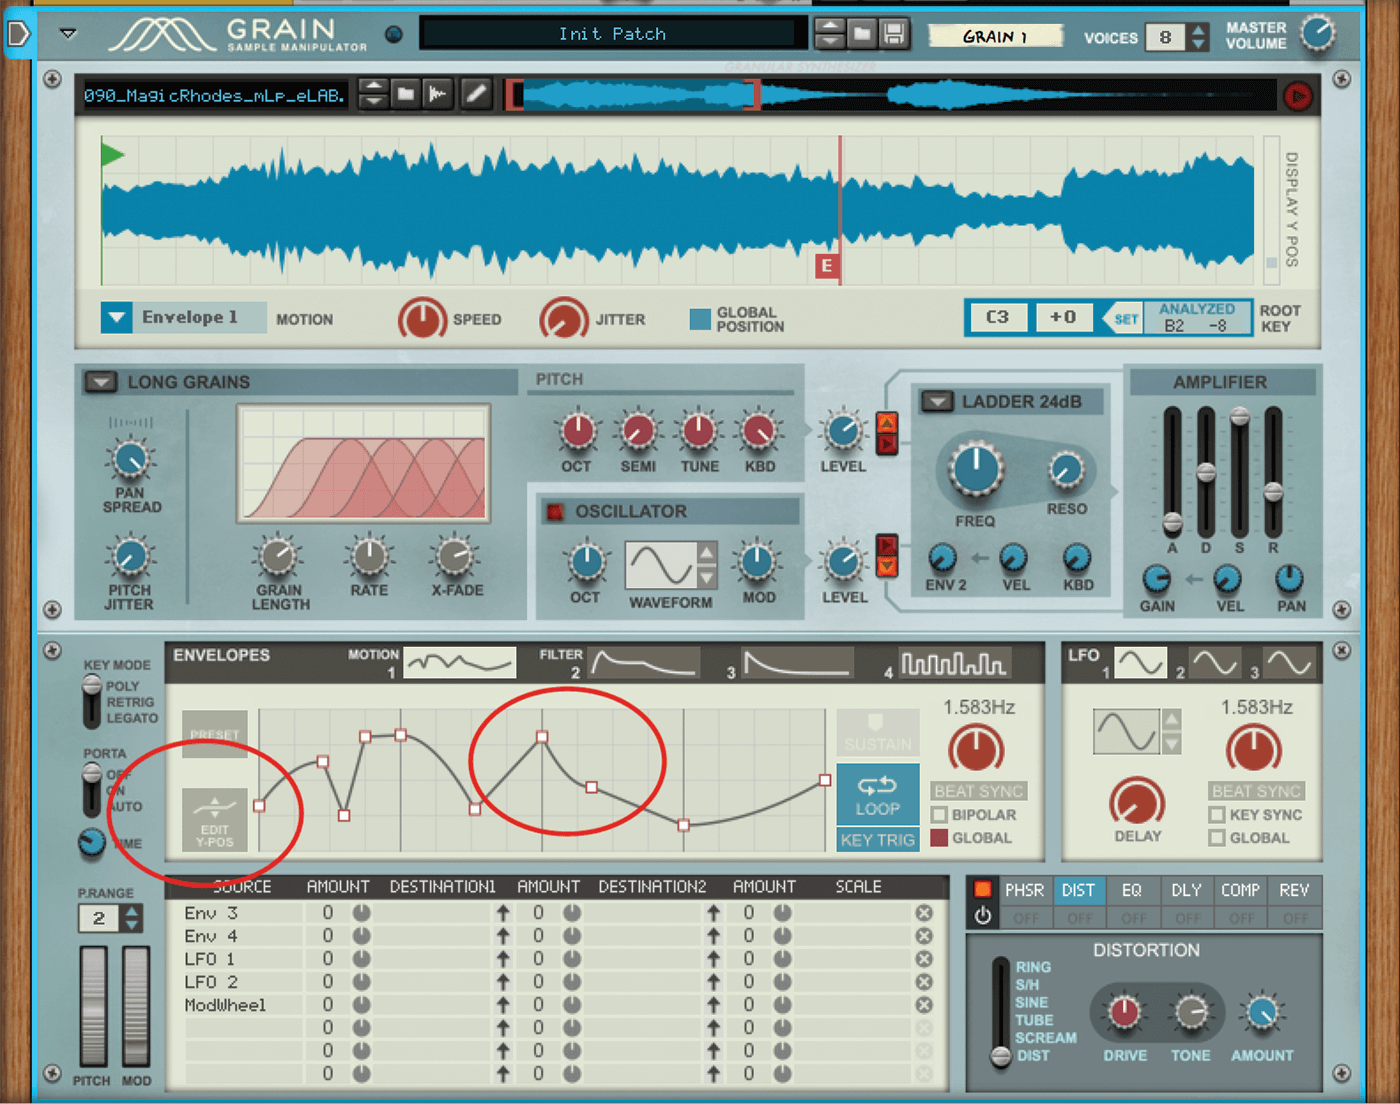
7. You can edit any of the presets by highlighting the Edit Y-Pos button and dragging points into different positions, altering the shape of a curve by clicking and dragging; or double-click the envelope to introduce edit points.

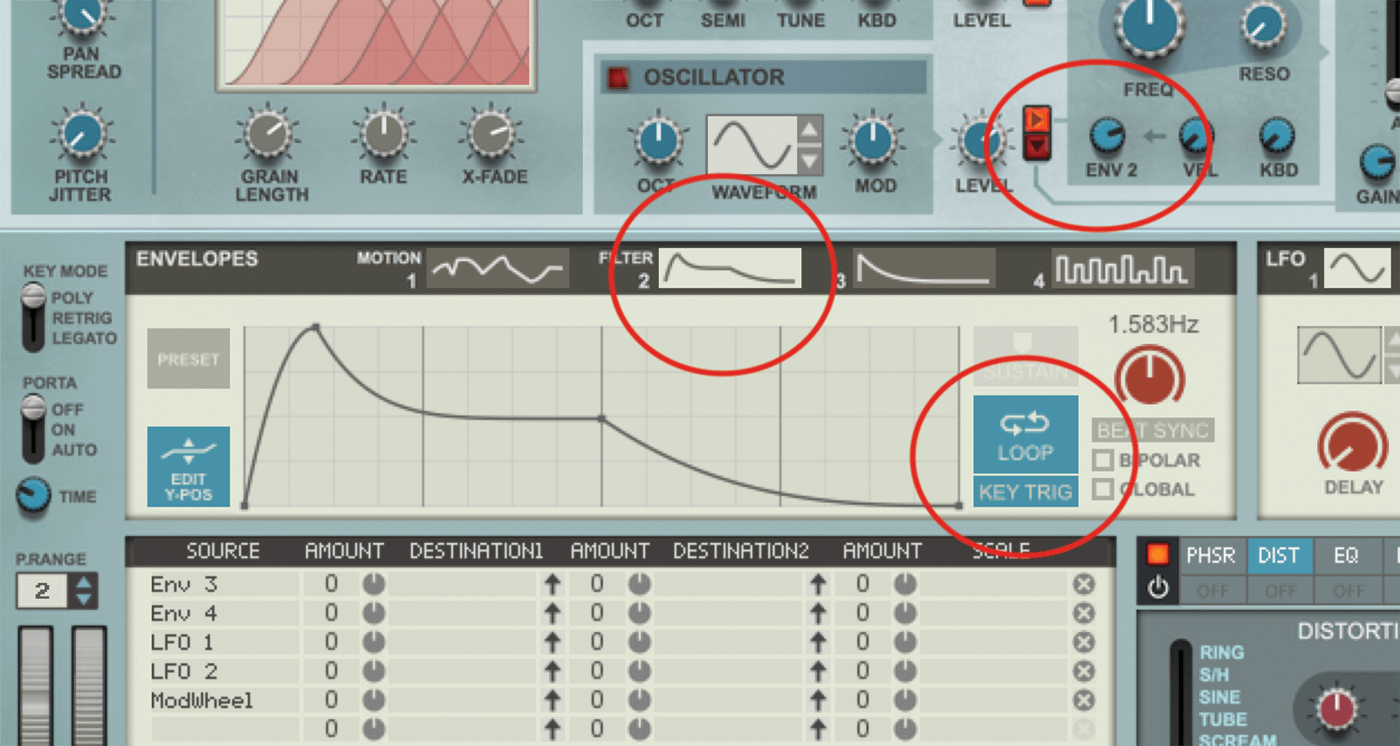
8. You can also introduce a pause in the playback by clicking off the Loop icon and clicking on the Sustain, which introduces a blue line. Drag it to a point on the envelope and playback will pause here when you hold a note.
9. Now release your keyboard note and the audio resumes playing under the envelope you have loaded in. In this way, you can introduce effects – upwards movements, repeats, etc – that happen when you release keys.
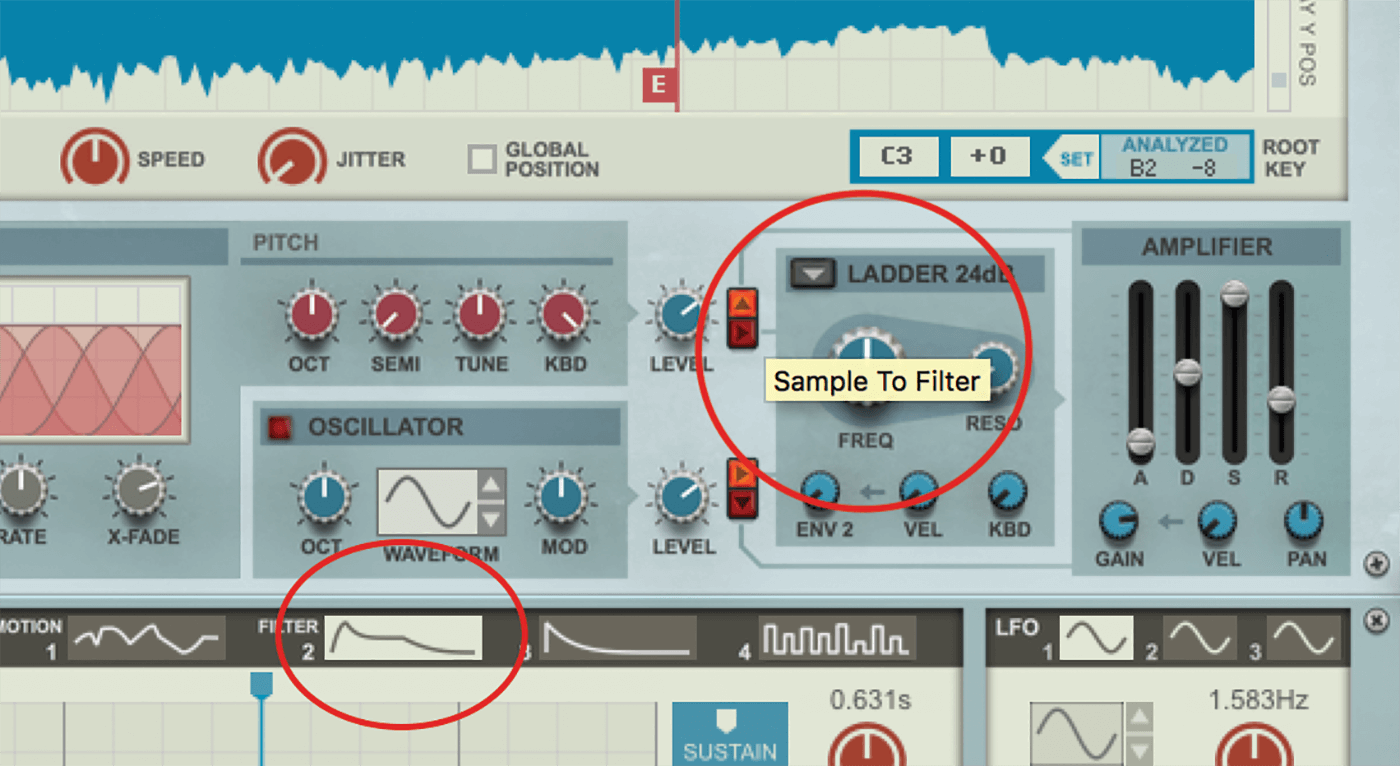
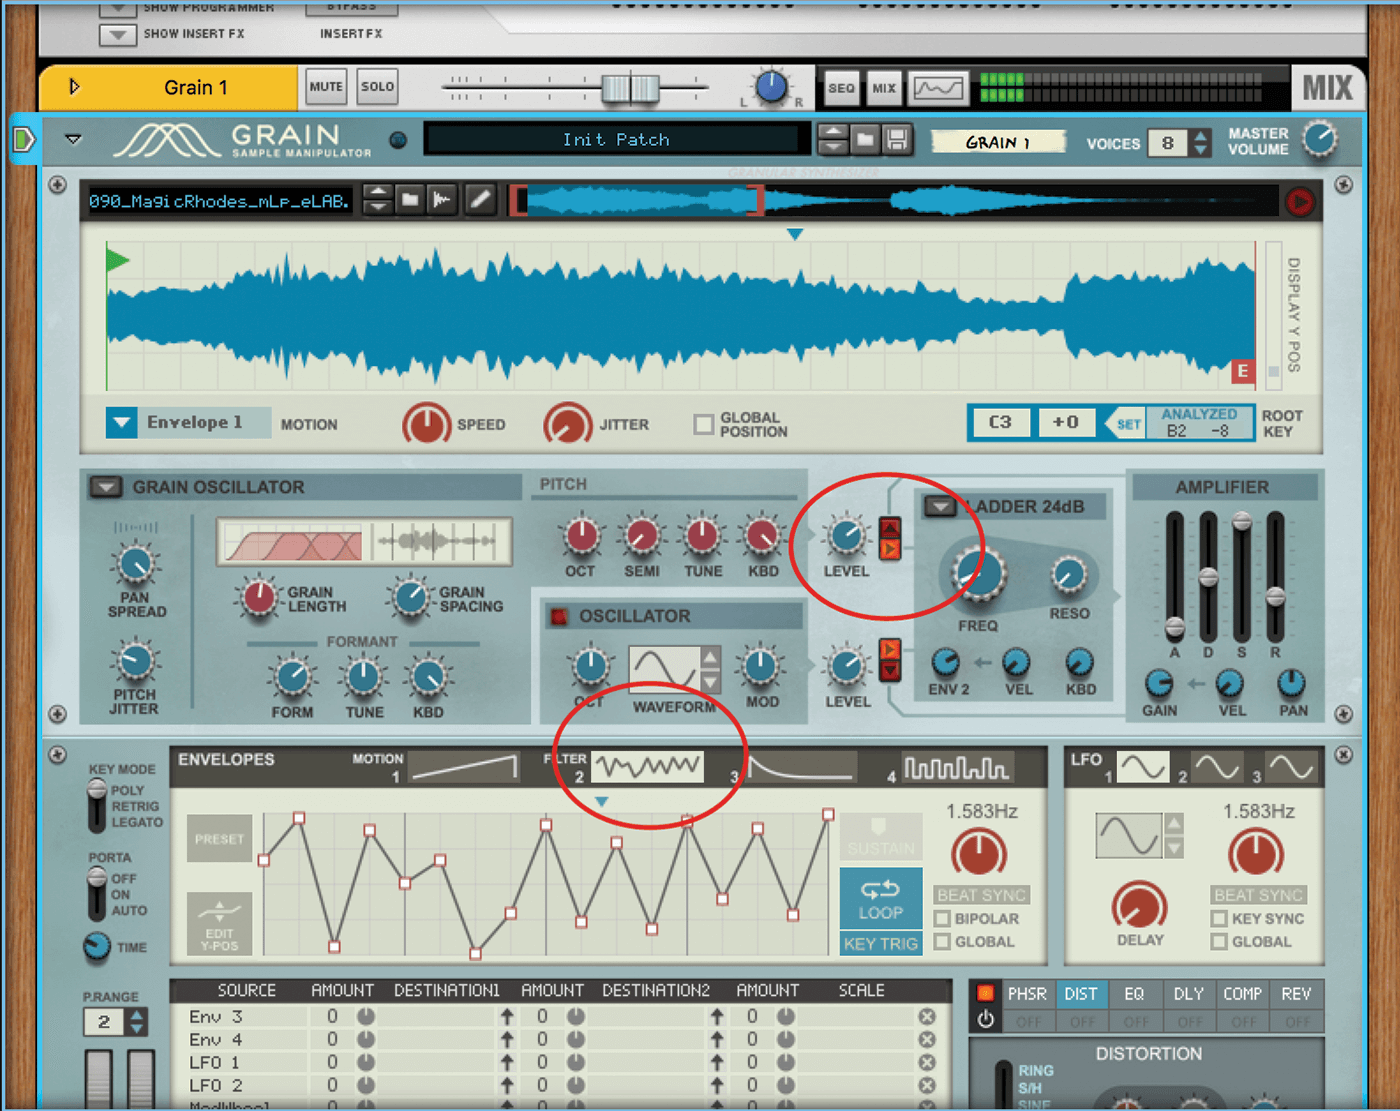
10. We’re now going to introduce some filter movement, so click the Filter 2 envelope and the top button next to the Filter section which routes the granular audio through the filter.
11. You’ll hear that the sound is already affected by the filter. Now increase the Env 2 rotary and it will change according to the envelope you have loaded in the Filter 2 slot, adding lots of sweeping EQ dynamics.
12. You can employ all of the features from the Motion envelope to the Filter envelope, so repeat steps 4 to 9 to load in a more complex envelope, hear the results and then introduce that sustain. Sounds amazing!
![]()
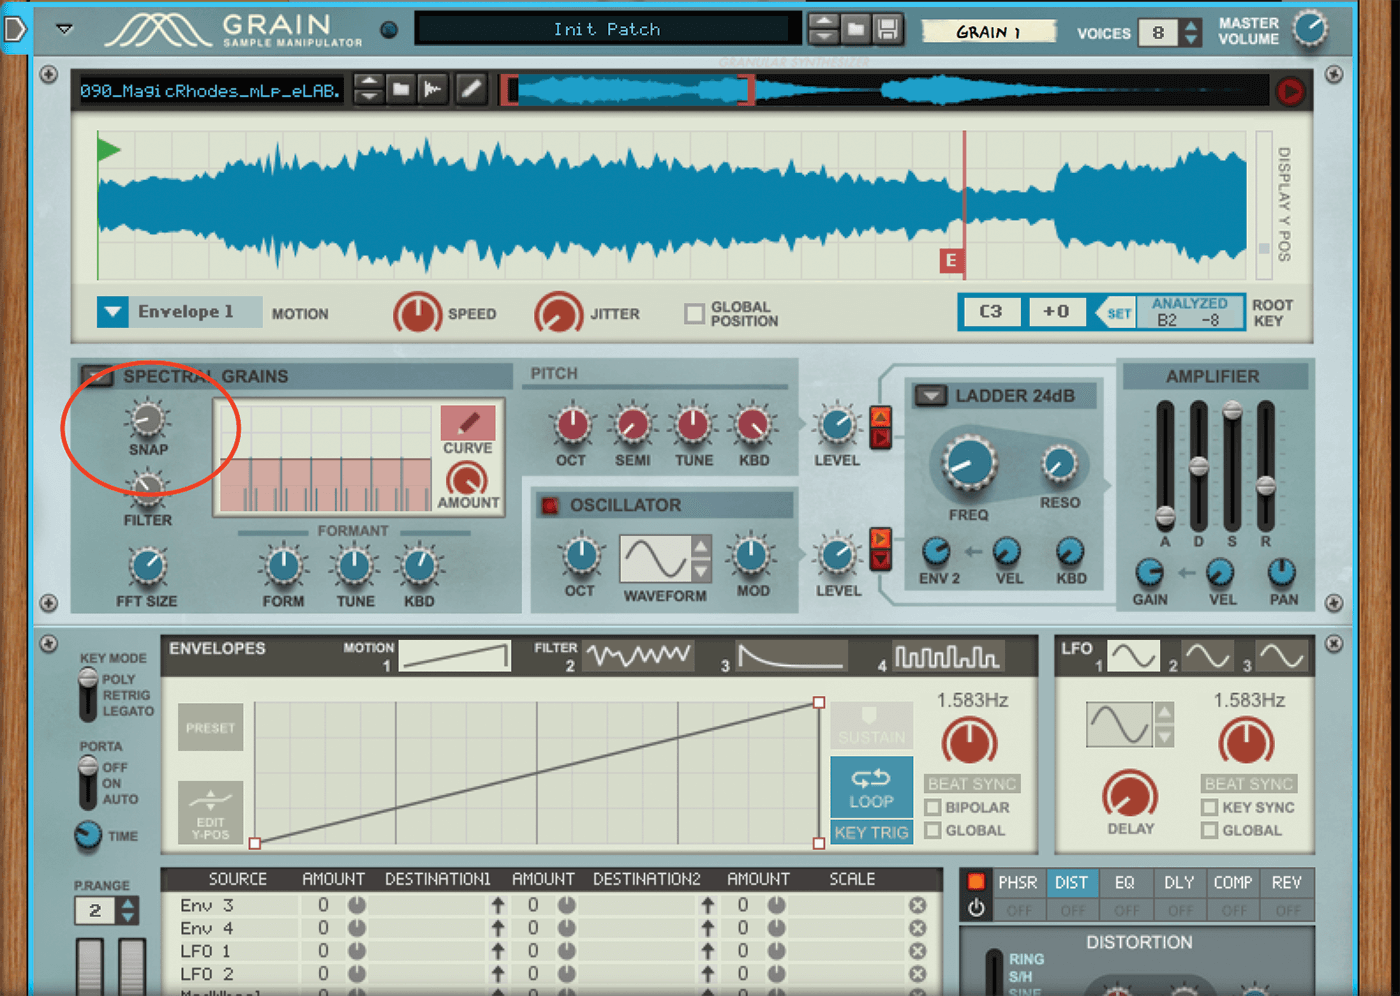
SPECTRAL GRAINS MODE The most complex mode in Grain, Spectral Grains mode analyses partial frequencies within each grain. These are matched to a fundamental-note frequency (the key you’re playing) – in varying amounts determined by a snap value. See steps 14-16.
13. Now we’re going to briefly look at two other Granular modes. Switch off the filter and engage Grain Oscillator mode. This effectively makes your granulated audio act like an analogue oscillator.
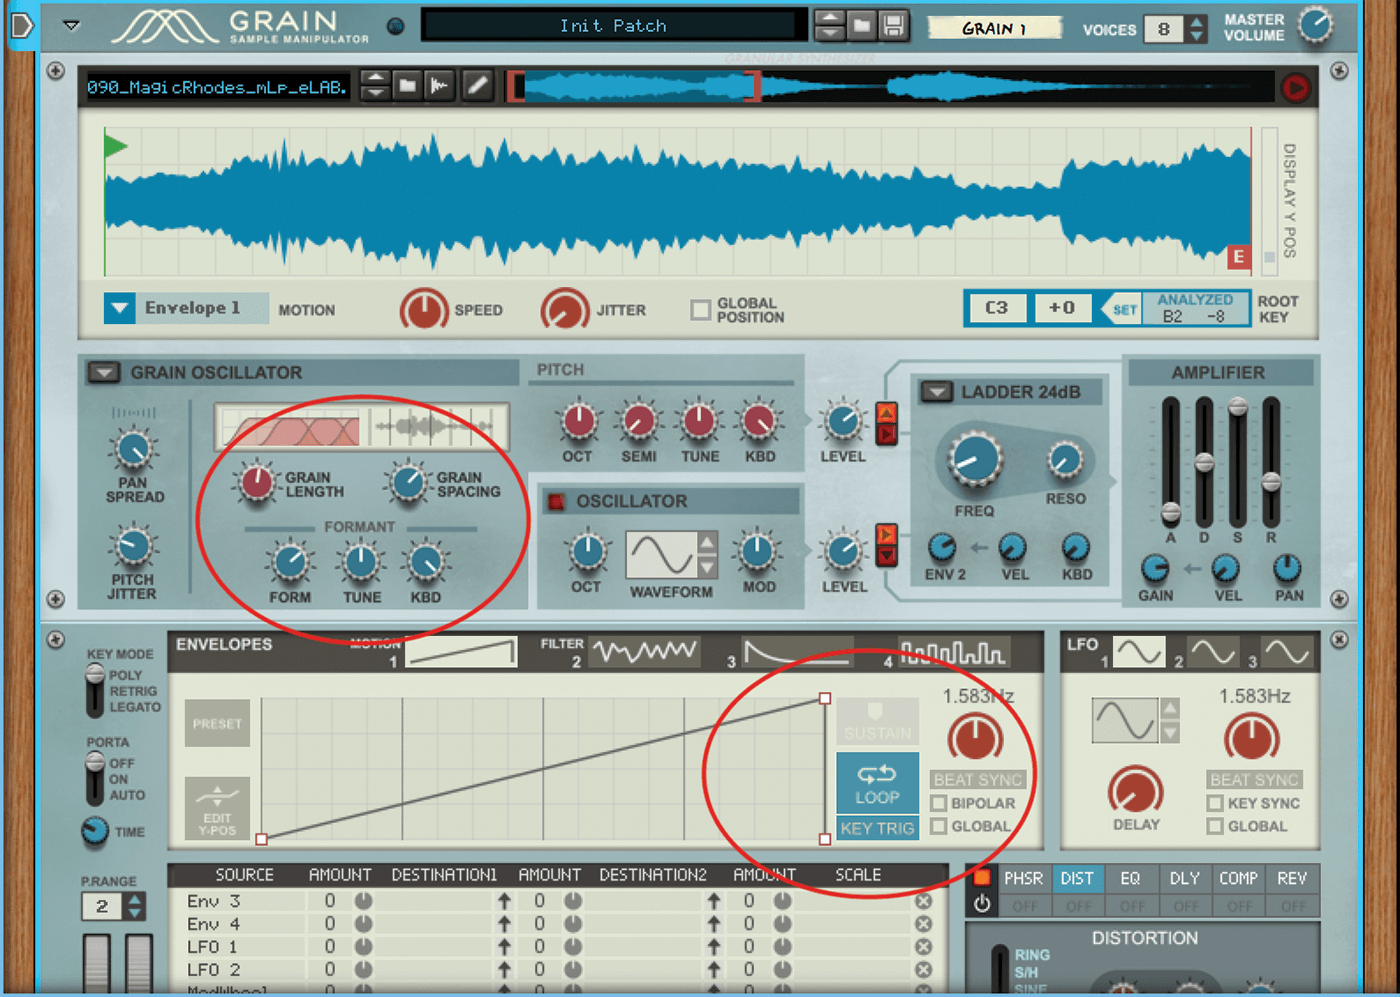
14. Return to Envelope 1 and engage the Loop mode, so you can hear changes more easily. Edit the Grain Length, Spacing and Formant options to hear the timbre change and the Jitter for pitching effects.
15. Re-engaging the filter lets you hear this mode in a more dramatic analogue manner. If you reconnect it to Envelope 2, your sound is like an analogue controlled, digitally produced beast!
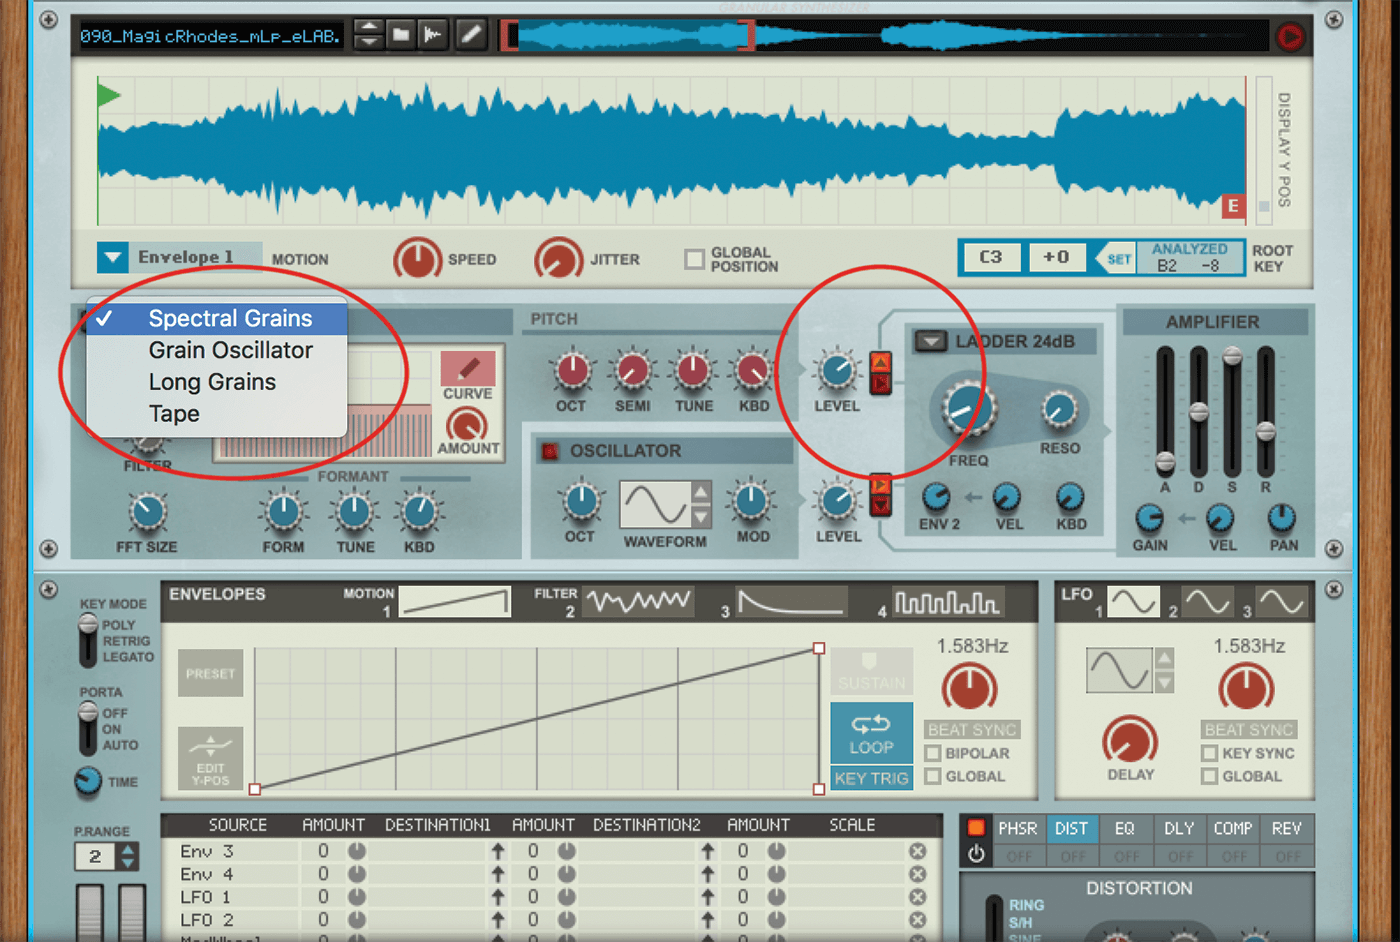
16. Switch the routing off from the sample to the Filter section and now engage Spectral Grains from the drop-down menu in the Granular Synthesis section, the last of our synthesis modes. It’s a more complex mode.
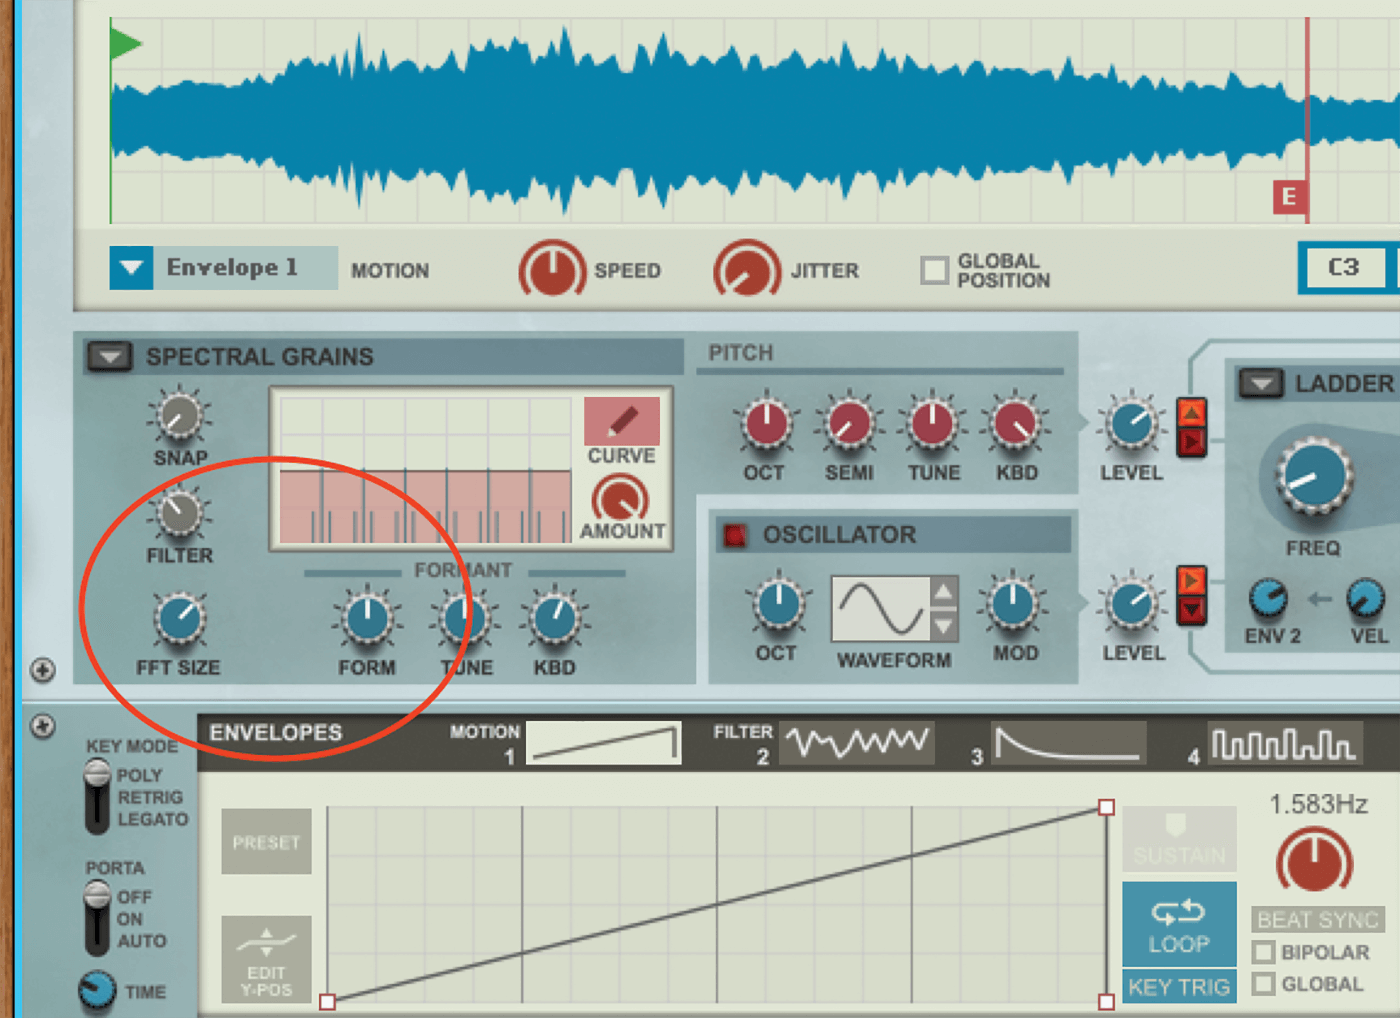
17. We explained more on this on the previous page, but essentially this mode is best experimented with. So adjust the Filter dial and Formant first, which give you an approximation of a filter effect and dramatic tuning.
18. The Snap dial is the biggie which adds a more whiny granular effect according to how matched the grain’s partial frequencies are with the key you are playing – it’s great for subtle swirling to ghostly grains.