Physical Modelling Plucks in Logic Pro X
Physical Modelling offers a wholly different approach to sound creation as well as a unique palate of sounds that can’t be found elsewhere.
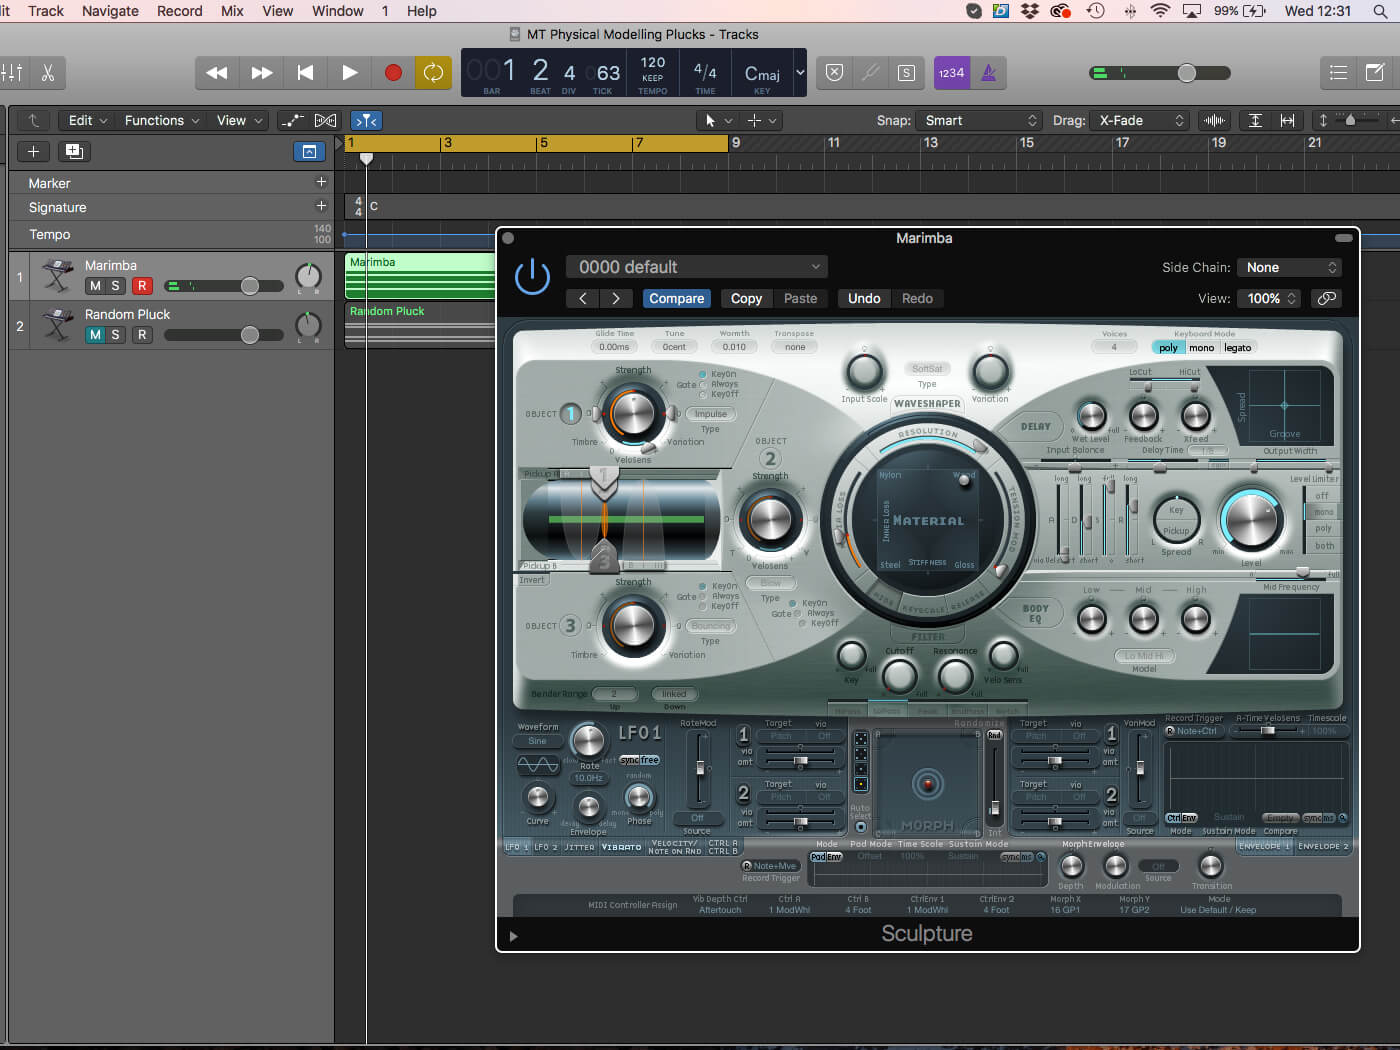
The rise of modular synthesis has seen a renewed interest recently, particularly in the realms of physical modelling. Modules such as 2hp’s Pluck and Mutable Instruments’ Rings have made it clear that modular synthesis isn’t solely about retro analogue tones but about digital sounds that blend acoustic and synthetic qualities. Having heard what musicians are producing with these modules, we thought it worth revisiting Logic Pro X’s overlooked physical modelling synth, Sculpture, to see what it’s capable of.
String theory
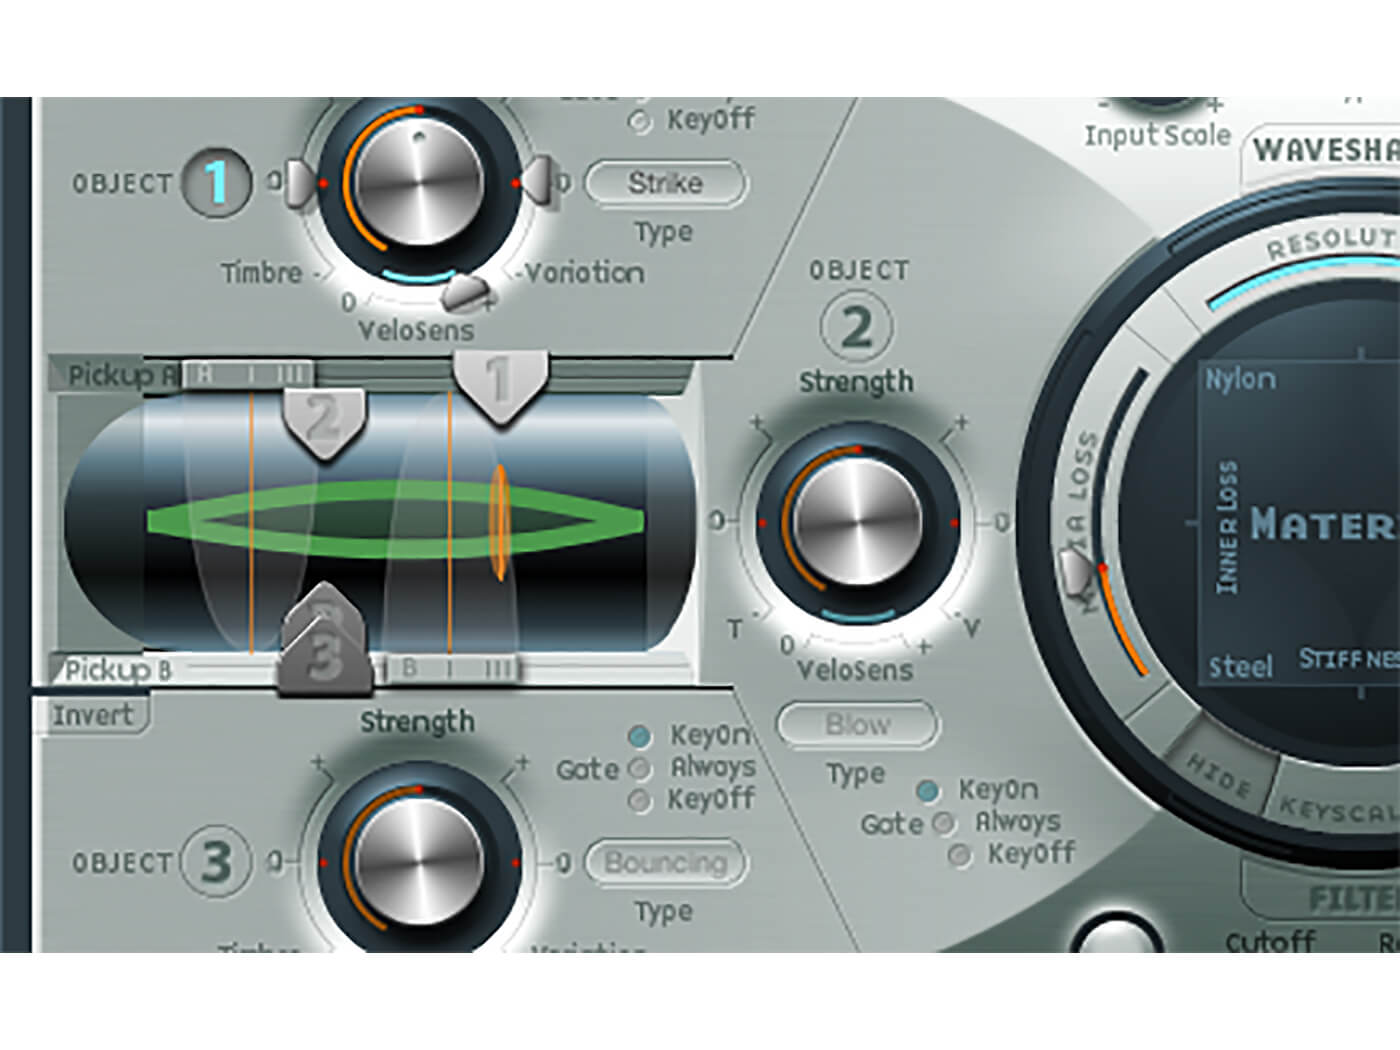
Technically speaking, Sculpture is a form of Karplus-Strong string synthesizer that uses an exciter and a resonator to create string-like sounds. To use an analogy, the ‘exciter’ would be something like a pick – a device used to apply energy to a string, which, in turn, acts as a ‘resonator’. Both exciter and resonator need each other to work – the string doesn’t make a sound unless the pick applies energy to it and, likewise, the pick alone is useless.
Your first encounter with Sculpture might be confusing. Though it looks like a conventional three-oscillator synth, the principle controls are radically different, and often operate in a manner markedly different to those of subtractive synthesis. Forget about oscillators, filters and amplifiers, and start to think of sound creation in more ‘physical’ terms – the stiffness of a string, for example, the type of object used to excite it, or the position of two virtual pickups. A simple subtractive task such as adding sustain, for example, is less about enveloping and more about parameters like media loss, exciter type and so on.
Material world
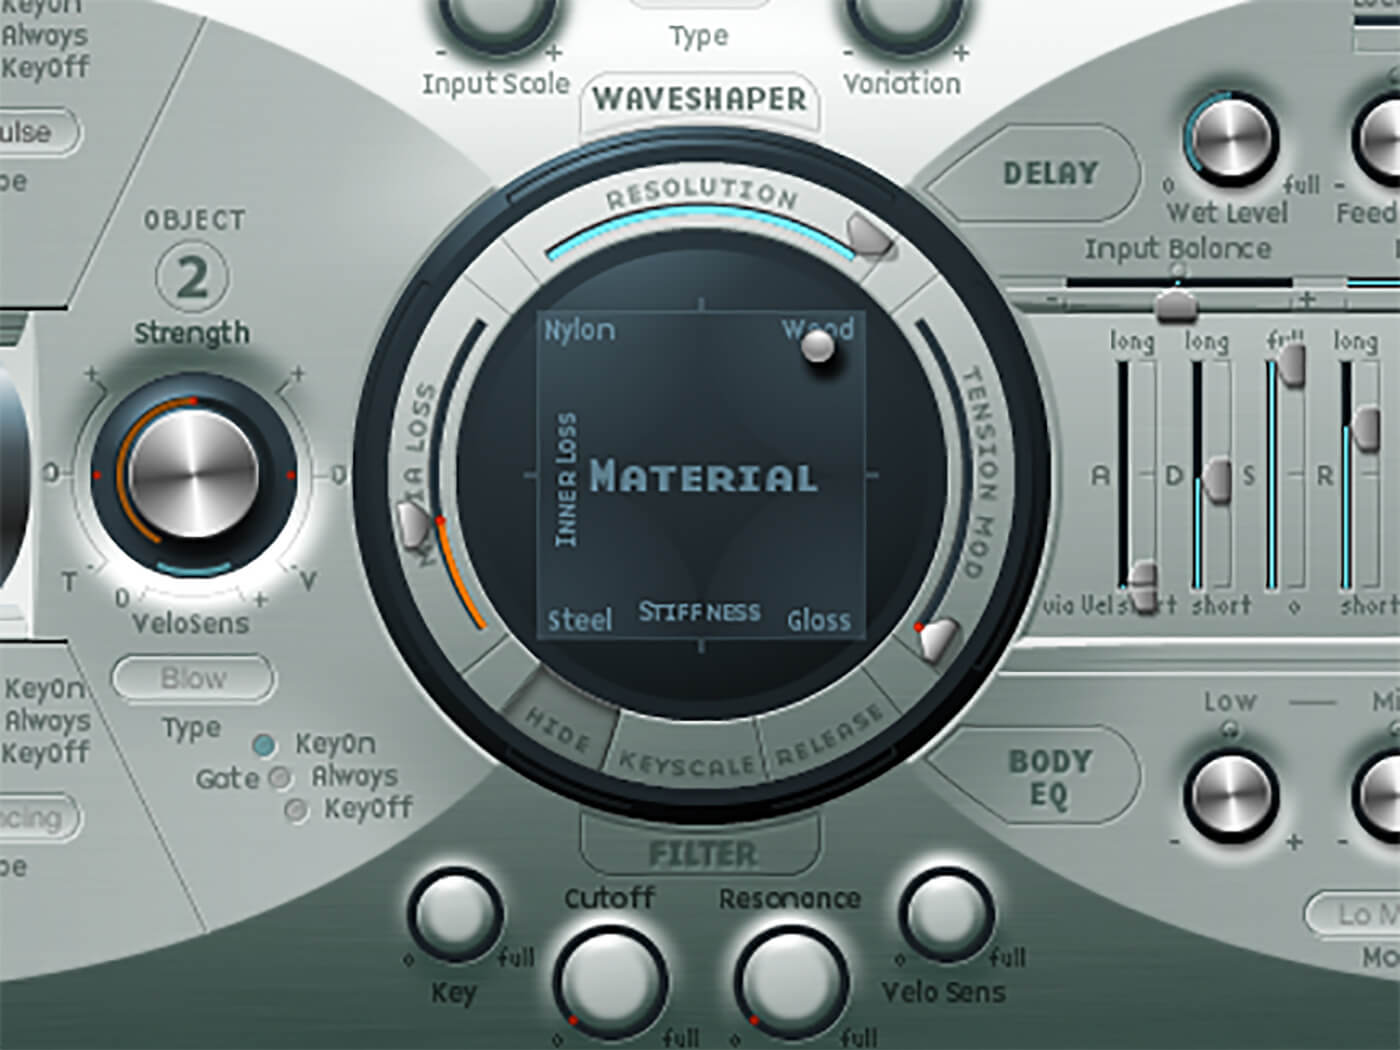
Don’t worry if this seems complicated. Sculpture is a hands-on instrument that rewards experimentation. To begin, we need to define the type of string we’re working with. For example, do we want a nylon or a steel-string acoustic guitar? You can define the basic properties of the string using the X-Y Material pad, which moves between four material types: Nylon, Wood, Steel and Glass. Pull the Material control towards Steel for example, and you’ll hear a sawtooth-like richness, while Glass sounds more open and inharmonic.
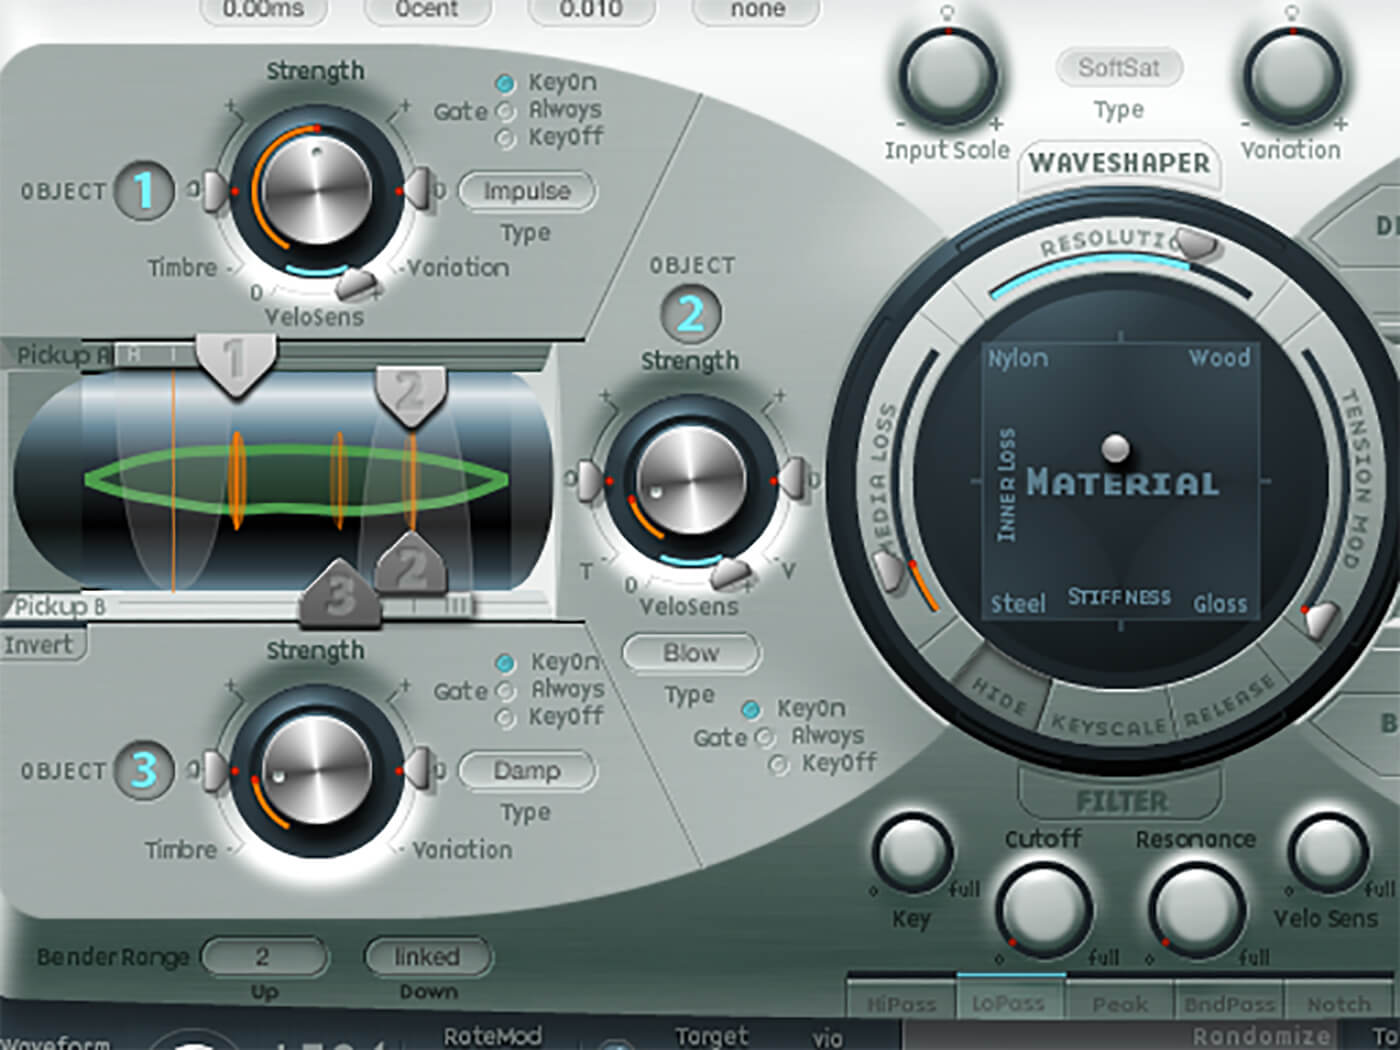
Next, decide what Object (or Objects) you want to use to excite the string. Confusingly, this section looks like the three oscillators on a subtractive synth but actually controls three different Objects that can interact with the single string. Simple sounds, for example, might only use a single Object, such as a Pick or Bow, whereas more complicated sounds will add more Objects, to dampen as well as pick the string, for example, as in a palm-muted electric-guitar sound. If you’re using multiple Objects, you’ll need to consider their relative strengths, so that lightly dampened string, for example, isn’t used in conjunction with a mallet-like heavy strike.
Stereo sculpture
Another important parameter is the position of the Objects alongside the two virtual pickups. Think of the difference between picking a string with your hand positioned near the bridge, which tends to create a weak and reedy sound, and the fuller sound produced when you pick the string further down towards the sound hole. Where you have multiple Objects interacting with the sting, their positions become even more interesting due to the dynamic relationship between them.
Another key point to note Sculpture is how it works in stereo. There are two ways Sculpture’s stereo image is defined – firstly, by the mapping of key position across the soundstage, and secondly, by the panning of the two virtual pickups. Modulating the two pickups using an LFO creates a chorus-like effect, which is left in place as part of Sculpture’s default setting. In short, it makes Sculpture sound good.
Super model
The final part of this walkthrough details the ways you can use the Modulator MIDI FX plug-in to create modular-like movement. Although Sculpture includes plenty of its own modulators, the Modulator MIDI FX plug-in is useful not only because you can see the parameter moving, but because it features interesting tempo-syncable LFO effects that go beyond what Sculpture’s LFOs can achieve.
Having covered the basics, the walkthrough expands on many of the ideas identified here. For example, you can dictate how Sculpture responds to the relative MIDI keyboard position, so that the physical properties of the instrument change as you move up and down the keyboard, becoming more woody in the lower octaves and more glassy as you move up. As you’ll see, Sculpture is a fantastically different way of creating sound, especially given its roots in the real-world design of physical instruments.
Physical modelling plucks in Logic Pro X: step-by-step
1. Using our provided project, solo the sound on Track 1, we want to turn this into a marimba. The first and most important decision, therefore, is to move the Material Pad towards the Wood setting. Notice the shifting harmonic properties.
2. Try experimenting with the Media Loss parameter. Media Loss sets the natural dampening characteristics of the string so that greater amounts of Loss create a more staccato-like result. Set this to about 0.36.
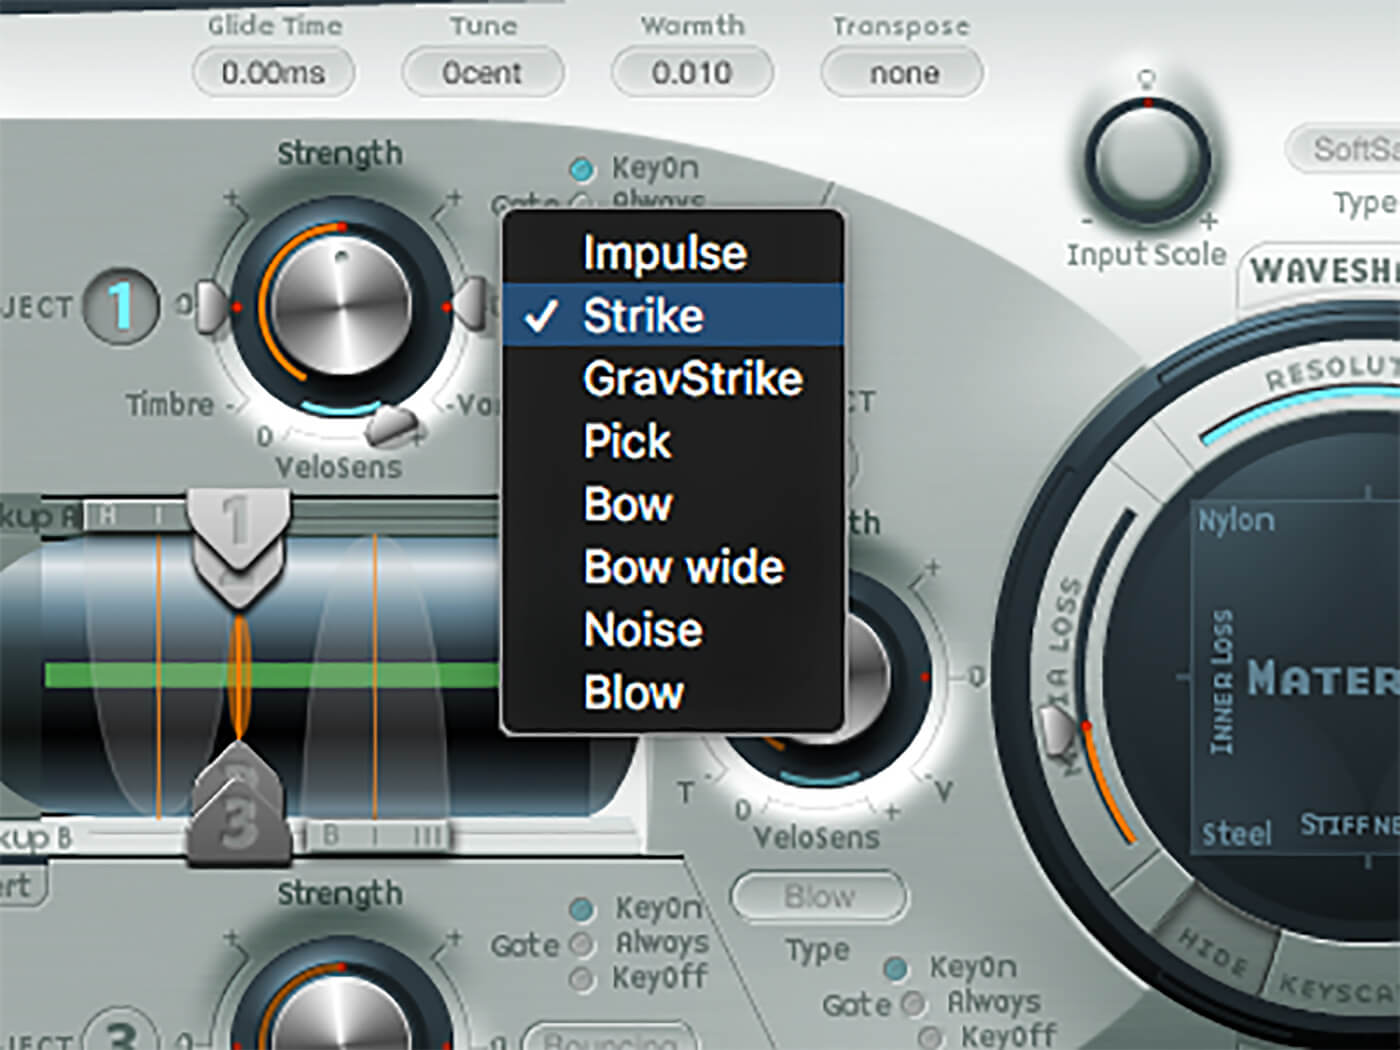
3. The Object defines how the string is excited. Select the Strike object to emulate the mallet used to play a wooden marimba.
4. Move the position of the object on the string and listen to the changes in timbre. The two ends of the string have a weaker sound. A setting of 0.72 seems to strike the correct balance of tone.
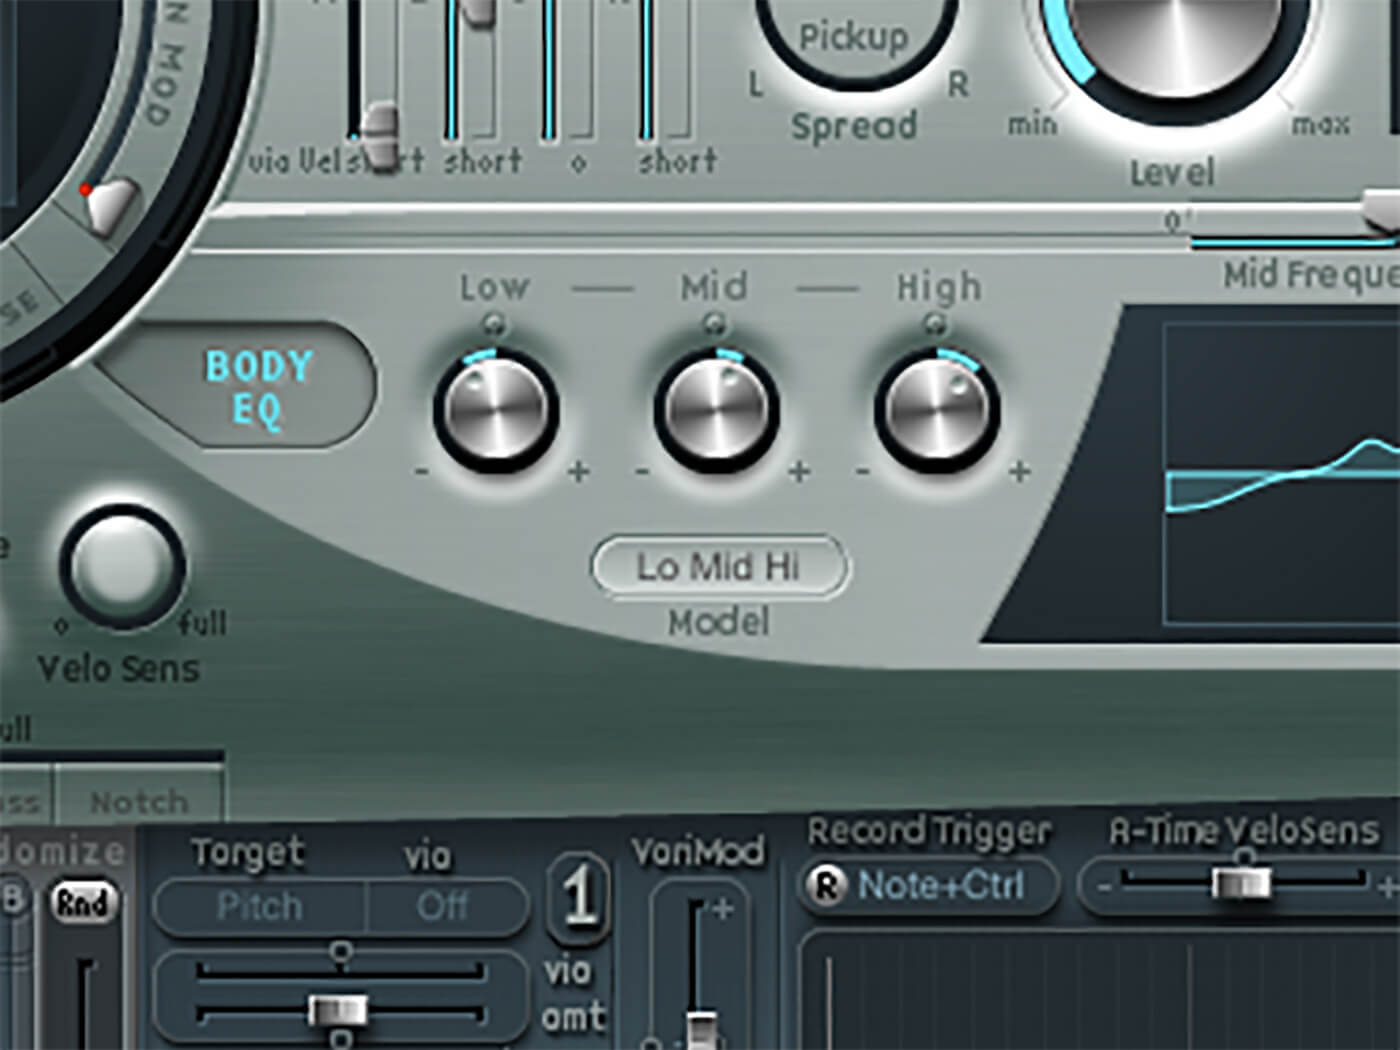
5. The Body EQ is a good way of setting the broad timbre of the instrument. Here, we’ve reduced Low control while raising the Mid and High, resulting in a sound that’s bright without too many low-mids.
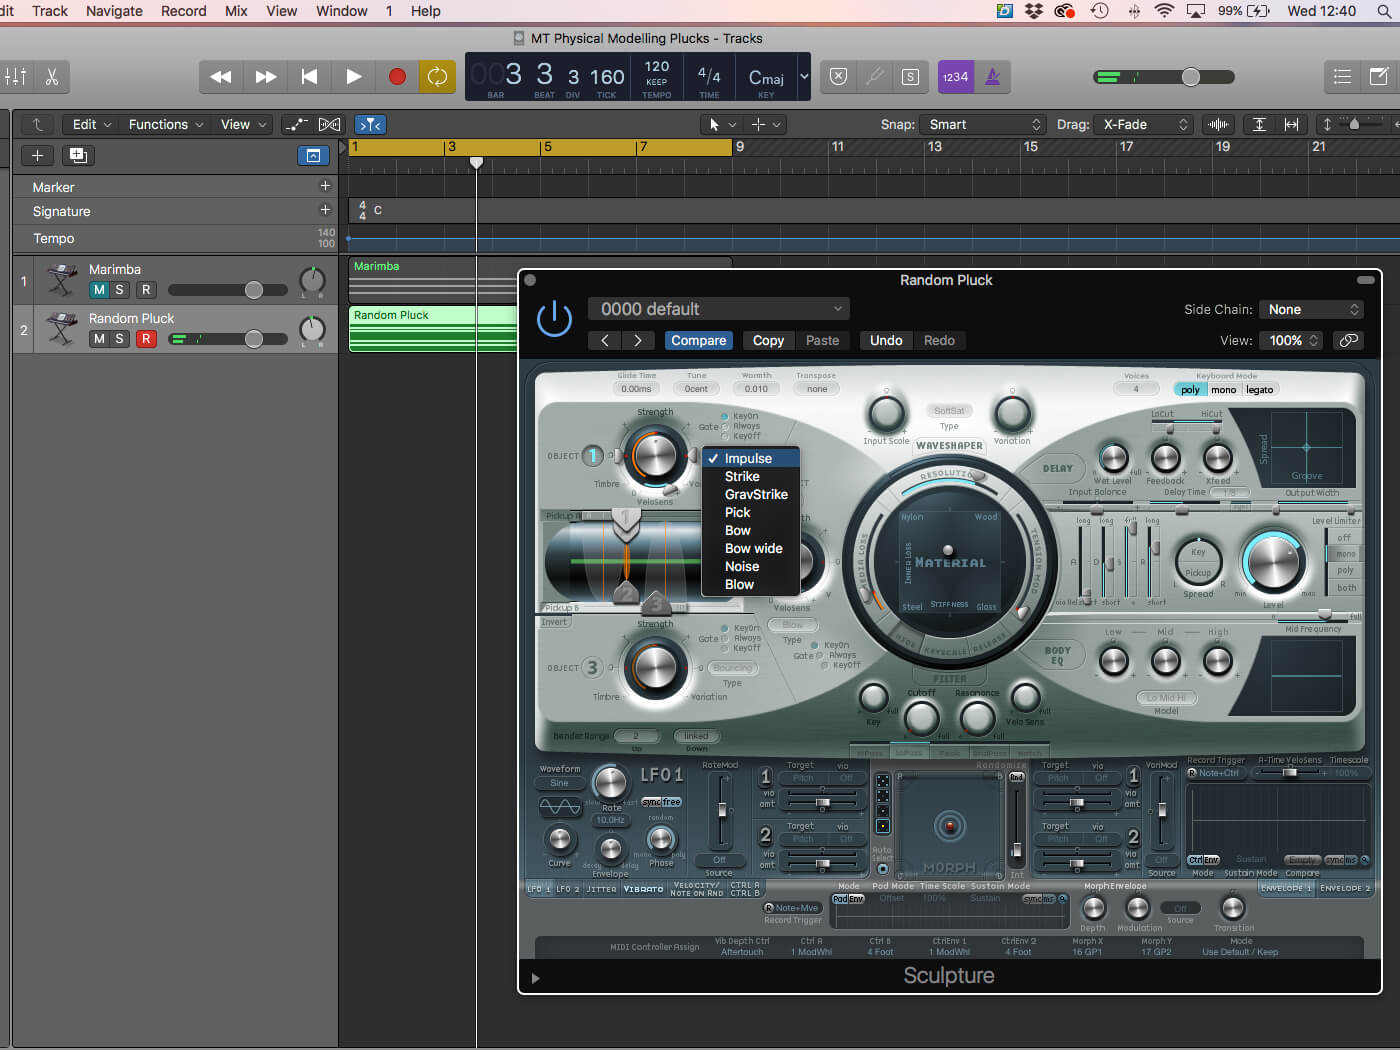
6. Move to Track 2. Use an Impulse object as the exciter. Position the Material control closer to the centre to actively modulate this parameter.
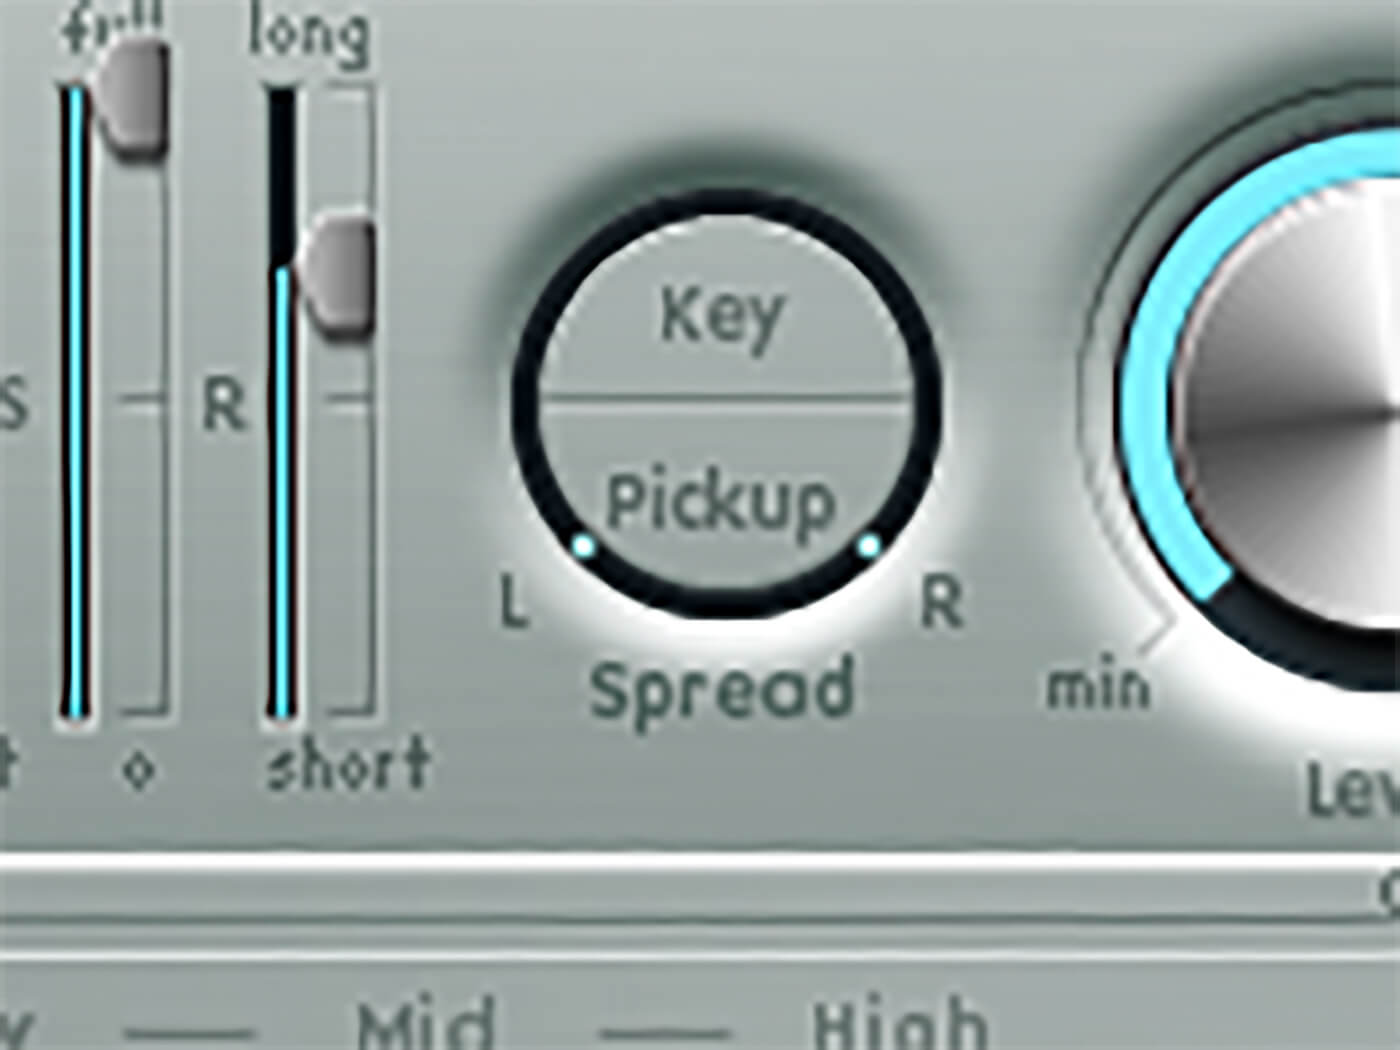
7. You can achieve a flattering stereo width to the sound by adjusting the pickup Spread control. The Spread control pans the virtual pickups placed on the string to either side of the stereo soundstage.
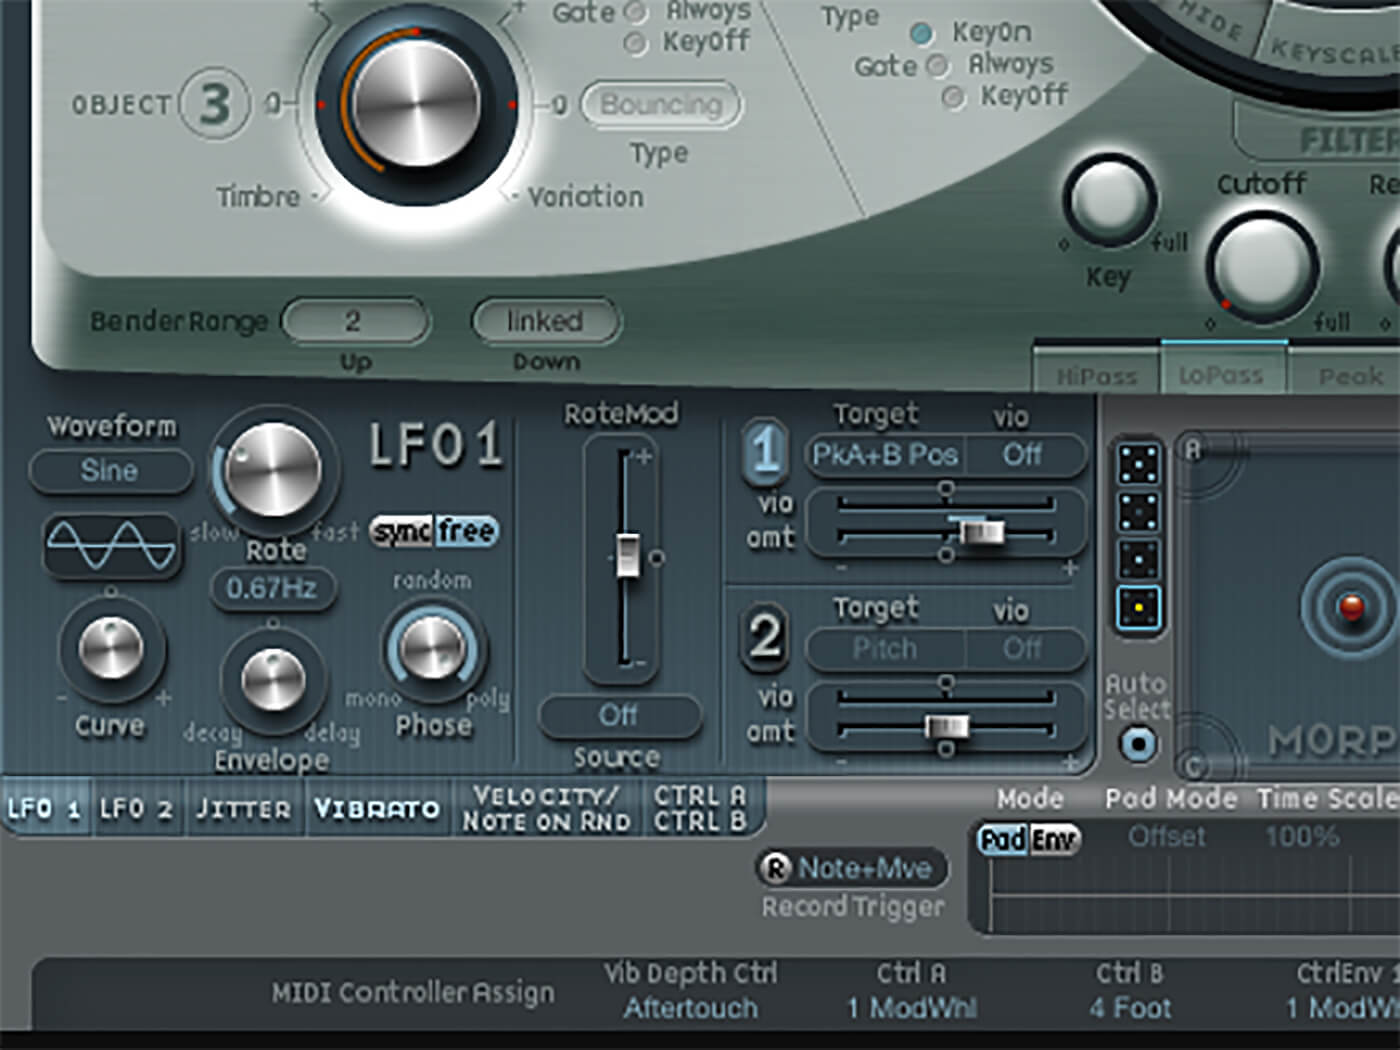
8. To add even more interest to the stereo soundstage, actively modulate the relative position of the two pickups (A and B). Set LFO1’s rate to 0.67Hz, the Target to PkA+B Pos, and the amount to 0.36.

9. Add another object, this time using Object 3 set to Damp mode. For additional modifiers, we only want their impact to be marginal (Impulse being the main exciter), so set the Strength to about 0.23.
![]()
ENVELOPE OR NOT? The inclusion of an ADSR envelope can be confusing because, technically speaking, the envelope only refines the sound originally produced by the string. If you want to add sustain, you’ll want to think about using ‘sustaining’ exciters such as a Bow or Blow object, rather than lifting the sustain parameter on the envelope, which may have little or no effect.
10. Object 3 is going to add a Blown element to the string sound, which by its nature has more sustain and less transient information. Keep Object 2’s Strength low (0.15) to avoid over-exciting the sound.
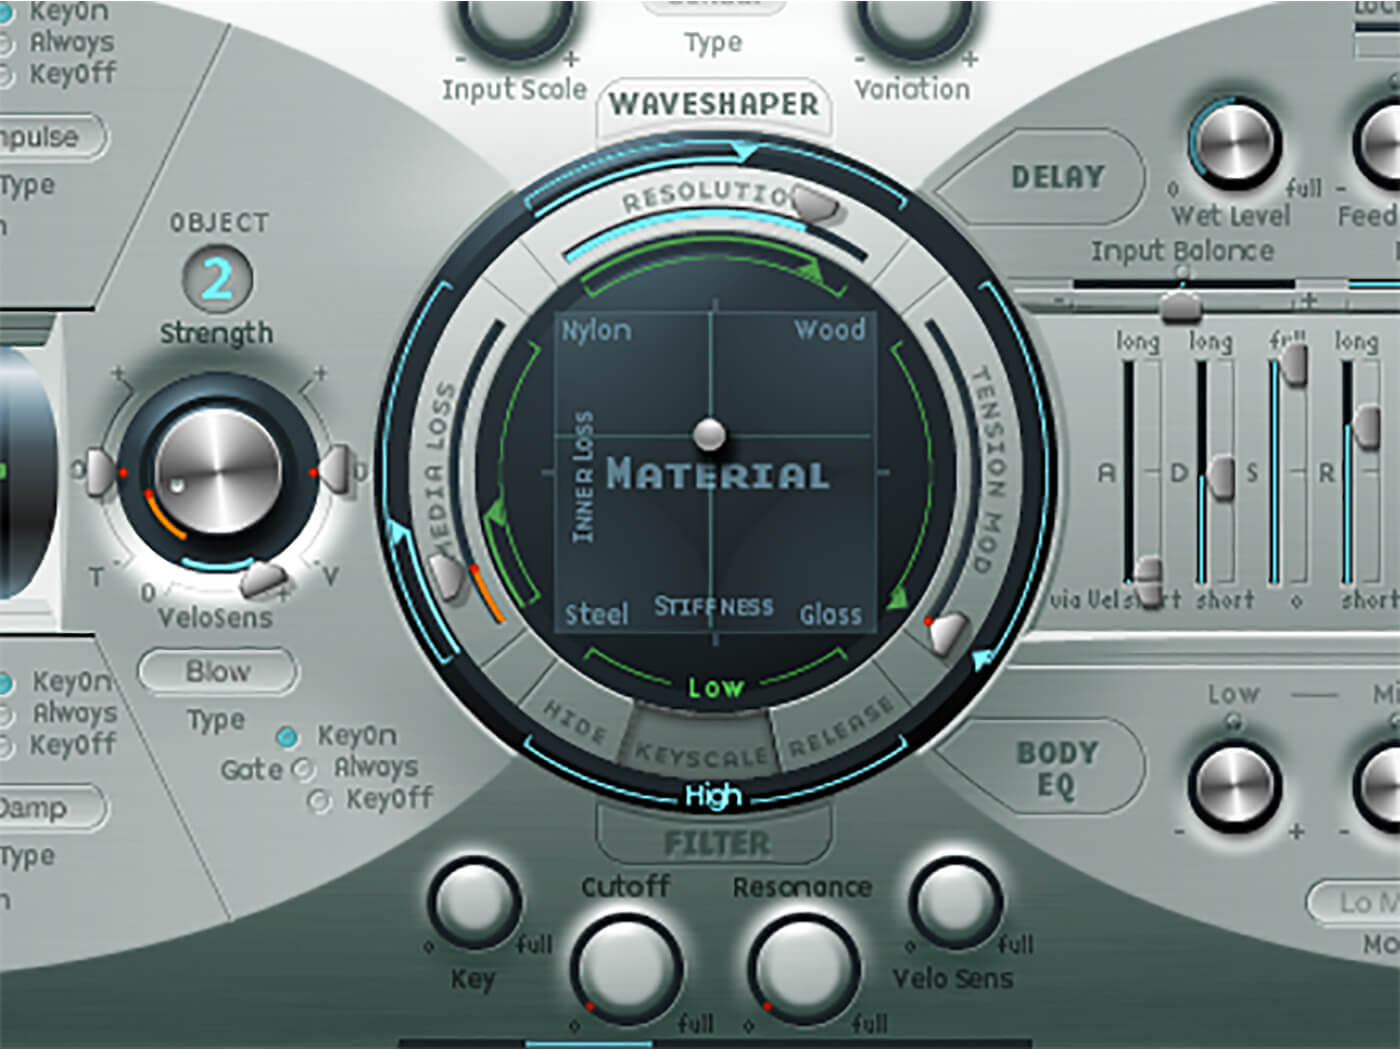
11. Press the Keyscale on the Material Pad to see how Sculpture responds to the key position. Notice the resolution parameter (the amount of harmonics) and the two arrows – Green and Blue – on each side of the main control.
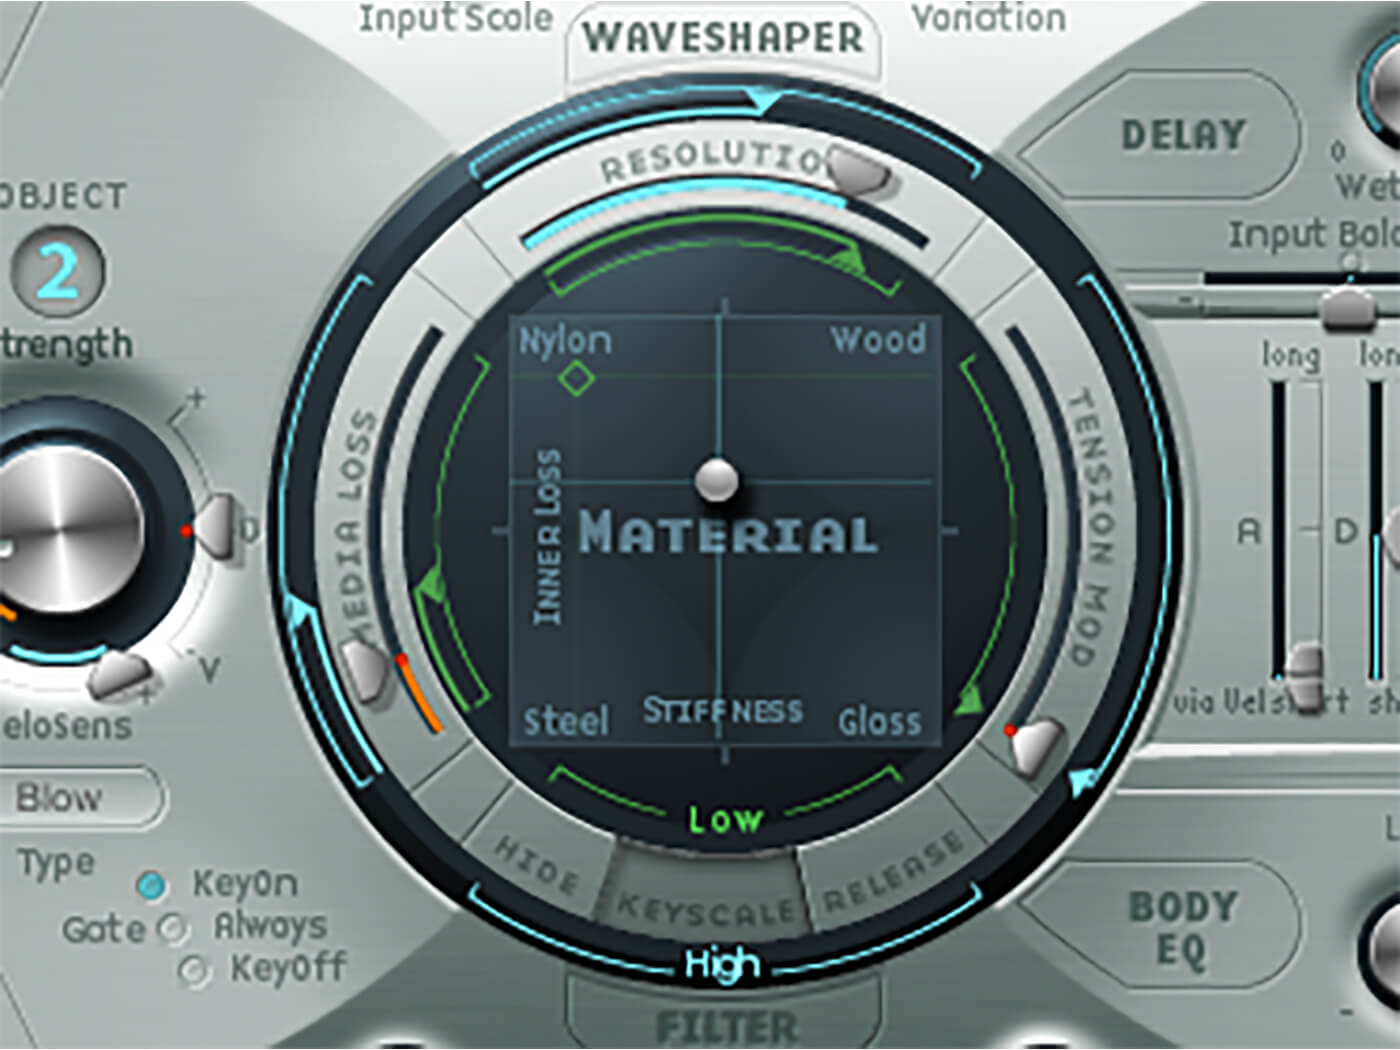
12. Click on the Green puck and move this towards Nylon. Notice how the sound appears different towards the bottom of the keyboard – less bell-like, closer to the sound of an upright bass.
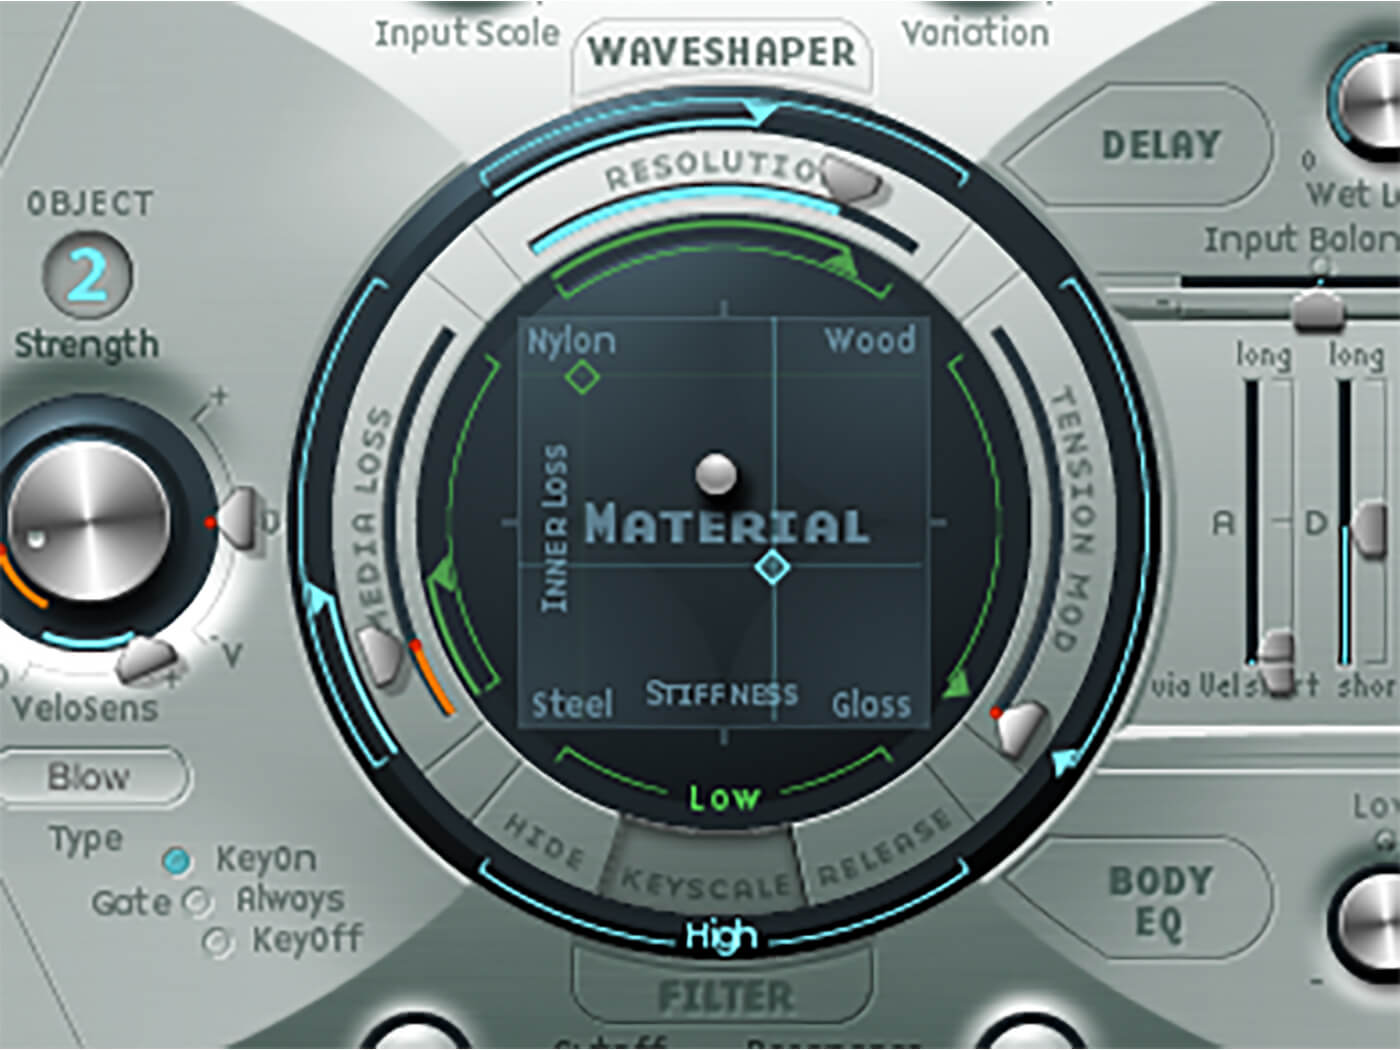
13. As the reverse of this, move the Blue puck towards the Glass corner, which will give higher notes an increasingly bell-like tone, in sharp contrast to the timbre of the notes lower down the keyboard.
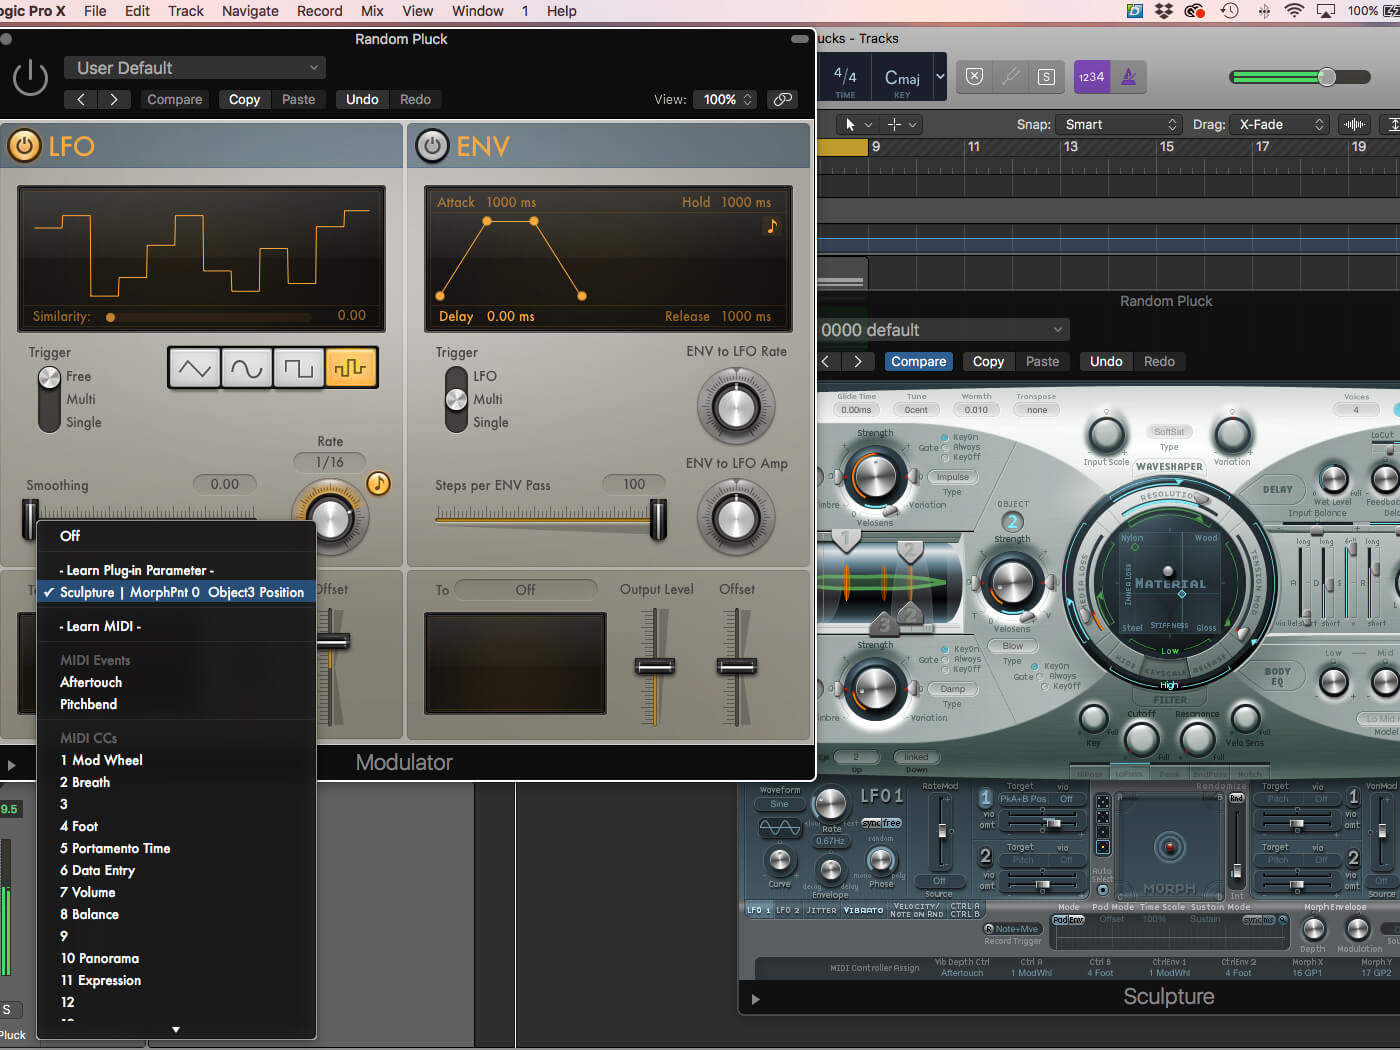
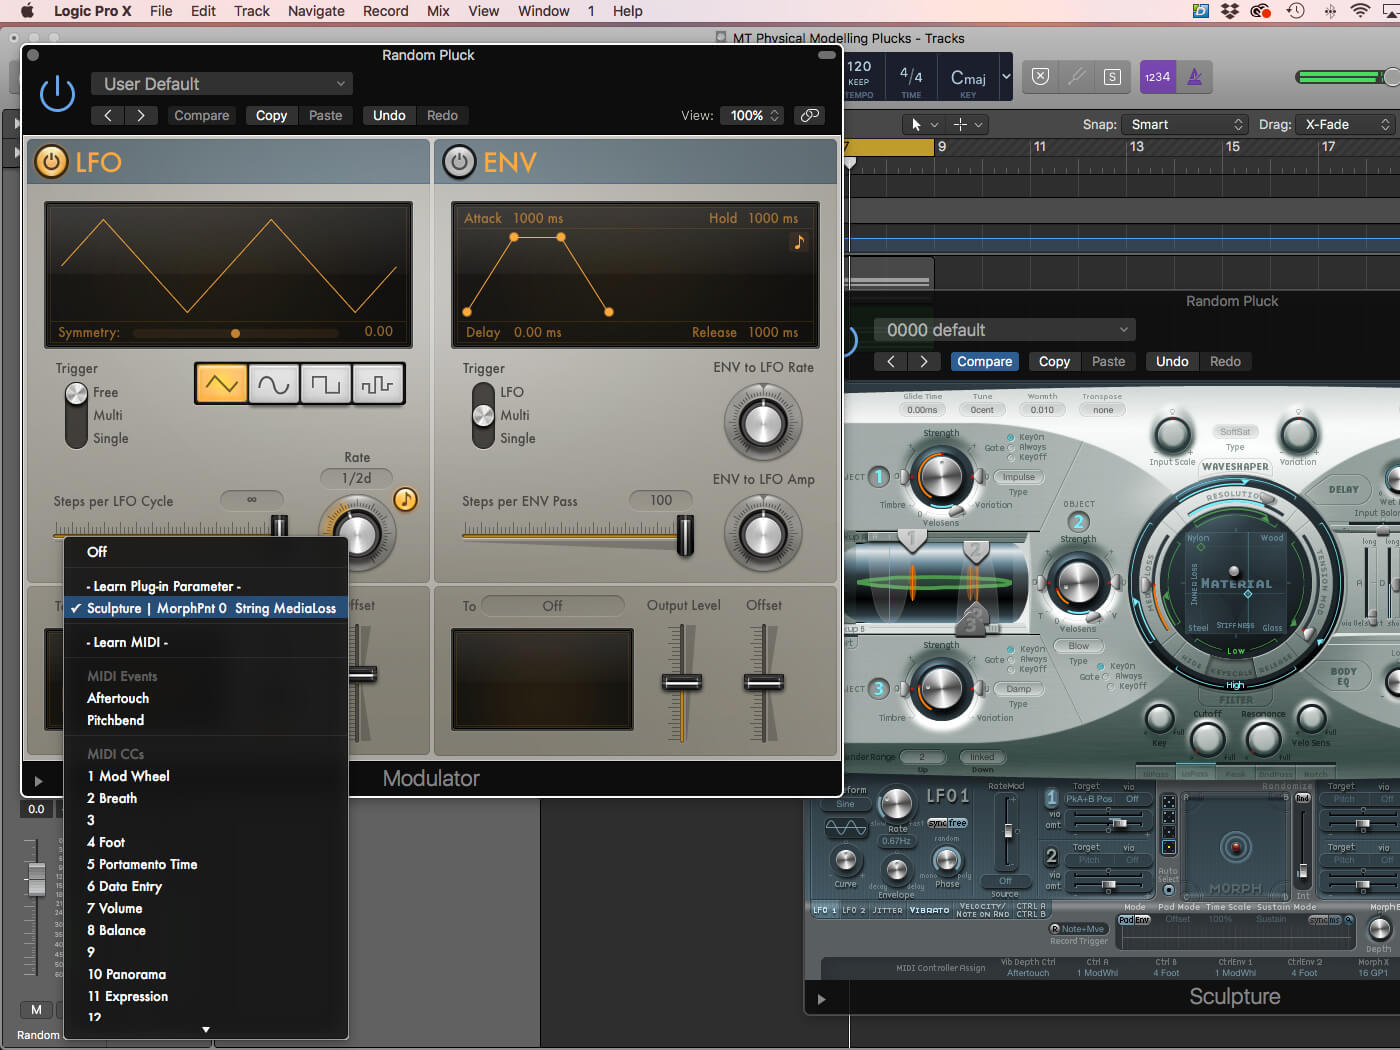
14. Using the Modulator MIDI FX plug-in works well with Sculpture. Select the Learn Plug-in Parameter from the drop-down To menu. Move Object 3’s position. It should now be mapped to the Modulator plug-in.
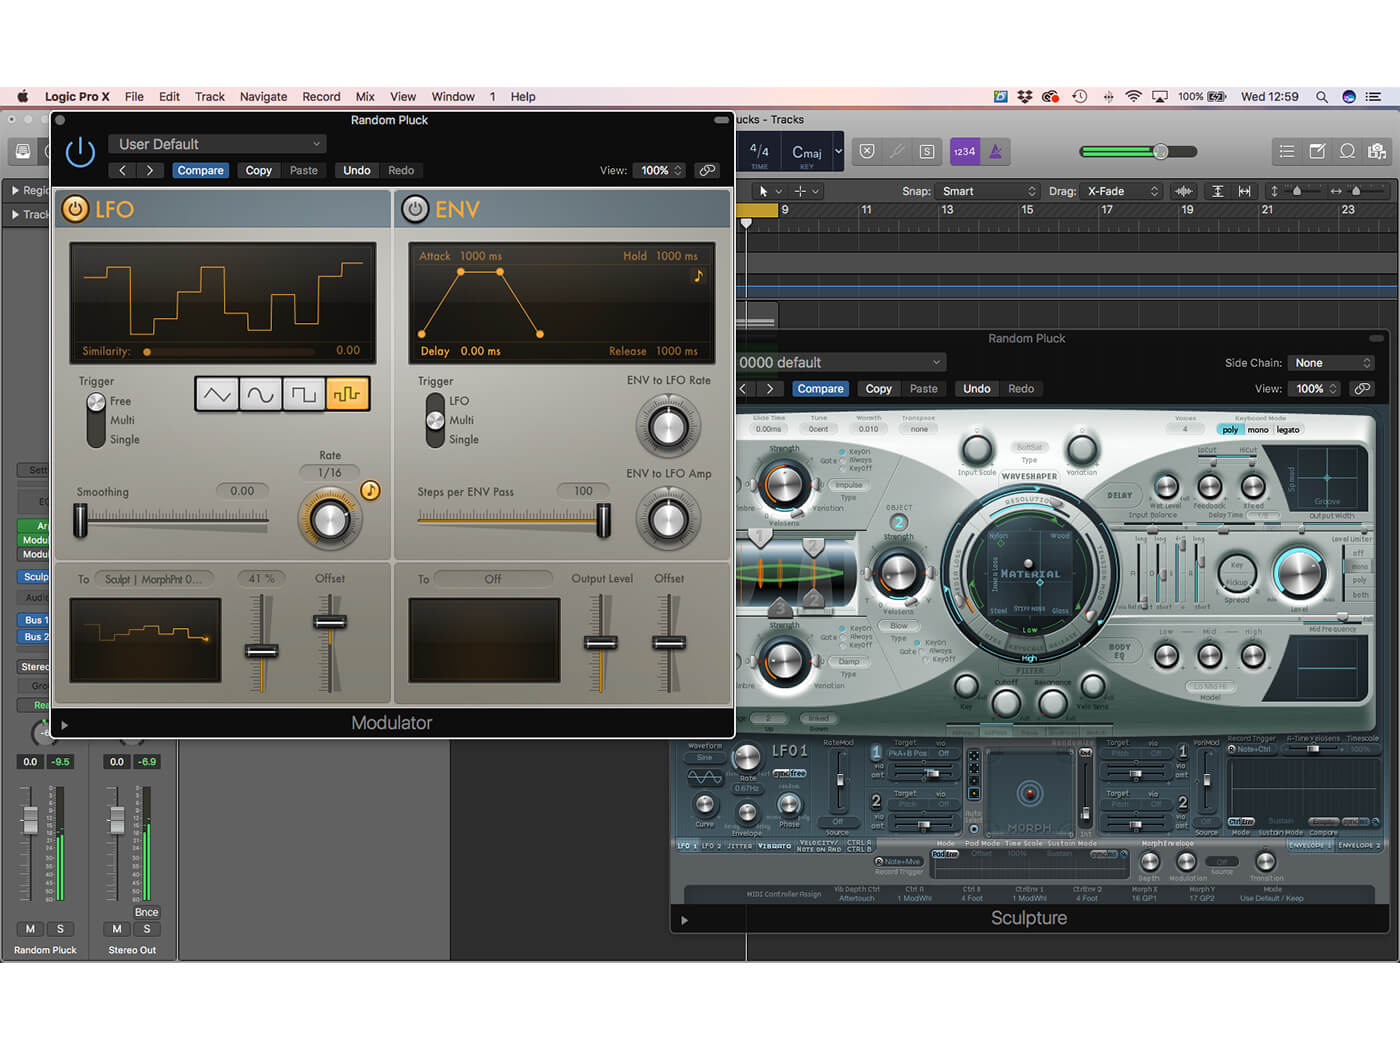
15. Select a Sample-and-Hold waveshape set at 1/16th divisions. Now fine-tune the Output Level (41 per cent) and Offset (44 per cent) so that the Damping position jumps around the top half of the string in musical divisions.
16. The next Modulator routing – with a second instance of the Modulator – involves an LFO mapped to Media Loss. This will dynamically change the sound envelope, resulting in a more or less staccato performance.
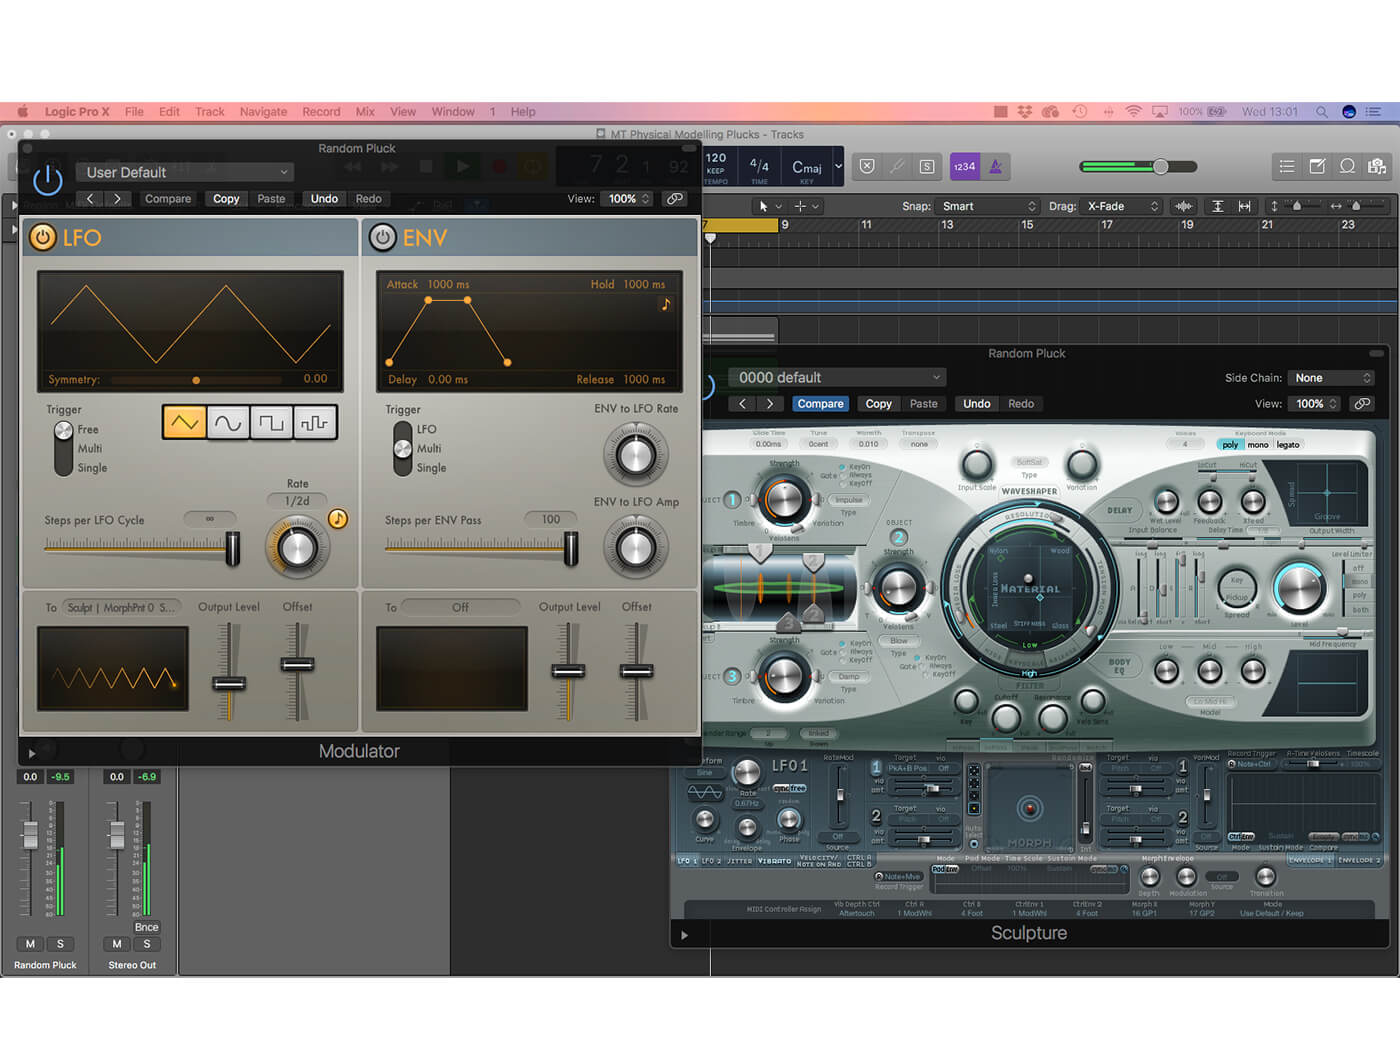
17. In this example, we’re using a relatively slow rate (1/2d), a low undulating Output Level (36 per cent) and a small amount of Offset (14 per cent). The most useful results come from subtle parameter movements.

18. As with our marimba, use the Body EQ to shape the timbre of the overall sound. We’ve added some lows and highs, and turned down some of the mids to tame any harshness.