How to use gain staging in Logic Pro X
The path to a better mix in Logic Pro X isn’t found in any ‘must have’ plug-in, but in a more measured and well-rationalised use of gain structure.
There’s a quiet revolution taking place in the music production industry – a movement that places emphasis on transient detail and dynamic range rather than the ‘needles in the red’ sound that epitomised the Loudness Wars. Streaming has actively changed the way we produce music, in this case, driven by the Loudness Correction used by the likes of Spotify and iTunes that actively turns down overcooked masters. Put simply, choice is being put back in our hands – we can choose between our music is pushed to the limits or an alternative where we give the arrangement room to breathe without fear the listener hears a dramatically quieter mix.
One of the big problems of the Loudness Wars was a tendency to work consistently up to 0dBFS – in other words, pushing everything in the mix, even the mix itself, as close to the top of the meter scale as possible. Of course, this methodology is a guaranteed route to producing a loud mix, but even in the case of more compressed music styles (like EDM, for example) the lack of sonic headroom makes for a confined and restricted working environment. As a result, many engineers are returning to a mixing and production workflow that values dynamic range and headroom – the art of Gain Staging, in other words.
Gaining the advantage
If you’ve ever tried producing music using Apple Loops in Logic Pro X (or, indeed, and other loop-based sample content) you’ll soon be aware of the need for Gain Staging. On the whole, most Loops are recorded ‘hot’, often mastered with compression to peak at 0dBFS. Assemble a collection of these loops into a composition, therefore, and before you know it, the Master fader is clipping red. To solve the distortion issue, you’ll take one of two solutions – either turning down the master fader (the quick and easy approach) or attenuating the individual faders, often pulling them right down in the mix. A simple sign of bad Gain Staging, therefore, is either a Master Fader, or individual channel faders, dramatically attenuated below their unity position.
Put simply, Gain Staging is all about allowing Headroom in your mix, both on a track-by-track basis, but also in subsequent buses and, of course, the main stereo bus. In the case of Logic, therefore, there are a number of strategies that you can take – both during tracking and just before a mix – that ensure you’re leaving enough headroom to mix properly. Likewise, you’ll also find that metering becomes your friend rather than battling against the dreaded ‘over’ of a mix pushed too close to 0dBFS.
Levelheaded
The walkthrough illustrates a number of contrasting solutions you can take in Logic Pro X so as to actively Gain Stage your mix correctly. The broad objective is to average all the signals in your mix around -12dBFS, attenuating Loops, Virtual Instruments and Audio Tracks so that they’re at the correct level before they hit any faders.
In the case of Logic Pro X, Gain Staging is principally about using the Gain plug-in, Clip-Gain, VCAs or just better use of metering to maintain good headroom. You’ll also want to take a revised look at some of the key plug-ins used in mixing – namely EQ and Compression – to see how their adverse application can compromise good Gain Staging in your mix.
Whilst we’re on the subject of plug-ins, it’s also worth mentioning how better Gain Staging can improve the performance of plug-ins that use Analogue Modeling. While it’s easy to think of Gain Staging as a new fad, the practice is embedded into the design and specification of analogue recording equipment – in short, it was designed to be used with plenty of headroom! In the digital domain, therefore, we’re often virtually running equipment with signal levels that are too hot – making a compressor too responsive, for example, or an EQ that sounds more ‘saturated’ than ‘warm’.
Max headroom
Of course, the inevitable question for those that enjoy their music sounding hyped or compressed, is that whether good Gain Staging results in productions that lack edge? Well, on one level Gain Staging doesn’t mean that you can’t actively use compression, it just means that when you’re combining heavily compressed drum loops, the stereo bus still, has room to breathe. Equally, it’s a fallacy that a loud mix will master louder, not least because loudness is a diminishing marginal return – the more dynamics you squeeze out of the mix, the less you can achieve in mastering. In short, we’re confusing the role of mixing and mastering.
We’ve spent plenty of time looking for Logic Pro X’s ‘Silver Bullet’ – the killer plug-in that transforms your music production. Gain Staging, of course, won’t immediately change your mix – simply Gain Staging an existing mix, for example, will make little marginal difference – but it does give you the headroom and headspace to start making better mixing decisions. In the long run, therefore, something as relatively innocuous as Gain Staging could be the workflow change that makes all the difference!
Gain Staging in Logic Pro X: step-by-step
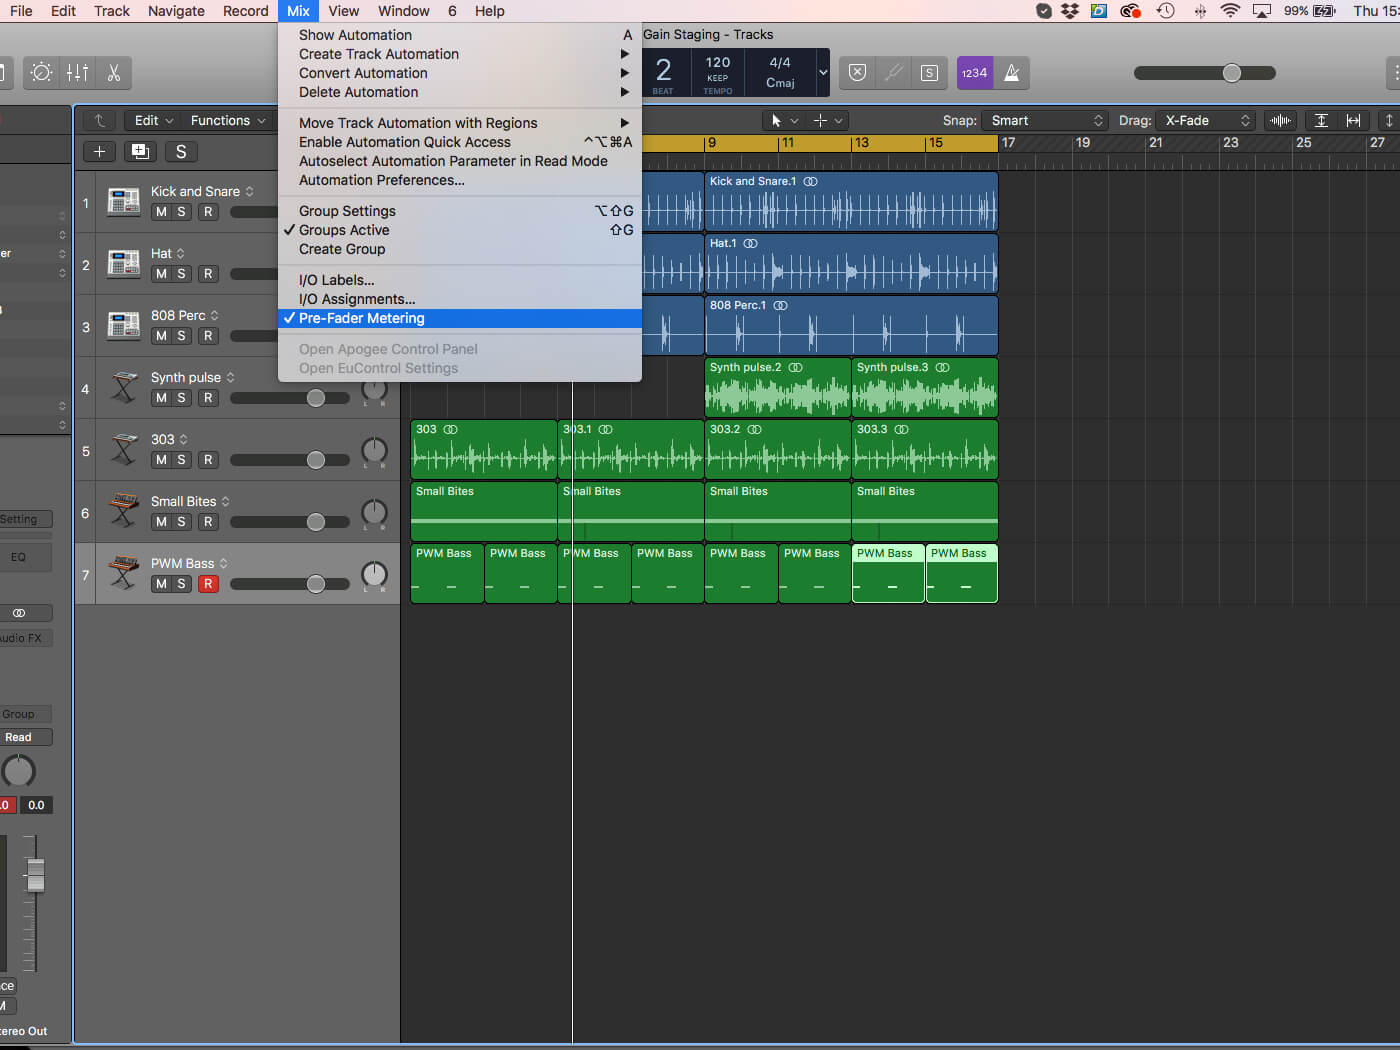
1. Use the menu option Mix > Pre-Fader Metering so that you have a clear idea of your signal level ahead of the channel faders. In many cases, imported material like Apple Loops will often meter around 0dBFS.
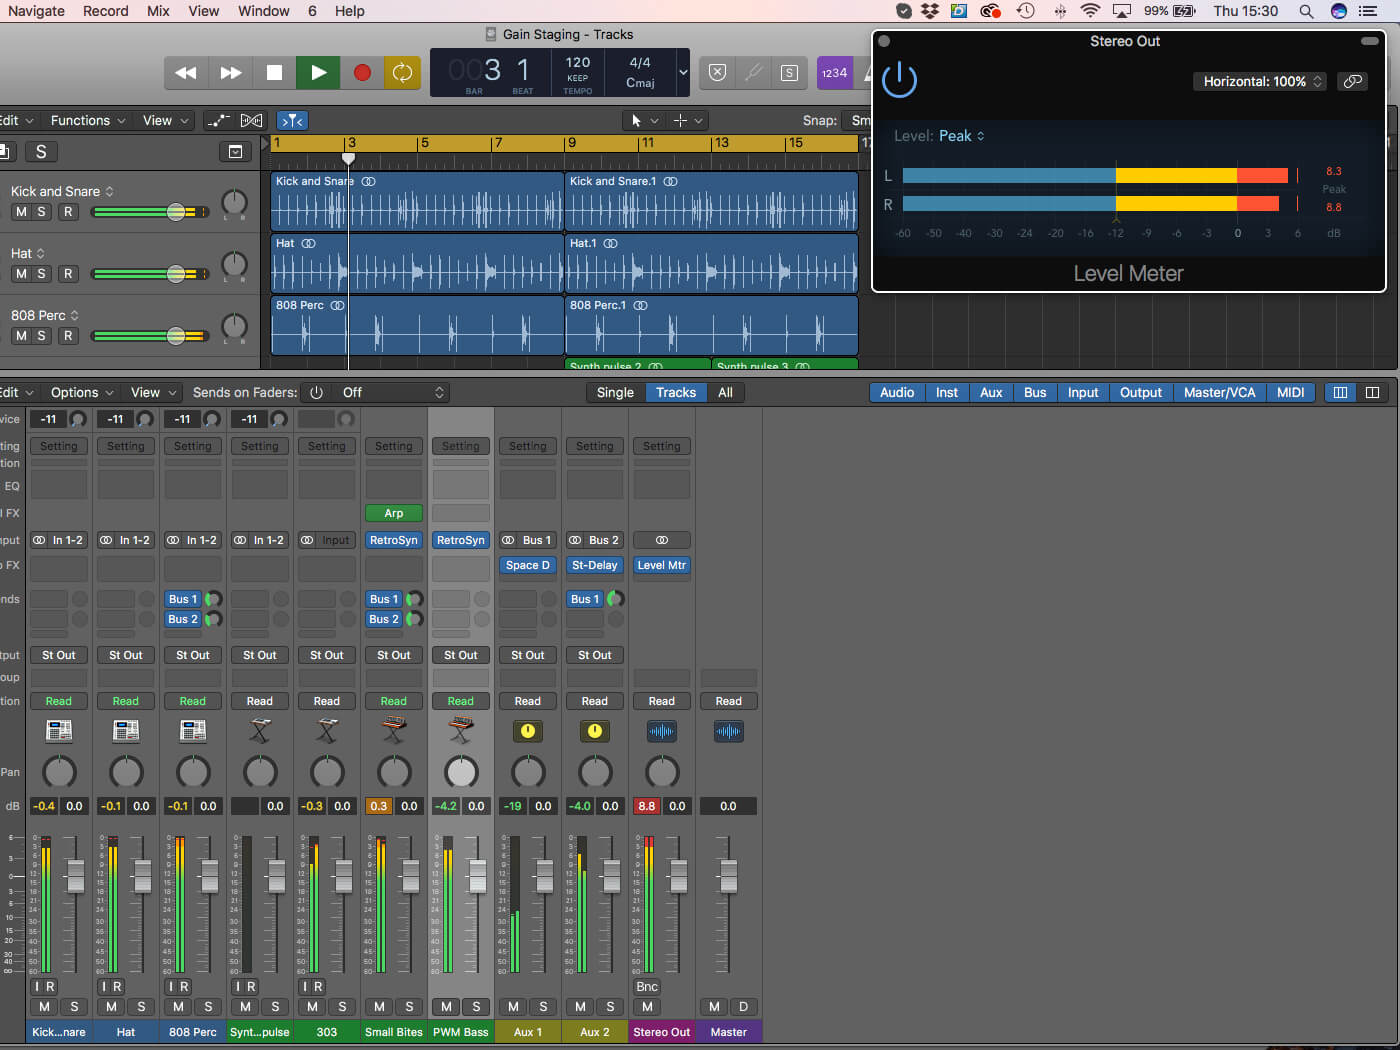
2. Good metering is essential for effective Gain Staging, so try placing an instance of the Level Meter plug-in across the main bus. Note how the current ‘unity’ levels push the stereo bus well into distortion!
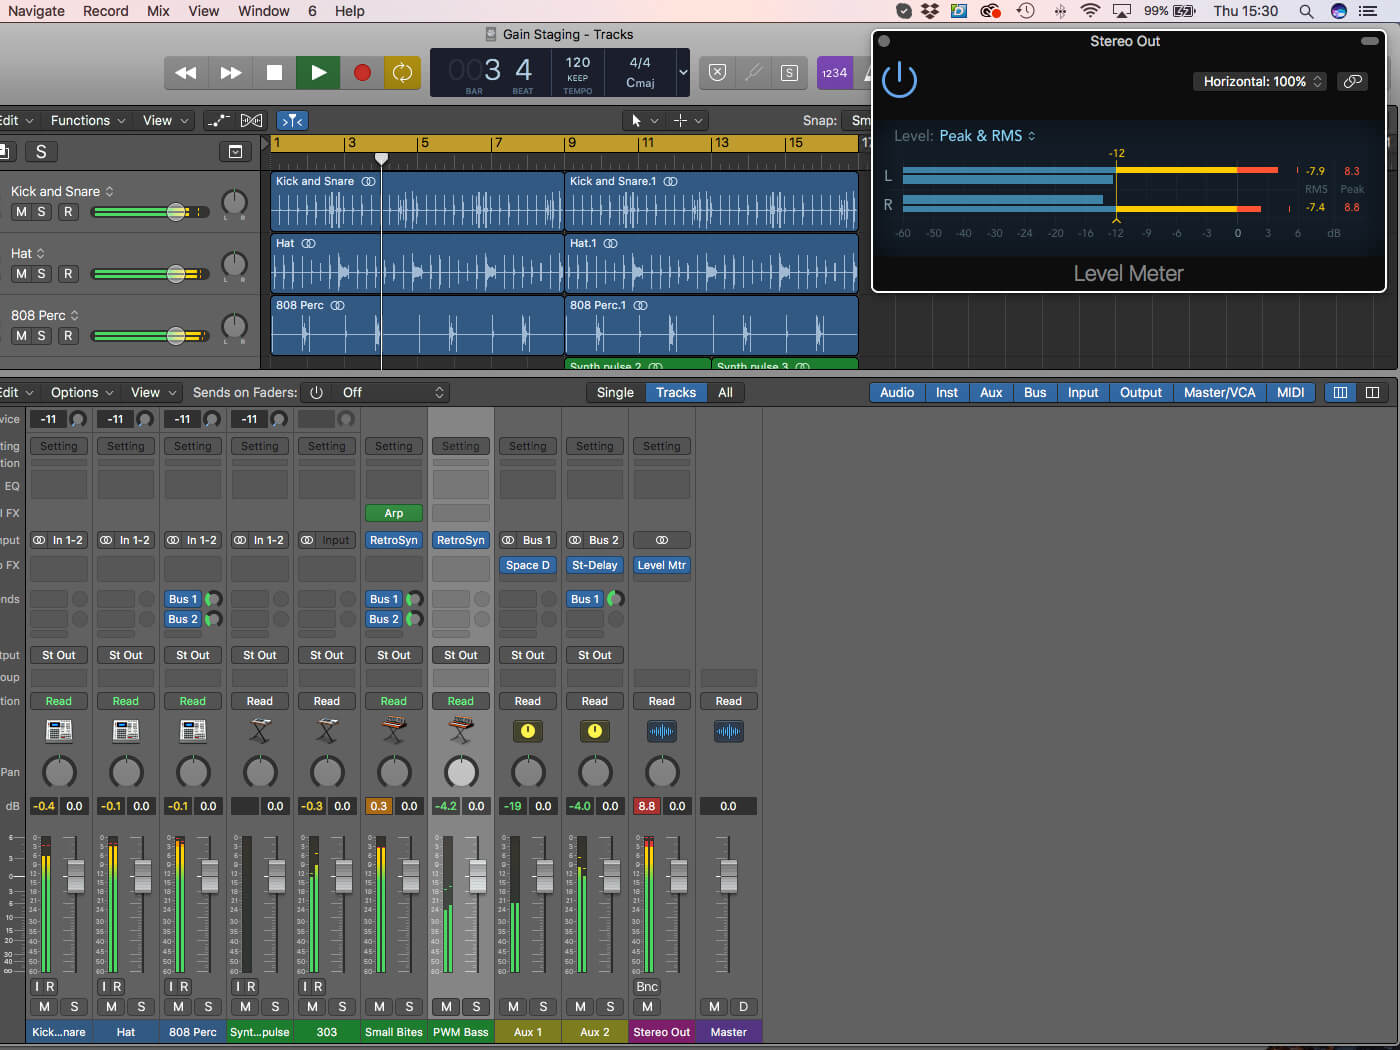
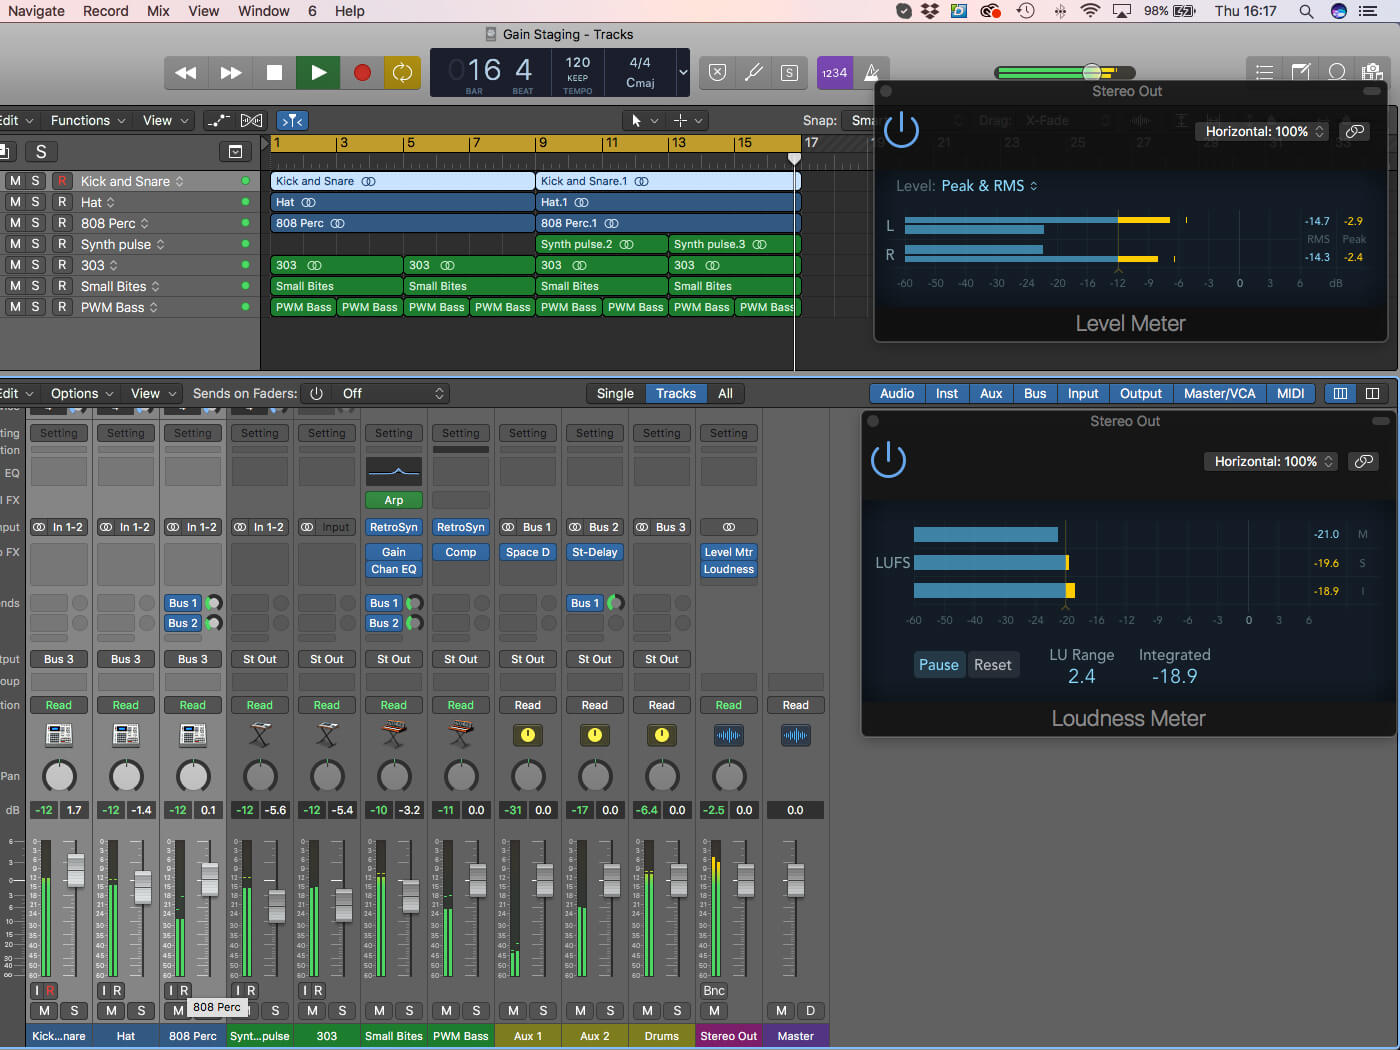
3. The Level Meter plug-in is most informative when set to Peak & RMS modes, showing averaged and instantaneous levels. Adjust the threshold to your preferred working level, which is usually -12dB.

4. Good Gain Staging begins when you’re recording, so ensure material that you record into Logic stays well clear of 0dBFS. As a rough guide, aim for you levels to average around -18dBFS and Peak around -12dBFS.
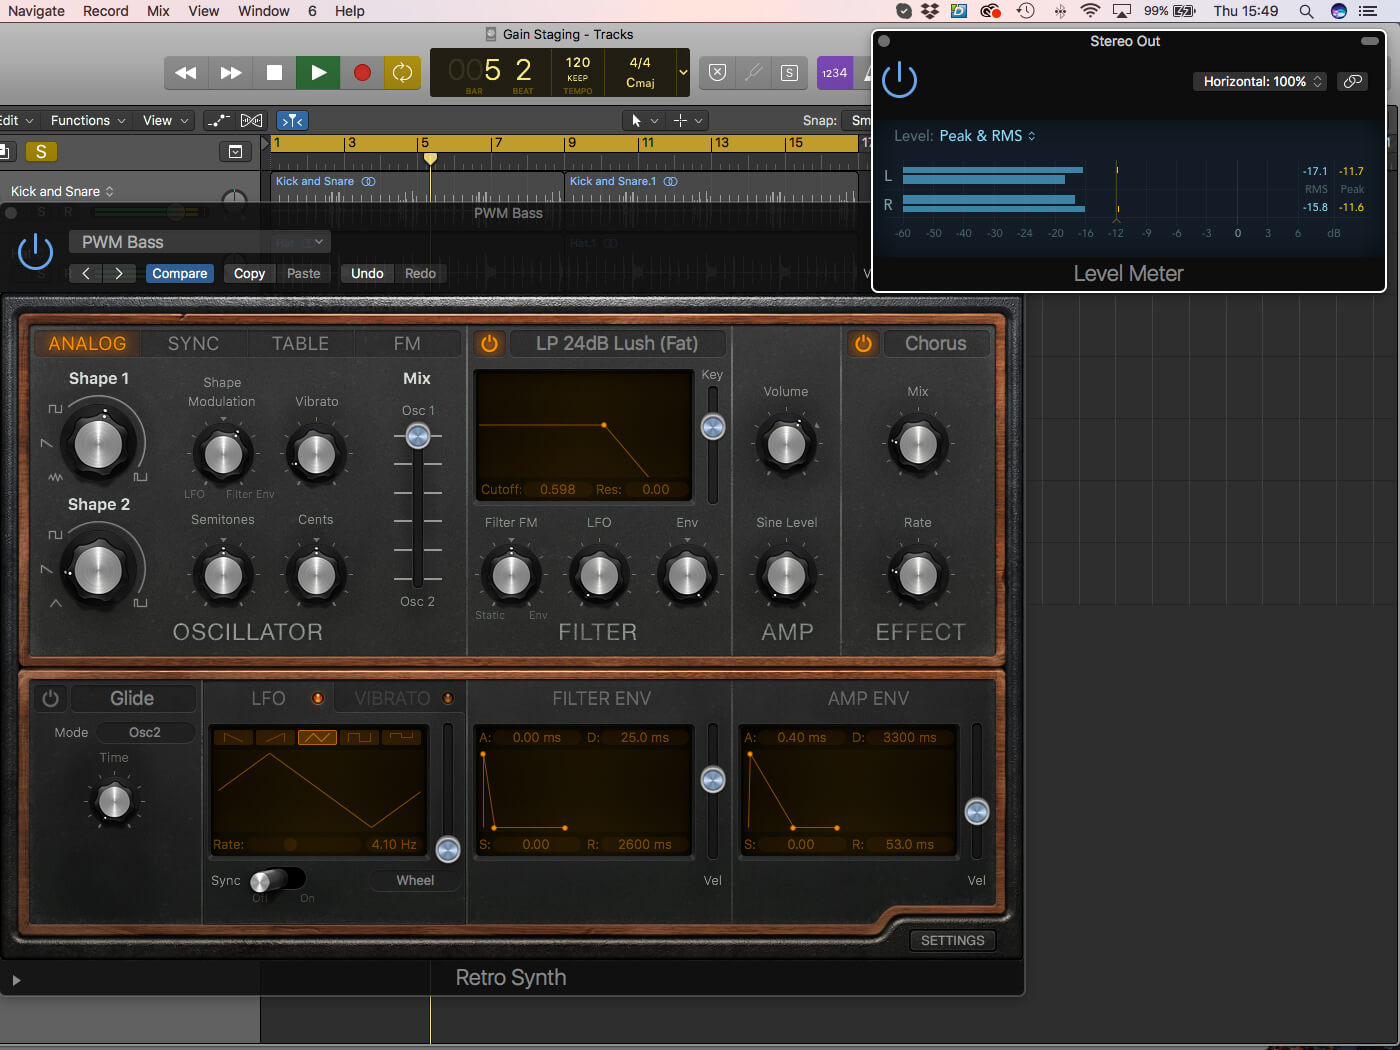
5. When you start to mix, the first stage is to ensure all channels peak/average around -12dBFS. The precise method of achieving this can vary – in this case, we’re simply attenuating the soft synth output level.
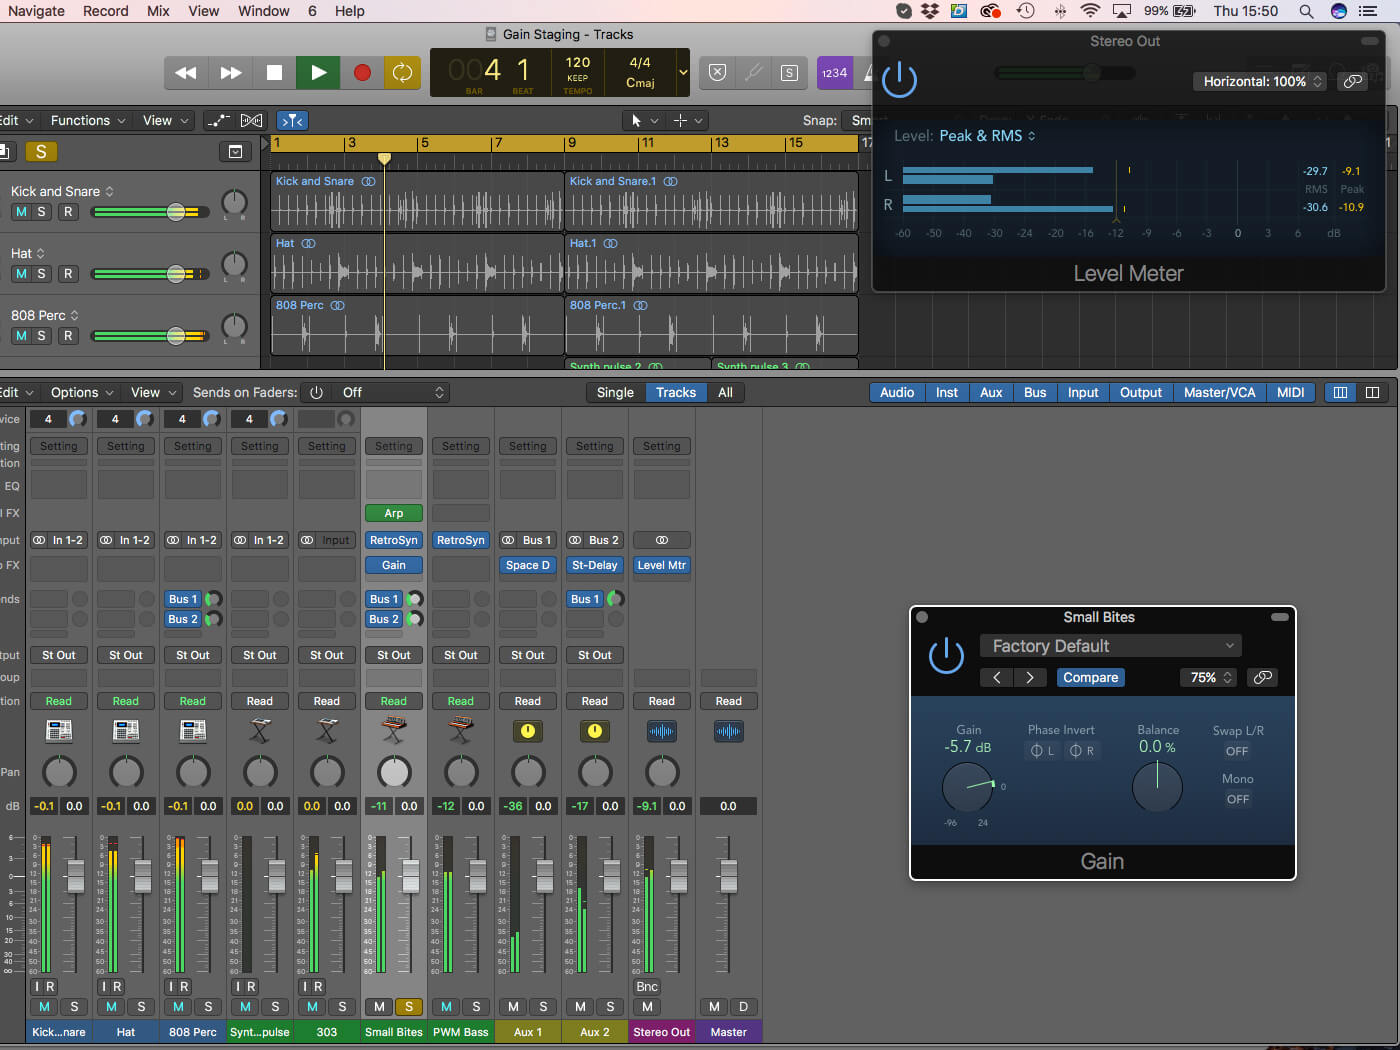
6. Another solution is the Gain plug-in, assuming it’s used as the first plug-in on the channel’s insert path. Once instantiated, lowered the Gain control paying attention to the levels on the Pre-Fade channel meters.
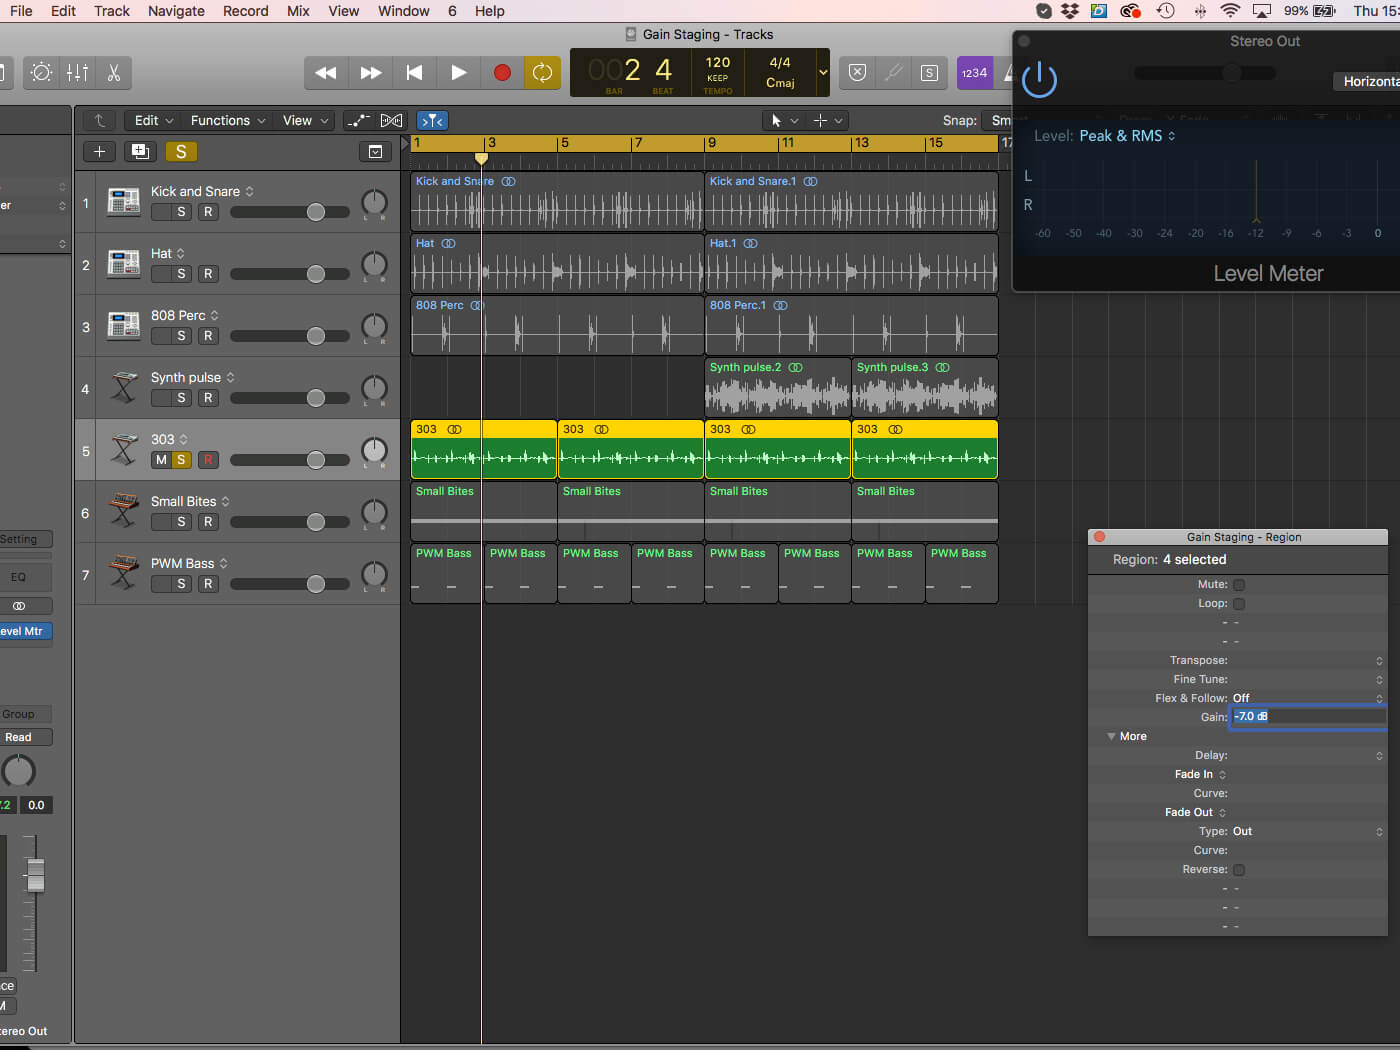
7. Arguably the most elegant solution for Audio Tracks is the Region-based Gain control, which adjusts Gain on a region-by-region basis. In this case, we’ve attenuated the 303 regions by -7dB so that they meter correctly.
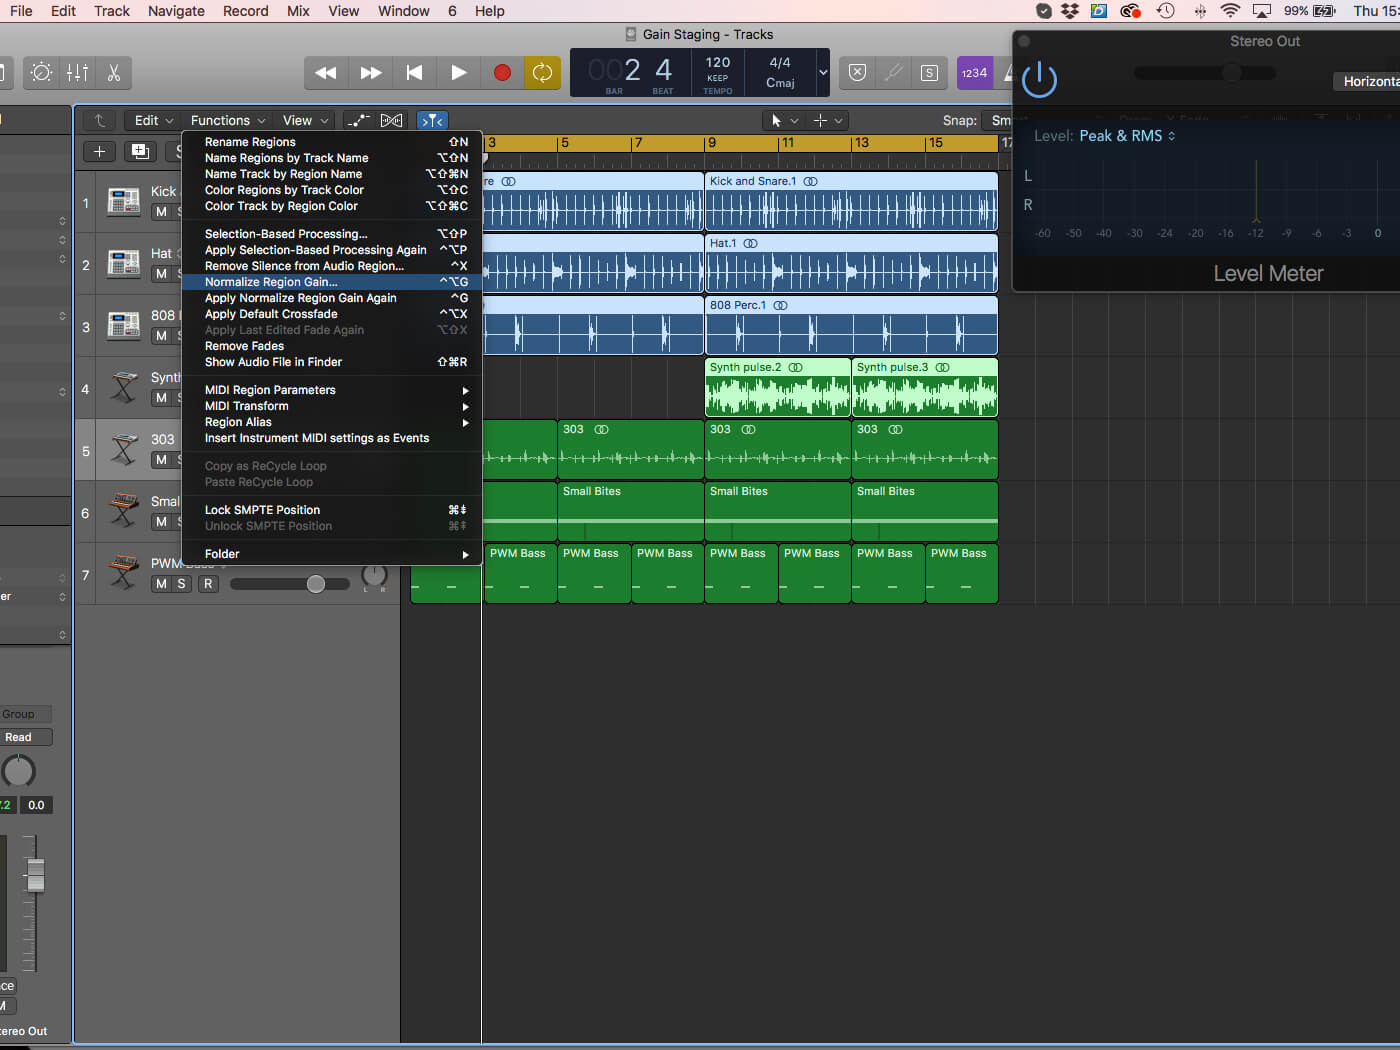
8. If you got a lot of tracks to correct, Logic includes a handy tool for setting region gain. Select all the required regions (in this case, everything down to track 4) and pick Functions > Normalize Region Gain.
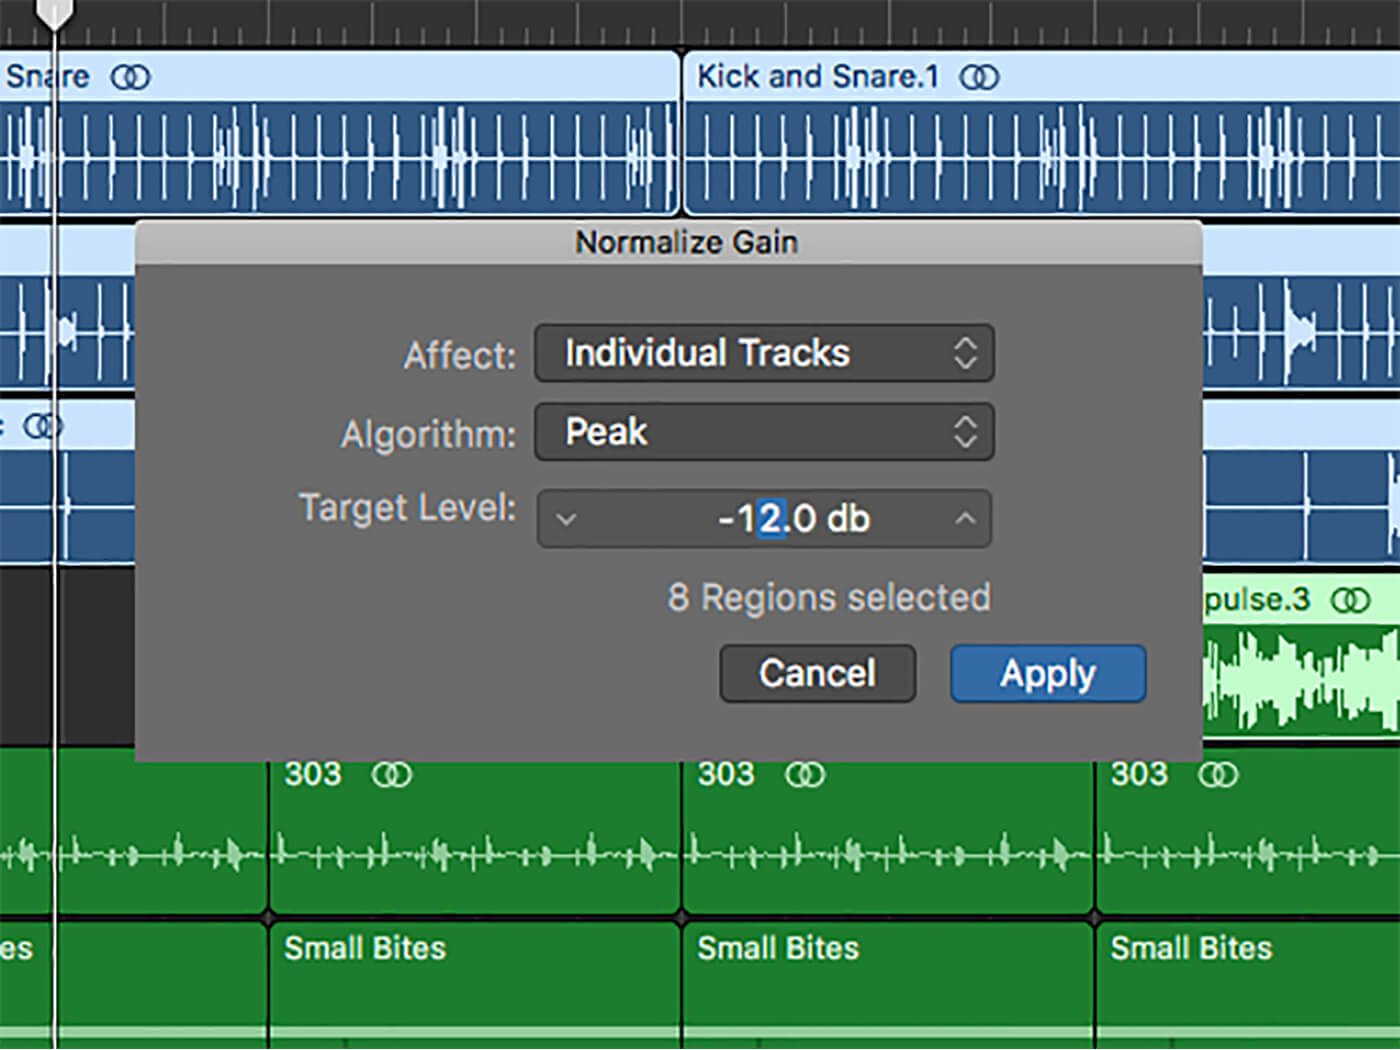
9. In the dialogue box, select Individual Tracks to Affect, the Algorithm as Peak and the Target Level to -12dB. The regions are then adjusted to -12dB on a per-track basis, rather than as individual regions.
![]()
WHAT’S THE MAGIC LEVEL? Opinion varies on what the optimal levels are for good mixing, but most solutions fall between -18dBFS and -12dBFS, and you can also take different views of whether this is average or peak levels. In truth the precise amount isn’t so important (and somewhat dependent on genre), it’s more the fact that you give your mix room to breathe.
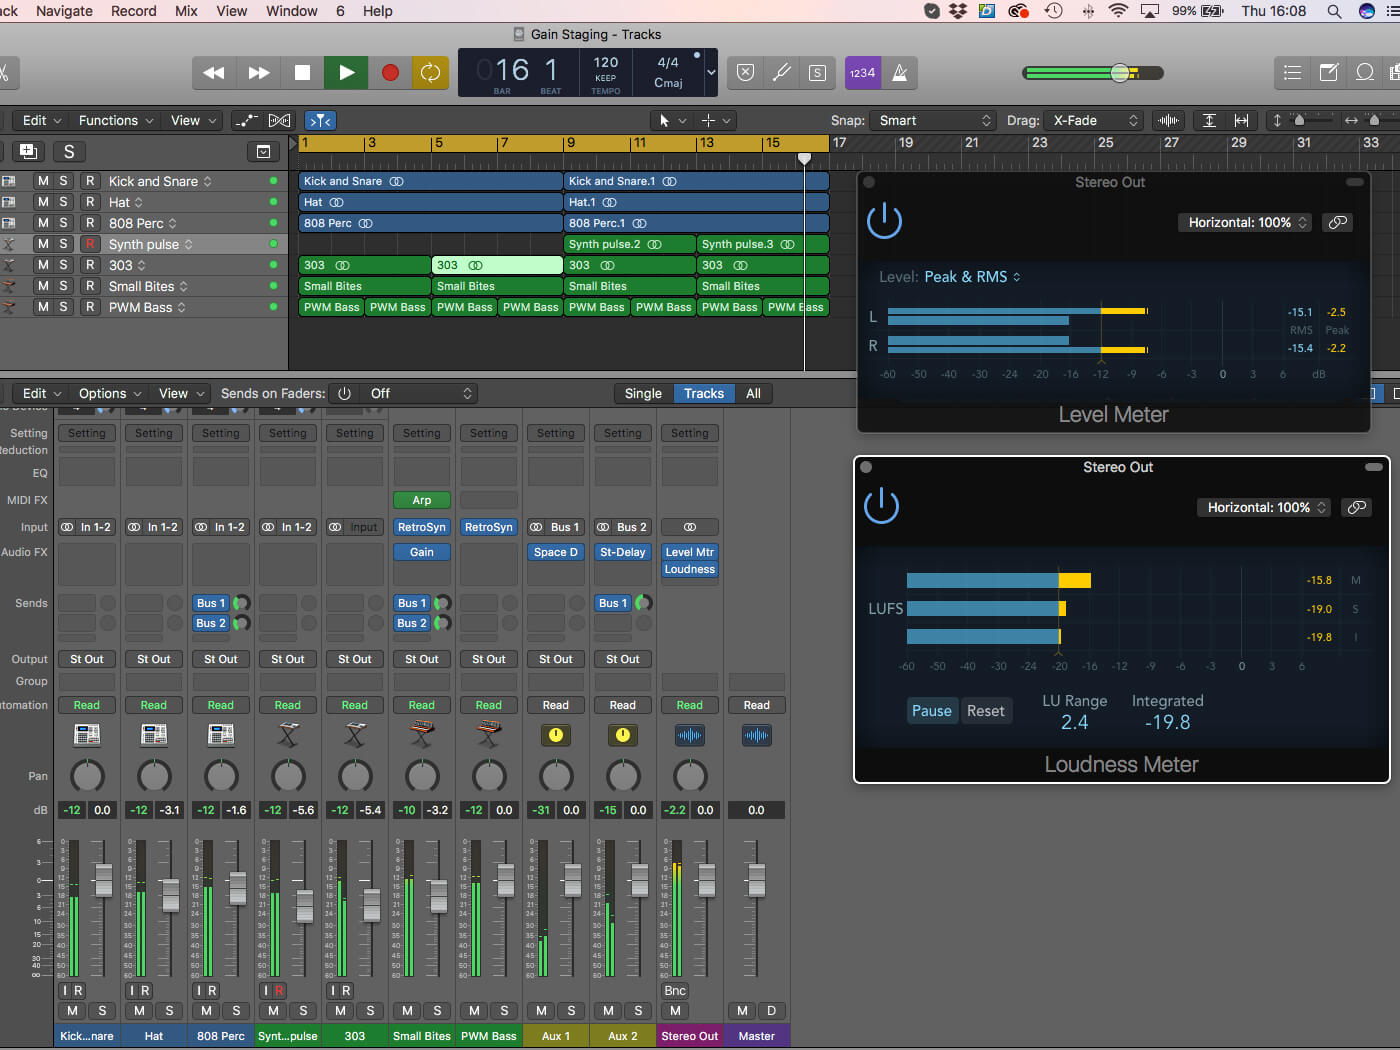
10. With the tracks correctly Gain Staged to -12dB, you can piece together a mix with plenty of headroom. You might even want to add-in the Loudness meter to see how dynamic (or not) your mix is.
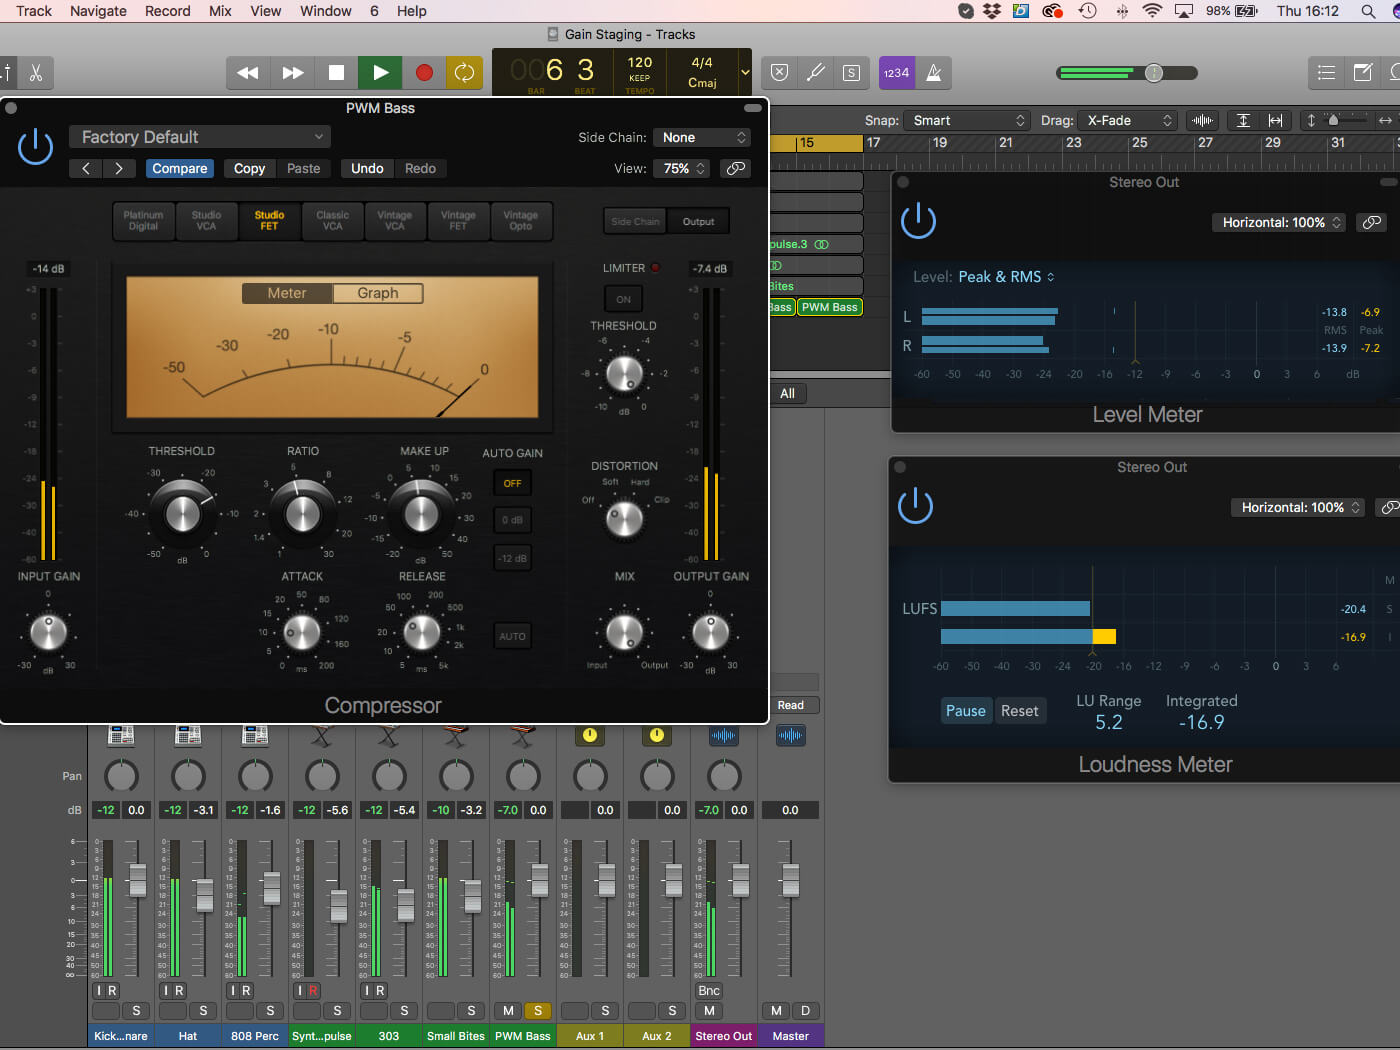
11. As part of good Gain Staging practice, you’ll want to pay close attention to plug-ins like compression and EQ that can affect levels. On the Compressor, for example, avoid overcooking the Make-Up control post-compression.
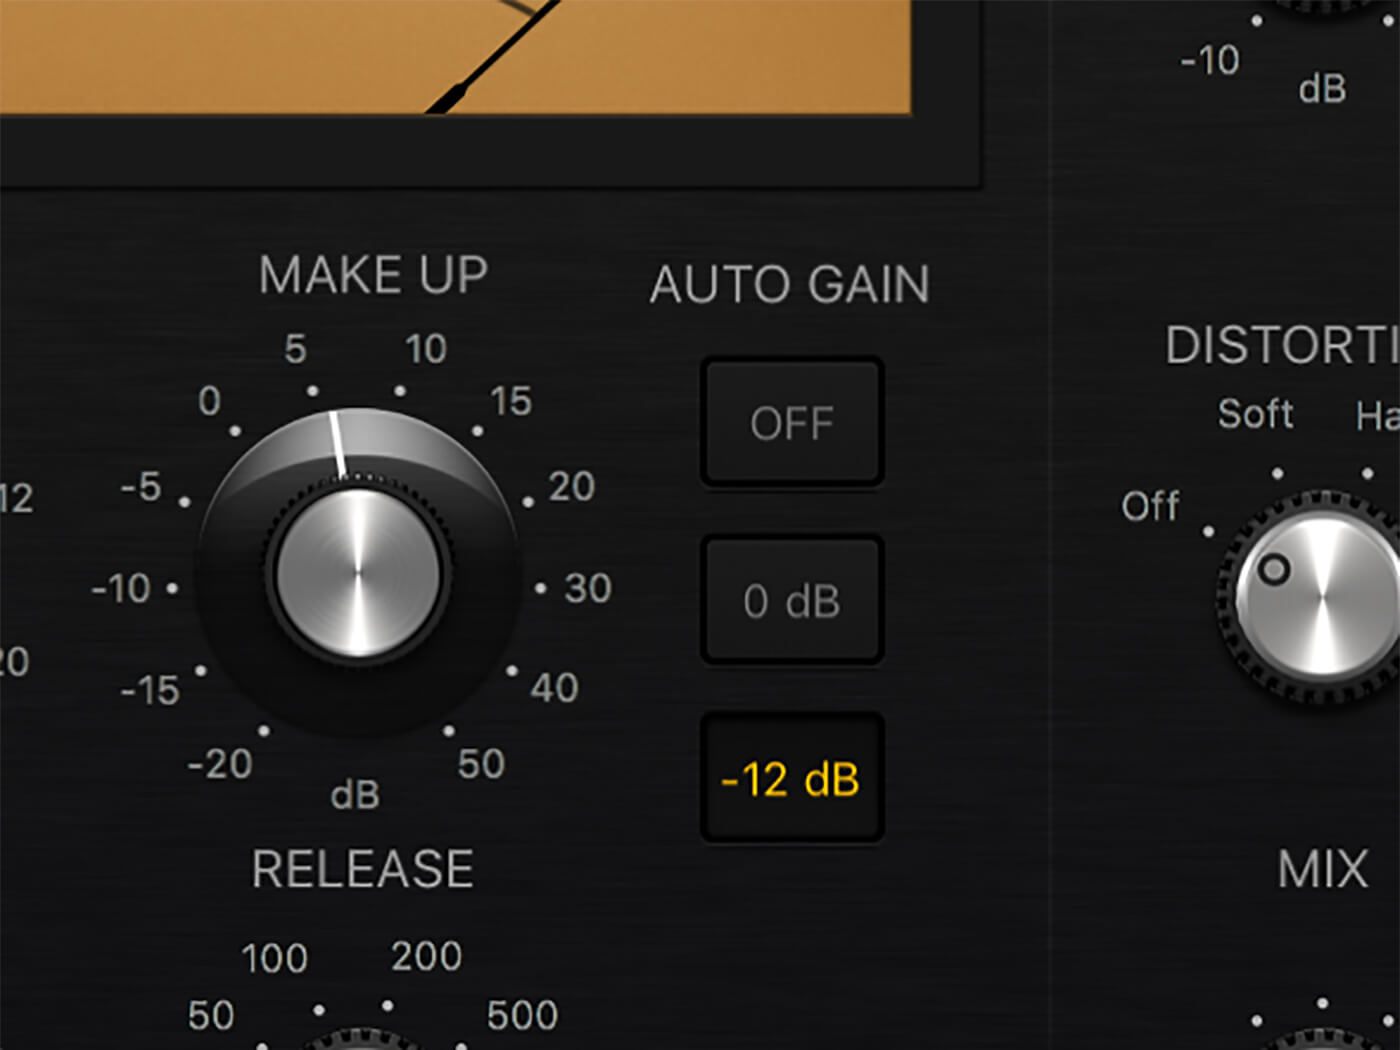
12. If you use Auto Gain – which automatically compensates the output level in respect to the gain reduction applied – use the -12dB choice rather than 0dB option, which could seriously compromise your headroom!
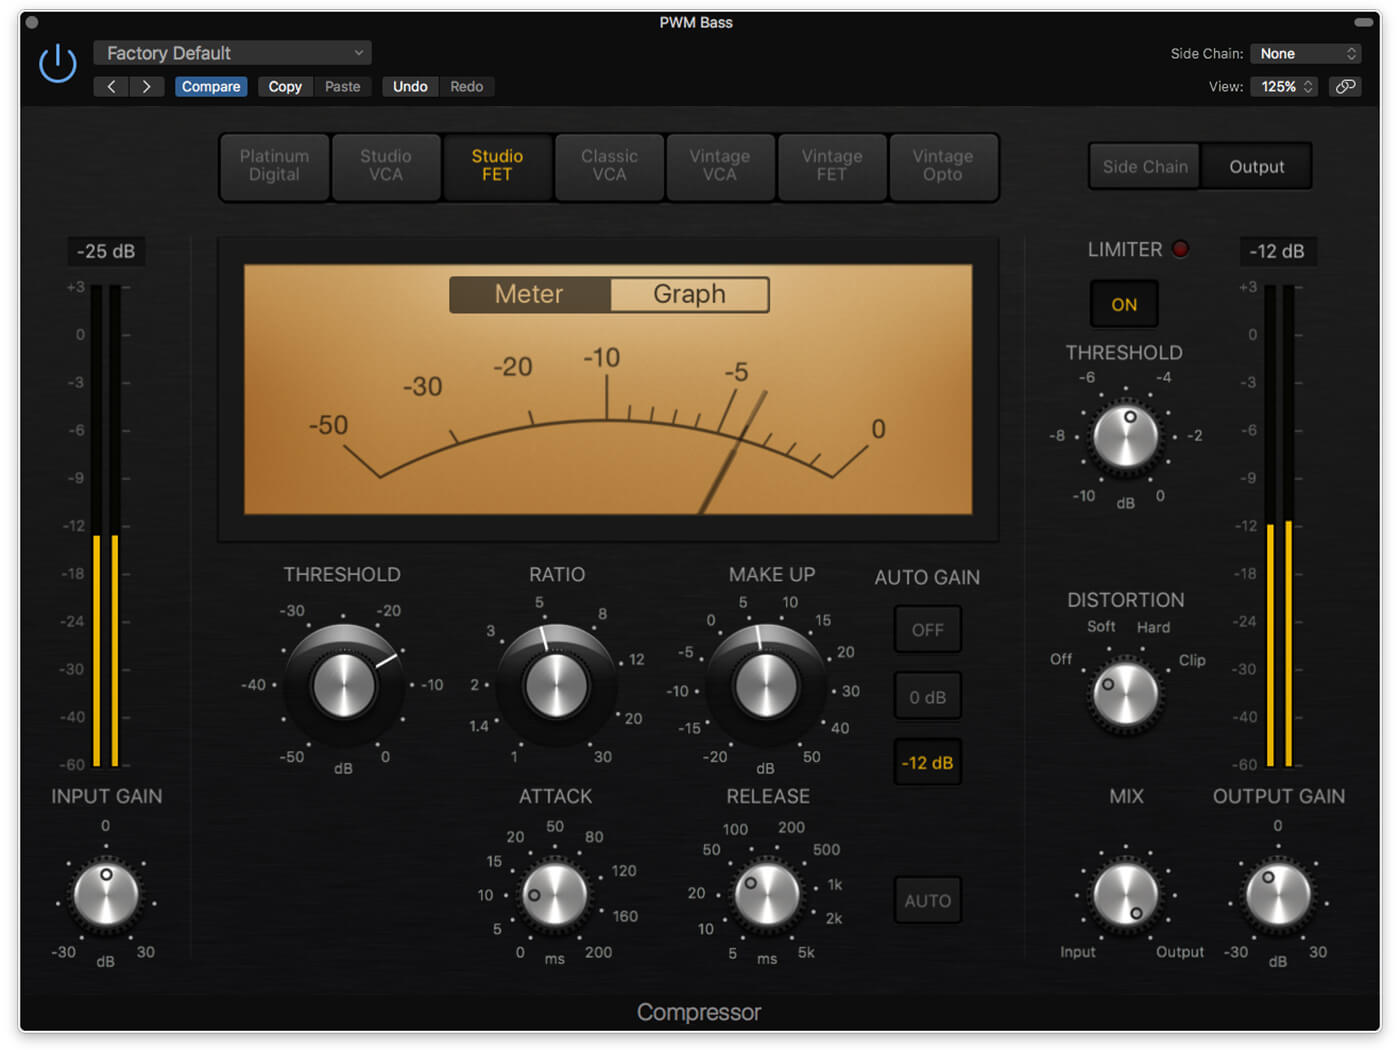
13. If you want to apply the in-built limiter, which works post Make Up, you might want to turn to the Output Gain to level-correct the Compressor’s output. This is the final control in the plugs-in’s signal path.
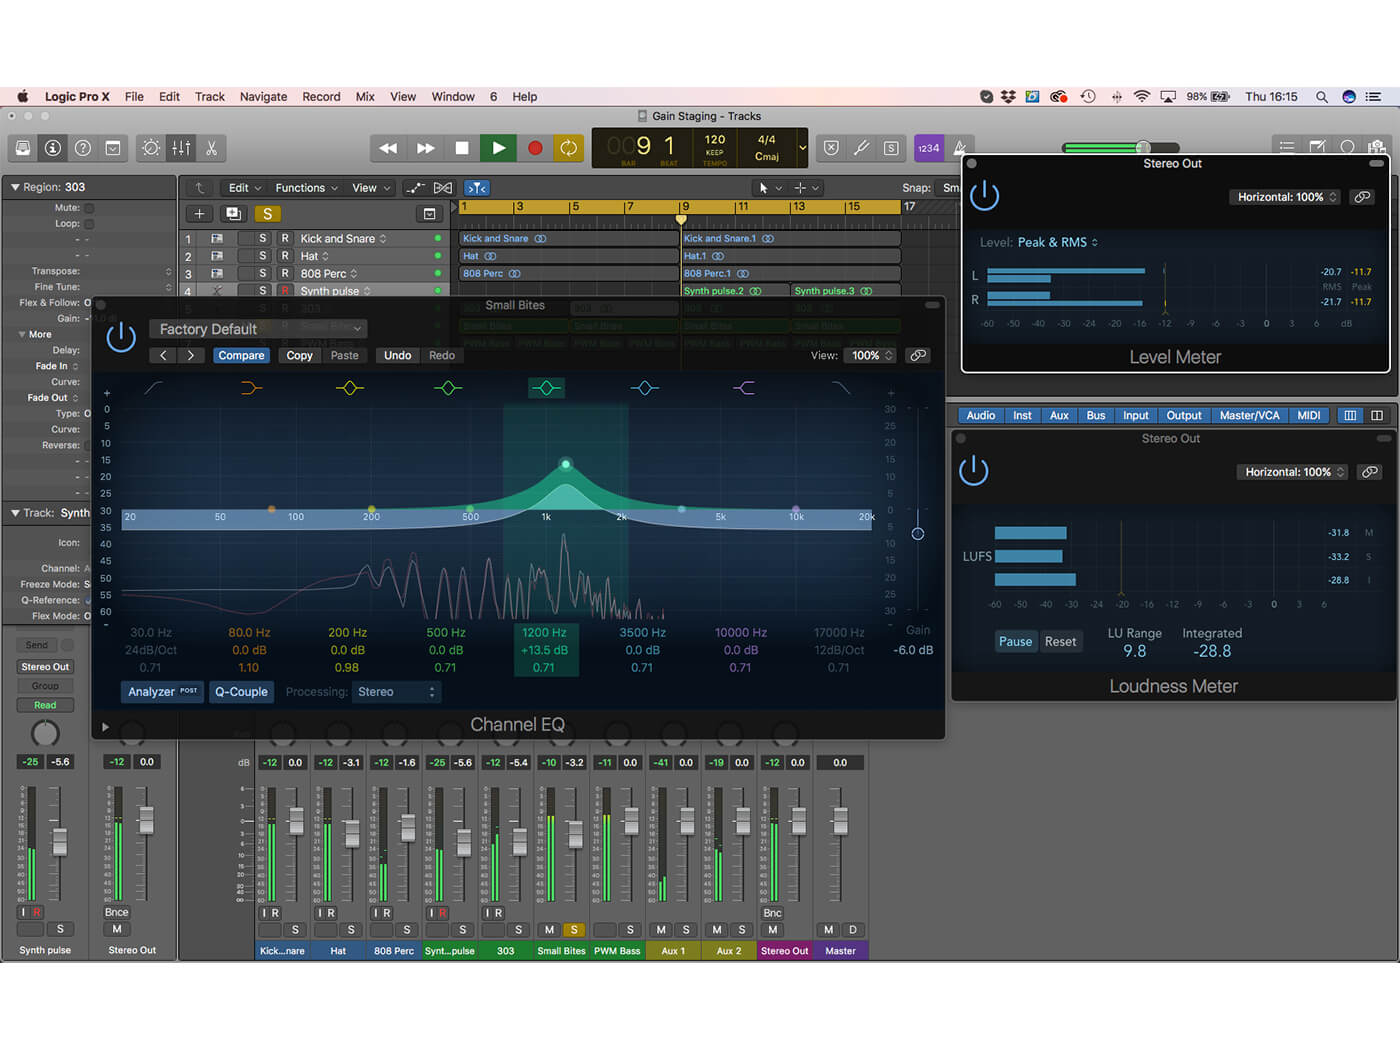
14. Likewise, if you use EQ, ensure you check your eventually levels, especially if the setting is additive. The Gain control on the right-hand side can be apply any level adjustment after the equalisation has been applied.
15. When it come to the use of Bus faders, try to preserve good Gain Staging practice. In this case, we’ve summed the three drum tracks to Bus 3, but the levels are starting to look too hot.
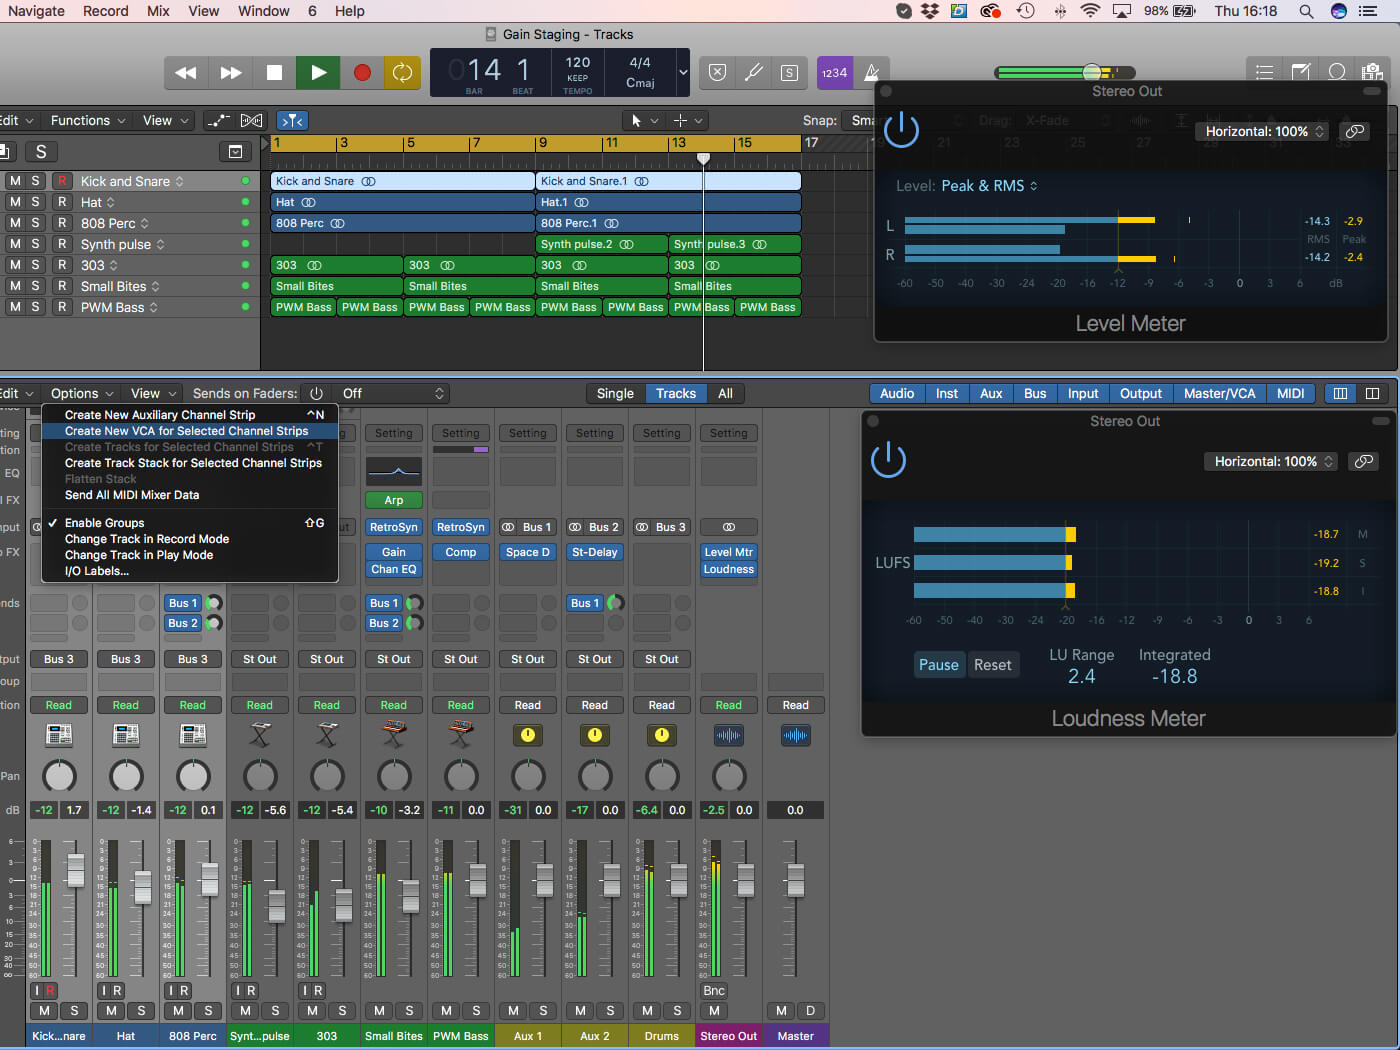
16. If you don’t want to adjust the individual faders, consider the use of VCA faders as a form of trim control. Select the drum track and pick Options > Create New VCA for Selected Channel Strips
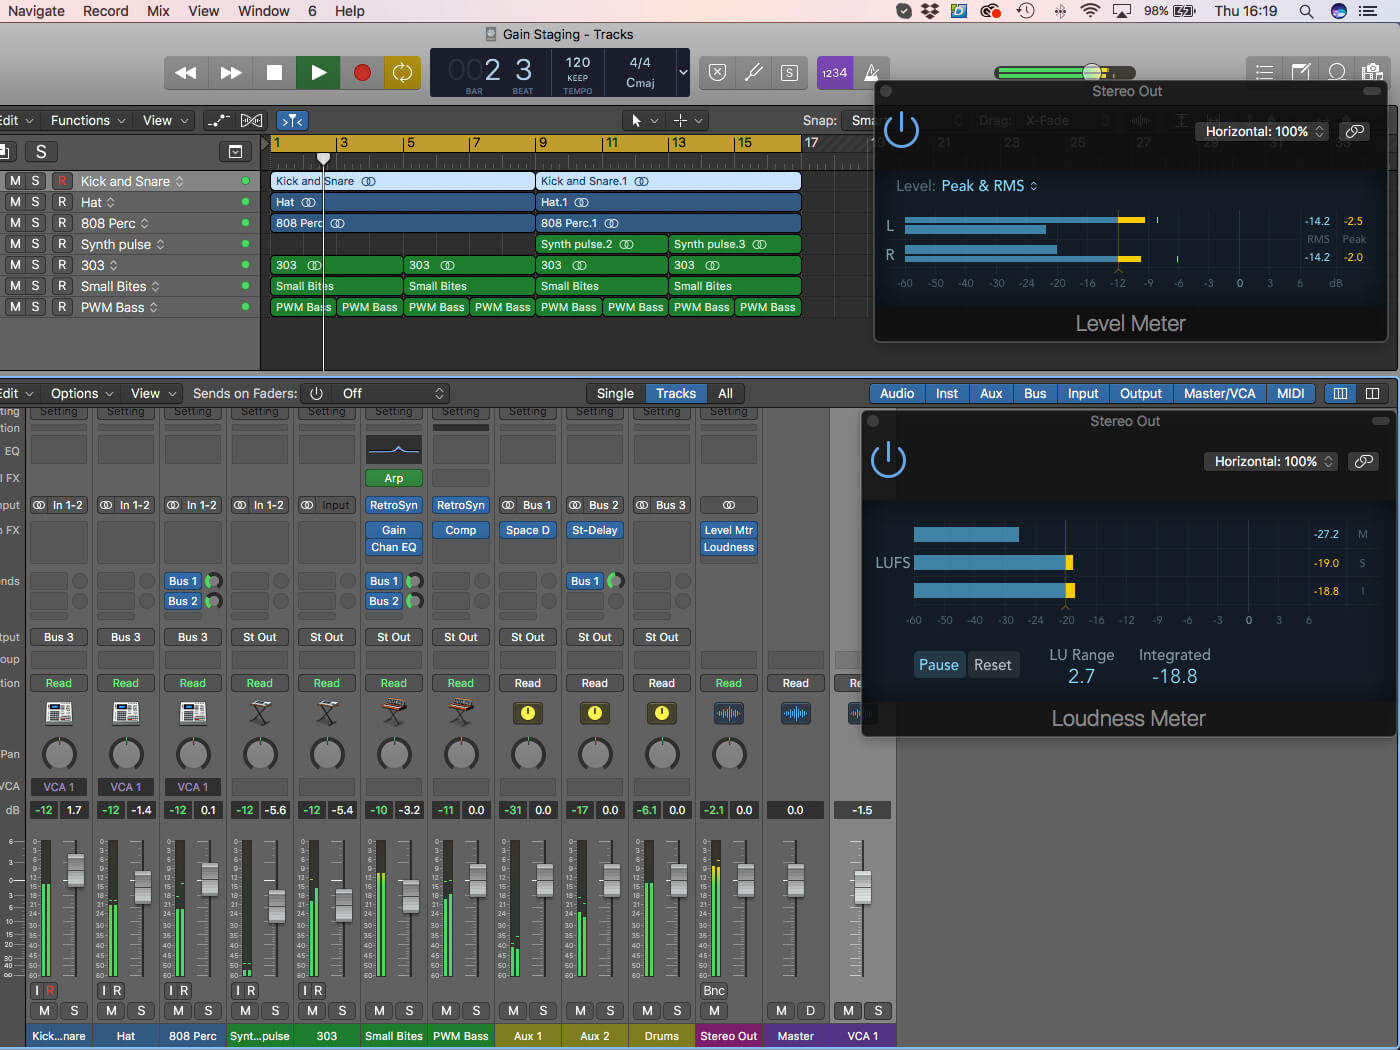
17. The newly created VCA 1 fader – found on the right-hand side of the mixer – can be used as a gain control between the channel faders and the input of the bus, preserving the overall headroom.
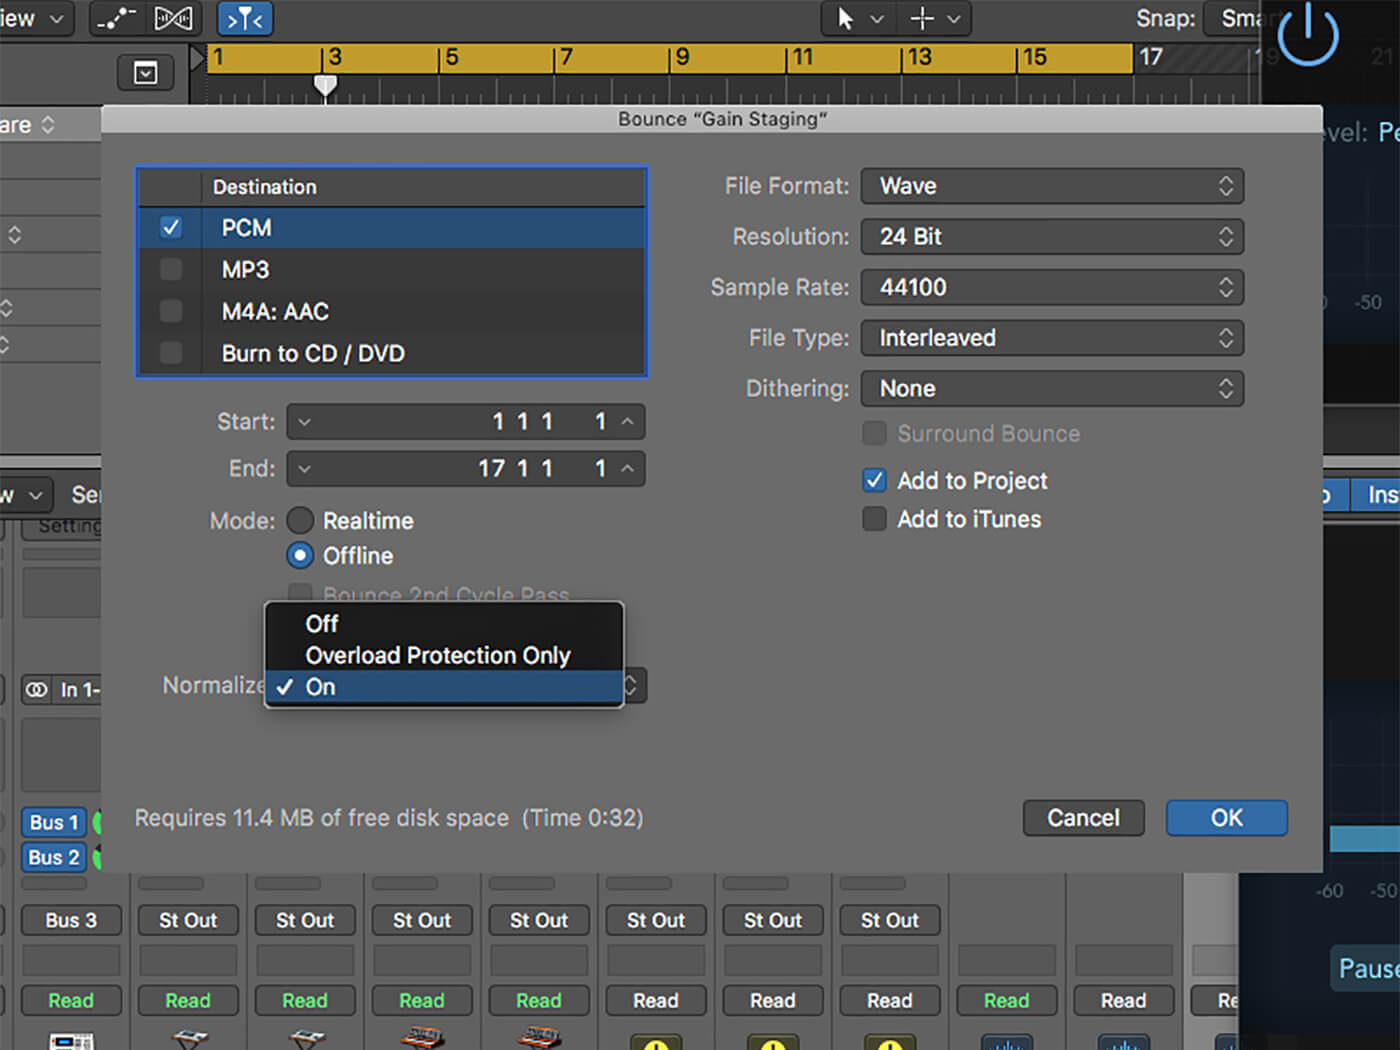
18. Your mastering engineer will enjoy the extra headroom! However, if you want to export mixes for auditioning purposes that peak at 0dBFS, consider using the Normalize feature as part of the Bounce dialogue box.
For more Logic tutorials and workshops, check here.