How to use automation in Cubase (Part Two)
Following our primer in part one, this time we take a deeper dive into the nitty-gritty of automation in Cubase, with tips and methods to work around common problems and pitfalls.
Last time, we looked at the basics of working with automation in Cubase, discussing lanes, curves and breakpoints. We also covered the difference between track automation and part-level MIDI CC messages, and examined the three automation punch-out modes, which have a big impact on how Cubase behaves when overwriting existing automation with new data.
We’re going to assume you’re up-to-speed with part one, because in this tutorial we’re going to look at some of the practical aspects of automation, starting with a problem that all DAWs suffer from, but one Cubase handles particularly well…
Needing a trim
The problem, in a nutshell, occurs when you’ve spent time honing and perfecting an automation curve, only to decide later that the overall level of the controlled parameter needs to be adjusted without impacting on the relative changes represented by the curve.
Cubase’s offline automation edit tools can certainly come to the rescue here, allowing you to scale and modify whole groups of breakpoints as one with just a few clicks of the mouse. But this isn’t always the most creative or spontaneous way of doing things, and can be fiddly where you want different amounts of trim at different points in the mix.
Cubase has a couple of good solutions that allow you to trim existing automation data with ease. With channel volume automation, often the best workaround is to employ VCA Fader tracks. This track type mimics the action of the VCA – or Voltage Controlled Amplifier – tracks found on some classic analogue mixing consoles, which allowed the volume faders of multiple channels to be controlled via a single VCA fader.
In Cubase, this is also their main use, but because in effect, they scale the fader position of the channels under their control, any volume automation applied to those channels can be scaled by the VCA fader. And because a VCA Fader can itself be automated, they can be a powerful tool even when used to trim just a single channel’s volume.
For all other automation types (and for volume, too), enabling Automation Trim mode provides another very effective solution to the problem. We’ll look at both VCA faders and Trim mode in the walkthrough.
Track automation and MIDI CCs
We touched on how MIDI CC and track automation compare in part one, but what we didn’t say is that things can become rather more complicated when dealing with MIDI and Instrument tracks.
Firstly, whether creating it offline with a mouse or live with mouse or hardware controller, MIDI CC automation can be created on the MIDI/Instrument track itself, or it can be created inside the MIDI parts contained on the track. This can create situations where Cubase has to decide whether to record incoming MIDI CC data to the track or to a MIDI part and where two different automation curves are trying to control the same MIDI CC. Both scenarios can be dealt with by Cubase’s MIDI Controller Automation Setup panel (see tip box).
Some instruments further complicate matters by providing a third way of automating their parameters. For example, Steinberg instruments integrate tightly with Cubase, as you would expect, exposing all of their parameters to standard track-level automation. But the same instrument parameters can also be assigned individually to specific MIDI CCs, leaving us to choose between automating a parameter via direct track-level automation, via track-level MIDI CC automation, or via part-level MIDI CC automation.
In this situation, it’s almost always preferable to use standard track automation, as it has far greater resolution than MIDI CCs, as we’ll discover in a moment. In any event, if you do end up with simultaneous track and MIDI CC automation, the track automation takes precedence and the MIDI CC automation is ignored.
Be aware, though, that not all instruments expose their parameters to track automation, while others don’t allow you to assign parameters to MIDI CCs, so it’s up to you to choose the best method from those that are available in any given scenario. Incidentally, MIDI and Instrument tracks can also automate their MIDI Modifiers, as well as most of the MIDI Inserts that can be applied to them – this isn’t always useful, but it does offer some intriguing possibilities for the imaginative experimenter.
Get creative
It can be fiddly and frustrating at times, but automation is one of the most powerful creative tools inside any DAW. When used well, automation can build the intrinsic element of a particular sound or part in a mix, and can be as important as the actual notes played or audio recorded. So take the time to really get to grips with automation in Cubase – it’s often the difference between a passable mix and a sonic masterpiece!
Step-by-step
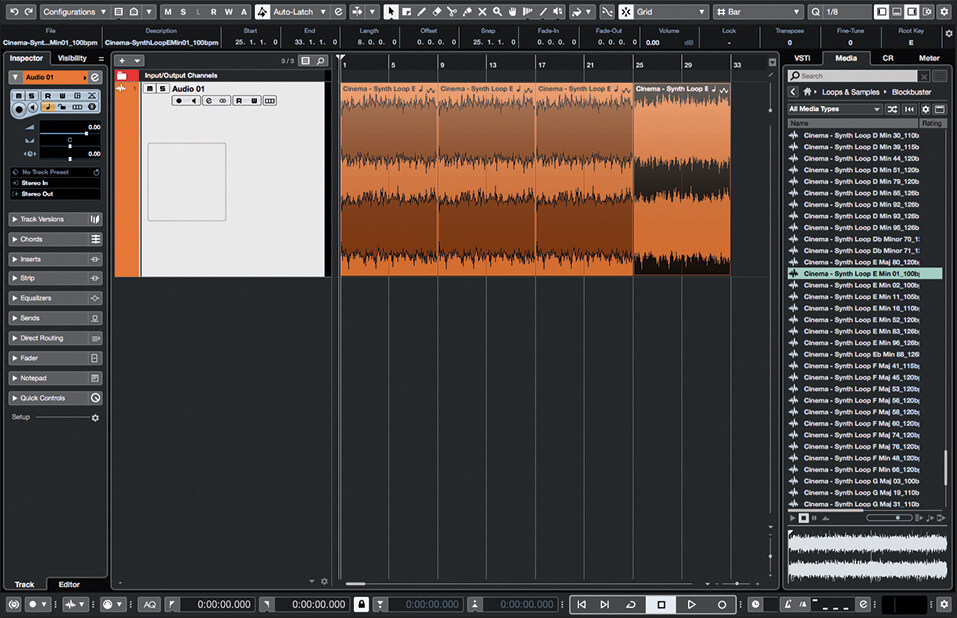
1. Let’s start by looking a VCA Faders. Create a new Cubase project and add an Audio track. We need something to work with, so drop a loop or similar onto the new track – duplicate it a few times so you’ve got plenty to work with.
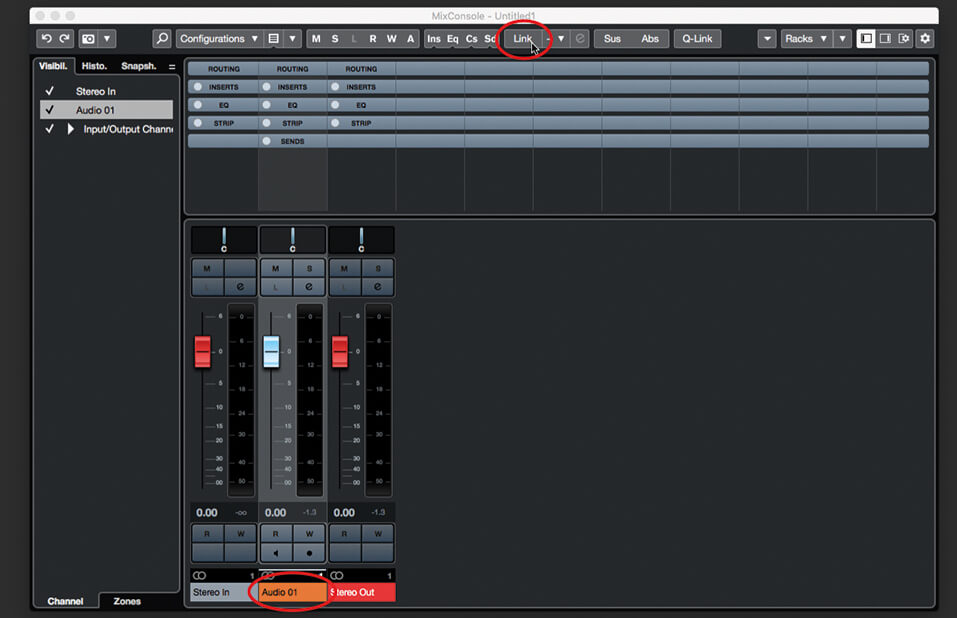
2. Switch to the MixConsole and click the name field on the new track’s channel strip in order to select it. Click the Link button at the top of the MixConsole window – the Link Group Settings window will open.
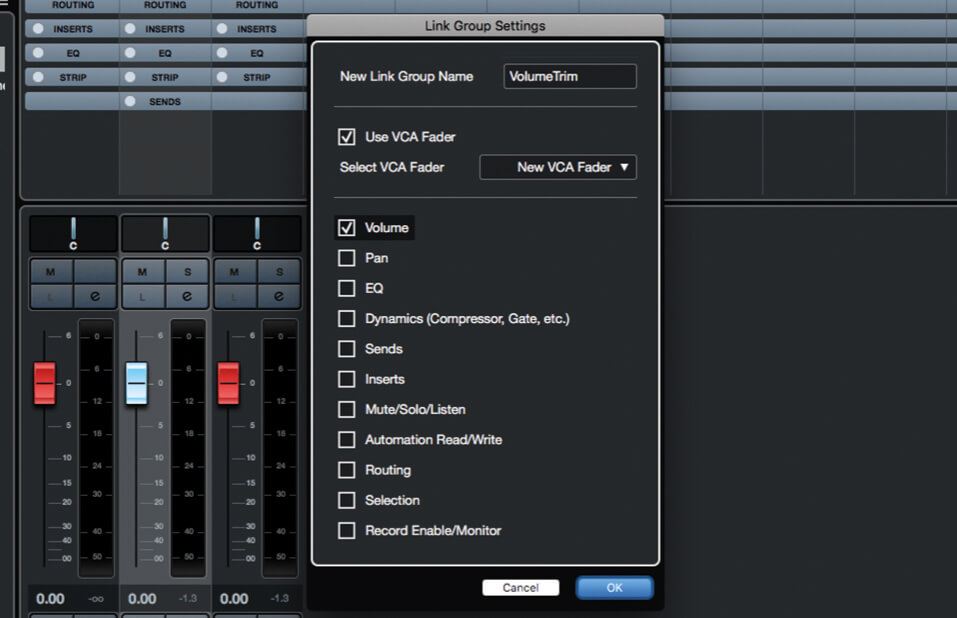
3. Call the link group “VolumeTrim”. Tick the Use VCA Fader box and ensure New VCA Fader is selected in the drop-down list underneath the tickbox. In the parameter list, ensure Volume is ticked, and untick everything else. Click OK when done.
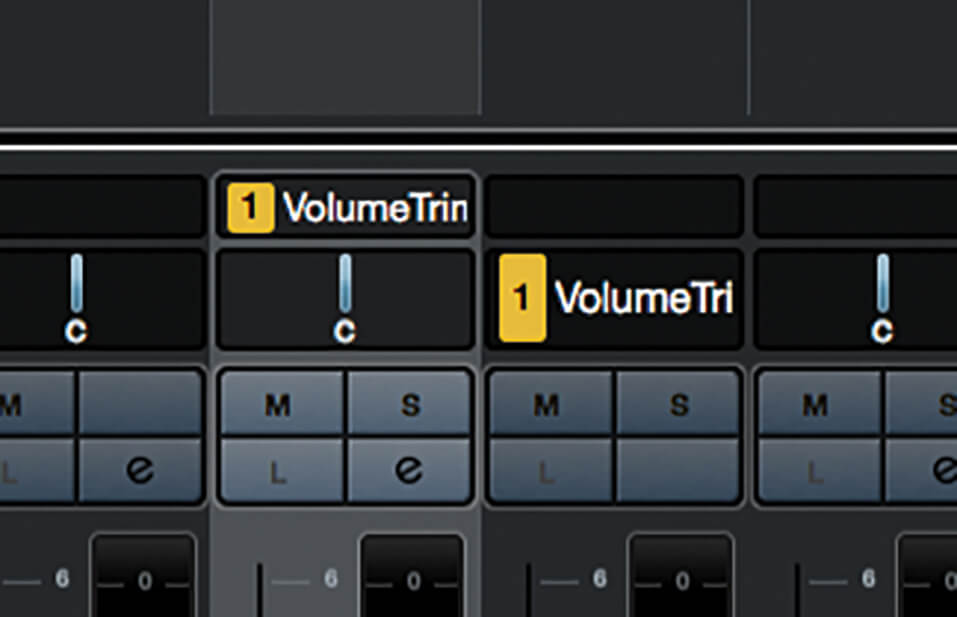
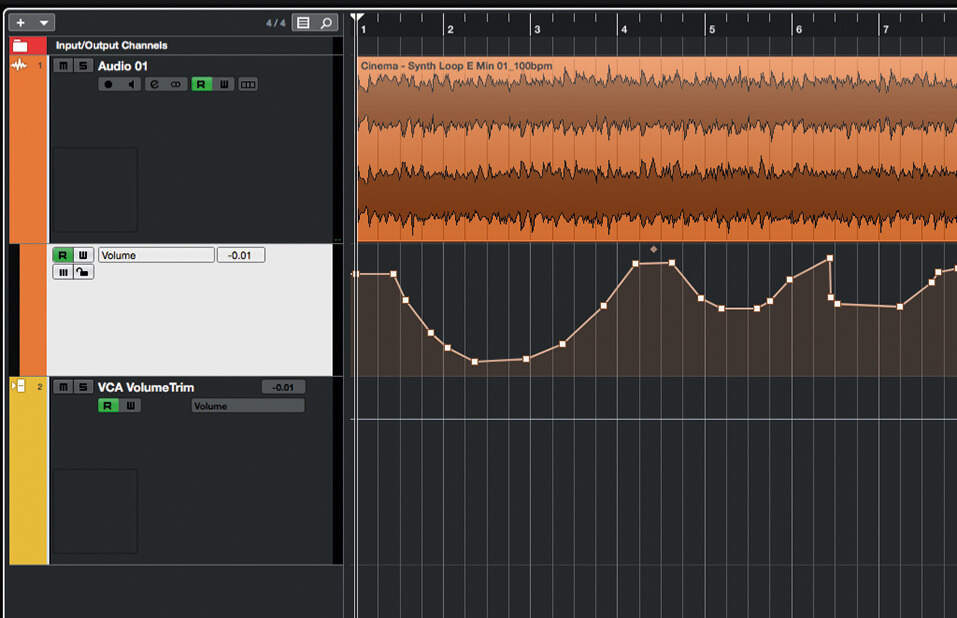
4. Your audio track will now have a field above the panner that says ‘VolumeTrim’ and a new VCA Fader has been created and assigned to control the VolumeTrim link group. Move the VCA Fader and notice how the linked fader moves along with it.
5. Reset the VCA Fader to 0dB and then switch over to the Project window. Open the automation lane for your audio track, and draw or record some volume automation – something fairly random will work best for this example.
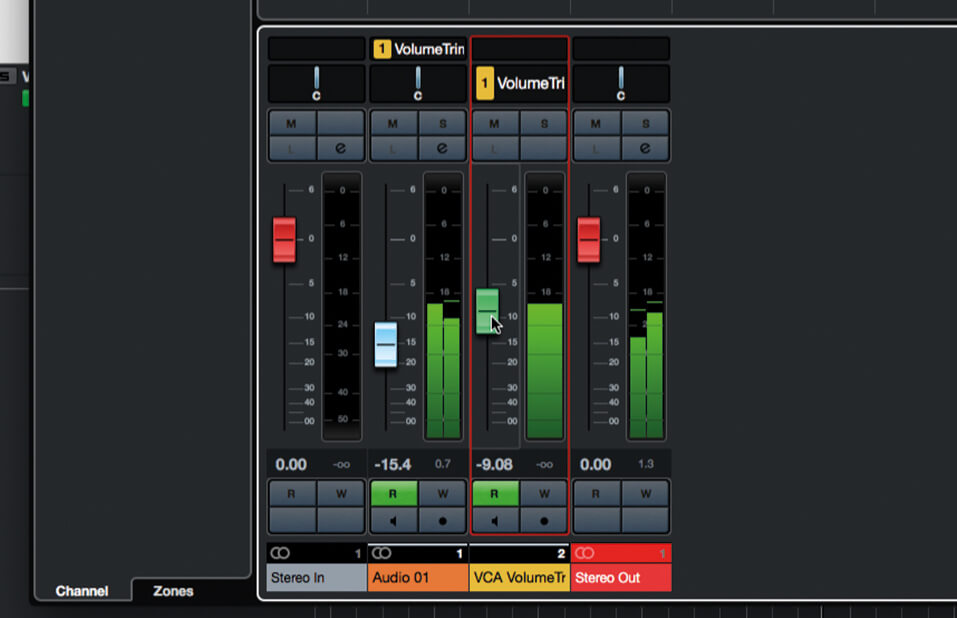
6. Flip back to the MixConsole and hit play. Adjust the VCA Fader, noticing how the linked volume fader is scaled by, rather than moving in lock-step with, the VCA. You now have a way of trimming the audio track’s volume independently of its automation.
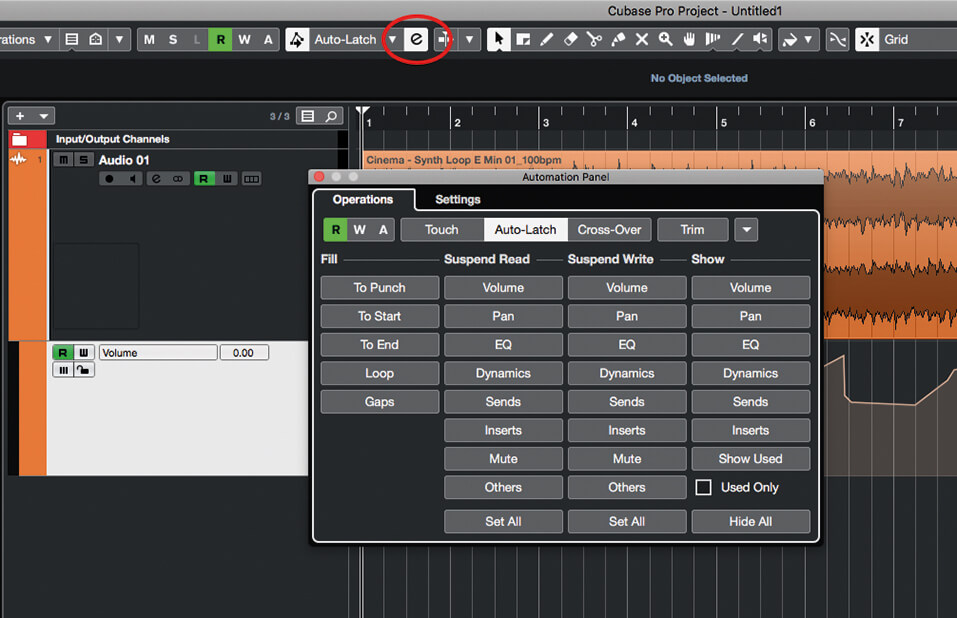
7. Return to the Project window, delete the VCA Fader track, and then click the ‘E’ symbol located next to the automation punch-out selector. The Automation Panel will open – there’s a fair bit to this, but for now, we’re only interested in its Trim mode.
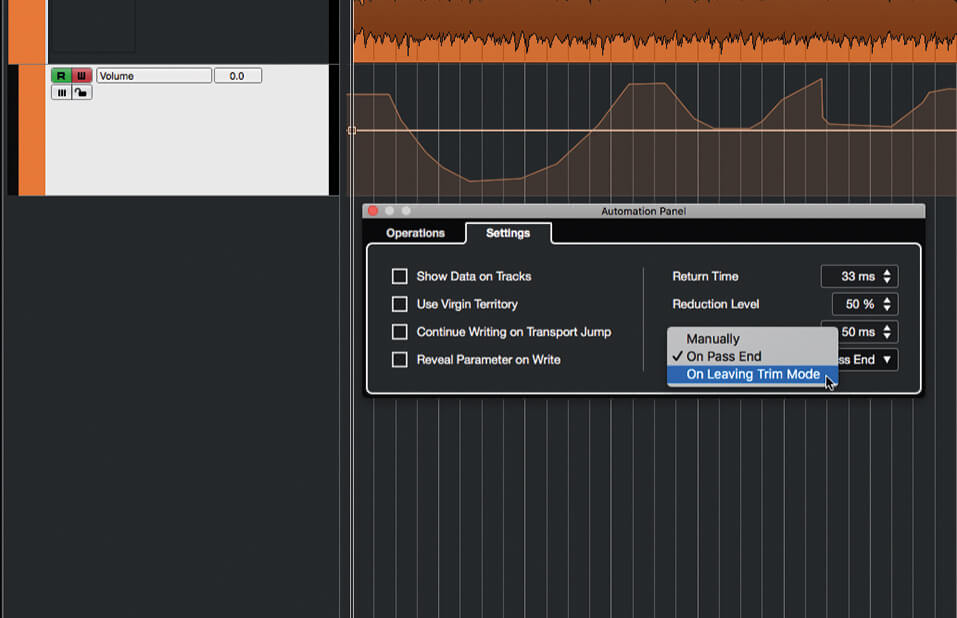
8. Use the panel to switch to Touch punch-out mode and enable Trim. Notice the automation lane now displays a second curve. Switch to the panel’s Settings tab and select On Leaving Trim Mode for the Freeze Trim setting.
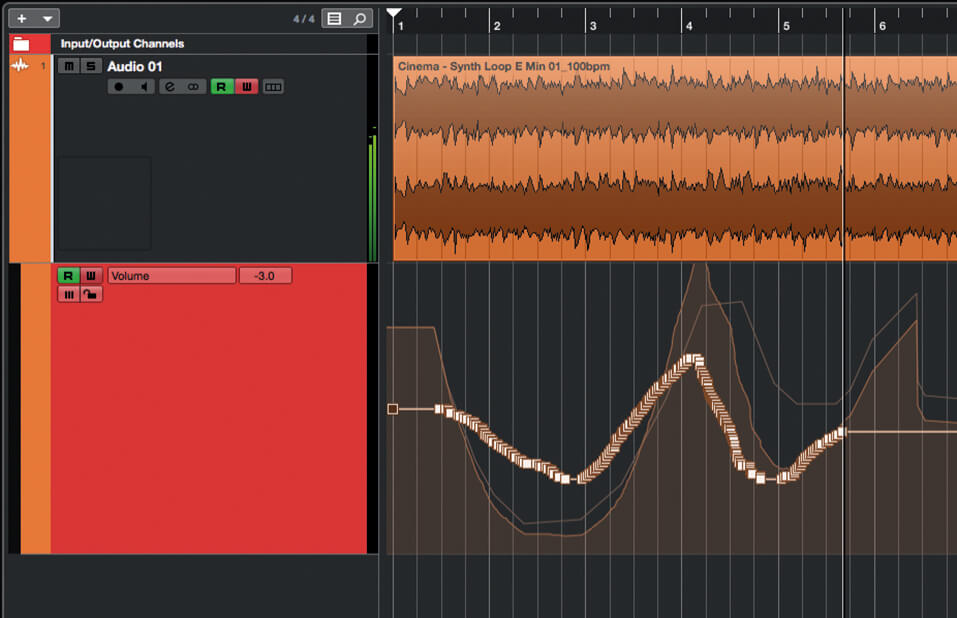
9. In the project window, select the audio track, ensure it’s in automation write mode, and open the Fader section of the Inspector. Hit play and move the fader. Notice it’s the trim curve that’s written to, and that a representation of the resulting curve is also shown.

10. You can modify the trim curve just as you would any other automation curve. Once happy, you can disable Trim mode. With our current Freeze Trim setting, this results in the trim curve being applied to the original curve. Close the Automation Settings panel.
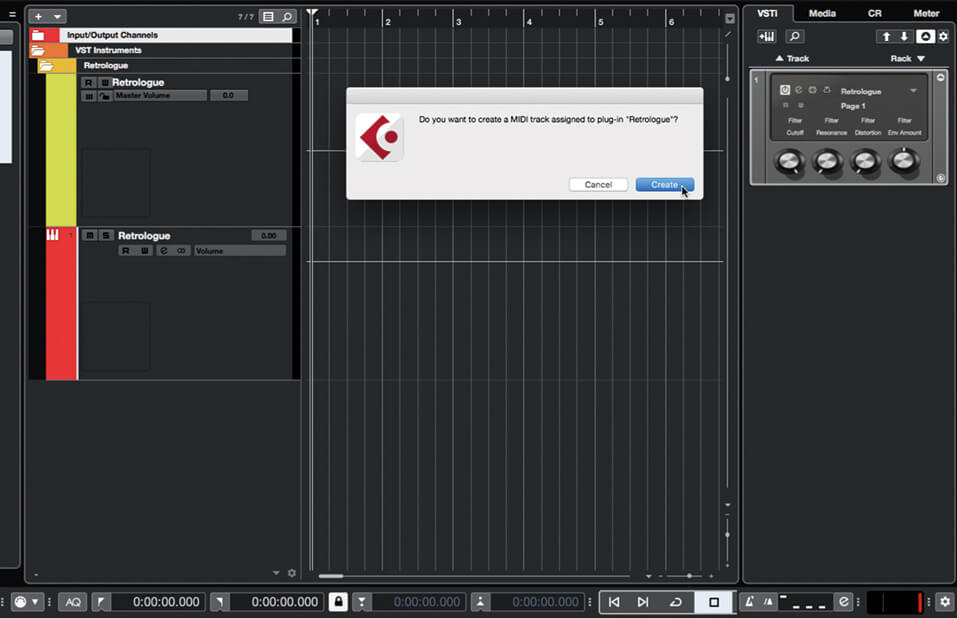
11. Let’s move on to MIDI CCs now. Delete the audio track, open the right-hand zone’s VSTi tab and add a Steinberg instrument to the Rack. I’m using Retrologue. Choose to create an accompanying MIDI track when prompted.
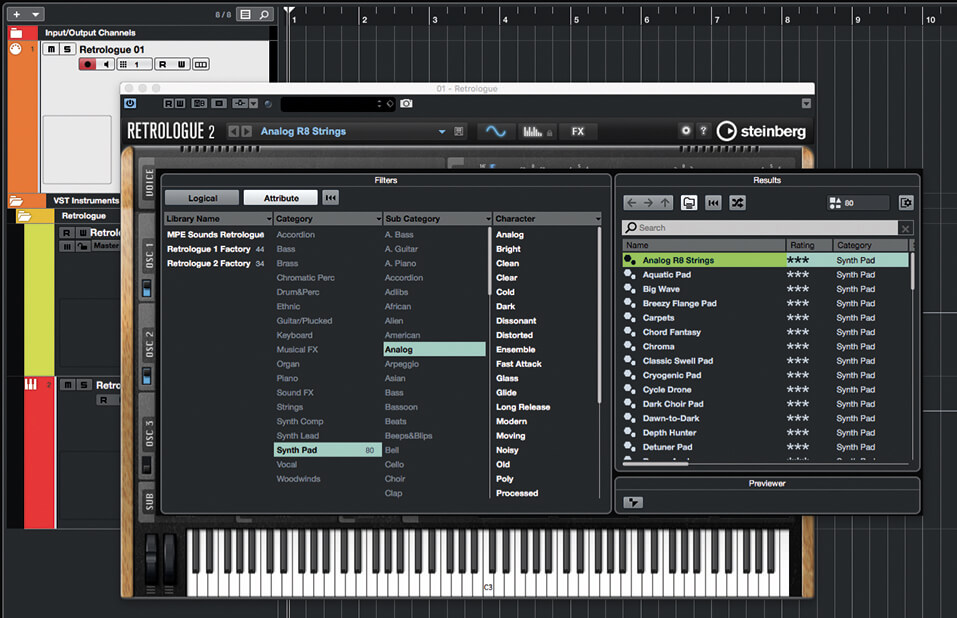
12. Load a simple sound that sustains for as long as a key is held down, such as Analog R8 Strings. Increase the filter resonance so that the cutoff frequency is clearly audible. On the MIDI track, create or record a nine-bar sustained MIDI note.
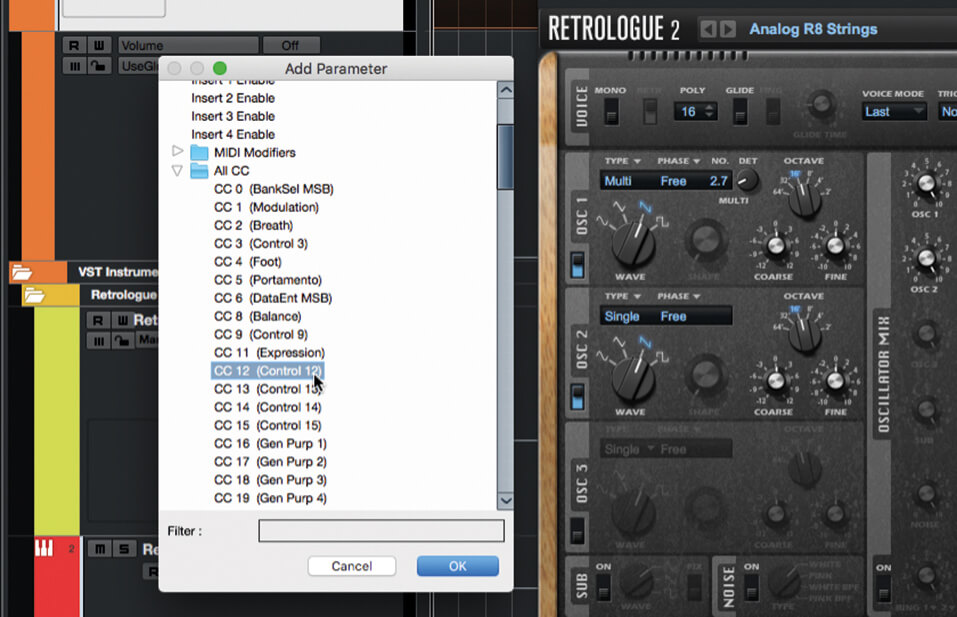
13. Open an automation lane on the MIDI track. Click on the lane’s assignment field and select More… to open the Add Parameter panel. Expand the All CC group and choose CC12. Click OK to close the panel.
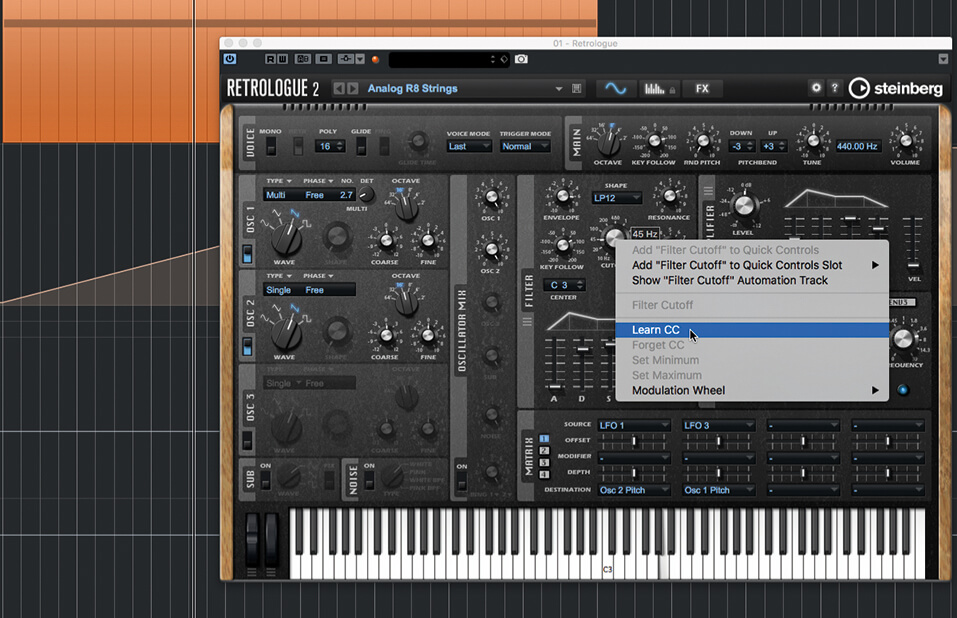
14. Create a long fade-up in the CC12 automation lane. Hit play, and in the instrument’s panel right-click on the filter cutoff frequency and select“Learn CC. This tells Cubase to bind the incoming CC12 messages to the cutoff parameter.
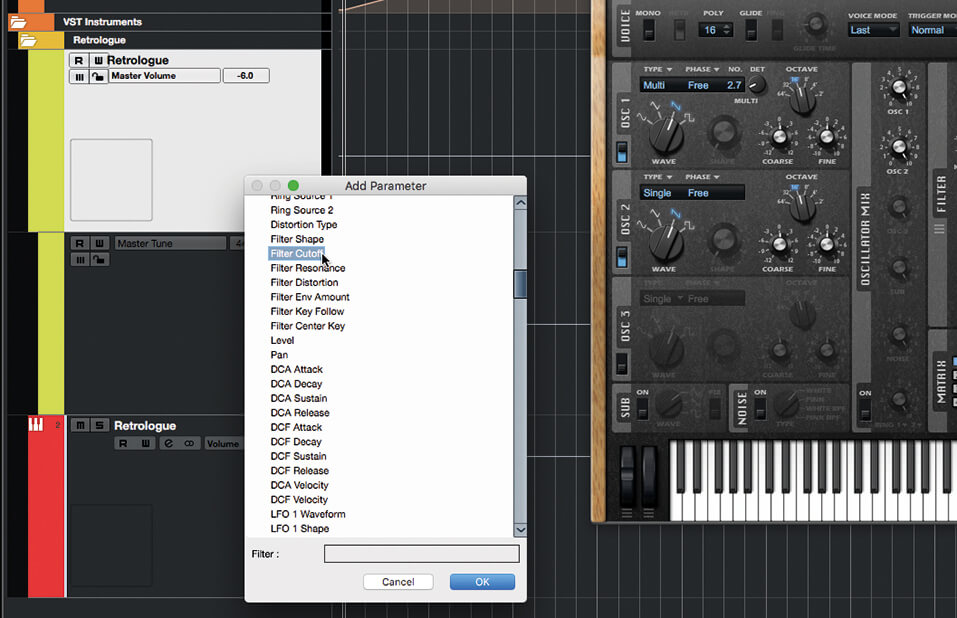
15. Open an automation lane on the instrument’s audio track, then open its Add Parameter panel (just like in step 13). Locate and select the filter cutoff parameter, then click OK. Copy and paste the automation curve from the MIDI track to this automation lane.
16. Mute the MIDI CC automation and hit play. Listen to how smoothly the filter cutoff changes. Now, mute the instrument automation and unmute the MIDI CC automation, then hit play again. You should now hear the ‘steppiness’ caused by the lower resolution of MIDI CCs.
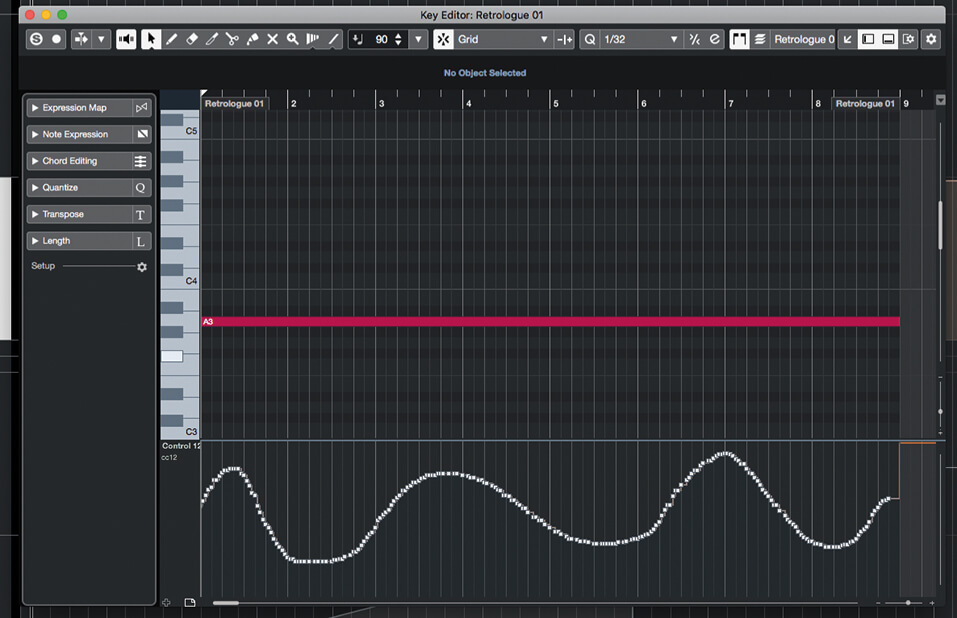
17. Open the MIDI part in the Key editor and show MIDI CC 12 in the editor’s controller lane. Use the pencil cursor tool to draw some random automation. Close the editor – we now have two conflicting MIDI CC automation curves.
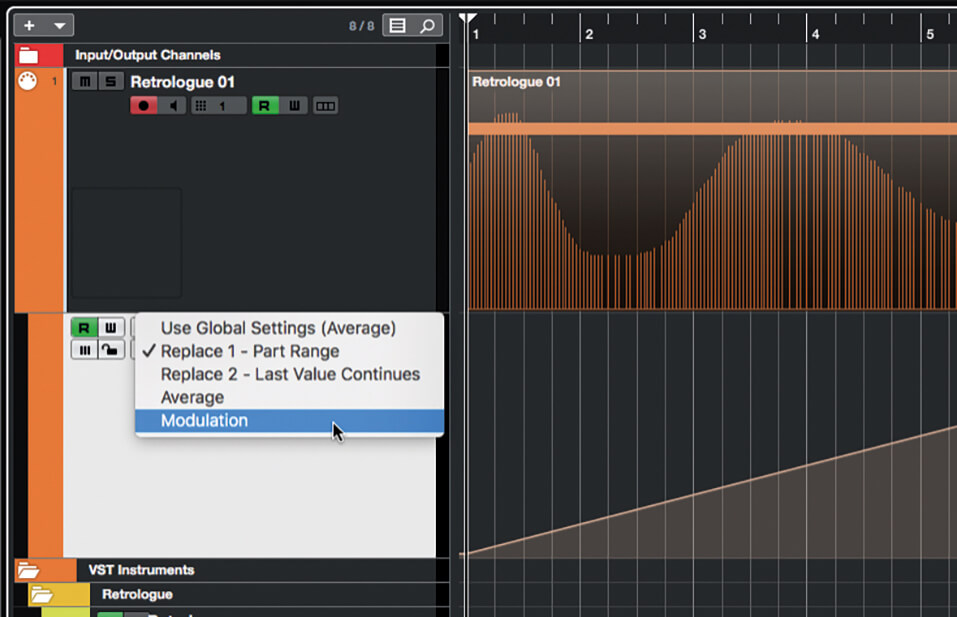
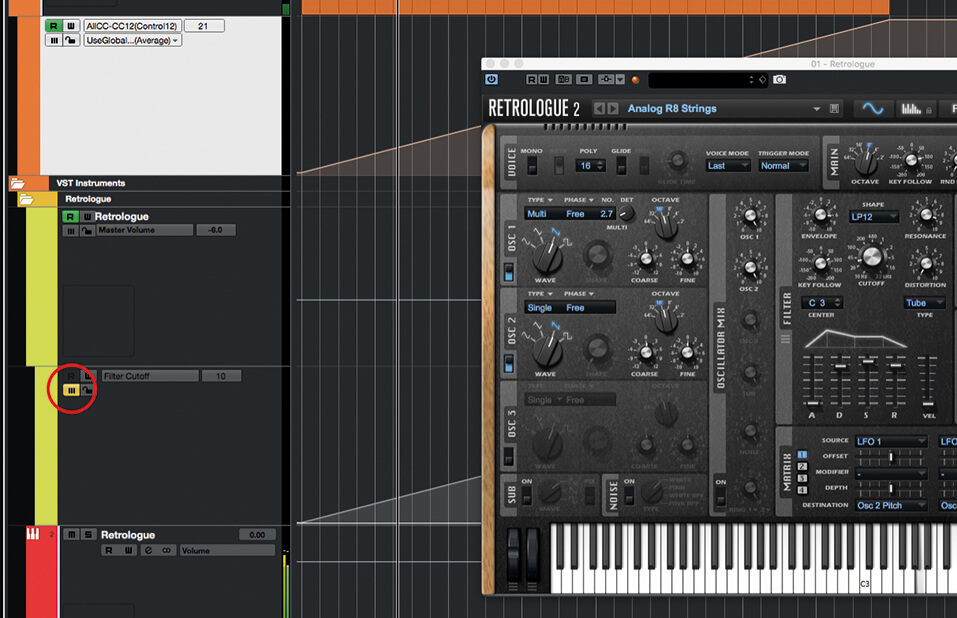
18. On the MIDI track’s automation lane, click the drop-down below the lane’s parameter assignment field. These options determine which CC curve takes preference – track or part. The Replace options give the part precedence, while the remaining options combine the two curves in different ways.