How to collaborate with VST Connect in Cubase
Don’t let social distancing curtail your collaborations. With VST Connect, you can work with musicians anywhere in the world and still record directly into your Cubase project.
Steinberg’s VST Connect has been around in some form since 2012, debuting as a plug-in in Cubase 7. But with musicians, producers and indeed everyone else locked down in their respective homes due to the COVID-19 crisis, it’s never seemed as relevant as it does right now. VST Connect allows you to record a musician or any other collaborator in real time via the internet. It sends cue mixes to the collaborator for them to perform to, captures their playing and returns it to the correct point in your project’s timeline.
The system allows up to 16 channels of audio to be captured and returned to your project, making it entirely possible to record full bands and multi-mic’d drum kits. There’s also a live video link-up so that producers and performers can see each other in real time. If you squint, it’s almost the same as looking through the glass from between the control room and the live room.
There are three key VST Connect applications: VST Connect SE is built into both Cubase Pro and Nuendo, and provides the basic studio end of the link-up. SE can only record two channels simultaneously via the remote connection but its big brother VST Connect Pro (£128) provides a more complete suite of features, including up to 16 tracks of recording, encrypted transfer and support for operating via a LAN.
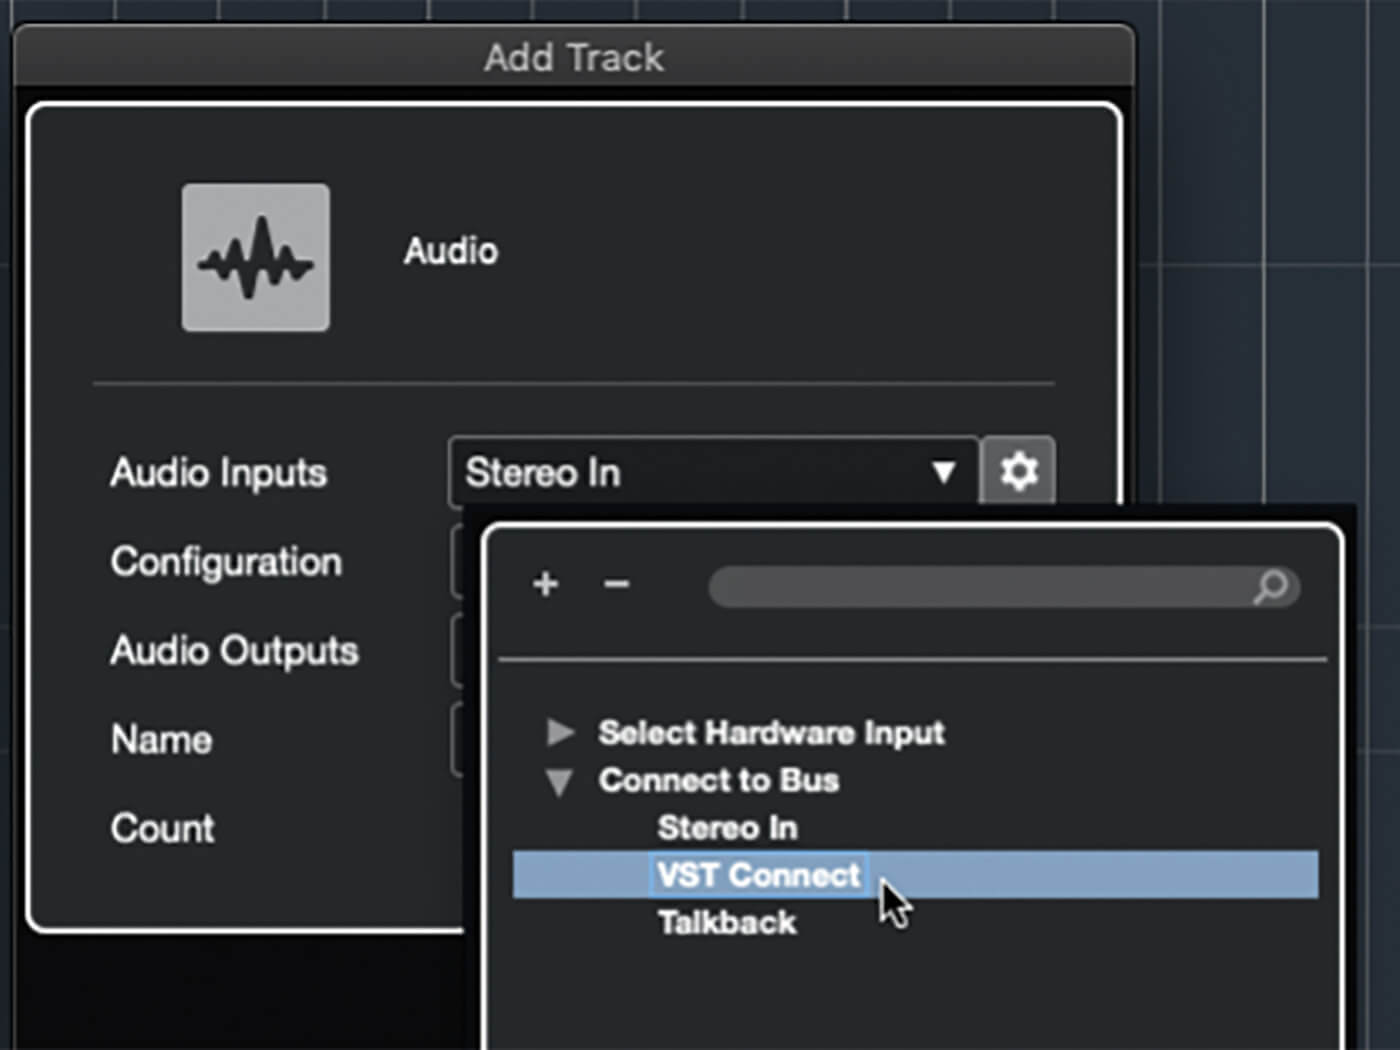
Connect the dots
It’s the third application though, VST Connect Performer, that is the most robust. This standalone application for macOS, iOS and Windows acts as the performer’s link to your studio. The desktop version of the app is free but the iOS version has a small cost (£4.99 at time of writing), presumably to cover the overheads involved in publishing via Apple’s App Store.
Although VST Connect Performer doesn’t require Cubase, Nuendo, or any other DAW to be present on the user’s system, it does require access to audio I/O of some sort. The I/O built in to most computers suffice as a last resort but ideally the performer will be using a recording-grade audio interface, with sufficient mics, preamps and input channels to connect all of the sources that are to be recorded. Once everything is set up though, the producer will be able to remotely control the mix and monitoring settings via VST Connect Performer, as well as set up hardware settings such as input busses and buffer sizes. Hopefully, this will leave the artist free to focus on their performance.
VST Connect Performer also has a series of in-built effects – reverb, EQ and compressor – as well as four insert slots for additional VST processors, which will first need to be installed on the performer’s computer. By default, these effects are applied to the performer’s direct monitoring signal only but the producer can choose to assign them for recording too. Alongside effects, VST Connect allows for one VST instrument to be added to the setup – any instrument you choose must be installed on both the studio and the performer’s computers – and, once enabled, this allows MIDI data to be streamed and recorded across the remote connection too.
There’s also a related iPhone app, Studio Pass, which allows iPhone-based collaborators to be sent mixes in real time from VST Connect Pro so that they can chip in with thoughts and opinions via the app’s live video and talkback links. This app doesn’t allow recordings to be dubbed back to the studio though.
Linking up
Once logged in and linked with a collaborator, you’re ready to start recording. When you initialise the system, a new VST Connect stereo input bus will be created, and a new stereo track named Performer Rec added to your project. The remote recording bus is always stereo, although this isn’t always what you’ll want – you may, for example, wish to record a single mic or two separate mono signals. If that’s the case, create new mono tracks in Cubase and source their inputs from the left or right VST Connect bus. Then, in the VST Connect editor panel, use the input channel pan controls to send each input to only the left or right side of the VST Connect bus.
The files transferred to the studio are stored as WAVs but their data is compressed for transfer, which may result in a loss of fidelity. To counter this, the full uncompressed (or HD, as they’re referred to here) audio files can be offline-downloaded from the performer after recording. You’ll find the tools to do so in the VST Connect editor panel.
Naturally, to complete this tutorial, you’re going to need some help – not just from us but from a friend with a microphone or instrument and an audio interface. Make some calls, get a collaborator lined up and let’s get going.
Collaborate with VST Connect in Cubase: step-by-step
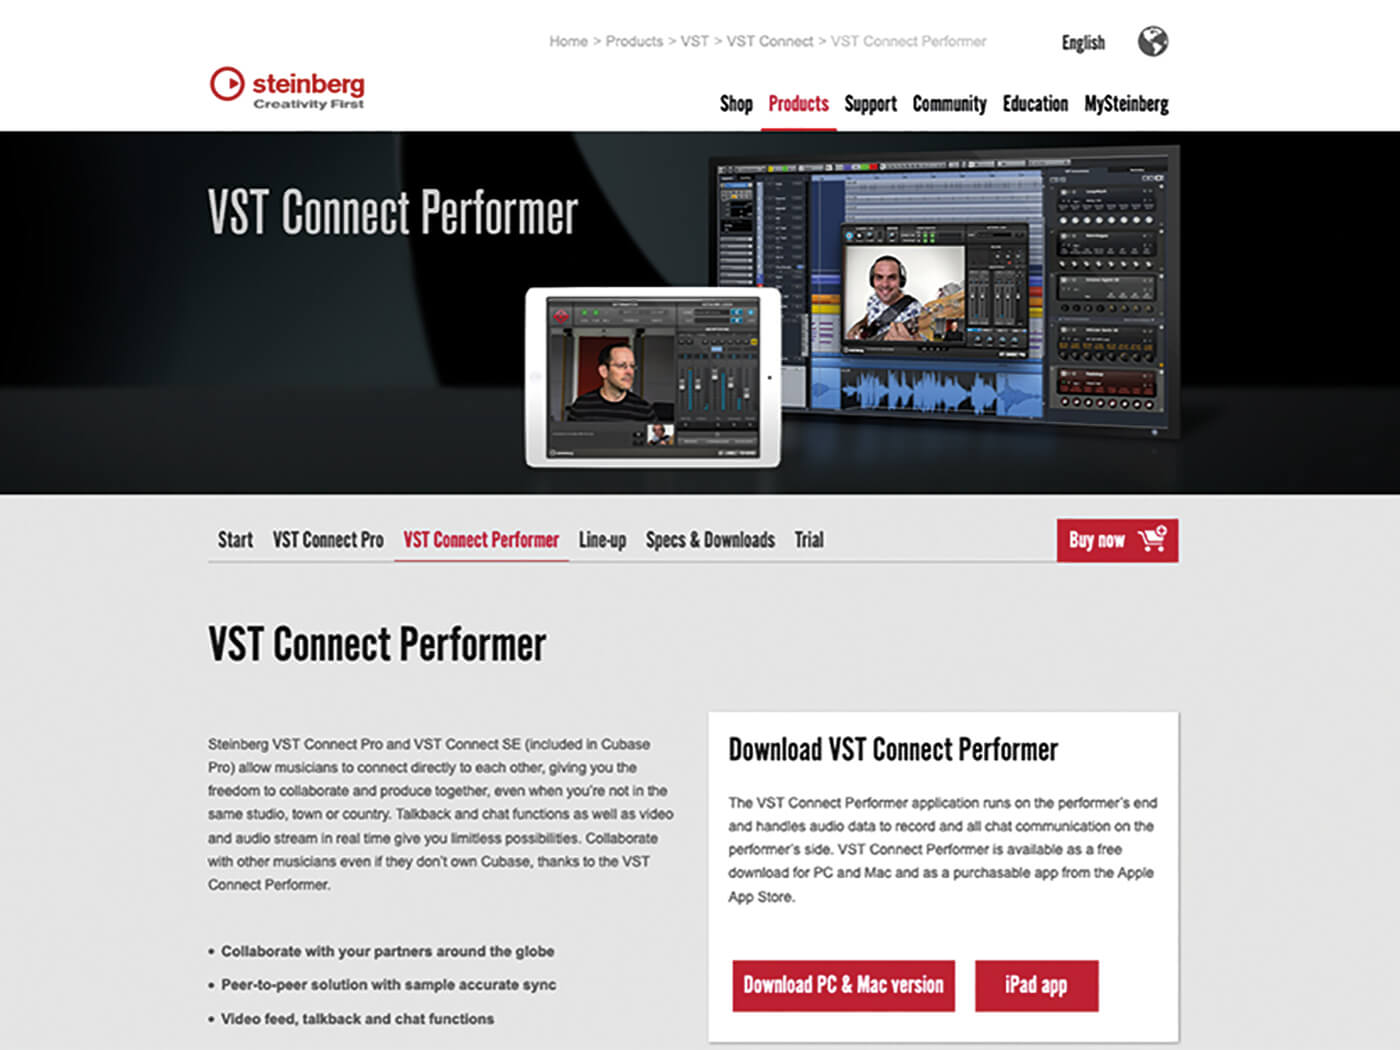
1. It’s important that both studio and performer are using the same version of VST Connect. The best way to ensure this is to both install the latest version. Instruct your collaborator to visit the Steinberg website to download and install the latest VST Connect Performer.
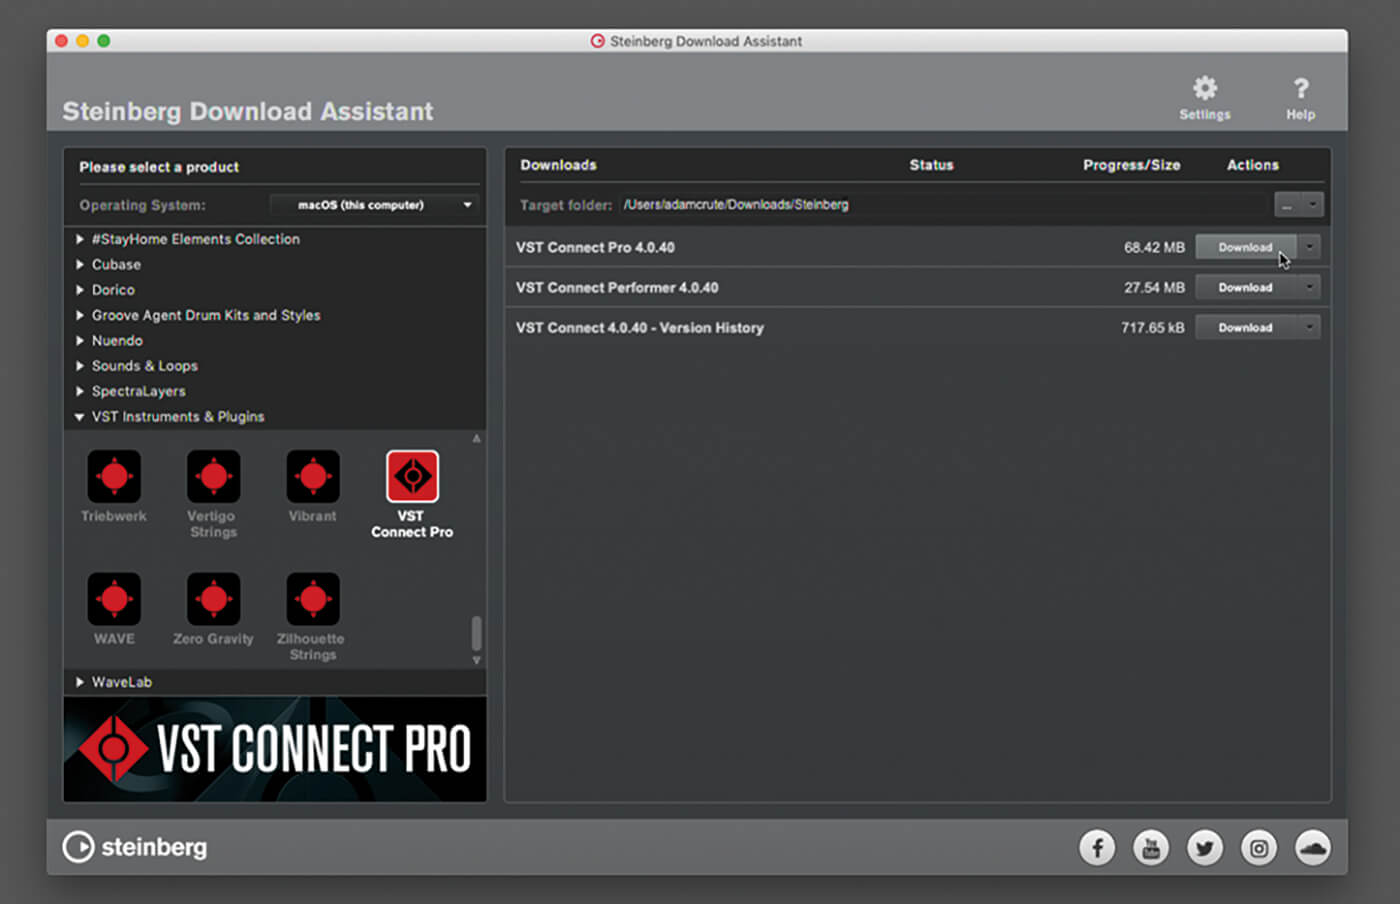
2. To update the studio end of proceedings, launch the Steinberg Download Assistant and select VST Connect Pro from the VST Instruments & Plugins group. Downloading and installing the latest version of Pro will update SE too.
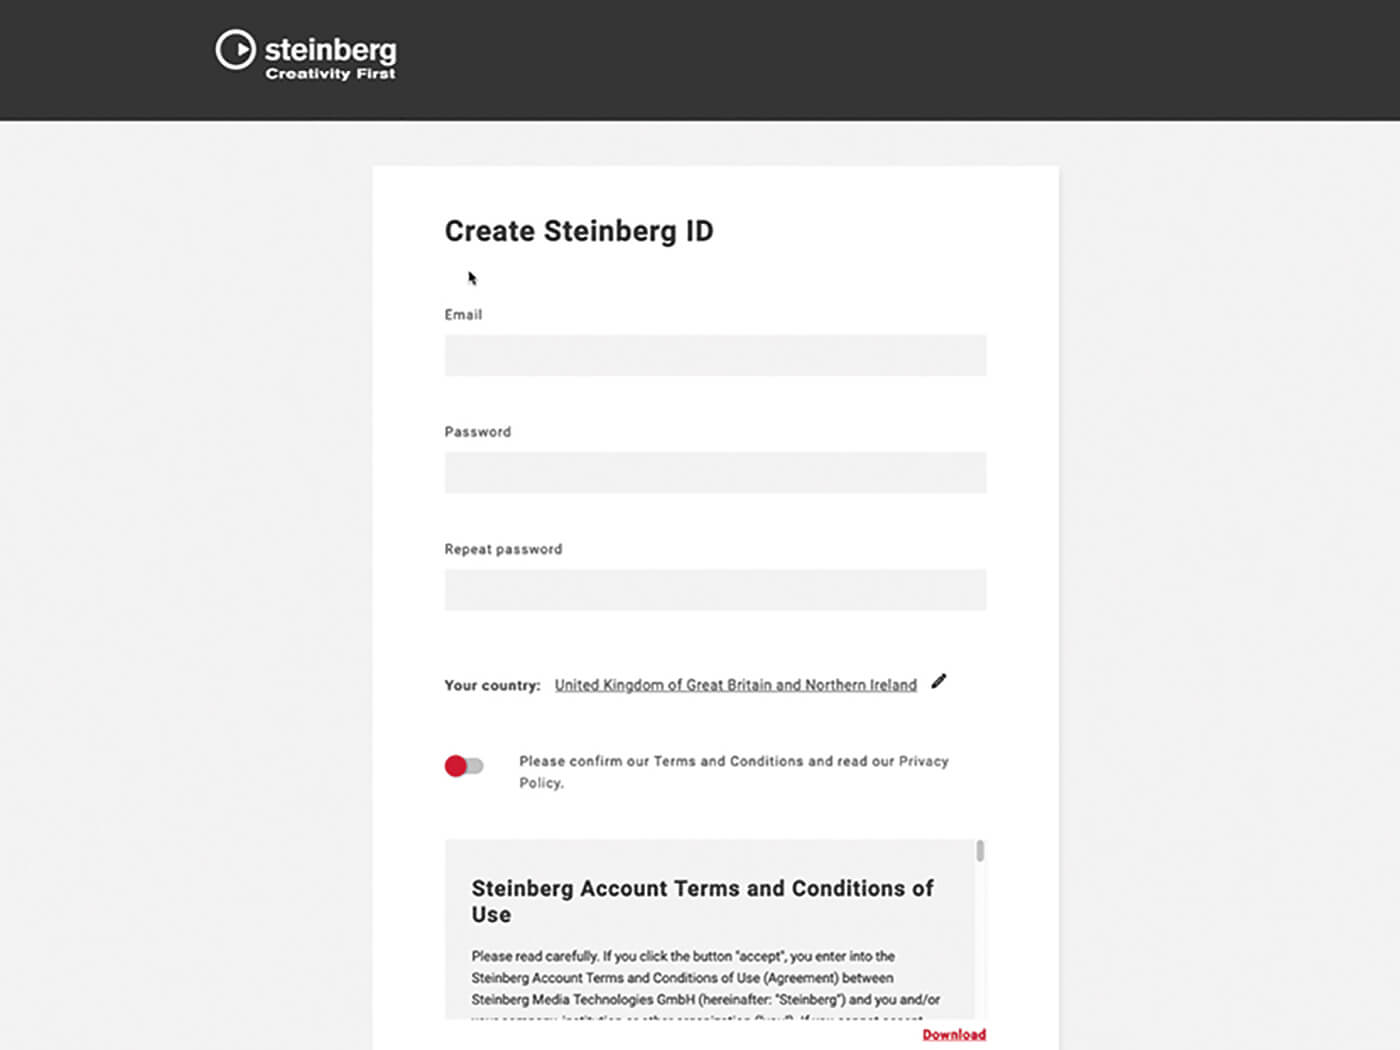
3. If you or your collaborator lack a MySteinberg ID, visit the Steinberg site, click MySteinberg on the main navigation menu, and follow the onscreen instructions to create and verify an account.
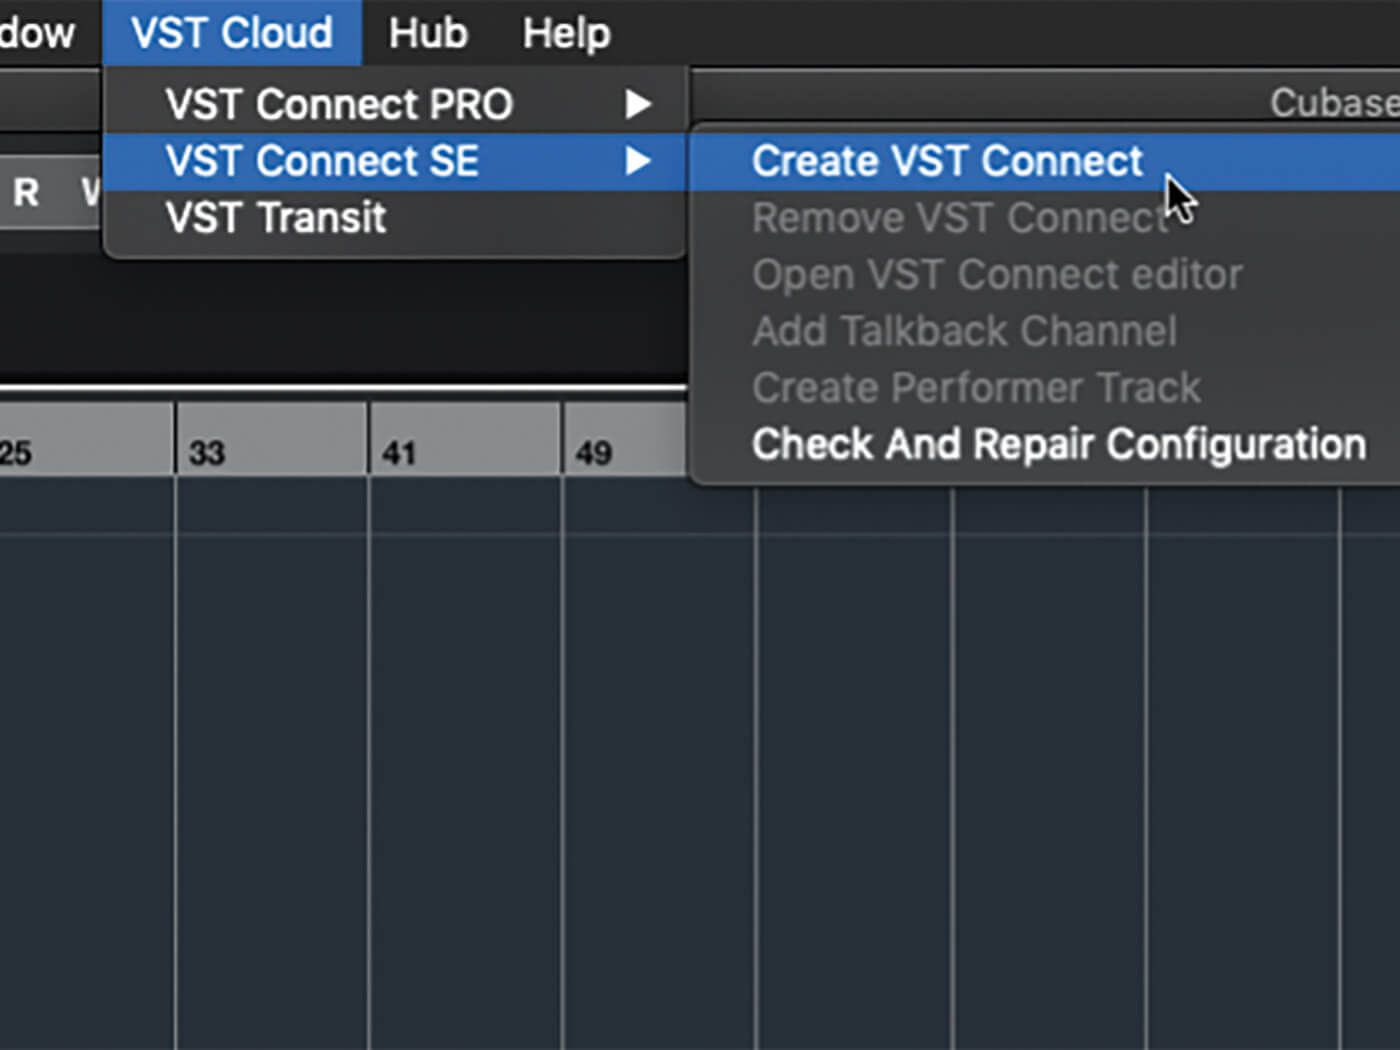
4. Launch Cubase Pro (or Nuendo). Open a project that you want to work on with your performer. Select the VST Cloud > VST Connect SE > Create VST Connect menu item. Ask your collaborator to launch VST Connect Performer on their computer or iPad.
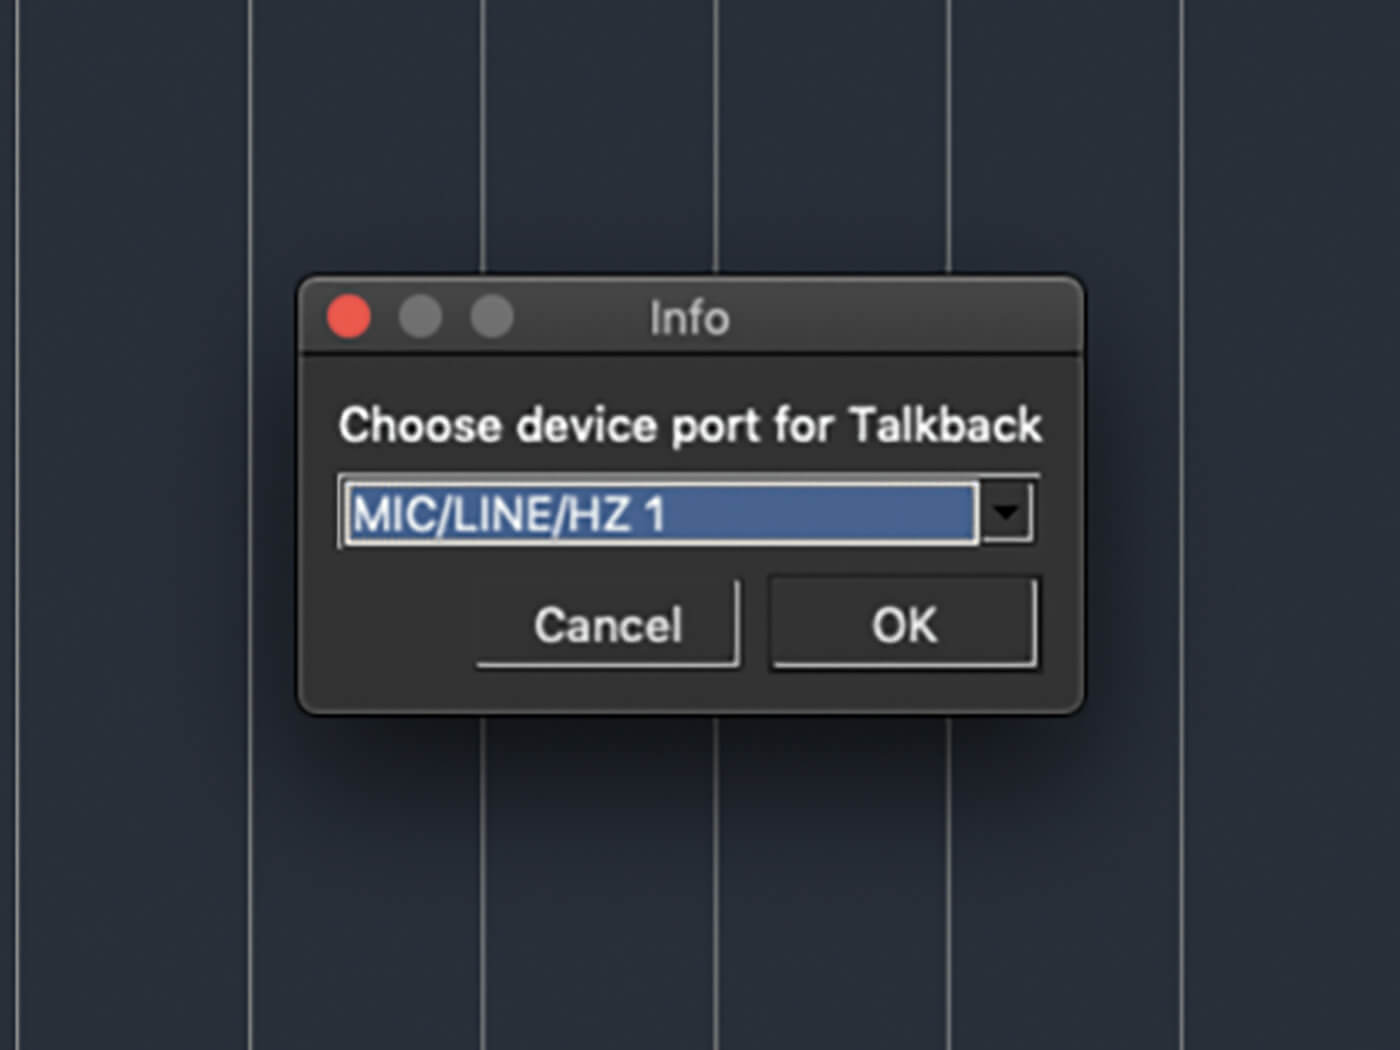
5. VST Connect SE and Pro make use of Cubase’s Control Room feature, which should be enabled automatically. You may be asked to specify the input that your talkback mic is connected to.
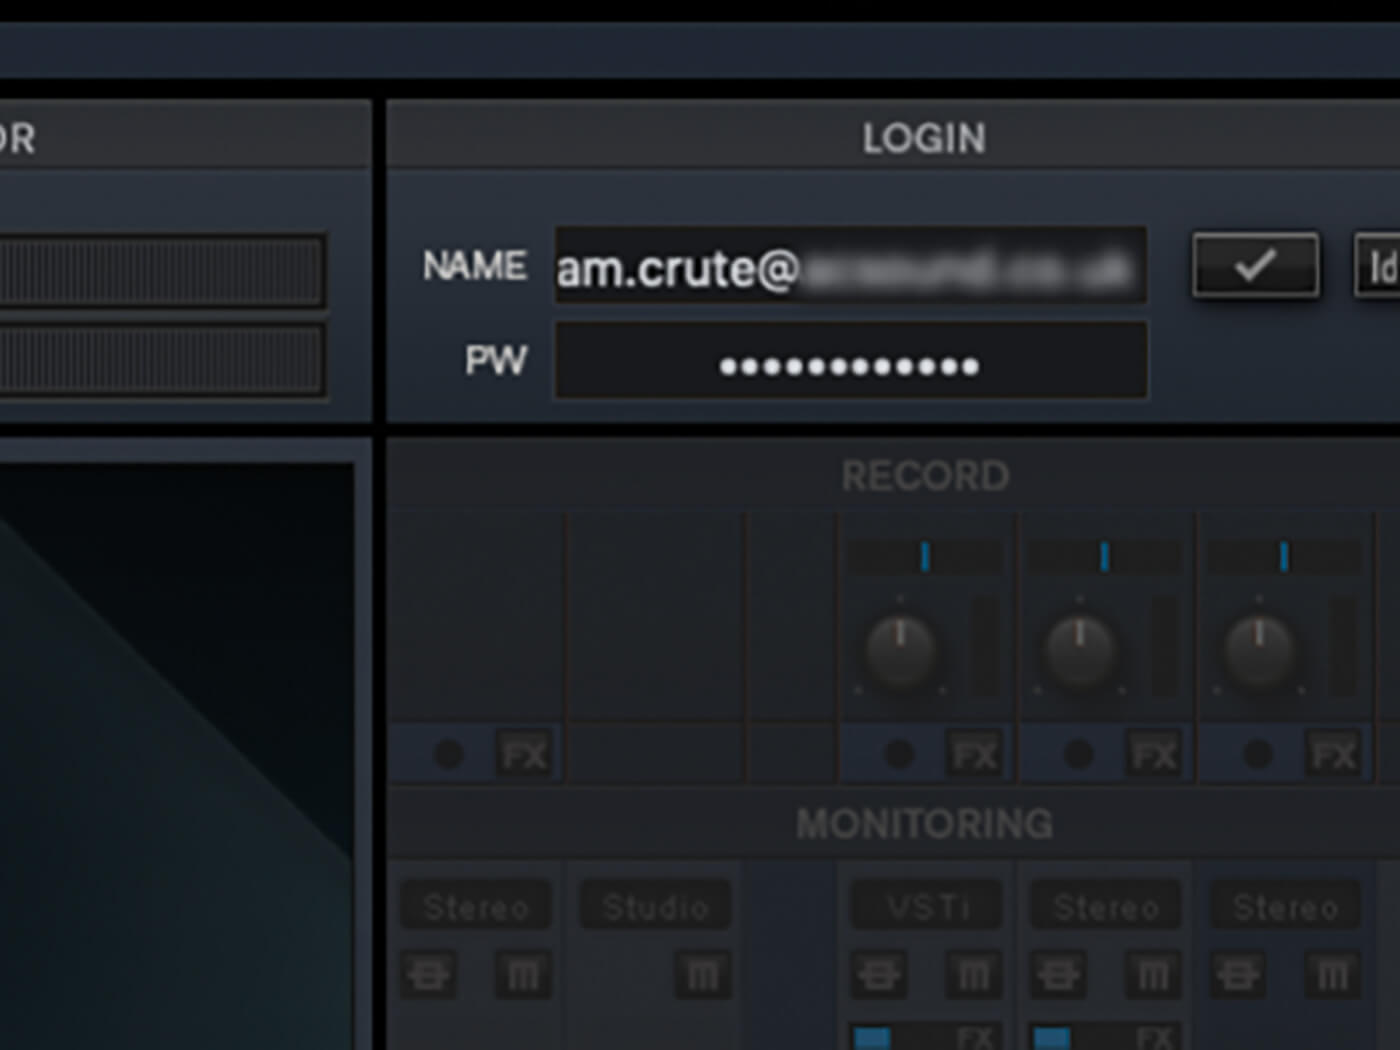
6. Enter your MySteinberg ID and password into the login panel of the VST Connect editor. The Performer app has the same panel, so ask your collaborator to sign in too.
![]()
CONNECT FOR LESS While VST Connect SE is built into Cubase and is sufficient for many purposes, the Pro edition is much more capable. It’s also more affordable – until the end of June 2020, Steinberg is selling it at half price. Snap it up for £64 and get connected.
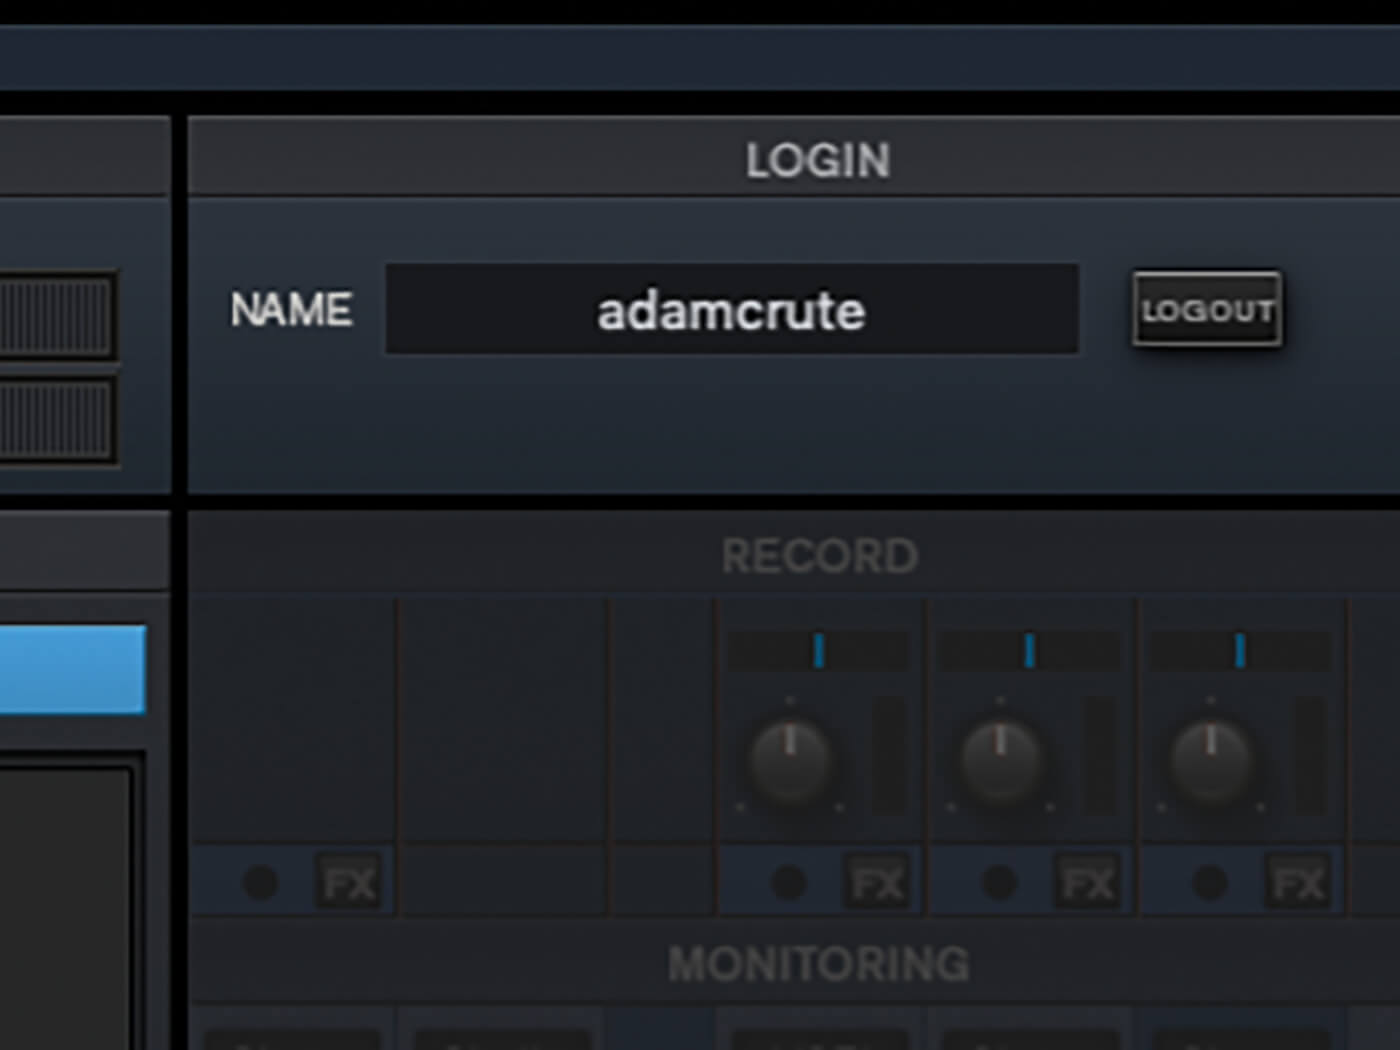
7. If you (or your performer) haven’t used Steinberg cloud services before, you’ll need to enter a username. This is the name that other VST Connect users will use to find you. It’s also publicly visible and cannot be changed easily, so choose wisely.
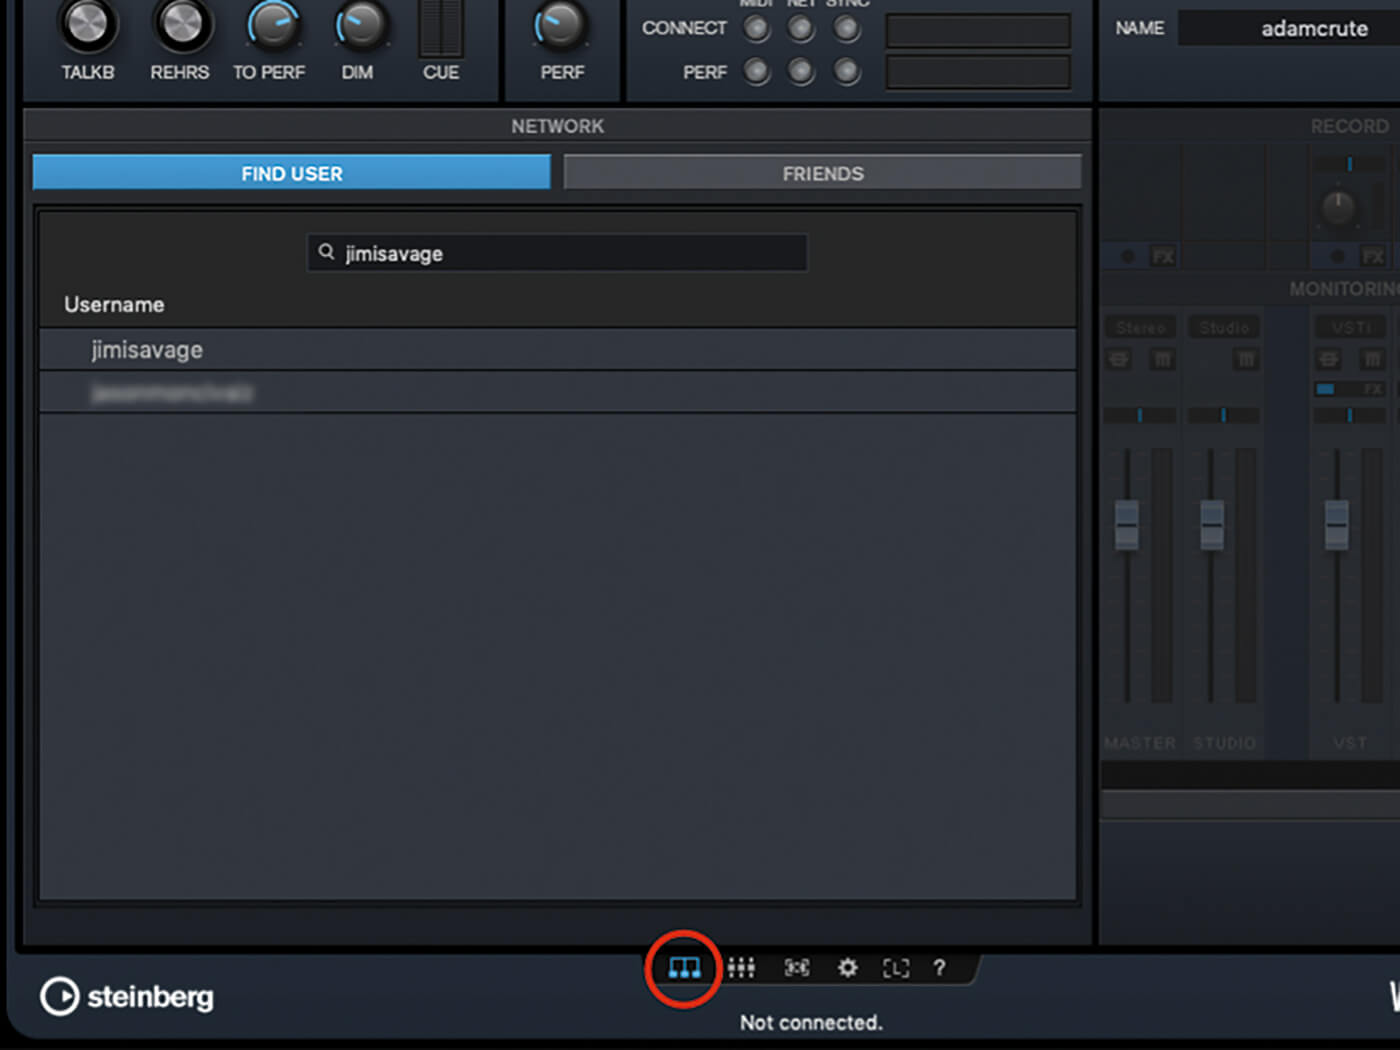
8. Towards the bottom of the editor panel is a series of icons that alter the view. Click the left-most icon and ensure that Find User is selected in the main area of the editor. Enter your collaborator’s username into the search field and hit enter.
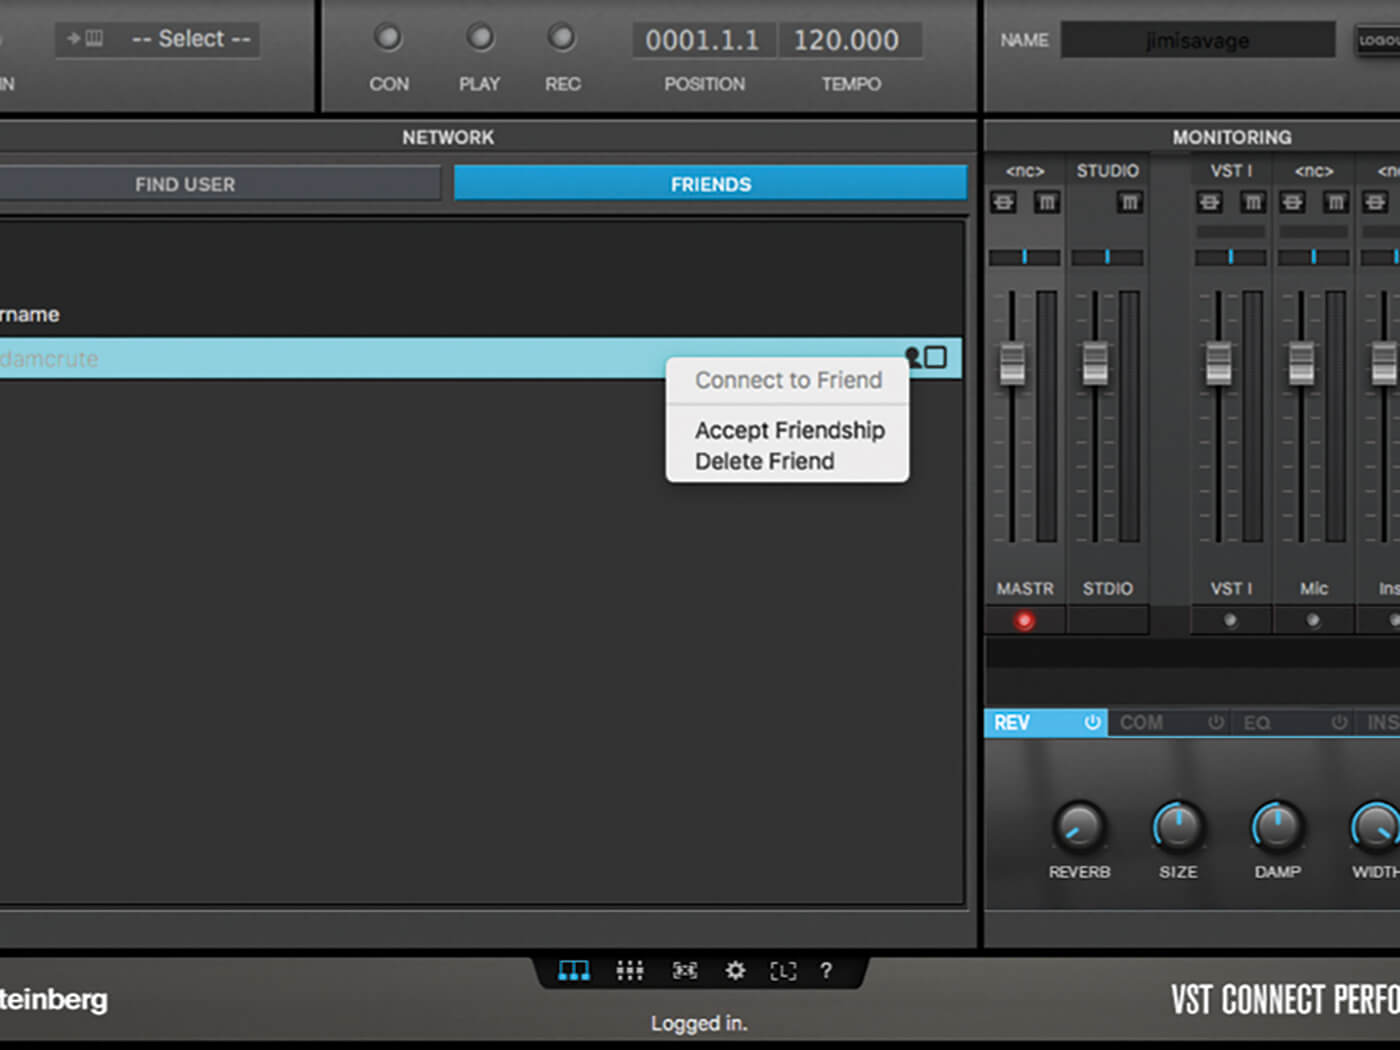
9. Find your performer’s name, right-click it and select Request Friendship. Your username will appear in the friends list of your collaborator. They need to right-click this and select Accept Friendship.

10. Once you’re friends, you’ll both appear in each other’s friends list and will be able to see when the other is online. To begin working with a friend, double-click their name in your friends list to connect.
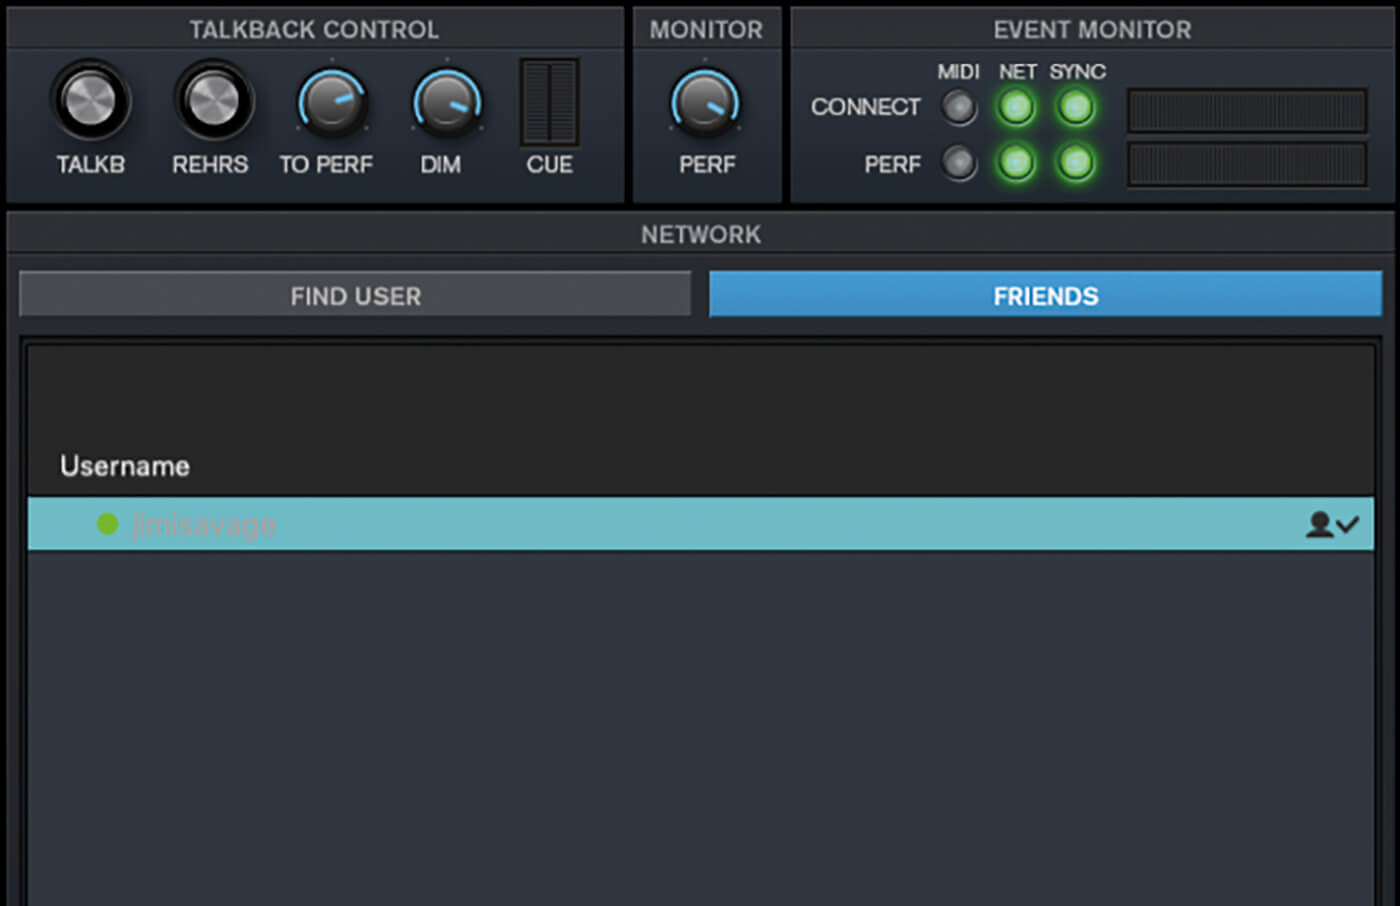
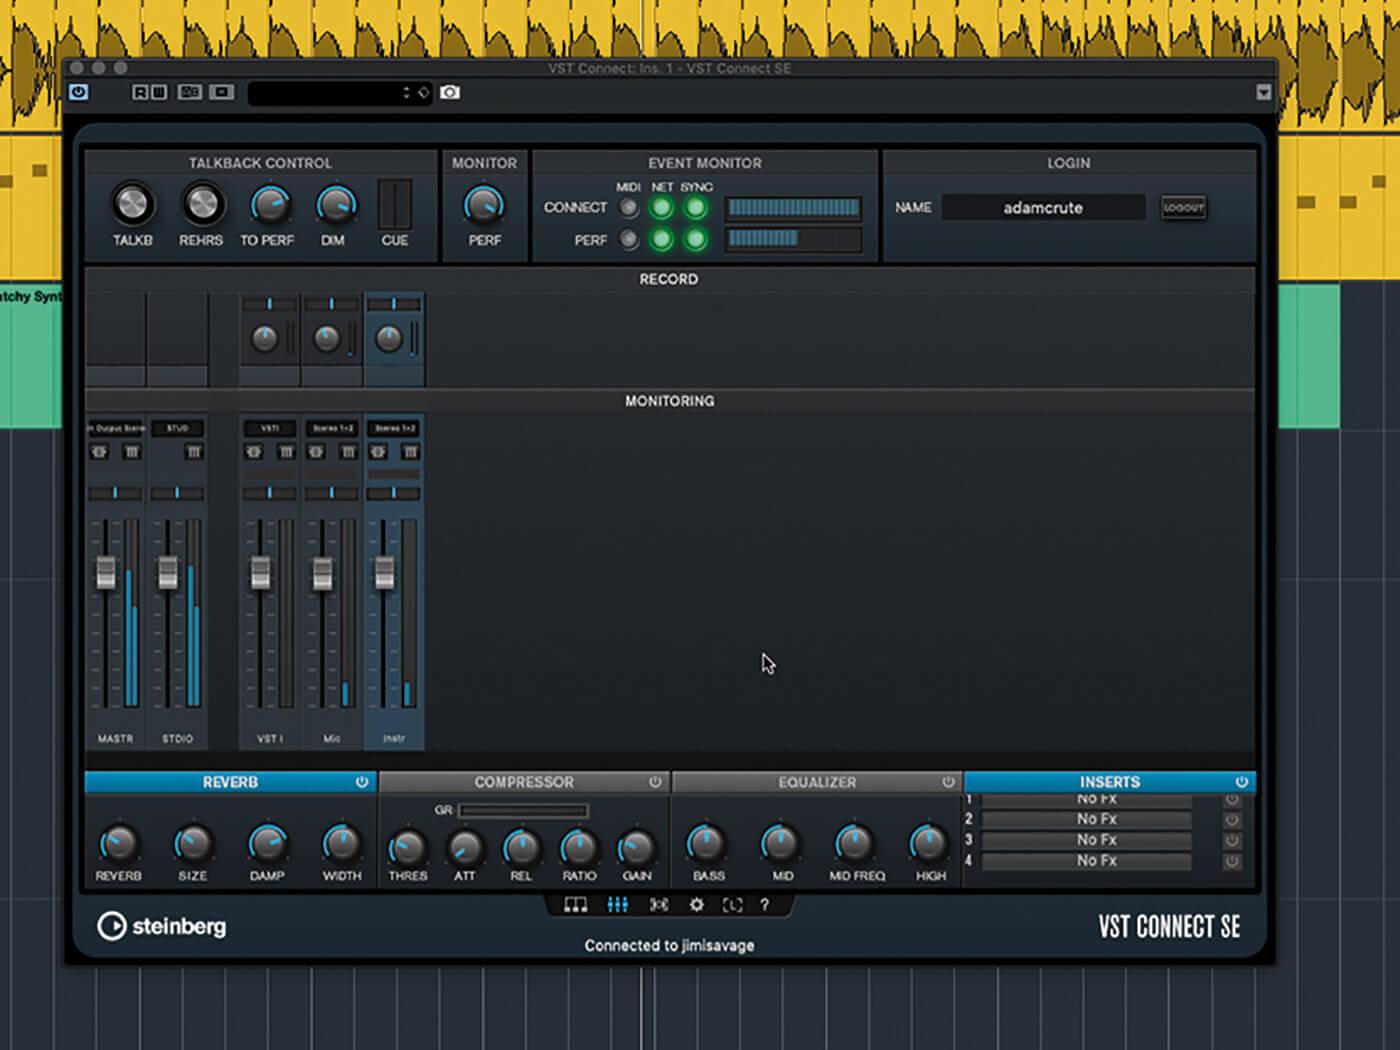
11. Once the connection is established, you’ll notice green lights in the Event Monitor section of the editor panel, and the panel’s mixer controls to the right of the friends list will be undimmed.
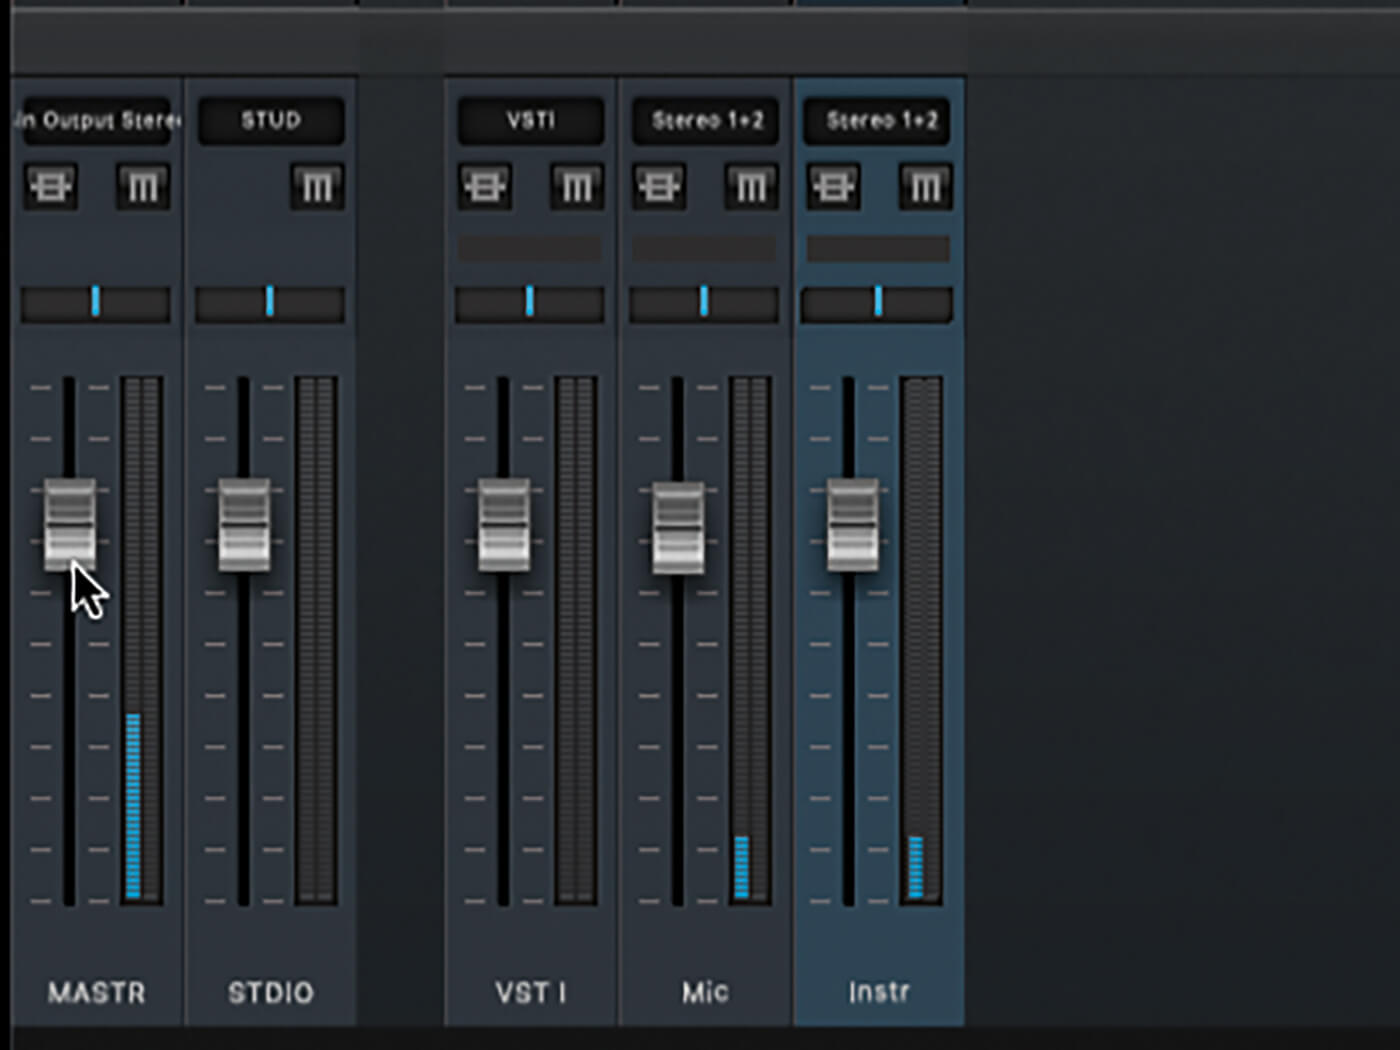
12. The monitoring section of the mixer controls the levels heard by the performer: Master allows you to adjust their main volume; Studio is the cue-mix monitor level; and VST, Mic and Instr are input-monitoring levels. These are remote controls for the Performer app mixer.
![]()
TALKING BACK Video link-up in VST Connect is optional, and depends on whether the computers used have cameras. Talkback, however, is essential. On the studio end, this is handled via Cubase’s Control Room, but the performer will need to hook up a mic too.
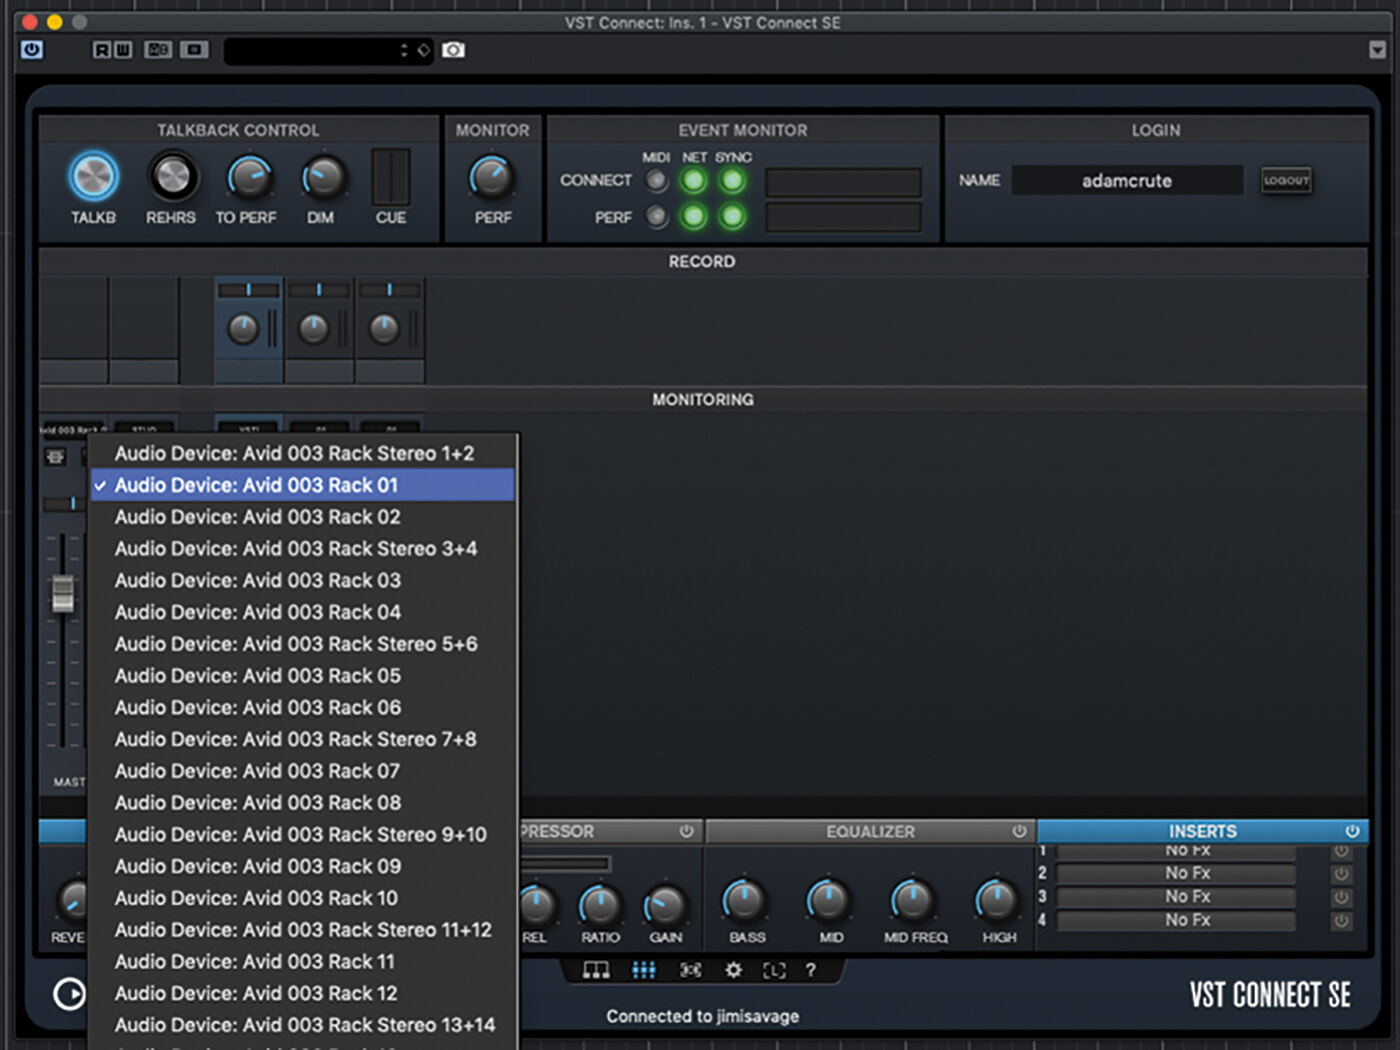
13. Use the mixer to select appropriate audio sources and destinations on behalf of your performer. These are accessed via the drop-downs at the top of each monitoring channel’s strip, and show the options available on the collaborator’s hardware.
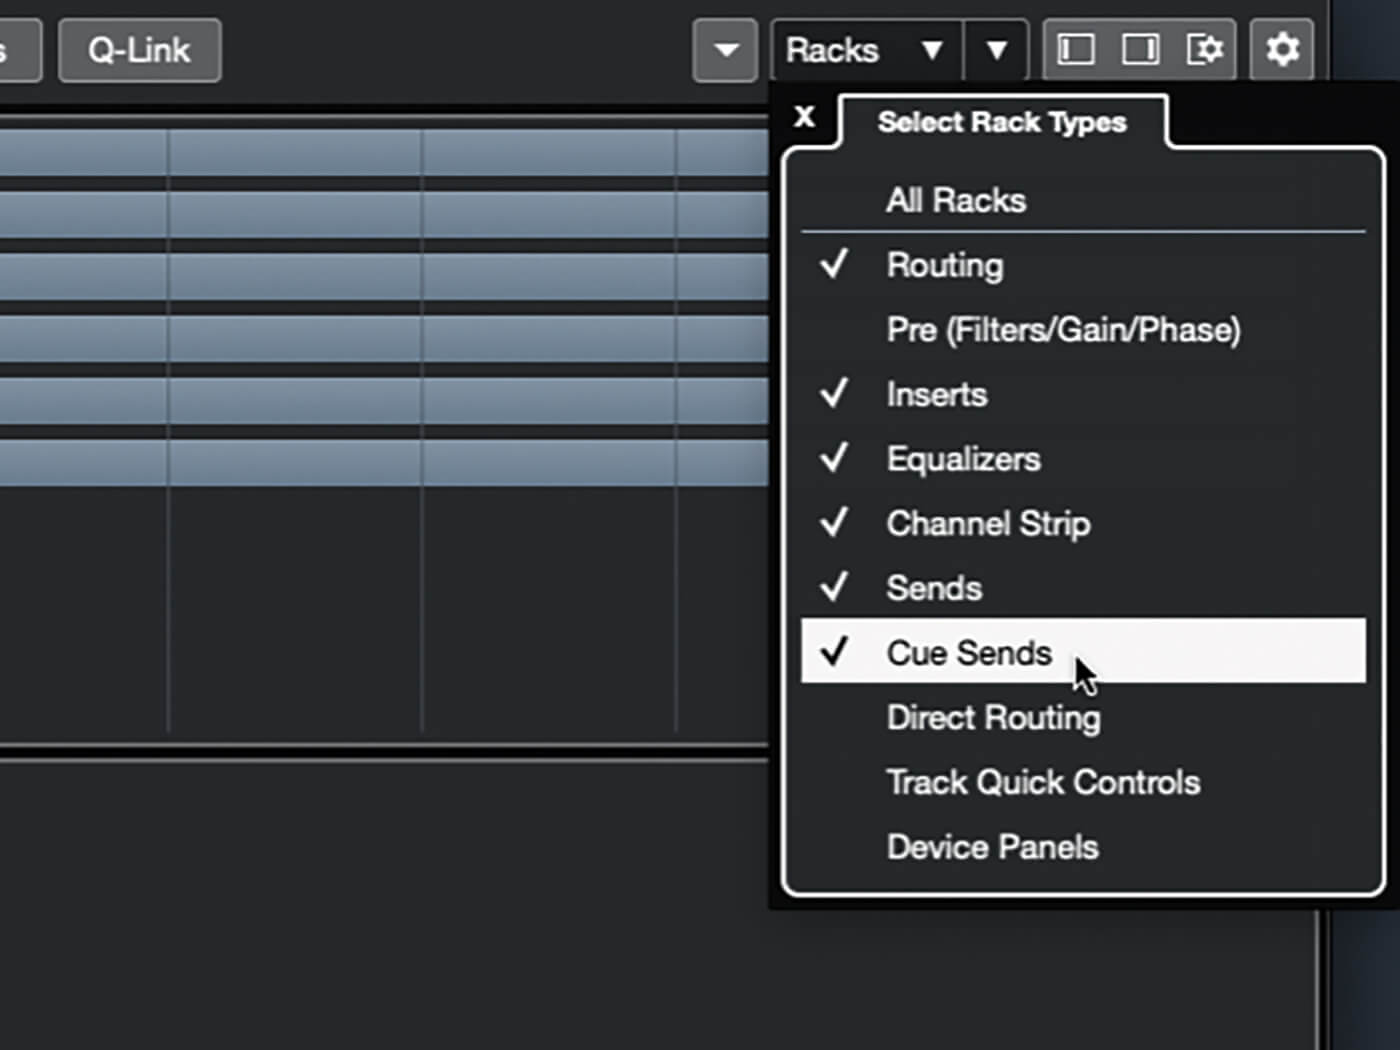
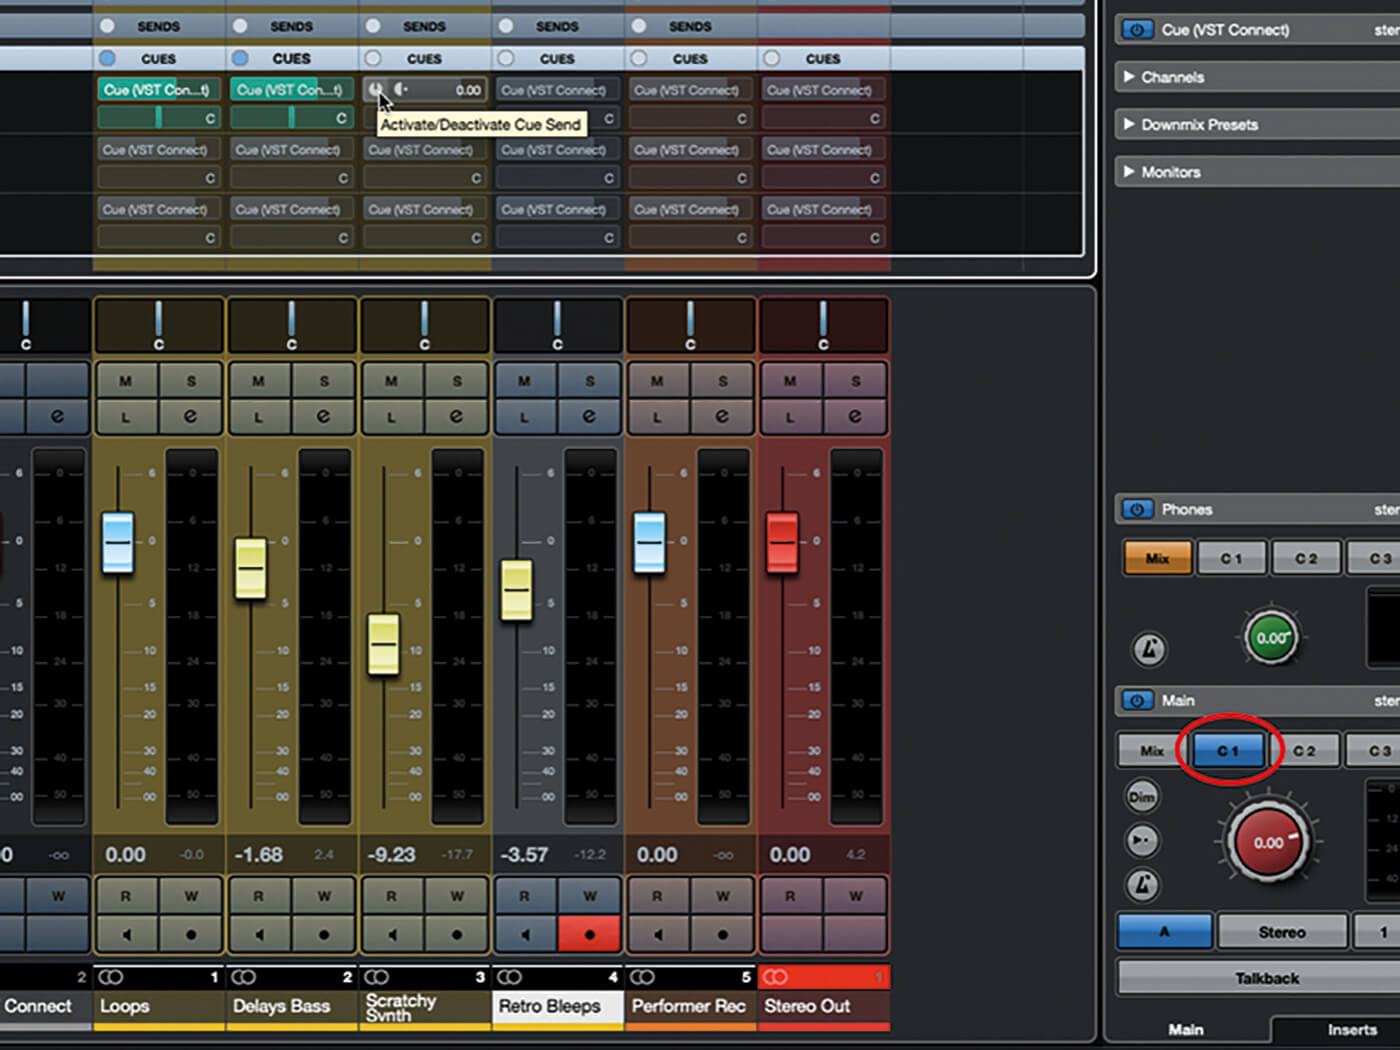
14. Cue mixes are sent to your collaborator via Cubase’s Control Room Cue send busses, so you need to set these up. Open Cubase’s main Mix Console window, open its Racks pop-up and ensure Cue Sends is ticked.
15. Expand the mixer’s Cues rack. Enable Cue 1 for each channel you want to feed to the performer and set its level. You can monitor the mix you’re creating by switching your monitor source to C1 in the Control Room panel.
16. Hit play – your performer will hear the mixed track playing and will be able to jam along so you can set recording levels, done using the rotary controls in the Record area of the VST Connect editor’s mixer.
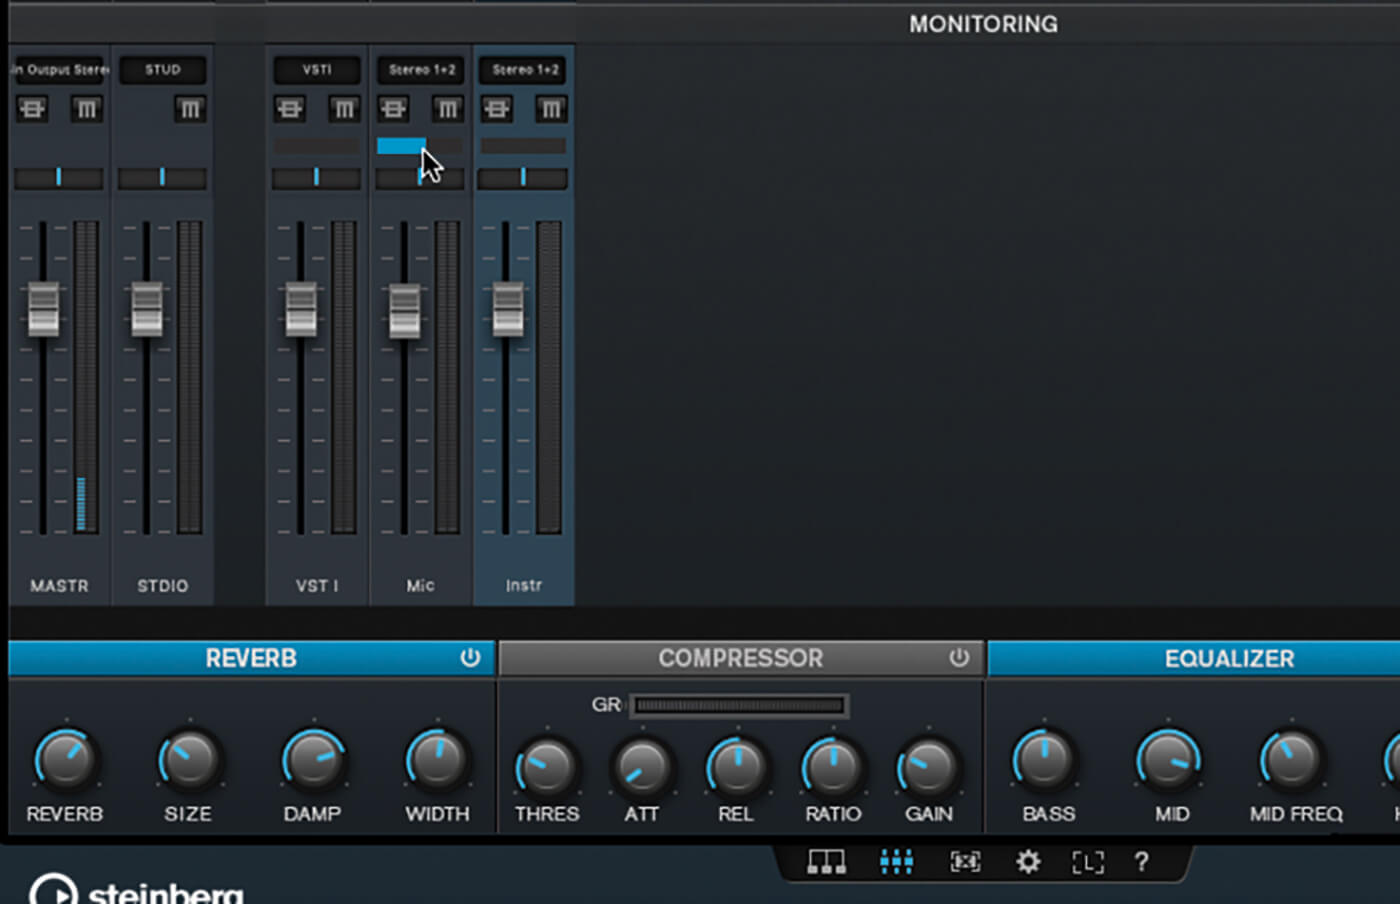
17. You should also set up some monitor effects, especially if you’re recording a vocalist. You can access the built-in effects and the insert points using the editor’s mixer page. Use the slider just above a monitor channel’s pan controls to set the effect send level.
18. The recording is routed to a track named Performer Rec but you can create other tracks to receive the remote audio by selecting VST Connect as the track’s audio source. Once you’re happy with all the levels, just start recording as you ordinarily would.
For more Cubase tutorials and workshops, click here.