Automating with Preview in Pro Tools
One of the great things about working in Pro Tools is that there is always more than one way to achieve what you want. We discover a new method of automating mixes at Metropolis Studios and bring you that alternative.
It doesn’t seem to matter how long you’ve been using Pro Tools professionally, there are always new ways of doing things waiting to be discovered. It may also be old features
that you’ve forgotten about, or sometimes simply a new way of using an old feature that suddenly changes everything for you.
That’s why, no matter how long you’ve been using the software, it’s still important to keep your eyes and ears open to new ideas. Sometimes these new techniques will come from a book or magazine article, or an online video, but more often than not, the ones I’ve found the most useful have come from other engineers. These are people like us, who are striving to always work in the best, most efficient way possible, to achieve great mixes every time.
Recently, I was chatting with Metropolis Studios engineer Liam Nolan, and he was eager to show me a new technique he’d been using on mixes, using the Automation Preview and Capture function to quickly go from a static mix to a fully mixed and automated track.
A change of scene
This method is commonly used among film and TV dubbing mixers, who use the technique to automate different scenes while editing to picture. It’s a method that enables the mixer to set up a basic mix for the show as a whole, while then creating completely different soundscapes for each scene, without being held up by the static mix.
When used alongside Copy/Paste Special, to copy and paste existing automation from one section to another, the Preview and Capture tools become even more powerful, one of many reasons why Pro Tools remains the go-to DAW for many of the engineers working in TV and film. These features aren’t just useful in dubbing, they are also great for music mixing and mastering, podcast editing or sound design.
Using the Preview and Capture tools in the Automation window (Ctrl+[4] (PC) or Cmd+[4] (Mac)) Liam is able to first get a static mix up in Pro Tools, then by using Preview mode he is able to alter the mix, making changes without writing these changes to the mix, quickly comparing any number of additional changes to his original mix using Preview suspend. Once he likes this new sound for any one section of a song, for example the choruses, he can highlight the section and write the new parameter settings to all the parameters across the entire mix, at once.
Liam can even go through each chorus until the end of the song, writing in the new parameters for each one with just a few clicks. This way he is able to quickly write automation for each part of the mix, working quickly to get sounds, without interrupting his creative flow with detailed automation writing.
A speedy workshop
In this workshop, I’m going to show you how to use the same techniques to speed up your mixes. I’ll make use of the Preview and Preview Suspend modes to quickly A/B all your changes at once. This method lets you make multiple changes to different plug-ins and channels all at once, without committing to writing the new settings, constantly comparing back and forth between the written automation and the Preview automation until you are happy.
This is ideal for scenarios where one automation change may mask another sound, forcing another change elsewhere in the mix. I was excited to learn this technique from Liam, and to bring it to you, and I’m looking forward to using it on all of my future mixes.
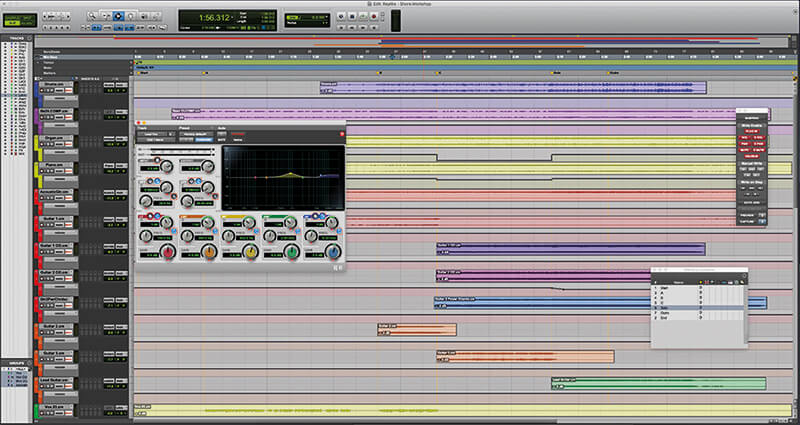
Shore it up
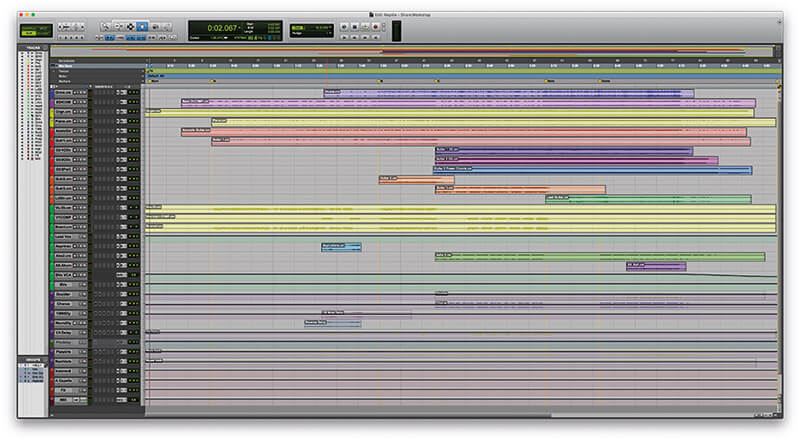
For this mix I have sub-mixed a mix of Reptile’s Shore into a more manageable project, using frozen channels for the effects sends, so that even if you don’t have the same plug-ins that I have, you can see what type of effects sends I have running. And if you do have the same plug-ins as I am using here, you could choose to unfreeze the channels and experiment with the sounds you can make with these.
The song has a fairly unconventional structure, with no obvious chorus included, but we can see how sounds from one section might still lend themselves to being used in another section, and how each section might want its own unique approach to the overall balance which, as we will see, can be quickly brought up using Preview mode, without altering the underlying mix.
Automating with Preview: step-by-step
1. I’ve prepared the mix by bouncing out committed parts for each of the channels to create a static mix. I’ve used the Freeze function on the effects sends, so if you don’t have the plug-ins, you’ll still be able to follow along.
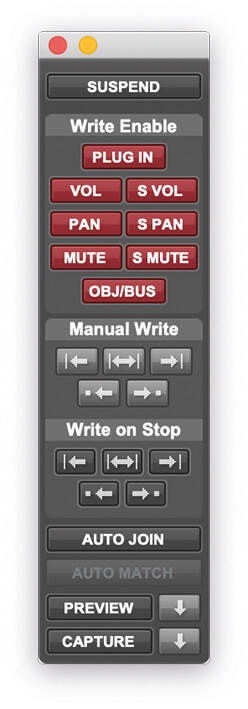
2. Bring up the Automation window by selecting Window>Automation, or clicking Ctrl+[4] (PC) or Cmd+[4] (Mac). Note that this has to be the [4] on the numeric pad of your keyboard, not the number keys.
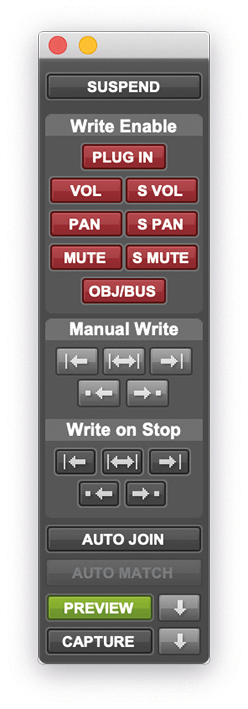
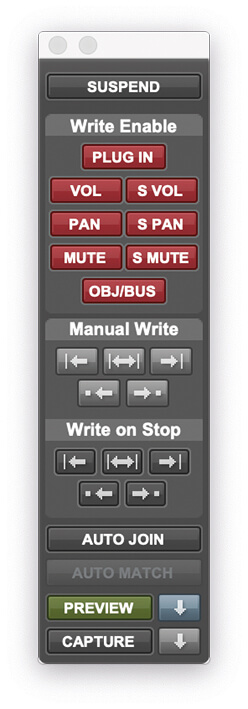
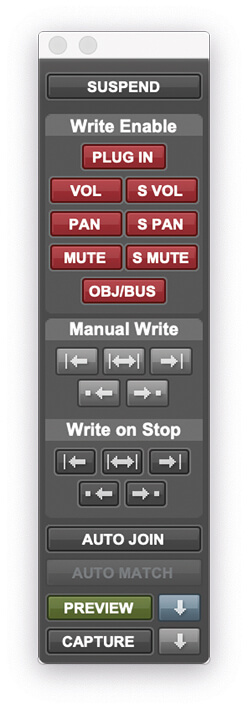
3. Before we start, we first need to enable the Preview mode in Pro Tools by clicking on the Preview button in the Automation window.

4. To use Preview Mode effectively, we want automation so enable Automation Latch mode on any channels we want to automate. Or simply hold Alt when selecting Latch mode and this will put all channels into Latch mode.
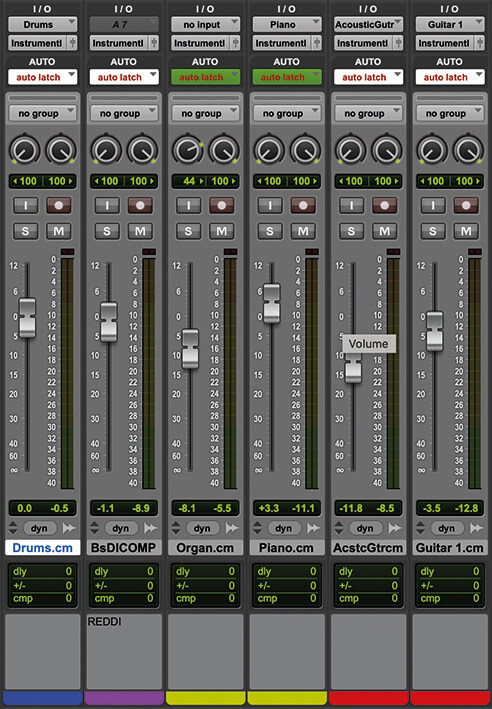
5. Pro Tools will continue to read automation, but any changes you make to the mix are not written, so you can try changes out. Try boosting the Organ and Piano in section C. Note how the Automation mode for those two turns green.
6. You can toggle between Preview and your current mix by Ctrl (PC) or Cmd (Mac) clicking on the Preview button. This puts Pro Tools into Preview Suspend mode, indicated by a darker shade of green on the Preview button.
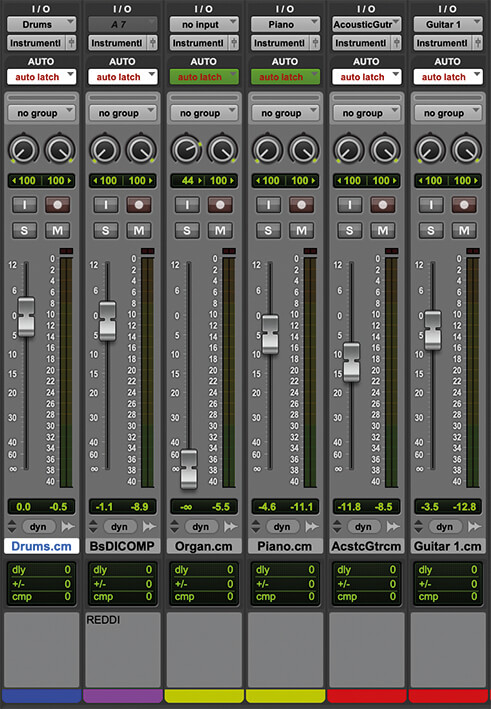
7. If you are unhappy with your changes, simply click the Preview button again to turn Preview mode off. It will wipe your changes. Enter Preview mode again to try another set. This time, cut the Organ or drop in the Piano.
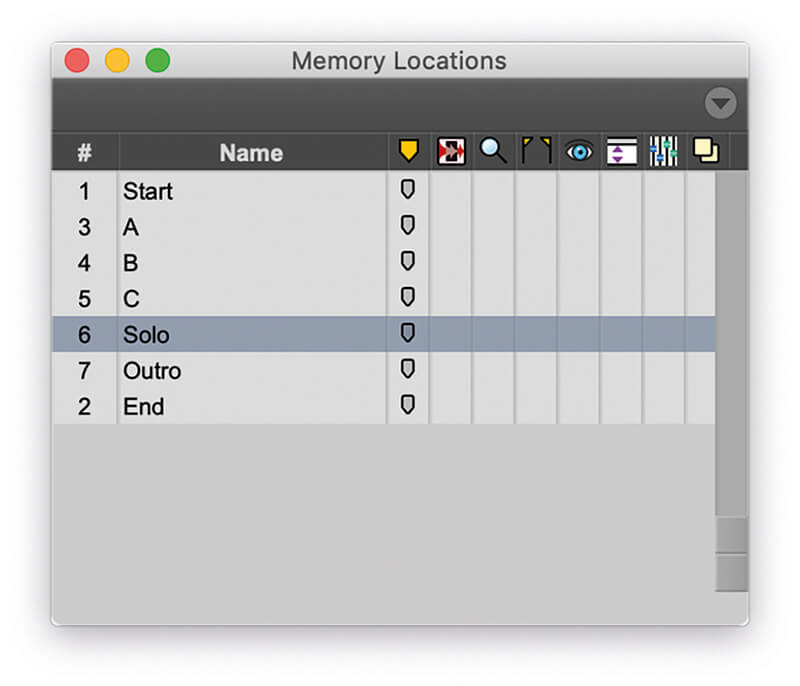
8. That’s starting to sound clearer, so let’s write that automation to the region. Highlight the region by using the Marker window, and clicking on C, then Shift-clicking on Solo.
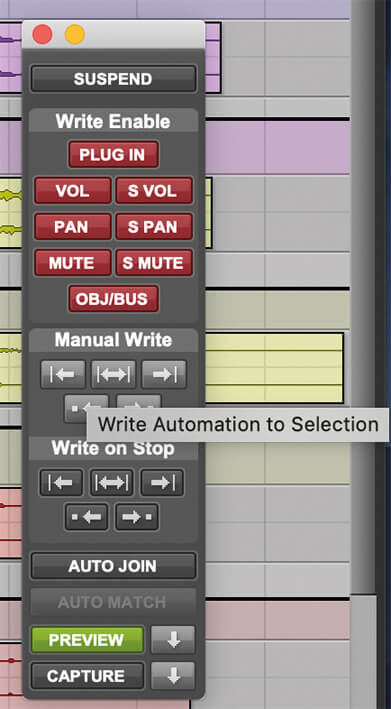
9. To write to the highlighted region, select the Write Automation to Selection button from the Manual Write section of the Automation window. This is the centre button with arrows pointing in both directions.
![]()
Useful Settings Several Preference settings are useful for using the Preview and Capture functions. In particular, we like to make sure Plug-in Controls Default to Auto-Enabled, Suppress Automation ‘Write to’ Warnings, and Allow Latch Prime in Stop, are all enabled.

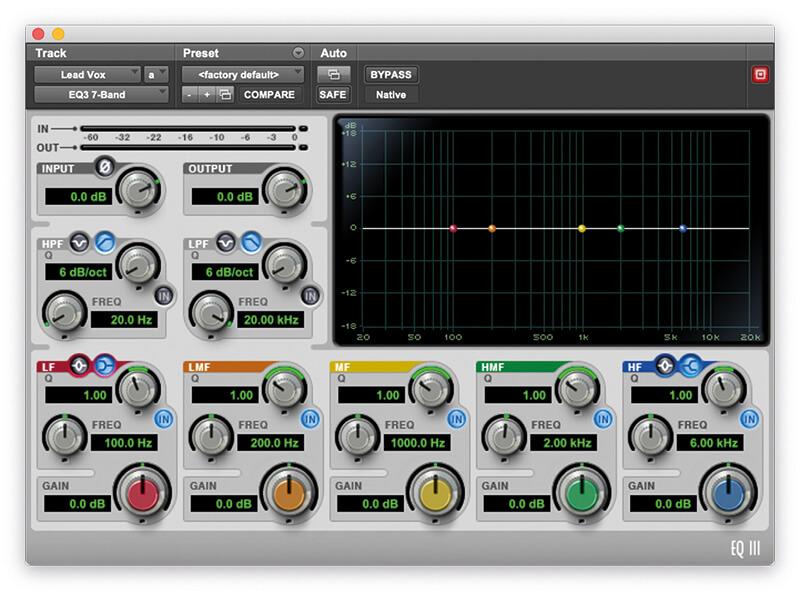
10. Preview mode works with plug-ins in much the same way as with volume or any other type of automation in Pro Tools. Now add an EQ to the Lead Vox channel.
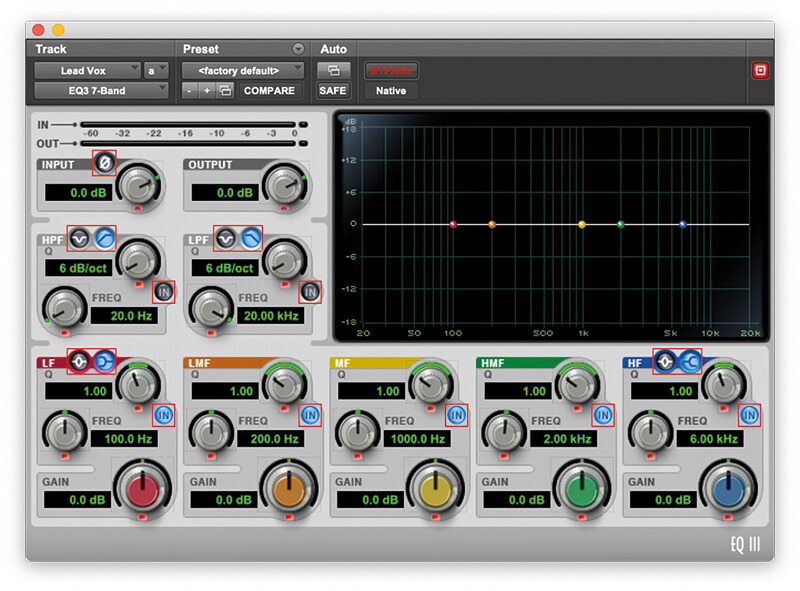
11. Before automating a plug-in, enable automation. Do this from the Plugin Automation Enable window in each plug-in, or hold Ctrl+Alt+Start (PC)/Ctrl+Alt+Cmd (Mac) and click on the parameter you want to automate.
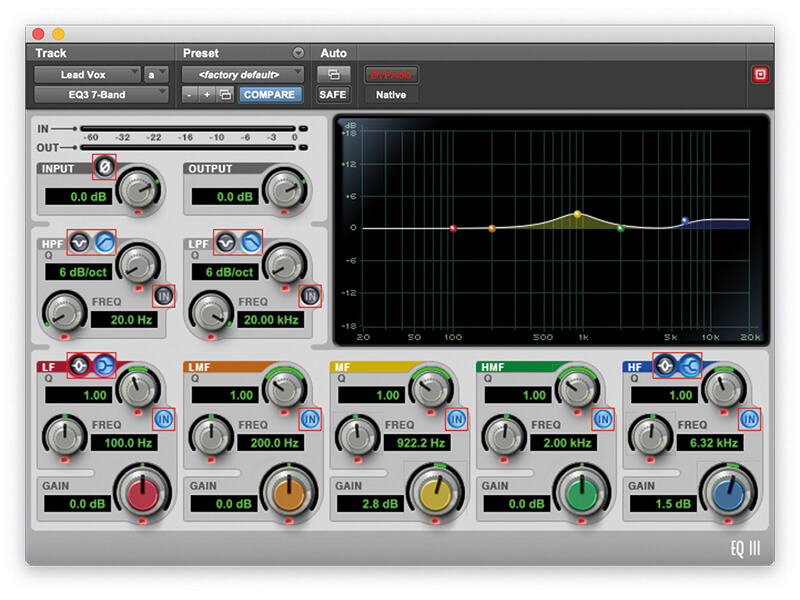
12. Enable all parameters (click the Plugin Automation Enable button). We’re happy with the vocal at the start, but want it to cut through as the track gets busier. Enable Preview again and tweak the EQ tone through section B.
13. Toggle the Preview mode on and off, using Ctrl (PC) or Cmd (Mac) while clicking on Preview to make sure your new EQ tone works. Preview mode will write to multiple plug-ins across multiple channels simultaneously.
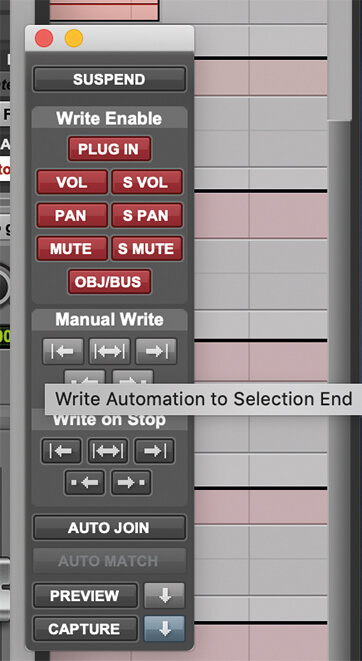
14. This time, rather than writing between a selection, we’re going to position the cursor at marker B, and use Write Automation to Selection End to write the automation to the end of the track.
15. Note that any automation already written on other channels, or active parameters that you haven’t adjusted in this Preview, remains in place, even if it covers the same region. So our fader rides from earlier are still there.

16. This method lets us make changes to one region and write the same automation to another. Use Preview to write an EQ change to the guitar part in the intro and then write the same automation to the outro.

17. The Capture button works in a similar way. When writing automation during playback (or in stop with Allow Latch Prime in Stop enabled), you can capture the automation state at any time by pressing Capture.
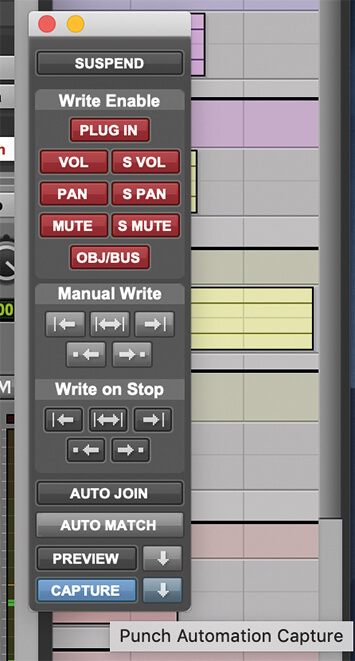
18. Skip to another part of the song and write that automation in with the Manual Write button, or by pressing Play and pushing the Punch Automation Capture button when you want the automation to be written.