Ableton Live Tutorial: Bass Design With Operator
Operator offers a great deal more than just FM leads and pads. Liam O’Mullane has the low-down in this Ableton Live Tutorial With the topic of issue 124’s lead feature being synths, we thought we’d show you around Live’s very own hybrid synth, Operator. Although its name comes from the FM synthesis-based term […]
Operator offers a great deal more than just FM leads and pads. Liam O’Mullane has the low-down in this Ableton Live Tutorial
With the topic of issue 124’s lead feature being synths, we thought we’d show you around Live’s very own hybrid synth, Operator. Although its name comes from the FM synthesis-based term for an oscillator, Operator can function both as an additive and subtractive synth. In fact, given the less than predictable nature of the alternative Analog synth (which is, of course, part of an analogue synth’s charm), we tend to reach for Operator to create any synth-like sounds when we want 100% predictability. On that note, we’ll look at it as a subtractive synth first to keep things simple while investigating its features.
Got ’rithm
The four divided sections to either side of Operator’s central display are called Shells. After clicking the bottom right-hand Shell this Global Shell will reveal 11 colourful algorithm symbols across the top of the central display. Although they look like the puzzle pieces from Tetris, they are in fact routing diagrams flowing from top to bottom.
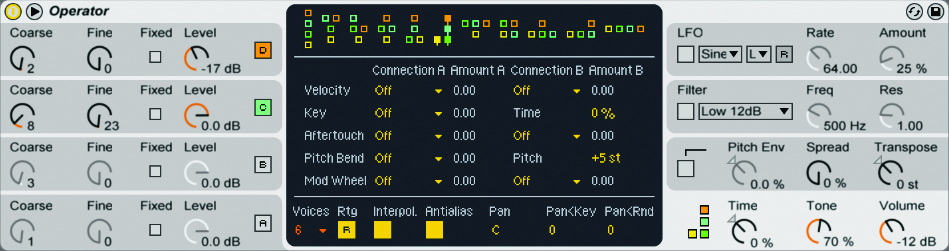
All of the algorithms apart from the very last one on the right are either FM-based or a mixture of FM and subtractive synthesis, so we need to click the horizontal shape on the far right. This represents each oscillator running in parallel to each other (ie, not modulating each other like an FM synth).
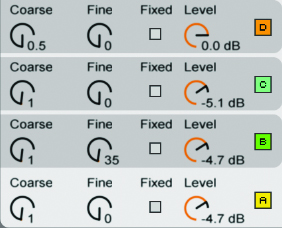
Operator’s four oscillators are the four Shells to the left-hand side. The Coarse parameter sets ratios of the input MIDI note, so if you’re playing a concert-pitch A3 and the first oscillator is set to a ratio of 1/1 you will hear A3 being played back. The technique of layering up a second oscillator an octave above the first can therefore be achieved by turning up oscillator B and setting it to 2/1. As some ratios are odd, like 3/1, there’s also a predefined selection of harmonics on offer. To tune an oscillator to a specific note, use Coarse to find the nearest note below the one you’re after, then use Fine to sweep up to the desired semitone. Although it’s named Fine, it offers a full octave range and isn’t limited to semitone adjustments as it’s calibrated in cents, making it useful for detuning oscillators to thicken a sound.
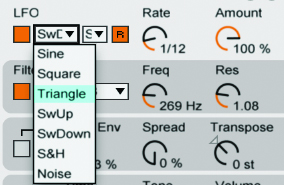
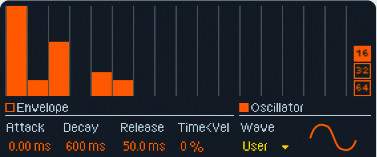
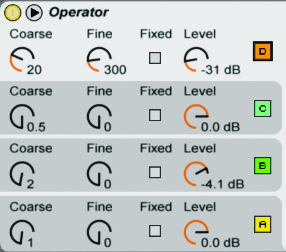
You can view either oscillator or envelope info at the top of the central display; oscillator type is available to the lower right. Let’s go through the layout by making a Reese bass. Select a Saw D waveform for oscillators A and B from the dropdown waveform list (see Image 6, bottom right). Set their Level parameter to 0dB and raise the Fine control for oscillator B up towards 25 cents. As long as you’re playing MIDI notes between C1 and C2 this should already be quite nasty-sounding. To give it more bottom end, raise the level of oscillator C but leave it set to its default sine wave as this pure wave is perfect for reinforcing your existing sound. Need even more weight? Raise the level of oscillator D and set its Ratio to 0.5 for a lower octave of sine power. Now re-balance the sounds using the Level control on each oscillator.
The LFO Shell to the upper right is set up by default to control the pitch for all oscillators via its Dest.A section. To give this Reese more of a Hoover-esque ‘rave’ stab tone, set the LFO waveform to SwDown (Saw Down) from the first pop-down menu. Choose Sync from the next menu (LFO Range) and set a Rate of 1 bar. Now raise the Amount while pressing keys higher than C2 to get that familiar descending Hoover bass.
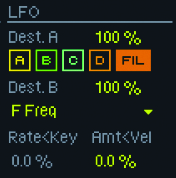
The LFO can be assigned to many other modulation destinations via Dest.B. In most cases you’ll want to disable its default assignment in Dest.B by clicking the A, B, C and D buttons. Although the filter cutoff can be assigned here, setting its Depth to 100% won’t move the cutoff from its minimum to full. A workaround to achieve a full-range cutoff sweep is to assign Dest.B to filter cutoff. With both assignments set to 100% and the LFO set to SwDown, you can achieve that tight and defined rhythmic modulation sound that has been recently made famous by the artist Datsik.
Returning to the Hoover-esque sound for a moment, you can get a more authentic upwards and downwards pitch change over time by using the Pitch Envelope in the next Shell down from Filter. With a positive setting between 10–50%, shape the envelope to create a medium attack slope and longer decay time.

Additive Approaches
If you move the mouse over the central display when an oscillator Shell is in focus you can draw in harmonic partials on the Waveform Editor. This is where Operator behaves like an additive synth, letting you decide which harmonics are present and at what volume. Try setting the harmonic amount to 16 (the uppermost block to the right of the Editor) and draw in a combination of harmonics. We’ve gone for just a few lower harmonics as this will be our bottom-end oscillator.
We’ve then edited oscillator B and right/[Ctrl]-clicked on the waveform display to set it to odd harmonics only. We can now create an upper frequency layer that has the odd harmonic characteristic of a square wave.
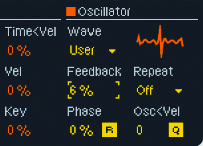
As we’re still using the subtractive synthesis algorithm – meaning that oscillators aren’t modulating each other – you can choose to feed back oscillators on themselves. Explore the Feedback amount below the oscillator-type menu. Harmonically rich oscillators are sensitive to this control so small amounts will make a big difference between distortion and noise. We’ve gone for 6% before the sound breaks up too much. This is now a sonically interesting layer that we can modulate.
Perfect Harmony
Each oscillator has an envelope that modulates its level like any normal synth, letting us slowly introduce this higher harmonic layer with a slow attack stage. These two oscillators alone – with a little vibrato from the LFO – can create a nice, organ-style bass that gains a harder edge over time.

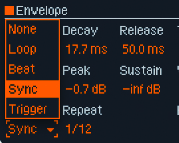
Envelopes can also be looped for creating rhythmic modulation shapes. The bottom right of the oscillator’s central display has a Loop pop-up menu: select Sync, then set Repeat to 1/12 for a triplet feel.
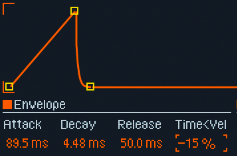
As long as Live’s main transport is playing, the envelope will now begin to repeat. Just make sure that the envelope’s shape is short enough so it can be heard changing before it loops around again. Experiment with the Time<Vel amount to the right of the envelope’s Release amount as this will shorten or lengthen the envelope duration via MIDI note velocity. A negative value will shorten the duration with lower velocities, which makes sense to us when playing expressively from a MIDI controller.
Frequency Modulation
Of all the available algorithms, the backwards-shaped ‘L’ is the most relevant for getting started with FM for creating bass parts.

The bottom part of the L holds the two oscillators you hear directly. The block colours correlate to the oscillator colour, so here, oscillator A in yellow is on its own, without any other oscillators above it. This means that no oscillators above are there to modulate it, so it’s a subtractive oscillator. We’ll use this for a bottom-end sine wave.
Oscillator B, however, has two other oscillators wired into it in series. The pitch of oscillator D at the top will modulate oscillator C, then the resulting sound will be used to modulate oscillator B. In simple terms, oscillators D and C are acting like an LFO to the pitch of oscillator B, but the rates are very fast (in the audible musical range) so the rate is fast enough to add new, audible pitch changes to oscillator B.
With oscillator A remaining at a Coarse ratio of 1, raise the Level to full for oscillator B after setting its Coarse ratio to 2. You’ll now have two sine waves an octave apart. Next, increase the Level of oscillator C and you’ll start to hear a dramatic change to oscillator B’s output. Change the Coarse ratio to be lower and you’ll hear a watery, super-fast tremolo effect; move it upwards and the sound will become increasingly metallic in tone. Now explore the Level control to hear how this acts more like a timbre control than a simple fade-in and out. Using this oscillator’s envelope for Level control or the LFO suddenly opens up a lot of drastic tonal change. Welcome to the wonderful world of FM synthesis!
Know Your Limitations
FM can create some incredibly high frequencies – so high, in fact, that they reach the limitations of the device’s sample rate. These are pushed back into the audible spectrum in a non-harmonically related way – this is called aliasing. When set up correctly this can create dense clusters of information, which is great for cymbal sounds, bells and anything else that isn’t particularly musically tuneful. For bass, try copying these settings with only sine waves to shape the aliasing effect into a vowel-like sound.
Down and Dirty
FM synthesis can also generate some really nasty bass tones if you carefully tune each modulator by ear to create a non-harmonic that has a slightly discernible pitch. This time we’ll use the very left algorithm to create a layer for higher frequencies that we can run in parallel with a sine wave from another instance of Operator for the low end.
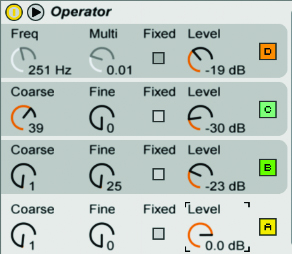
The first thing to do is to choose an interesting waveform for oscillator A as this is where your sound begins. We’ve gone for the SW8 wave (saw wave) to provide a bright sound, then we’ve chosen an odd-harmonics-based sound for oscillator B with the Sq8 wave. This creates a very demonic beehive-type of sound when detuned a little and applied with a low Level. We’ve then added a sine very high up in the register with a ratio of 39 to create a very high, buzzy tone. Finally, to lose a little definition we’ve added a noise oscillator for D and applied it very lightly.
Of all the options here, FM needs to be approached with some restraint, adding one oscillator at a time as it’s very easy to go from a solid, desirable sound to something that’s just fatiguing to the ear. So take the time to switch oscillators on and off as you go, checking that you’re not going too far. Then, when you’ve made a sound, explore switching algorithms as this can often yield some very surprising results.