Beginner’s Guide: Everything you need to know about microphones
We’ve looked at the core of your studio, the computer and the main software it uses. Here, we explore the key recording tool: the microphone.
The humble microphone is very much the start of the recording process. It’s what goes into the musical pot – the raw ingredients; whether that be a voice, a drum, a guitar or an orchestra. A microphone can also be described as similar to, and actually the opposite of, the endpoint of the production process: the speaker. The former takes in and records the vibrating sound particles; the latter spits them back out the other side in a similar manner.
Both use similar components – a diaphragm in the mic that records the vibration and a diaphragm in the speaker that causes the vibration. So music production, on a very basic level, can simply be described as a human being manipulating particles between a couple of vibrating diaphragms. And you thought you were getting into something quite glamorous, right?
Since microphones are the starting point in the audio chain, they’re arguably the most important part. Actually, let’s say definitely the most important item in the audio chain (warning: we will be saying this about speakers in another article, too!). This is because it’s always best to get your recorded source to sound as slick as you can. Capture a beautiful recording and you’ll need to do less to it down the line in the mixing process. Capture a bad one and you may not be able to salvage it.
Yet when we’ve asked producers we’ve interviewed the best way to capture the best guitar/vocal/drum, they inevitably reply: “Get the best performer.” So it turns out that the human being making those particles vibrate could be the most important part of the chain…
Microphone types
Okay, here’s the science bit. We’re going to divide our mic types up into two broad types. The first is called a dynamic microphone. These use a wire coil, a magnet and the aforementioned diaphragm. Sing into it and the air particles you shift as pressure waves will vibrate the diaphragm, which will move the coil backwards and forwards.
This generates a current by way of electromagnetic theory that represents your sound in electric form. If you then put an amplifier on this signal, send it to a ‘reversed’ version of a dynamic mic – a speaker – the signal is then converted back from a now-larger current to a bigger vibration, which moves more particles to give you bigger waves and a bigger sound. There. We’ve just explained the science behind singing into a karaoke system in just 100 words.
Dynamic mics are the essentials of the mic world. They are simple, very useful, often cheap, require no extra power and you can record a whole variety of instruments with them. They are also sturdy and can handle big sounds, so you’ll tend to see them used as live mics – the trusty Shure SM58 is a ubiquitous live vocal mic, and you’ve definitely seen it before.
Next up are condenser mics, which are sensitive and fragile compared to dynamic mics and tend to record a lot more detail. They have two plates that act like an electrical capacitor that stores charge. One of the plates is fixed and the other one moves, so generates differing charges depending on the depth of the sound pressure wave hitting it. This process requires external power – a battery or phantom power – which is often generated from a mixer or interface that you plug the mic into.
Condensers tend to be able to pick up a lot more detail than dynamics, but they don’t like loud sounds so much. Think of them as nuanced and sophisticated – maybe like cats. Yes – cats for condensers, dogs for the bigger and slightly dumber dynamics. Yes, that’s good. We’ll use that.
There are several other mic types based on these cats and dogs. Ribbon mics capture sound in a similar way to dynamics. Whereas dynamic and condenser mics record changes in pressure, ribbon microphones respond to velocity. They have a very thin film of electrically conductive material – called the ‘ribbon’ and often made of aluminium – that is placed between two poles of a magnet and moves in response to the sound.
It’s a similar process to the dynamic mic, but the ribbon is a lot more sensitive and has more freedom to move and respond than the more rigid diaphragm used in a dynamic mic. This means ribbon mics tend to be the best at capturing everything, yet don’t capture so much noise, as they are more focused on what is coming from the front or back, rather than the sides. They used to be the more expensive and more fragile option – at one time, you only had to say ‘boo’ to a ribbon and it would run off crying – but newer models have become more sensibly priced and a little more hardy.
Other mic types include tube mics, which are essentially condenser mics with valves to give you added warmth. Back-electret mics are condenser mics with a back plate that has a permanent charge that dissipates over time. They are more robust than a condenser but just as sensitive, so give a better performance than a dynamic. Finally, we have several mics that are designed for both USB connectivity and iOS – many of which are ideal for podcasting.
Anatomy Of A Microphone
A classic dynamic
The Shure SM58 (pictured below) is one of the most popular dynamic mics out there.
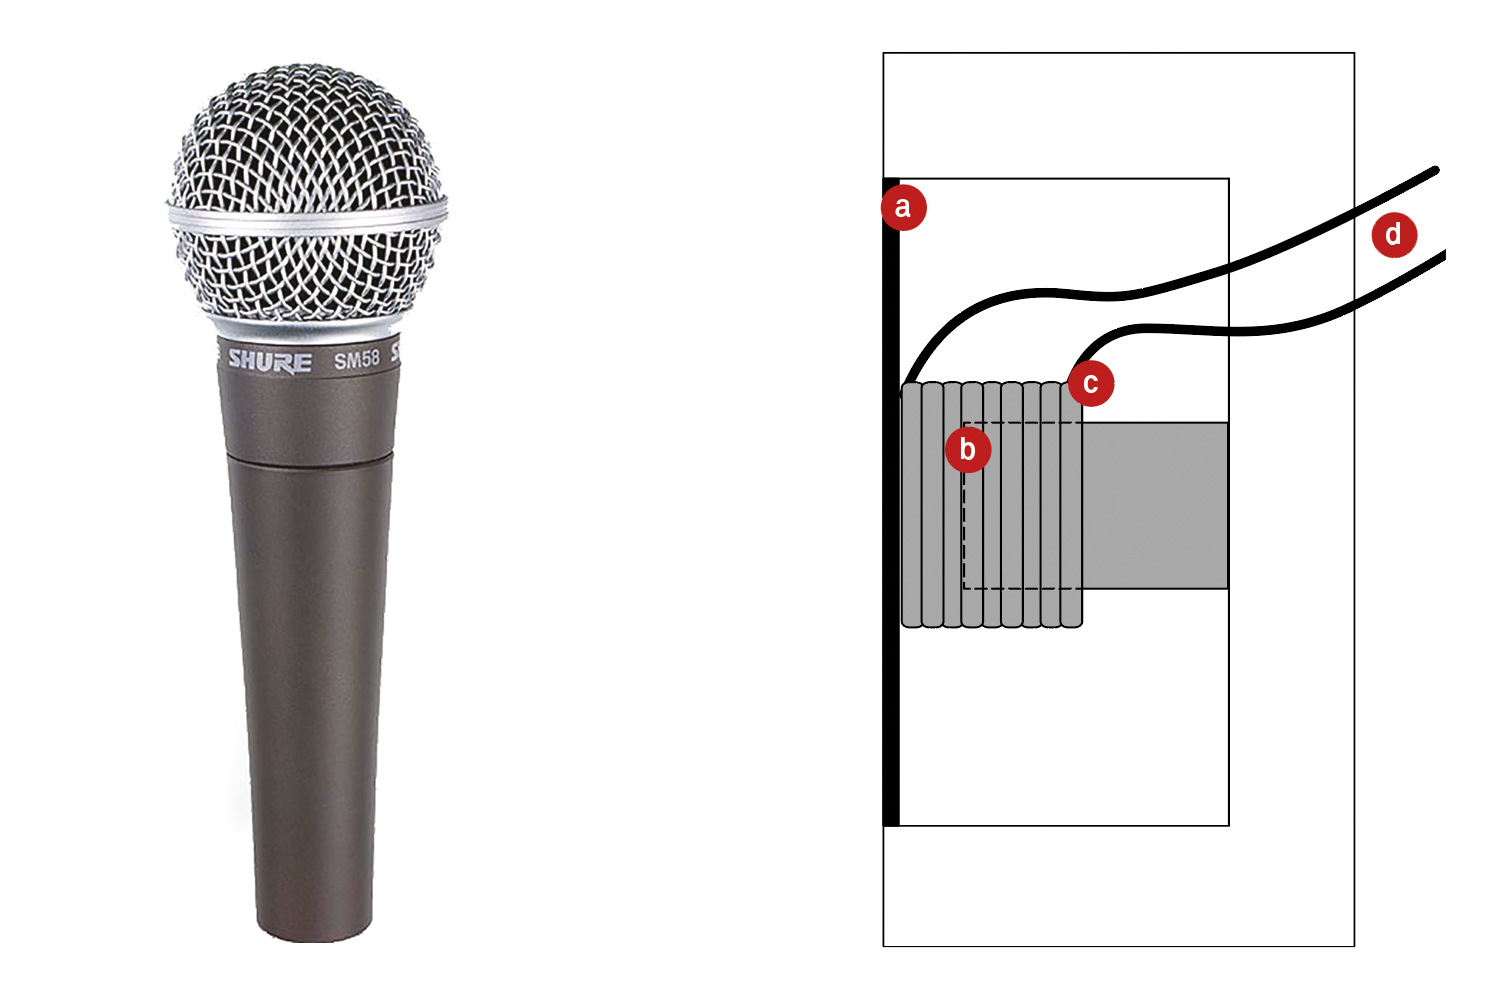
Dynamic microphones (above)
Sound waves move the diaphragm (a) which then causes the coil (b) to move right and left over the magnet (c) which, by way of electromagnetic induction, generates a current (d).
A backwards speaker (above again)
Now look at the image and process again, in reverse: a current, in conjunction with the magnet, moves the coil, which in turn moves the diaphragm – and suddenly, you have a loudspeaker on your hands.
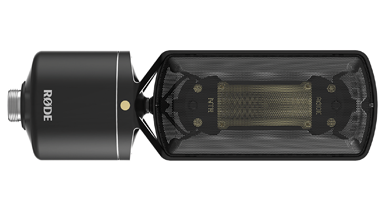
Condenser microphones
In this instance, there’s a backplate (e) that is charged – so a condenser system requires a battery or phantom power. Again, the diaphragm is moved to varying degrees by the soundwave, which changes the capacitance of the circuit and therefore generates an electrical signal.
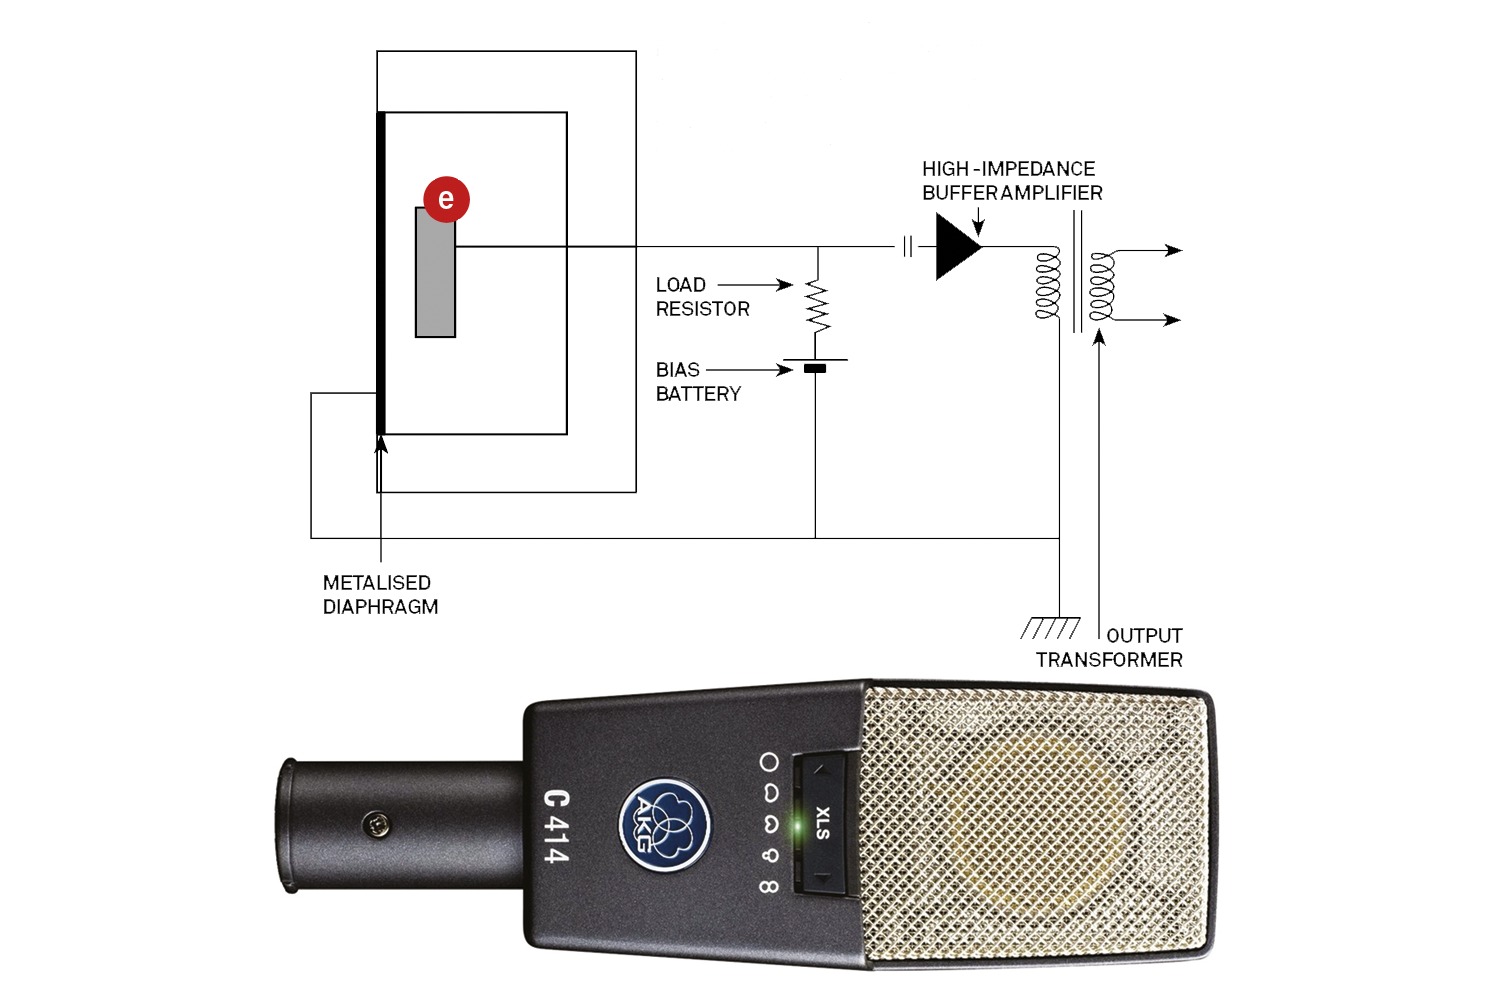
A classic condenser
The AKG C414 (above) is one of the most famous vintage condenser microphones.
Pattern play
As you’ll see when you look at the huge number of microphones out there, you’ll see references to the ‘pattern’ of microphones, with words such as ‘cardioid’, ‘omni’, and ‘multi’.
Again, it might sound like we’re overcomplicating things, but these terms are referring to the polar response pattern of a microphone – and all the pattern refers to is the best area that a mic can focus on when recording. Think of the mic standing upright: the area around its capsule (where the grille is) that it picks up or records best within is the pattern, and this tends to be one of several shapes (or indeed, with some mics, you can select different patterns).
The main patterns are omnidirectional or cardioid, as we’ve shown in the diagram above. Omnidirectional microphones record sound equally well from any point around the mic, so the pattern is a circle… or in 3D, it’s a ball sitting on the end of your microphone.
Cardioid microphones slice the back of the ball off and look like a heart (hence the ‘cardioid’ name) when viewed flat on as shown, and the main focus of the pattern is what the mic is pointed at ie, a mouth, or guitar cabinet). These tend to be used for vocal mics live, as you’ll get less crown noise from behind the mic or less interference from other instruments.
As such, a good live mic will always be a dynamic (sturdy, loves loud things) cardioid microphone, and that’s why the Shure SM range of mics has proven so popular over the years (and they’re pretty cheap, too).
Other patterns include bi-directional or figure of 8 (because it looks like an ‘8’ flat on). With the focus on two opposite areas, these are great for recording either a couple of instruments, or an instrument and some of the room ambience that goes with it. As we’ve already discussed, ribbon mics have this pattern and record front and back, but keep the noise down by not recording the sides.
There’s also supercardioid and hypercardioid which which each sit between the figure of 8 and cardioid patterns moving towards it, with more focus on the front area with Hypercardioid and then even more with Supercardioid. Finally, shotgun pattern mics tend to have an extreme focus on a narrow ‘8’, with the intensity at the front.
Polar Patterns
The two most famous polar patterns are: omnidirectional, where the mic picks up everything around it equally (left) or cardioid (right), where the mic focuses on what it’s pointed at.

Summary
Dynamic mics are best for recording loud sources and for performing live; condensers are more detailed and more fragile; not great for loud things like kick drums, but ideal for acoustic guitars. The polar pattern refers to the area around a mic where what it records sounds best, so bear that in mind with mic placement.
You can pay many thousands for decent mics that offer you classic tones and character – and top studios have many microphones in storage, so you can choose a classic one to record with (head over to MusicTech.net and look up last issue’s Abbey Road feature for edited highlights of their selection of over 800!). But it comes down to what you want to record, whether you want to record it clean and how good that sound is. Like we said earlier, get as good a set of vibrations going as you can.
Spec Checks
A microphone has a number of other specs you’ll need to understand before you make your purchase – but don’t worry, we have you covered. Here are some simple explanations of the relevant tech terms…
Frequency-Response Vocal condenser, super-cardioid
A mic’s frequency response is the range of frequencies it is suited to record. 80Hz to 15kHz is adequate, but if you want to record bassier instruments, you’ll need a mic that can go down to at least 40Hz.
Maximum SPL
This means Sound Pressure Level and refers to the loudest sound that a mic can deal with before it distorts. 120dB SPL is good, but it’s a case of the bigger the better. Although anything above 155 and you really should ask yourself why…
Self noise
This is the amount of hiss you might get from a mic, so the lower the figure, the better. It’s measured in dBA – you’re looking for a maximum of 25dBA and to then move down.
Signal-to-noise ratio
This is simply the level of the signal you want to hear, versus the noise you don’t want to hear – so the higher the better. Look for something higher than 69.